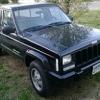
relyt120 Posted December 17, 2012 Posted December 17, 2012 Let me introduce you all to my second MJ which I am calling bumblebee; for obvious reasons I got it in a trade in which I gave up a Toyota Cressida, which I acquired from my mom after my stepdad and I built her an xj to drive. I paid $600 for the xj up front so that is what I considered to have had into the Cressida and therefore into this truck. As you can see the truck has some issues, but if it didn’t then it wouldn’t be any fun now would it?? Known issues: PO’s bad rendition of a paint job (though I'm digging the color scheme) Jacked doors Jacked fenders Jacked header panel Mossy oak all over the place (even the floor-mats) LOUDNESS Very hard to shift into first Bumper is pretty rough Several circuits have no power (I was afraid of that) Stupid PO’s inability to remove anything before rattle can paint job E-Brake release missing and ratcheting spotty Dash is trash Radio wiring has been hacked up (what is wrong with people?) The good stuff: NO EXTERIOR RUST Vinyl floor Decent tires (though one is a different size) Intact rear window Dome lights present Tailgate decent It’s an MJ Hey it runs! Here’s some more pics for your viewing pleasure: In the background you can see my DD MJ Clair-e for which I have not yet created a tread, she is awaiting the warmness of spring for a fresh coat of paint, though I already have the bed fenders and tailgate painted and waiting.
relyt120 Posted December 17, 2012 Author Posted December 17, 2012 I think bb my have an exhaust leak :rotf:
SW86 Posted December 17, 2012 Posted December 17, 2012 lol saw that one on the CL. think it might of even been posted here as well. not a bad score for six hundy
relyt120 Posted December 17, 2012 Author Posted December 17, 2012 Managed to remove all the mossy oak stuff off the windshield and back glass
relyt120 Posted December 17, 2012 Author Posted December 17, 2012 Forgot to mention: 89 4x2 manual, which trans has yet to be determined, though it does have od.
relyt120 Posted December 18, 2012 Author Posted December 18, 2012 Took BB down the road after getting the hazards and blinkers to work properly (had to use fused jumpers) and the truck died on me in the middle of the street. I was literally blocking both lanes because I was attempting a u-turn when it died. Couldn't get it to start back. Had to push it out of the road and walk home. Got in Clair-e and drove to get some gas in the can, figured my assuming that the seemingly functional fuel gauge was accurate was in error. I was right, threw a couple of gallons of that good old unleaded in and drove it right home! Also finally got my little cousin into the project. This truck is intended to be his when he can drive, he's 13 currently. He helped me get the remains of a decal off the rear glass and was present for the whole running out of gas debacle. all in all a good day: all lights work and it made it back to the driveway tomorrow it gets a good cleaning!
Minuit Posted December 21, 2012 Posted December 21, 2012 Not bad at all especially for $600! Shame the paint looks like it was done in 5 minutes, but I'd be lying if I said I didn't like it. Your cousin is lucky! :thumbsup:
relyt120 Posted December 21, 2012 Author Posted December 21, 2012 Yeah the paint looked a lot better in the ad but both fenders are crap and the doors have the mounting holes from the mirrors so I'm just going to replace those and repaint. I am letting my cousin decide the color so we will see how that turns out.
relyt120 Posted December 21, 2012 Author Posted December 21, 2012 I also was having some dying issues and posted up my issue to the tech forum and proceeded to test and clean the cps. Used a ratchet extension and my parts cleaning toothbrush (Courtesy of the dentist), tied them together and applied carb cleaner. I managed to improve the cps output without shelling out $50 for a new one and I didn't even have to crawl under :thumbsup: the issue is mostly gone, I think the only dying issue I have now is the stubborn first gear :doh:
relyt120 Posted December 21, 2012 Author Posted December 21, 2012 Oh yeah also I thought I had a line on some pristine 2dr xj seats and other goodies but I call the guy and he says they crushed it; the ad was only 2 days old! What a let down :ack:
relyt120 Posted December 29, 2012 Author Posted December 29, 2012 Picked up a new bed for the bee. The bed it has on it now is straight but dented all to hell. I found this at my local pnp and could not pass it up. It only has one dent, near the drivers door and the gas door is bent for some reason. Much less work than having to fill and sand and sand and sand and sand 50 dents out of the current bed. Also I know there are at least 2 different colors of paint on top of the factory paint on the Bumblebee's bed so that would be no fun to sand either. here it is on the back of Clair-E
relyt120 Posted January 3, 2013 Author Posted January 3, 2013 Got the bed put on. I had it sitting on the uni-body before the new year but went on a trip to visit family so all the bolting in and reconnecting of stuff had to wait till I returned. Whenever I took the drop in bed liner out it revealed the only rust on the bed. Minor rust on the bed rails. I'm going to sand the rust out and shoot some rust reformer on it and then throw the bed liner back on until its time for paint. As for the tailgate I just happen to have a red one so I through it on.. because I obviously care a lot about matching colors :rotf: Also swapped the fuel doors since the red one was bent for some odd reason. Here's the pics: Oh Yeah! I also got to test out the trailer wiring adapter I made. It works like a charm! Thanks for the great write-up! I used this to take it a bit further and create a plug and play trailer harness using both ends of the connector from a spare rear wiring harness I acquired. It just goes between the rear harness of the mj and the tail light harness :thumbsup: Worth the effort in my book as spares my tail light harness from being hacked up; and luckily for me the spare harness had already been hacked up and had the flat 4 connector with it.
MiNi Beast Posted January 4, 2013 Posted January 4, 2013 Very nice. So when you painting the bed to match?
relyt120 Posted January 4, 2013 Author Posted January 4, 2013 Thanks. Going to be painting the whole thing Baltic dark blue. A factory color that my cousin chose. That is not on the short list of thing to do though, so many other things to fix first, like parking brake buckets and dash.
MiNi Beast Posted January 5, 2013 Posted January 5, 2013 Very nice. Be pretty sharp with the blue. Keep up the progress.
MiNi Beast Posted January 5, 2013 Posted January 5, 2013 Hold on bumble bee with a blue paint job? Lol
relyt120 Posted January 5, 2013 Author Posted January 5, 2013 Lol yeah might have to find a new name when the time comes. On another note I took a wire wheel to the rust on the bed rails and was about to spray some rust reformer and it starts raining out of nowhere. I had to rush to spray the exposed metal. Needless to say it looks like crap and has water bubbles. Covered it with a tarp. I'll probably sand it down and do it again, will have to see ihow it looks when it dries.
relyt120 Posted January 7, 2013 Author Posted January 7, 2013 It was as bad as I thought so I went ahead and wire wheeled the entirety of the bed rails and reapplied the rust reformer. Here's some pics of the process: We will see how it looks in the morning after it has had a chance to completely dry. Though I'm not too worried about it as the drop in bed liner is going to cover it anyway.
relyt120 Posted January 8, 2013 Author Posted January 8, 2013 removed the tape and re-installed the bed liner.Note to self: get better tape next time; this tape bled a bit. Starting to notice we may have scratched the bed up a little more than I realized when we loaded it at the JY. Not a big deal since its getting fresh paint down the road, just irritating!
relyt120 Posted January 10, 2013 Author Posted January 10, 2013 Scored a set of MJ bucket seats today at the JY :banana: I've been begging anyone with a 2 dr xj for sale on craigslist to sell me their buckets; now i can stop. Both seats have their quirks: passenger's seat won't fold forward, driver's has tears and two of the mounting holes are trashed they both were soaking wet when i picked them, i guess the truck had been rolled or something so the windshield was gone allowing the rain we have been having to thoroughly coat them. So they will need some work, but like I said before if they didn't need work then where would the fun be? I also got a couple spare taillights, both cracked but good for spares. :idea: on the way out I also found a full inst. panel out of a 90 xj
relyt120 Posted January 12, 2013 Author Posted January 12, 2013 This update may seem trivial but I replaced the shifter knob with one out of a 99 xj. I'm already inexperienced driving a stick, the wobbly knob was NOT helping anything!
relyt120 Posted January 13, 2013 Author Posted January 13, 2013 All thanks to mfpdm whose write-up on bucket seat restoration aided me in replacing the zip tie which was causing my yet to be installed passenger's bucket to not function.
relyt120 Posted January 25, 2013 Author Posted January 25, 2013 Patched up the muffler with a sheet of aluminum, some jb weld, and some exhaust sealing tape stuff. I gave up on removing the flange bolts since i decided that replacing just the muffler wasn't worth it. Ran it though emissions and got it tagged :thumbsup:
GHayduke Posted February 25, 2013 Posted February 25, 2013 I've had mine called Bumblebee for similar reasons I'm guessing. Haha! I'm just starting a 88 to 98 driveline swap on mine.
relyt120 Posted February 25, 2013 Author Posted February 25, 2013 Sweet. I wish I had the ambition for that!

Recommended Posts
Create an account or sign in to comment
You need to be a member in order to leave a comment
Create an account
Sign up for a new account in our community. It's easy!
Register a new accountSign in
Already have an account? Sign in here.
Sign In Now