

DirtyComanche
-
Posts
7945 -
Joined
-
Last visited
-
Days Won
11
Content Type
Profiles
Forums
Gallery
Everything posted by DirtyComanche
-
Project 2drx4. A cherokee.
DirtyComanche replied to DirtyComanche's topic in Member Projects: Your Comanches
Yeah, half the reason I did them was I only plan to run a 2" lift at most (and by lift, I mean a collection of parts I found in my garage). Although, that plan might change. I won't make them any wider - screw the body, I'd rather fit through things. It's not like this thing has virgin sheetmetal or anything. And mine are air tanks too, well almost, along with the rear bumper, and the front bumper will be too... Figured I might as well. Plans might really change though. -
Thinking of getting one for the 2drx4. Owners of a renix 4.0 know how silly the stock oil filter is mounted - vertically with the threads down. It means you're guarenteed to dump a fair amount of oil when you change it, and it might lead to priming issues. I know a guy can rotate the oil filter adapter, or run the newer style (HO) one which mounts the filter sideways. But that doesn't really fix the problem. But I saw this on summitracing: http://store.summitracing.com/partdetai ... toview=sku For $50 you could throw it somewhere else - the firewall assumably would be the best place if you could find the room. Then the filter is oriented correctly. And you can use a larger filter. They have a dual setup too, and they make them for the HO. Anybody already got one? Where'd ya mount it? I'm tempted to go this route for my next oil change. Any other thoughts?
-
Project 2drx4. A cherokee.
DirtyComanche replied to DirtyComanche's topic in Member Projects: Your Comanches
Got the other slider welded on. Well, half welded on. To the same stage as the other one anyways (good enough for now) Image Not Found Some of the welding went awesome, some of it was ugh. Image Not Found But I managed to get it to match the other side pretty darn well, even the slight angle they're on (they slope outwards a bit so water will run off) is the same. I have to say though, these were more time consuming than I thought. So much cutting stuff off, then putting them in place, only to pull them off and grind a bit off something else, and try again and again... But I think they'll be worth it. Now, what I did that I do NOT like at all. Instead of doing the cut'n'fold on the rear wells, I decided to try something different. My reasoning was that I couldn't get as much clearance by just folding them as if I changed/removed the lip/pinch seam completely. Also, I had a rust issue, and I wanted to cut it out. So, I did this. Image Not Found Basically I screwed it up so bad that I'm going to have to do some major surgery to fix it. I took 1x.125 flat bar and welded it between the quarter panel and wheel well from the inside. Then I cut off the pinch and ground everything 'flush'. My mistake was that I should have used much wider flat bar (2" or 2.5") or just done it with sheetmetal like a regular person. As it is, I've not got a properly shaped wheel well. Image Not Found I didn't even bother cleaning up the front because I'd realized it was screwed. I'm pretty mad at myself. Normally I think about things enough ahead of time that I don't get in this situation. And that is all for a while... Back at work. Other than I might order some goodies... -
Project 2drx4. A cherokee.
DirtyComanche replied to DirtyComanche's topic in Member Projects: Your Comanches
Made the ears for the bumper mounts: Image Not Found In retrospect, those could have been made from a single peice, and it probably would have looked better. Ohwell, nobody sees 'em. Oh yeah, the new hardware is AN, I think AN6-11As, but whatever, I have lots of it and it'll work. I drilled through the stock captured nuts and will just put nuts on the back. Of course, prior to this I figured I should remove the two snapped off stock bumper bolts. Welding a nut to them did not work. So I chose to drill them out. After dulling a lot of bits in a short period of time (I lack a bench grinder to resharpen them here, and have to do it at work), I tried using my nice lennox step drill since it has a carbide edge. I broke the end off. Swearing, lots of swearing. Image Not Found Anyways, welded one of the ears on. Image Not Found Other side. Image Not Found Main part of the bumper is 2x4x.188. I cut the ends at a 40* angle. RO sanded for paint adhesion, yada yada... Image Not Found Welded the caps on the ends, wasn't overly impressed with myself with the bead appearance, but the penetration was good. I ground them smooth afterwards anyways. Image Not Found Tacked it place. Image Not Found Keg stand! But not quite how I did them in college. Man do I ever have a ghetto shop, instead of a welding table I either use my trailer or whatever is around... Anyways, welding the bumper mounts on. You can see the shape of the brackets... Image Not Found -
Project 2drx4. A cherokee.
DirtyComanche replied to DirtyComanche's topic in Member Projects: Your Comanches
And I partly built both rear bumper mounts... Just some 2x3x.188 with some nuts welded in it. They aren't as hardcore as some people's, but I pick up 4 place on the uniframe per side, plus the 4 stock holes per side (other than the ones that have broken bolts in them, something to do sometime...) I used 1/2" GR8 hardware for no reason other than it fit the holes in the frame nicely, and GR8 has a nice plating on it so it doesn't rust as quick. Image Not Found -
Project 2drx4. A cherokee.
DirtyComanche replied to DirtyComanche's topic in Member Projects: Your Comanches
Test fitting the new rocker/slider. Looks like it'll work... Of course I had to cut way more stuff off. Image Not Found More test fitting... Image Not Found You can see how it doesn't extend too far back. More on that later... Image Not Found Capping the ends. Image Not Found Ugh. Was still dialing in the welder (haven't welded in 2 months), then realized it was spooled with crappy wire (I lend it to a friend when I'm at work). Of course, had I looked before I started welding, this wouldn't have happened. Anyways, I ground that part out and re-welded it. Image Not Found I cut the front of them on a 40* angle, then capped them too. At this point I was getting a little more comfortable. Image Not Found Ground smooth (same with the rear). Then I RO sanded the entire thing to promote paint adhesion. Image Not Found Shimming it all into place for welding... Image Not Found Welded most of it up. Had a minor, almost major, fire in the interior. Apparently this foam lights up really easy. Considering I was welding on the other side of the A-pillar when it lit off. Image Not Found Welded all around the top... Ain't done, but I was sick of welding. Thick steel to thin sheet it trying of one's patience. The welds vary from decent looking to horrible. I think I'm going to put a sealer of some sort over them anyways, so nobody will really see... Image Not Found -
Project 2drx4. A cherokee.
DirtyComanche replied to DirtyComanche's topic in Member Projects: Your Comanches
Did some more work.... This area had to be cut out... I was about half done at this point, all of it had to go. Oh yeah, there's a few cracks there, don't mind those, they're on the list. Image Not Found At this point I figured I was about done cutting this side. Yeah... Image Not Found I cut out the back of the uniframe rails to put my bumper mounts in (2x3x.188). Image Not Found Yeah, I cut that one very square... Shh. The top shackle bolt extends too far and is in my way. Luckily it has about 20 threads more than it needs. So I pulled it out, cut off about five threads, then ground the end to a bit of a point so it would self centre. Image Not Found Threw some anti-seize on and reinstalled. Plenty of clearance. Image Not Found (I know that's a picture of the other side, just imagine everything backwards if it's a problem) -
Project 2drx4. A cherokee.
DirtyComanche replied to DirtyComanche's topic in Member Projects: Your Comanches
Started pulling the rear bumper off... I said I didn't like the swing out - so off it came. I broke EVERY bolt that held it on. And while I'm sure you could just unbolt the bumper from its brackets, I was not interested in that game (torx). So I just cut it apart... Image Not Found Bumper removed, only snapped two of the bolts that hold the brackets on. Trailer hitch/boat anchor removed mostly - I had to cut one of the tabs off it as the bolt was not removable yet (still getting to that) Image Not Found I have to comment on who-ever the genius was that had installed this aftermarket hitch... Put some damn anti-seize on the bolts, I only broke 4 of the 5 that I removed (with the 6th still in place, as they installed it in a creative manner, I will remove it whenever I have more stuff out of the way). And that was after I heated them cherry-red with the torch. Began the first of the sheetmetal mods... This part was all rusty, and really doesn't do anything for me. So, I butchered it off. Just the inital cut. Image Not Found Before you jump on how I cut all of this, I just went for it. Later I'll clean it up, I was just concerned with getting it out of the way for now. View from inside... I'll weld in some 22ga or something in the hole. Image Not Found The pretenda-rockers had to go next... I'm going to weld in some 2x6x.188 in their place, I think. Image Not Found Mostly cut out in rough... Image Not Found All cut out. Other than the end there. I need to figure out exactly what my plan is there. I was going to use some MJ rear flares over the rear (cut and fold it), and see if that part was 'covered'. But that's kidna hack. I might just have to cut a bunch more out, and maybe patch it (heaven forbid). Image Not Found Took off most of the junk from the front that doesn't interest me... Vacuum bottle and horn will get relocated. There's more work to be done here, but not for tonight. Image Not Found -
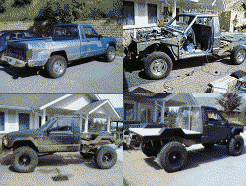
Remember my story about acquiring the 'cheap' cherokee? Yeah, that pile... If you don't know the story: I acquired this XJ through a bunch of schinanigans. It belonged to a co-worker's girlfriend, and I had made some drunken deal that when she bought a new vehicle I'd buy this pile. Granted I'd never even seen it when I agreed to this. Being a man of my word, when I got the phone call I headed over with cash in hand. Did I get ripped off? Uhhhhhhhhhh...... Not the worst looking from here. Image Not Found Swing out spare - doesn't interest me. Image Not Found Rockers were optional I guess. Image Not Found The B-pillar took a hit and is dented in, the door frame is twisted, and generally there's dings all over the place. Image Not Found The good stuff: 4.0L/AX-15/NP231. Not a bad combination. Personally I'm more of an AW4 guy, but whatever. 1990 - it's a renix, I understand it. 2drs, since I'm young and stupid. The bad: The rust, dents, dings, ugly paint. Clutch slave or master is out. Water pump MIA. No AC, although I only want it for the pump. It's probably a good thing actually... 10 000 other things. My 'Plan' (like I really have one) Build a 'mild' wheeler for camping/expiditions. I no longer live in an area where there is estabilished hard-core wheeling, and you can't do that alone. I'm thinking I will probably run about 2-3" of lift and some 33s, along with some body mods. The back seat and cargo area interior will be axed in favor of making enough space that I can sleep, and some storage. I'm planning dual batteries but haven't entirely sold myself on how they should be done. OBA is needed, and I will run a sanden style compressor out of convenience. However, the biggest emphasis of this build will ultimately be the reliability of the rig as a whole (more on this later). So, the first order of business was to change the water pump and serpentine belt. The old belt got eaten as the water pump had played up to the point that the belt got thrown into the mechanical fan. I changed the lower rad hose while I was at it, the old one looked rough. Serpentine belt shredded around fan: Image Not Found Since I need a new belt, I did the idler pulley delete. No sense keeping a useless pulley. Which I've had fail before, not a good thing. Reference picture of belt routing minus the idler: Image Not Found Part number for the belt (upside down so it's easy to understand) Image Not Found Then I did my first major mod. I plan to turn this one into a write up. I think many would benefit from it. Image Not Found Yeah, the gas struts are worn out, the 2x4 keeps the hatch up... No, I won't actually write a how-to on it, sorry. So I changed them. Apparently the parts store wants $60 each for the struts here (jerks). Started pulling out the interior junk. Found that the roof braces had de-bonded, probably as a result of whatever had hit the B pillar on this thing before. I think I'll just use some 3/16" bolts to re-attach it, and seal them with poly or something. I'm undecided, but definatly not going to bother replacing the roof to fix the dent. Image Not Found Rust, rust, rust... Image Not Found
-
What I love... The hardcore rice with the custom 'for sale' decal in the back window. Let's think about this in relation to where I live... A lowered Civic with a body kit that hangs 1/2" off the ground. Yeah, that's smrt. Anyways, when I see them with their lovely decal declaring their stupidity in dumping so much money into a crappy car that they can't drive in this part of the world, I always try to get the number. I like calling them randomly and telling them their car is ghey and they want too much for it (even though I never know the price). I think it helps them grow up. Or maybe I'm just an a$$hole.
-
Another RUSTYS rant.....
DirtyComanche replied to CWLONGSHOT's topic in MJ Tech: Modification and Repairs
Seems typical. Be wary of the broken leafs. They will break again. Soon probably. The risk is that it might come free the next time around. I've seen it happen on the trail, and it's quite interesting to watch. -
Mods for increasing reliabilty.
DirtyComanche replied to DirtyComanche's topic in MJ Tech: Modification and Repairs
The pump is probably different... But if a guy wants some bling, PSC ( http://www.pscmotorsports.com/ ) offers a high-pressure/high-flow pump (remember my thread in the how-to on P/S pump mods, they do that basically) that has an AN/JIC fitting for the inlet instead of the integral reservoir. They also sell nifty aluminum remote reservoirs which are baffled to prevent pump cavitation while off-camber or hitting big air. PSC has overdrive pulleys too (more turning power at idle) and cooler setups. Here's another one for increased power-steering reliability; add a filter. An el-cheapo hydraulic filter in the low pressure line would work well, but is bulky and adds restriction to the low side (kinda bad). A high-pressure T-style would be ideal, like these http://www.normanfilters.com/HighPressureMiniTee.html . I have no idea how expensive they are or if you can easily source them - I'm looking currently (half-assed) because I do want to do it. -
Mods for increasing reliabilty.
DirtyComanche replied to DirtyComanche's topic in MJ Tech: Modification and Repairs
Woah really? Do you have any more info on this? i've got a busted A/C condensor that i've wanted to get rid of for the longest time... I've told you all I know. Apparently it works, but I have no pictures to back it up. I'm going to look into it along with some of the other options. Other options: http://naxja.org/forum/showthread.php?t=956261 http://www.jeepforum.com/forum/showthread.php?t=540166 I'm currently looking for an option that will allow me to put the A/C compressor somewhere else - I want it for OBA. -
I'm looking for any new ideas. Or old ideas. Throw out whatever you've got. I'll get the ball rolling with one. High mount alternator - I have not tried this, but apparently the 2.5L bracketry will allow a 4.0L alternator to be mounted in place of the A/C compressor. Why mount it high? So it doesn't injest mud, which will kill the slip rings and bearings.
-
Apocalyptical - I don't care
-
A couple things about this thread... 1) Stop calling it a god-damn unibody! It's not! A unibody is what you see in a crappy sub-compact car. A UNIFRAME is what we have. It is different in that we still have clearly defined 'frame-rails', which just so happen to have the cab welded to them. 2) Welding process DOES NOT MATTER when welding mild steel. Stick, MIG, Flux-core, TIG, gas, whatever. It'll all work and when used by a competent person who chooses the correct filler it will produce a near identical result. Most el-cheapo MIGs can produce enough heat to get proper penetration on the frame rails, as they really aren't very think (most of it is about 16ga, I believe). I'd personally use a MIG welder as I have one, I know how to use it, and it's faster/easier than most of the other avaliable methods. If anybody told me I had to do the repair with an ARC/stick I would either look them in the eye and tell them to get bent, or tell them I did as they would not be able to verify otherwise. And as a side note, prep is king on the uniframe. It's dip-galvanized from the factory, and you'll get mad zinc contamination if you don't prep it well. If you burn through multiple layers (where there is seams, etc) you may get some unavoidable contamination. That will suck.
-
Did it actually rust through? There's holes in the frame that are ment to be there... If it's rusted through, you can fix it, but it's involving. I wouldn't patch it.
-
I can drink about a half cup. Then my head starts to ache. If I'm hungover and cold, I can have about 2 cups since I'm hurting anyways. I drink tea normally... A LOT of tea. Think pots and pots of it.
-
transfer case?????now w/pics
DirtyComanche replied to jeepaholic's topic in MJ Tech: Modification and Repairs
I believe that's a TH-350 and a NP205. But I could easily be wrong. Read around on here... http://www.novak-adapt.com/ -
I can't imagine living in a place that annually sees big storms like that. Maybe it's just because I've always lived where I have. Although, I guess people would say the same thing about a canadian winter. Not that it'll flood your house though...
-
Valve Cover Bolts/Seal/OIL CAP??
DirtyComanche replied to jeep_freek88's topic in MJ Tech: Modification and Repairs
I don't know if you can run one of those fancy ones...? Anyways, the stock replacement one is like $10, and it's not yellow anymore. Kinda a grey/black. Well, it cost me $10. So I imagine it's like 2.99 in the states. -
The plan was to have the flare cover it so even if it looked bad, nobody would know. Unfortunatly it came out more or less not as functional as I'd like. And the only thing I did wrong was I needed to use some 2 or 2.5" flat bar instead of 1". Bah. I might do some major surgery on it instead. Jeepco's method looks like fun.
-
Rear flares, what's the difference?
DirtyComanche replied to DirtyComanche's topic in MJ Tech: Modification and Repairs
That seems reasonable. It was the only thing I didn't look at in detail, as I wasn't planning to mount them with those holes. -
So I have this pile of an XJ that I've been working on (didn't bother to post a build thread here). I figured I'd try everything that I figured was nifty with it, after all it's a dirt cheap pile. It's kinda like when you pick up that really dirty girl at the bar, you might as well do everything that you've always wanted to try, right? Anyways, so I did weld in rock sliders (rocker replacements) and it actually came out good enough that I was inclined to try to make a nice build of the thing. I mean, if she took that like a champ, what else can she do? So I figured I'd try something different for trimming the rear wheel wells. Instead of just cutting it to the pinch, or cutting and folding the pinch, I figured I'd weld some flat bar behind the pinch and remove the lip/pinch completely. Man, did it ever come out bad. Image Not Found I don't even know what to say. It's so ugly that I didn't even bother to clean up the front area. I just quit. Yeah, clearance is good and all that, but I didn't do it well enough for clearance to be great. In fact, had I stopped for about 15 seconds and thought about what I was doing before I did it, I could have made it so it came out looking decent, and with better clearance. Anyways, that's my little rant for the night. Now I get to cut that crap off and try it again.
-
Not a 'are 2dr XJ flares the same' thread, but a 'what the hell is the difference between the RH and LH rear flares' thread. I looked at them for about 20 minutes. I can't figure it out. One says LH, the other RH. Is that the only difference?