
Skylynx
-
Posts
107 -
Joined
-
Last visited
Content Type
Profiles
Forums
Gallery
Everything posted by Skylynx
-

Lund visor repops
Skylynx replied to frankspeed420's topic in Vendors- members making products for MJs
i'm still very interested on buying one of these, please @frankspeed420 LMK if and when you'd be willing to do business! -
PICTURES NEEDED! OM jeep MJ AMC Rear window louvers
Skylynx replied to Skylynx's topic in MJ Tech: Modification and Repairs
No pictures for now but i’m making some progress! Working with Aluminum is harder than i thought and I’m waiting on some special tools i ordered to get here before i can continue, the first draft will be quite rough and just a proof of concept, the next time i do this i’ll get then pieces professionally laser cut -
Gosh, the most imperfect timing ever! that’s okay, i’m glad you guys are back up in the states already, safe travels and absolutely! Lmk whenever you’re around and we’ll set up a meet!
-
PICTURES NEEDED! OM jeep MJ AMC Rear window louvers
Skylynx replied to Skylynx's topic in MJ Tech: Modification and Repairs
Actually, thinking about it maybe the easiest thing to do is to just take a quick video of the thing just slowly going around it and focusing on some details by getting the camera up close to it and then just uploading that to youtube, That way we’d have way better image quality and from there i can rewind and pause to just look and reference anything that i’d need to at whichever point, that way i’m not pestering your existence with this or that particular picture! -
PICTURES NEEDED! OM jeep MJ AMC Rear window louvers
Skylynx replied to Skylynx's topic in MJ Tech: Modification and Repairs
Oh Yee of little faith, I await the day in which the world shall stop doubting my Hyperfixation! Honestly, they look a little intimidating for sure, but i don’t see anything on them that i won’t be able to easily replicate, your pictures actually made me realize that these things are actually way simpler than what i had thought they were before! I’ve already ordered some new tools to work with aluminum sheets so i can start cranking at this thing, so glad i didn’t place the order for a spot welder since apparently it’s all just rivets, yeah? IF IT’S AT ALL POSSIBLE AND NOT TOO BOTHERSOME some more extra, more up close and detailed pictures of the areas i marked would be beyond incredible and you’d be my hero forever and ever <3 Again, THANK YOU so much for all the help and the info, this has been so productive and helpful already ahaha i was hoping for maybe one or two extra esoteric pictures from far away taken with a $#!&ty smartphone 15 years ago or something, and here i am getting detailed looks! -
PICTURES NEEDED! OM jeep MJ AMC Rear window louvers
Skylynx replied to Skylynx's topic in MJ Tech: Modification and Repairs
Oh okay! So even the parts that i circled in blue that i thought were spot-welds are actually rivets? If they are then that honestly makes this build way easier then! yeah measuring the exact thickness on things can be quite hard without the correct tools, but i don’t need exact measurements! Like, would you say the material on the louvers is as thick as a quarter? Slightly less? Slightly more? -
PICTURES NEEDED! OM jeep MJ AMC Rear window louvers
Skylynx replied to Skylynx's topic in MJ Tech: Modification and Repairs
@88mjsally you have no clue how grateful i am with you for this, this is amazing!!! Thank you you so much for the pictures, i would have never guessed that’s the way they attached to the window otherwise, i can confidently say that these images have taken me like 90% of the way to understanding how i wanna approach this project, but if you’d be willing to provide a tiny bit more detail on this i will be forever in your debt, honestly those pictures may have been enough but the image compression in this site is quite aggressive, and i think it’d be easier to ask question that to be chasing blurry pixels. my first and biggest question would be about the materials it’s made of and the gauges, i’m 99% certain this is aluminum but knowing how thick the louvers are and how thick the “supports” are would be a game changer! i’ve highlighted here in some images the other questions and doubts that i have, i know i’m pushy and bothersome and that i’m asking a heck of a lot but it would be SO COOL if i could clear up these questions too before i go and start spending money to replicate this things, i’ll repay you in beer and a big heckin’ steak one day i swear!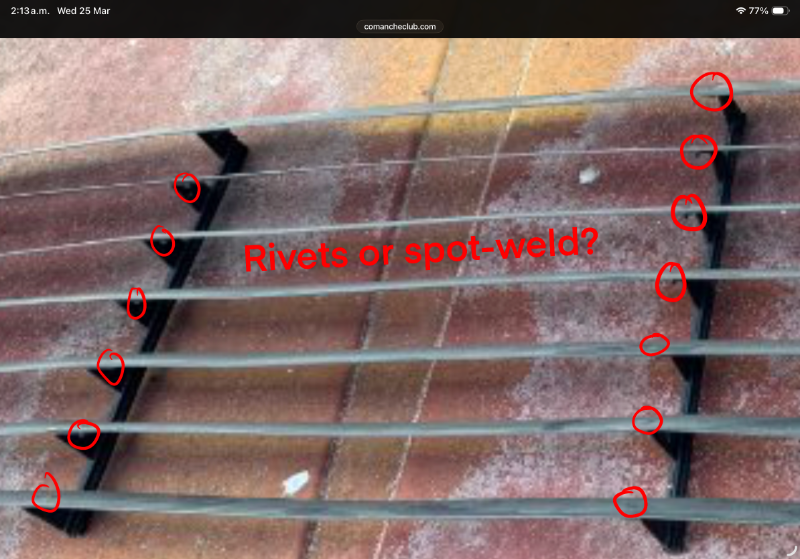
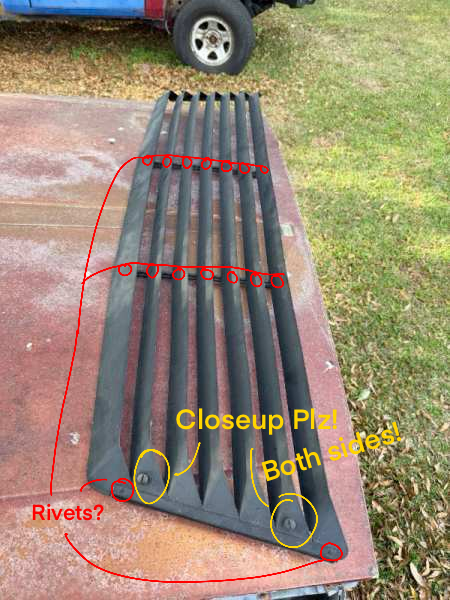
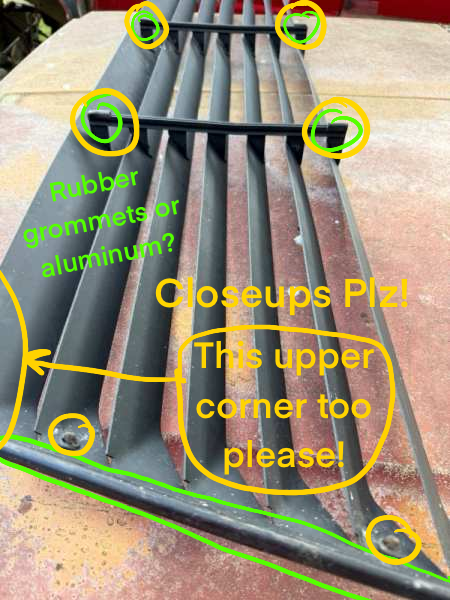
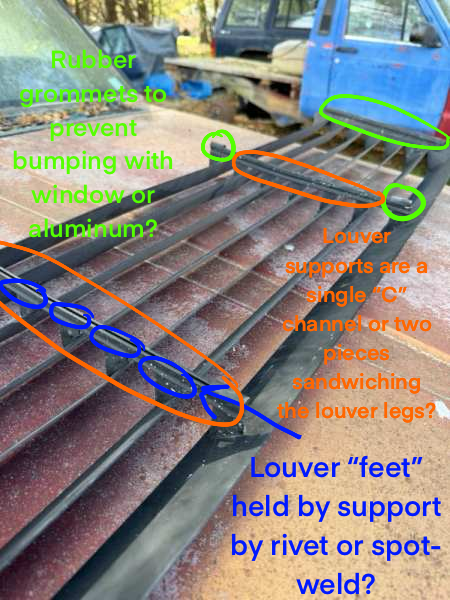
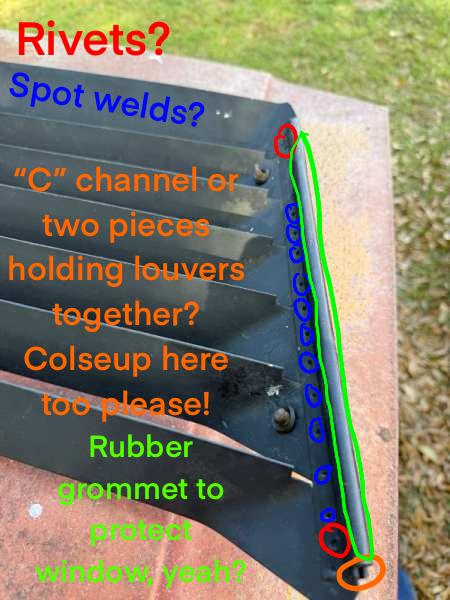
-
PICTURES NEEDED! OM jeep MJ AMC Rear window louvers
Skylynx replied to Skylynx's topic in MJ Tech: Modification and Repairs
You’re literally a godsend!!! Thank you yes that would be great! Before you do that also take some pictures of it mounted to the glass so we can see how it attaches onto it if you can! Thank you! -
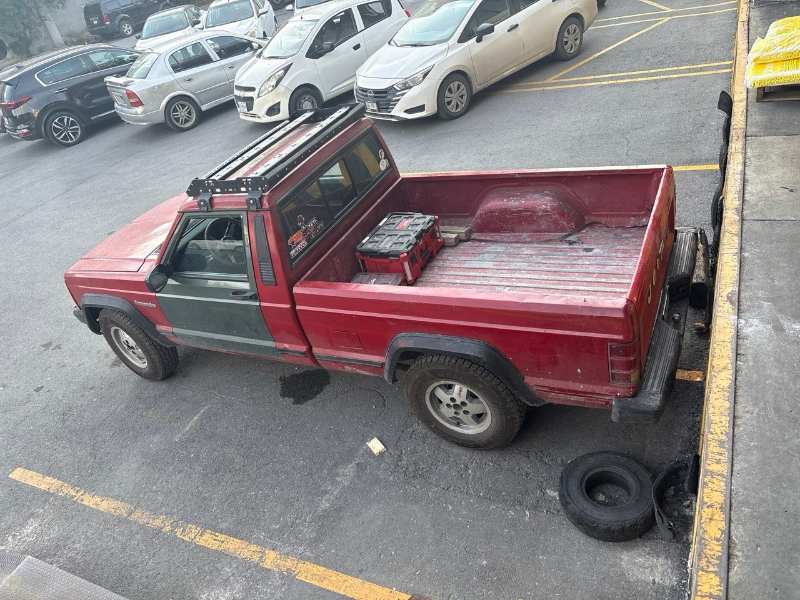
Oh man, just saw this now! i'm in Monterrey and i have a SWB, 4.0, 2wd, 88 comanche that i'd love to see in a picture with yours! we'll get some beers to replace some of the ones Belize took!
-
PICTURES NEEDED! OM jeep MJ AMC Rear window louvers
Skylynx replied to Skylynx's topic in MJ Tech: Modification and Repairs
Sorry forgot to quite you on the last message so it would ping you about it, i'm so filled with hope that you still have it ohmygosh, if you could provide any pictures of it at all it would be a massive help! -
PICTURES NEEDED! OM jeep MJ AMC Rear window louvers
Skylynx replied to Skylynx's topic in MJ Tech: Modification and Repairs
do you still have it? is there a way fr you to take more of them? -
PICTURES NEEDED! OM jeep MJ AMC Rear window louvers
Skylynx replied to Skylynx's topic in MJ Tech: Modification and Repairs
Yup, that’s where i got it from! I’m so sad that he never really posted more about such a unique piece, it would have been massively helpful on this… -
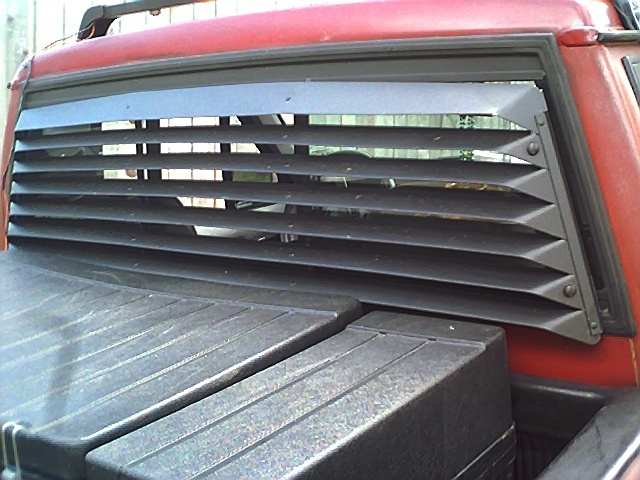
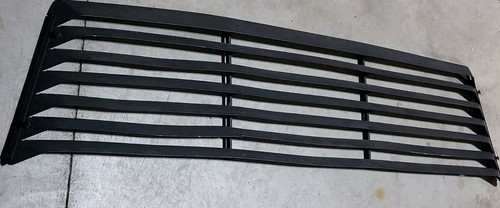
I'm going to try my best at recreating the Original rear window louvers that were a VERY rare option in out trucks, but despite my best efforts i can only find two pictures of them online, i need as many of them as i can get to try and recreate them as faithfully as i can so PLEASE!!! if you've got any pictures of them please post them here to make this little experiment easier! These are the only two pictures of them that i've got.
-
Lund visor repops
Skylynx replied to frankspeed420's topic in Vendors- members making products for MJs
REALLY interested in one of these! Sent you a PM, hope i’m not too late to get one! -
Just bought the bosch pump and it’ll get here in a few days, i’ll report back with how much i like it or not, thanks guys!!
-
Heyo! I’m looking to do this upgrade in my MJ as well but i was wondering if you could elaborate on what kind of mods i’ll have to do to the carrier to accept the DW200 pump? I have an otherwise stock setup for a renix 4.0 aside from the 4 hole bosch injectors that cruiser recommended in his page. Thanks for the time <3
-
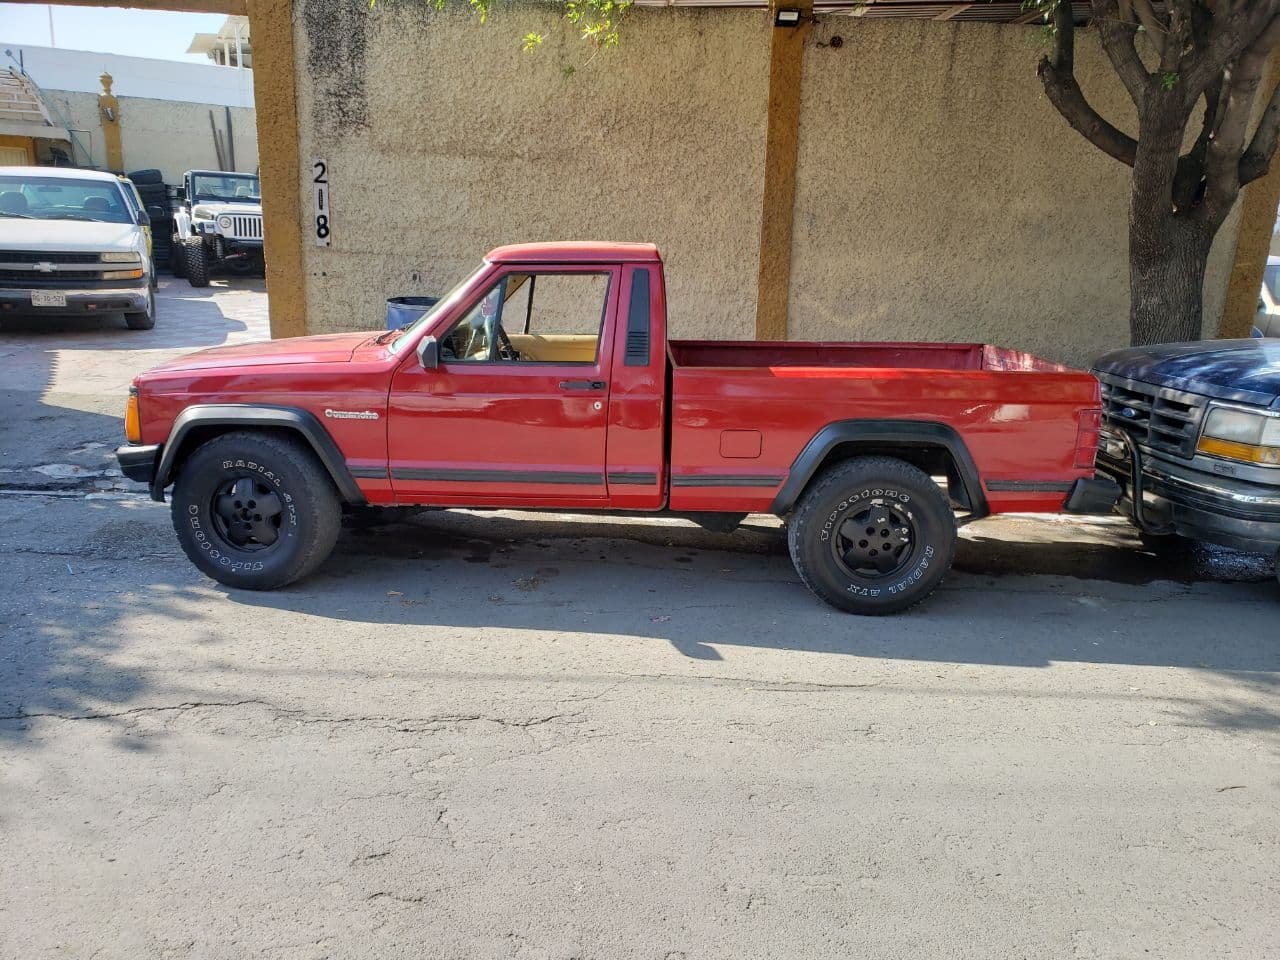
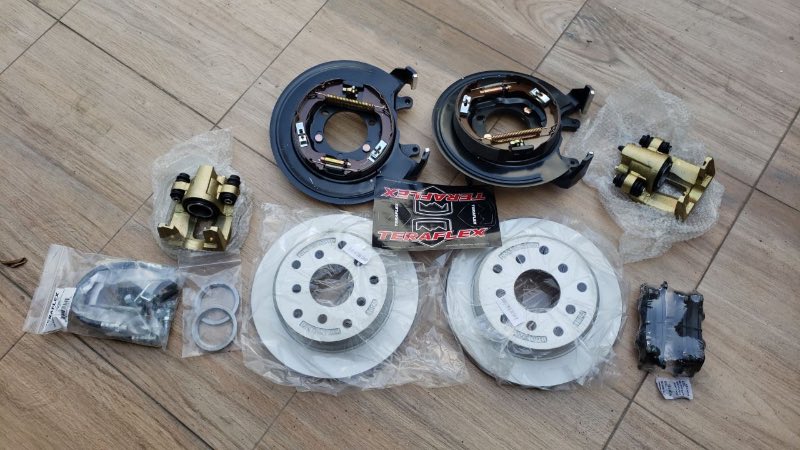
I guess it would be kind of preaching to the choir to say that these trucks are pretty dang dope in this site, but they honestly are! not only are they simple to work on and reliable, but they look outrageously cool when done right, the plan i have for this truck if for me to keep it forever, and i am doing my damn best for it to be the best version of itself for it to serve me as such, at least that’s kinda what i was telling myself when i swiped my card on one of These… Getting rid of the drum breaks on the back of this truck was something i knew i wanted to do since the day that i bought it, specially after i felt how terrible they were when i first drove it and how much better discs were alleged to be in may posts in this very forum, thankfully i had many options to go for in this conversion, the simplest would have been to grab a rear Chrysler 8.25 axle and put some Liberty disc breaks on that, but my previous spending habits kind of made that not an option with the cherokee dana 44 that i bought some years ago. The next option would be to to go for the ZJ disc breaks conversion and just have to accept the fact that i would have to do away with having a working parking break, which is something i was absolutely NOT OKAY with in any way shape or form at all, plus the need to rely on old, used and modified parts from a junked vehicle for my break system. ((Please pay no mind to my junkyard found jeep wj from the 2000’s break booster, that does come and bite me in the @$$ further in the story.)) this left me with just one realistic option that had everything that i wanted in one package, and sadly for my credit score it meant spending way more money than what i could at the time in a disc breaks conversion kit for my old rust bucket, i had no idea credit cards could feel pain until this point! More to show and tell in the next post!
-
It’s good to see more Mexican comanches around! We should start our own club!
-
Fuel line problem, need part numbers.
Skylynx replied to Skylynx's topic in MJ Tech: Modification and Repairs
Oh wow i actually watch your videos all the time! Your setup is pretty close to what i want to get to with mine! As ingenious as the solution in the video is i think i would rather try and replace things with the AN fittings, it’s the little steel crown with the tube that you reused that’s leaking for me, i’m hoping it’s just the o-rings and not the piece itself, though as i said i’m going to replace everything with new connectors and hose anyway -
Fuel line problem, need part numbers.
Skylynx replied to Skylynx's topic in MJ Tech: Modification and Repairs
Already ordered the fuel injection hose clamps and the hose itself too! Thanks for the tip, i’m definitely ditching these ones it’s got right now -
Fuel line problem, need part numbers.
Skylynx replied to Skylynx's topic in MJ Tech: Modification and Repairs
I think that’s what i’ll end up doing, i’ll get under the truck and tear everything out and see if i can reuse the tubes at all, if i do i saw these in amazon that i think could work, apparently these slide over the tubes and you tighten the half nut over them to compress it into a new a new AN thread fitting after which you can add a hose, i’m guessing these are the compression ones you meant?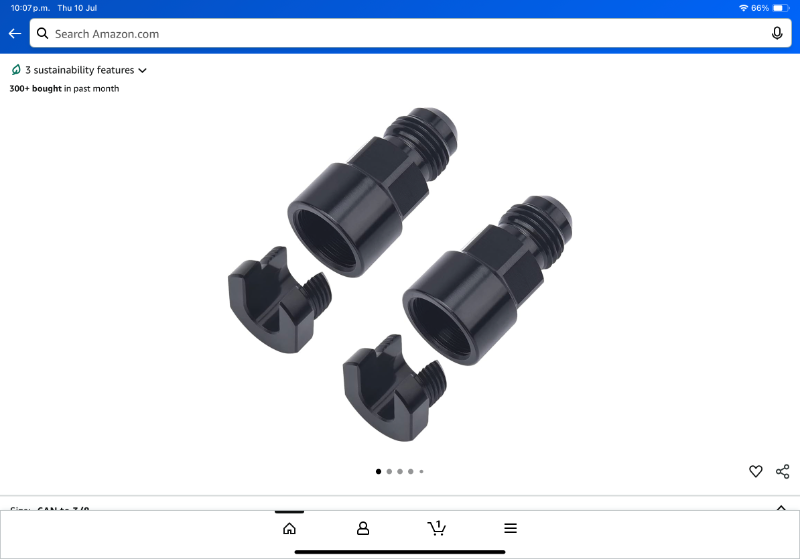
-
Fuel line problem, need part numbers.
Skylynx replied to Skylynx's topic in MJ Tech: Modification and Repairs
Okay, so i should get the 3/8 fuel rail fitting to -6an connectors for the part of the fuel line that’s leaking? is there somewhere you’d recommend me to get those? I don’t want to cheap out on cheap chinesium here since it’s the fuel lines, i don’t mind keeping the hard line parts, just replace the rubber parts with the adequate parts, i’m already ordering the 3/8th fuel injector hose to replace the ones coming from the tank and going to the filter! -
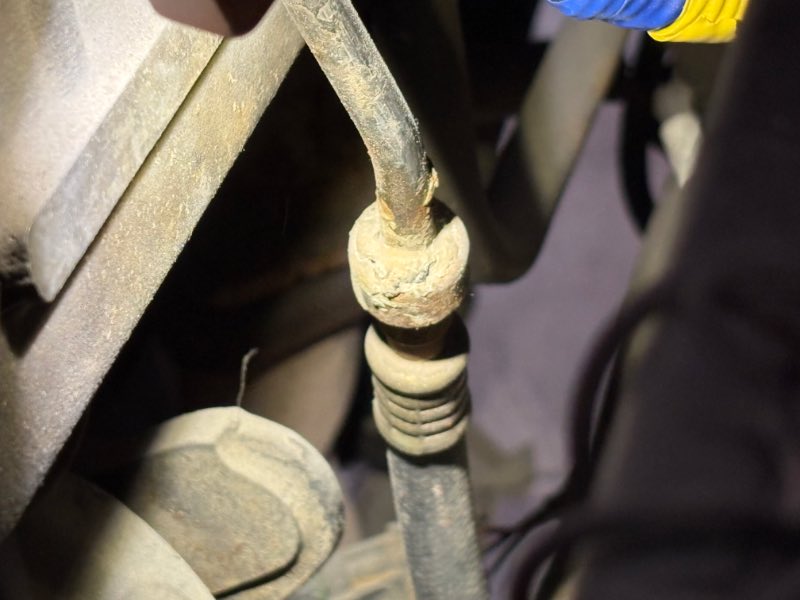
So recently i finally managed to turn on my comanche after a few years of it sitting on my garage and i’m pretty happy about that! Though i was quickly informed by my nose that having it running was likely not the best idea due to the strong smell of gasoline coming from the puddle of it forming under the engine I tracked the leak up after turning the truck off and fetching the garden hose just ion case and found that it was coming from this joint thingy on the fuel line, it sits almost under the break booster and it’s where the hard line turns into a rubber hose It was dry when i took the picture but it was dripping enough gas to make the truck shut off due to the low pressure after a few seconds, it was spraying all over the place. recently i switched my transmission coolant lines to -6AN lines and i was wondering if there was a writeup here to do that same thing but with the fuel lines for these trucks? I can’t find the part number for this rubber hose section of the fuel line to replace it, and honestly the rest of the fuel system is in such bad shape that i’d like to give it new life with better components if possible, here’s some more pictures of the state it’s in. hopefully you comanche gurus can help me find a good solution for this, thanks for the time and help!!
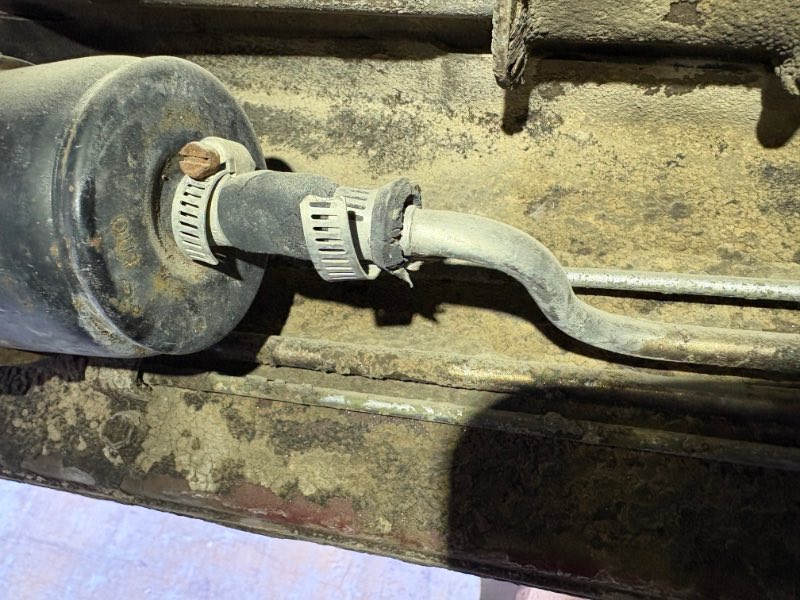
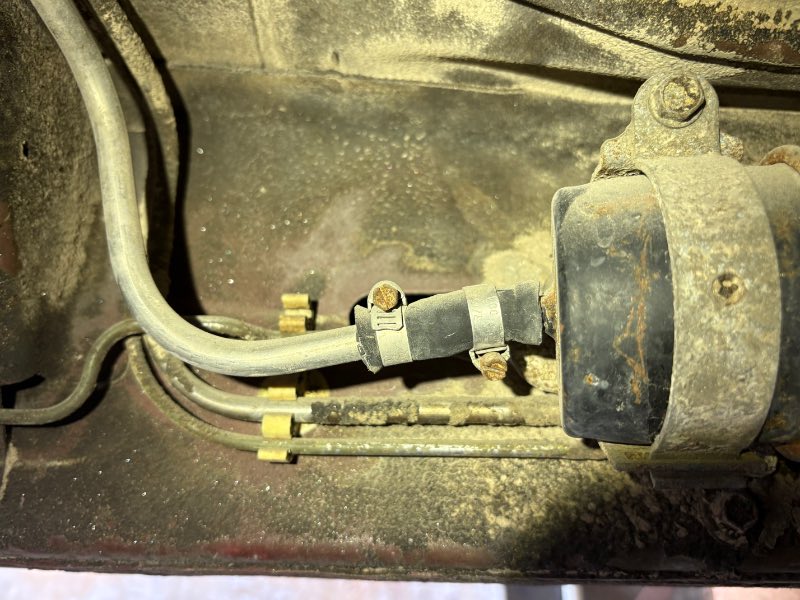
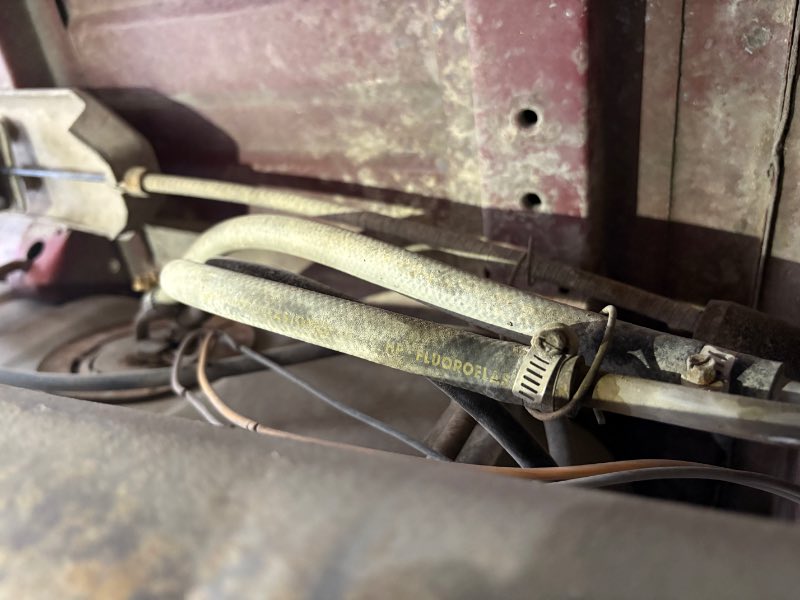
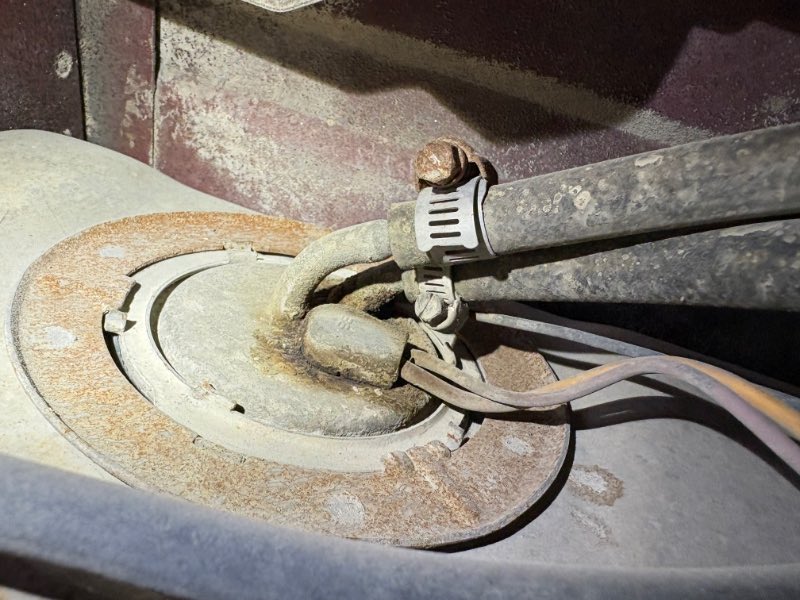
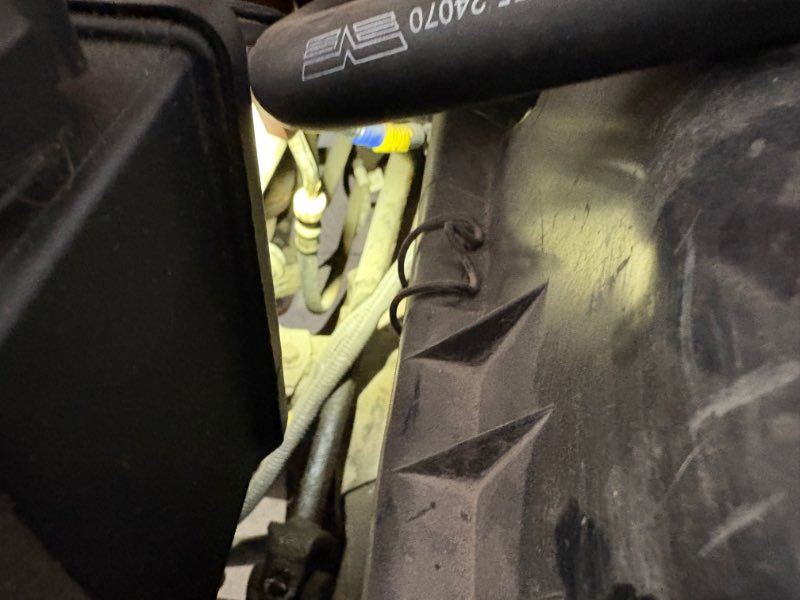
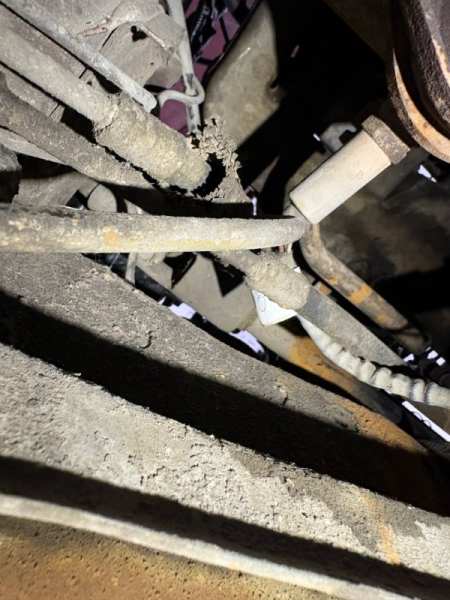
-
Heck, wanted to order one for my truck but living in Mexico comes to bite me in the rear once more, sad to see you’ve had bad luck with scammers before :<

-
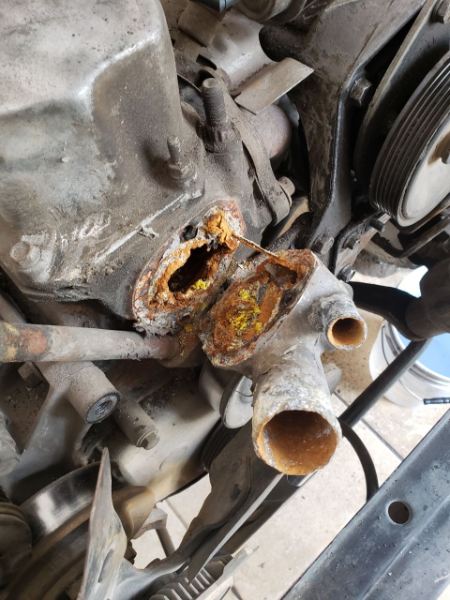
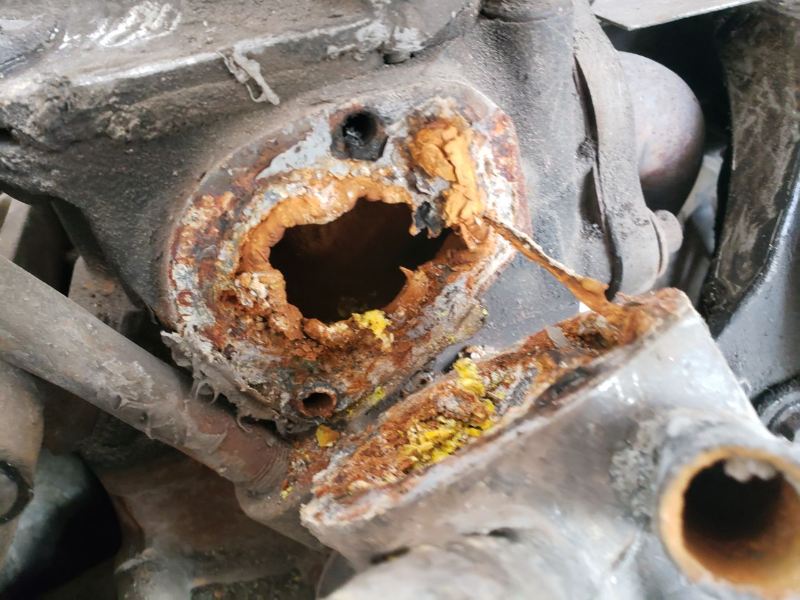
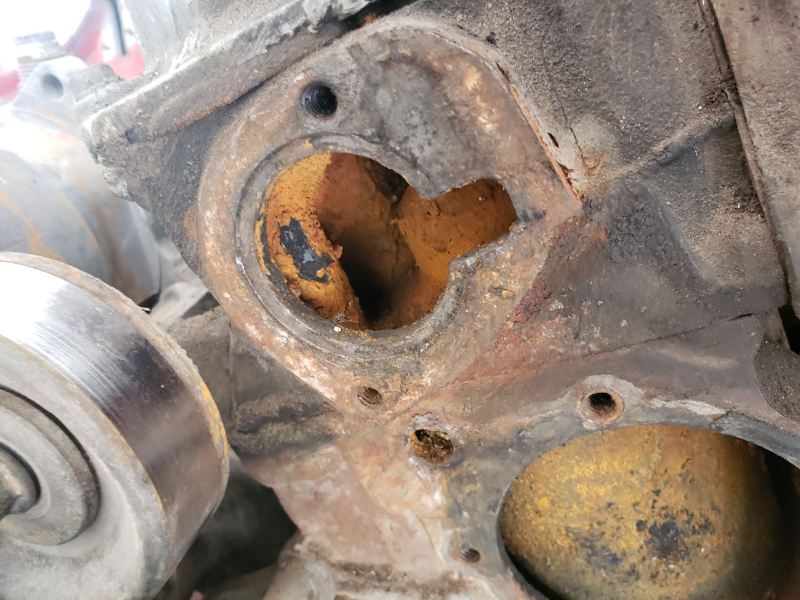
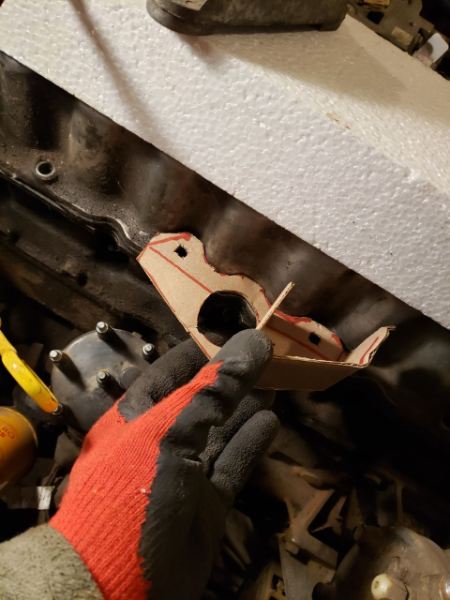
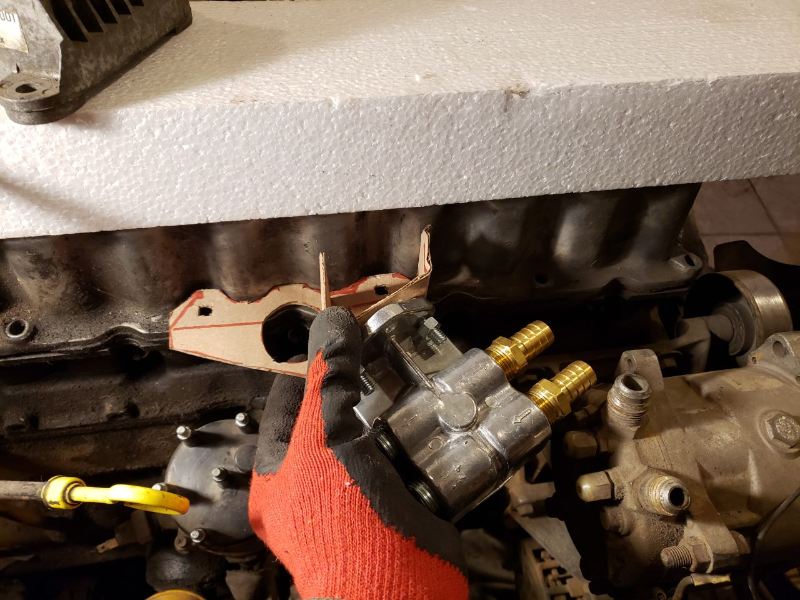
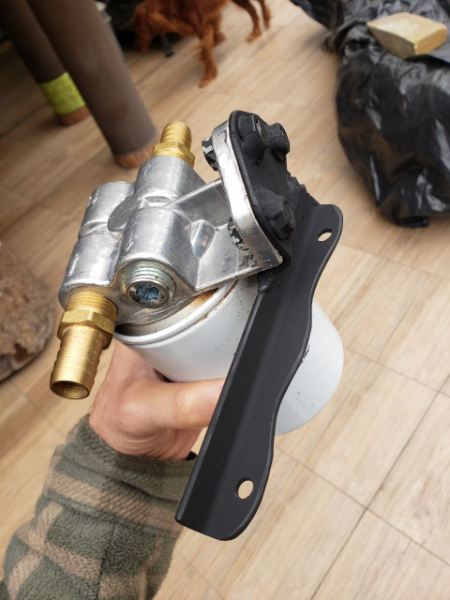
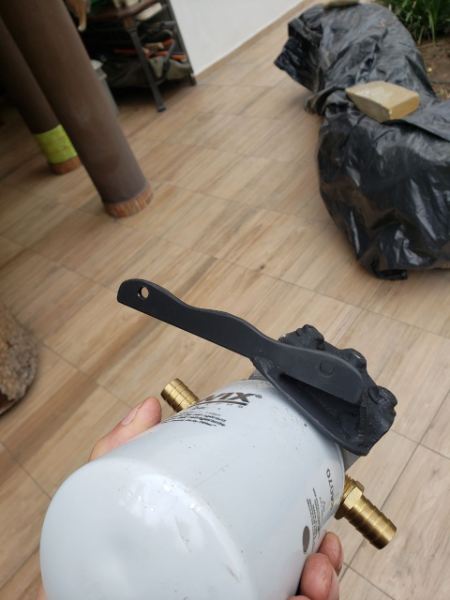
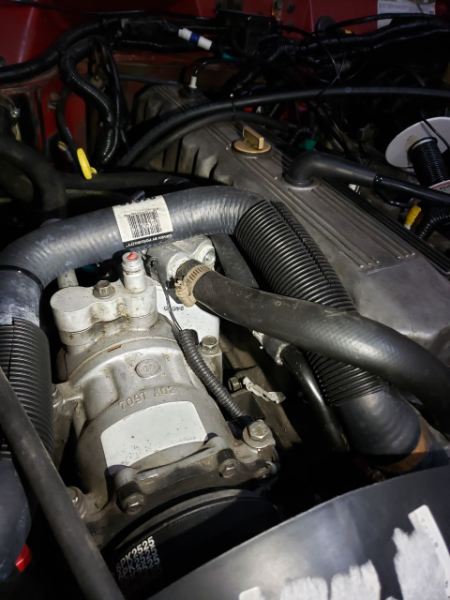
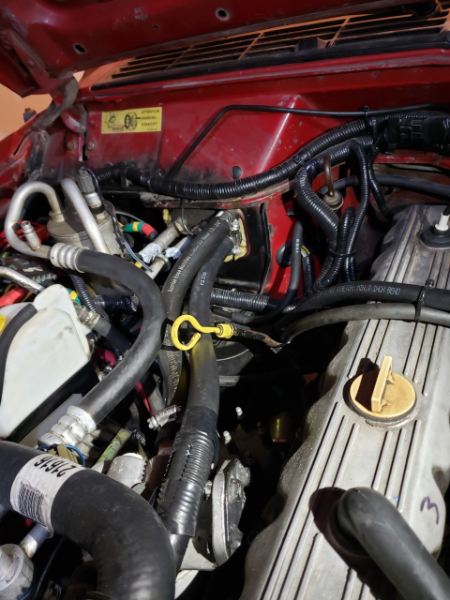
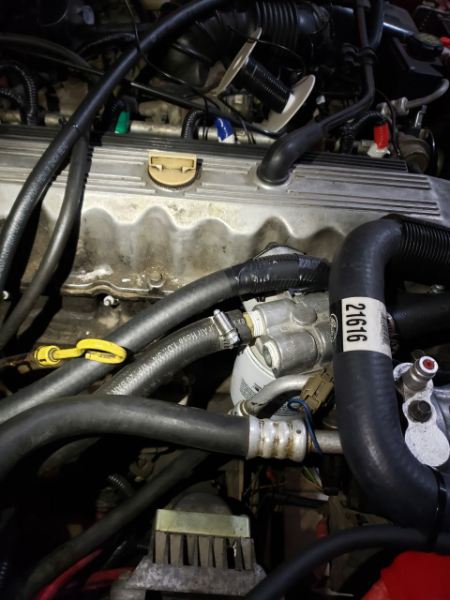
i was going to make the next post about the doors since that is what would make sense now that i have a way to connect them to the truck, but that would be smart and boring and i just don't really do much of either as clearly shown by the fact that i own a 36 year old jeep i'm desperately trying to bring back from the dead. No, instead we're Hoppin' over the wall to do another job! The FIREWALL i mean, don't worry gringos, your jobs are safe from me. Back when i got this truck and began tearing all the crumbling junk out of it i realized that all the legends of a 4.0's reliability were not an exaggeration at all, my jaw actually dropped and i called upon my god when i began flushing the cooling system, the supposedly green antifreeze was instead just mud, brown, stinky and toxic mud that oozed out of the lower radiator hose and fitting, this already gave me an idea of how bad things were going to be but i seriously considered trashing the engine once i got to removing the thermostat housing. You're lookin' at it, that horrid and cursed moment when i managed to peel it off the engine, frozen in time in this picture to haunt further generations forever.... it's gross, i know... Want a closer look? here ya go. I've seen my fair share of dirty holes in my time but this one is quite up there with the worst of them for sure. Sadly this is also the case for the rest of the engine's water reservoirs or however you call them, it's clear that the previous owners did not care about any sort of antifreeze mixture and instead just filled the damn thing up with hose water for years. This is it after i cleaned it off as best i could to add an actual thermostat to the thing, you can see the insides of it being pretty damn rusty and crudded up, i'm not even going to try and save the old radiator which is heavy with silt and mud, and i replaced the heater core as well since the one it had before was so clogged you didn't get any airflow if you blew in one of the hoses, that's how bad things are in there. this being the original engine for the truck makes me want to preserve it as best as i can, and to give it the best chance of lasting as long as possible, i bought new everything that had to do with the cooling system for it, but i knew that would only be a temporary solution if i don't go the extra mile here and try my best as curing this rust cancer so after i washed the inside of the engine as best as i could i took a page out of @NickInTimeFilms 's video and decided to filter out all the remaining gunk this engine was going to produce with a Coolant filter like the one he got in his XJ. Here's the video in question. It's literally the same parts too! Here's your filter. And here's the base for it. I did things a little differently though, instead of mounting it all the way up on the firewall like he did i had a more "in-line" kind of idea, it took me a while to figure out exactly how i wanted to do this but i think i managed to find a pretty good solution! How bout' a Bracket right there that will hold it kinda like this? ignore the sockets the hose barb fittings are in right now, they're just there to be there really, I'd likely loose them (again) if i took them out and put them somewhere else, but here in this picture you can see where i'd mount the thing, i've got just enough space to do it, i can still access all the sparkplugs and it isn't contacting with anything, plus this way the filter is upright, which helps clear our bubbles of air from the system and it would also be in line from the water pump's tube and the heatercore! I sadly don't have any pictures of the fabrication process of it since it was such a small and quick thing to do, but here's what i came up with with the few bits of scrap steel i had laying around in a bucket, i welded the nuts on the back of it because i'd rather struggle with that right now than to have to deal with them AND the bolts in the future, and gave it a good coat of paint to go, as you can see the mounting plate is on an angle to more easily catch the hose coming out of the pump. Not too shabby!~ And here you can see some pictures of it mounted onto the engine, Spoiler alert, this next few pictures i took just now so there's a few goodies there that i've not yet gotten around to show you guys, you'll just have to wait and see when i come to those :) I'm pretty sure the way i had to hook things up to the heatercore will reverse the flow of coolant through it, but that shouldn't damage it none, the front part where the thermostat hose goes up IS a little busy.. but none of the hoses are cramped or squeezed so i'm pretty confident this is going to work!