
Skylynx
-
Posts
106 -
Joined
-
Last visited
Content Type
Profiles
Forums
Gallery
Everything posted by Skylynx
-
i bet a kid put it in there and then got mad that he couldn't get it back out! ahaha! maybe that kid is paying taxes now being all grown up and really wishing he could have his 25 cents back!
-
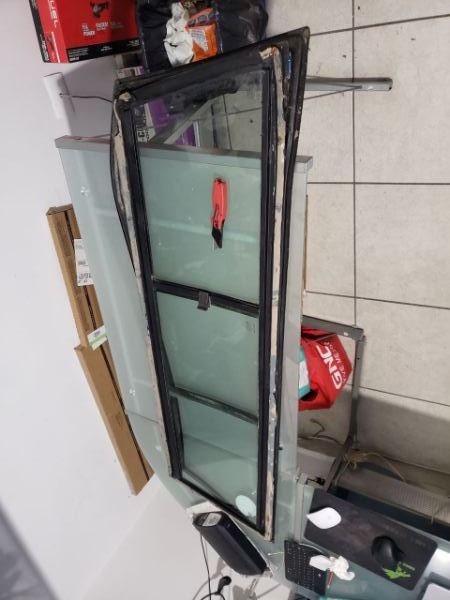
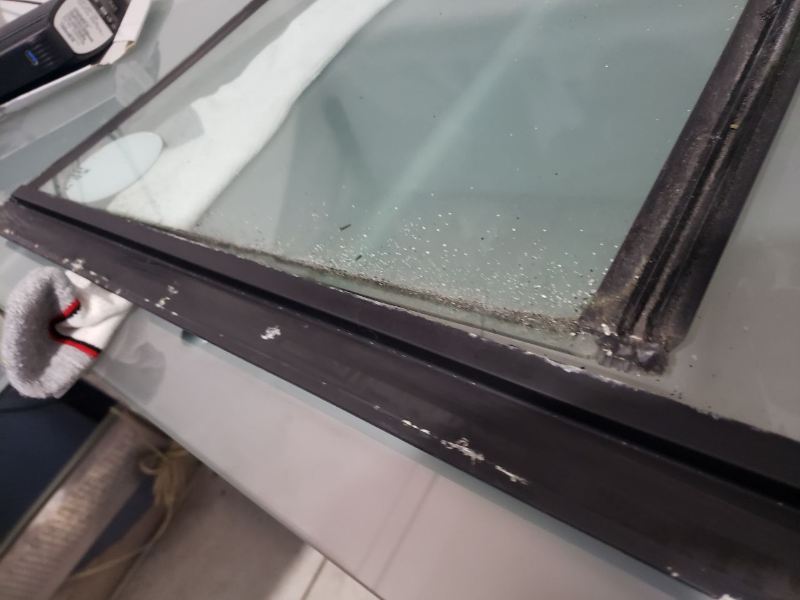
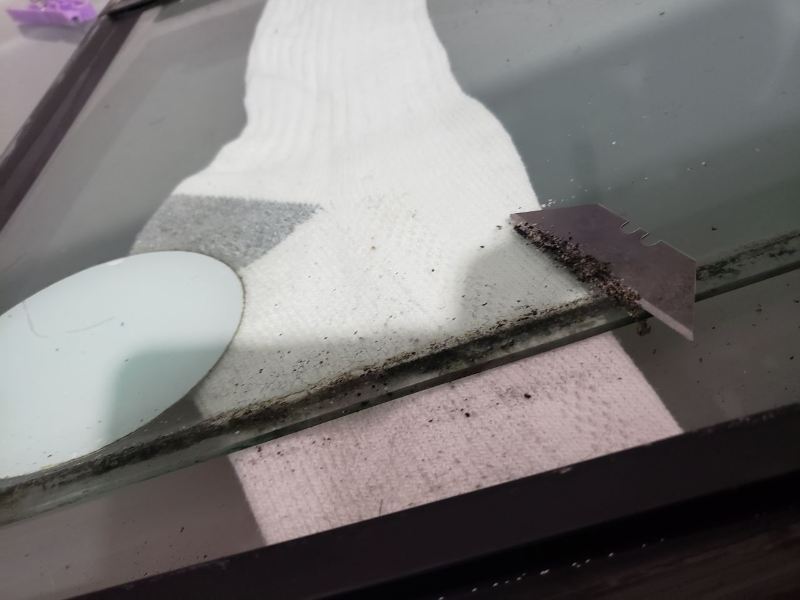
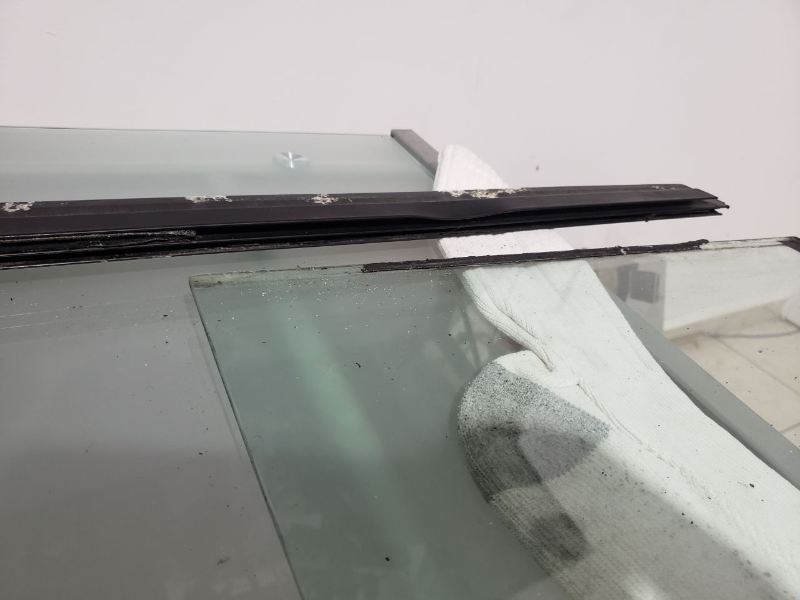
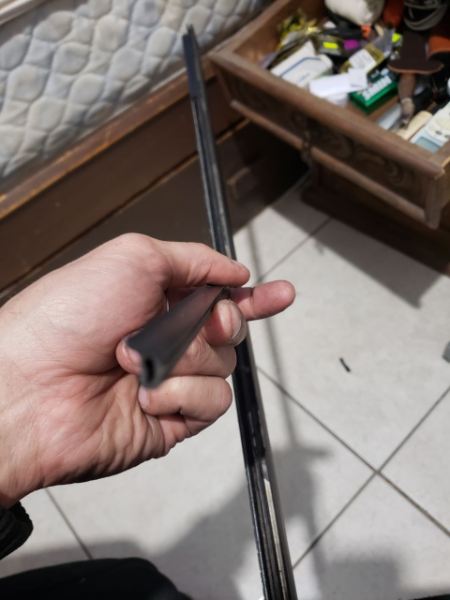
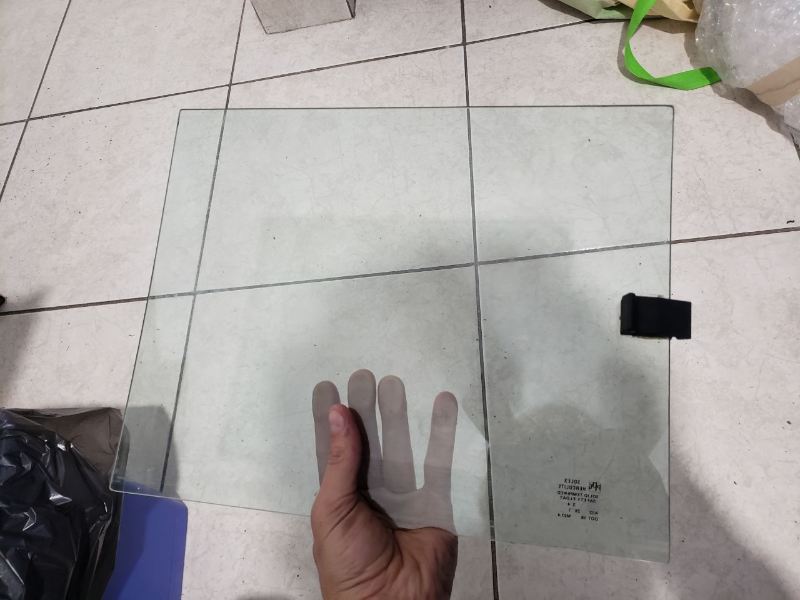
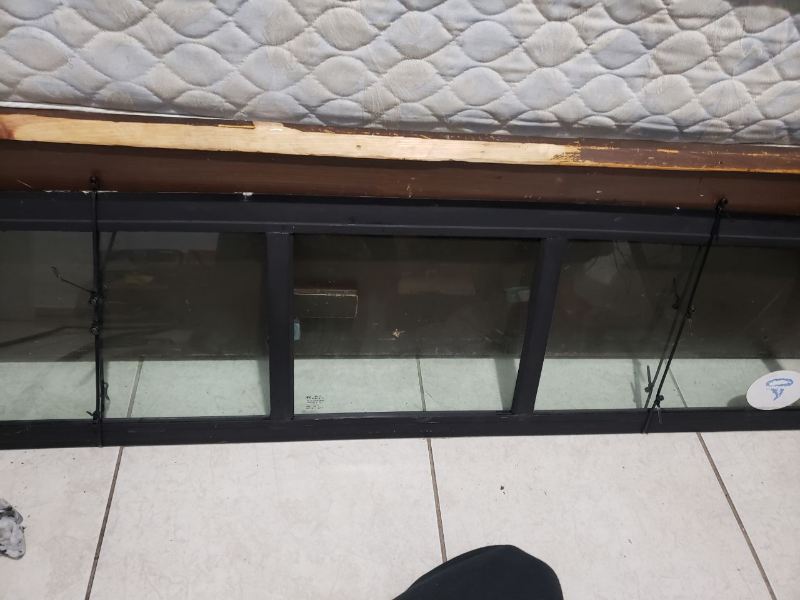
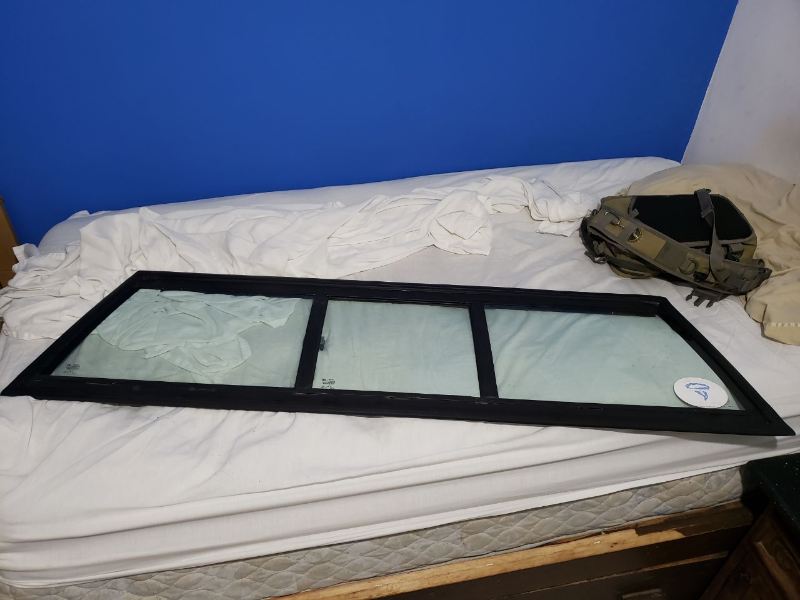
Believe it or not we're still not done with catching up to what i've done to this truck, i THINK we're close to the half way line now but i guess i'll know that for certain once i am up to date here... gosh, i promise to keep you guys more updated with this stuff in the future, sometimes i just don't have time or i flat out don't remember on making an update once i'm done with a little repair or upgrade, but i promise to be better on that in the future and not let the post pile up for two years in a row again! (here's hopin') After i was done with the seats and the carpet for the truck a big heckin' winter storm rolled in.. No, literally as i was putting my tools away it began to snow a little bit here in dog gamn mexico believe it or not, so me being from the region and used to being perpetually baked alive instead of a little bit of cold, i decided to stay inside while the week long storm pased IT SUCKED I mean, i was so pumped up from having completed such a complicated and crucial part of this build that i was primed and ready to move on to the next thing right away, i was making so much progress and it showed, but now outside made me feel like i was going to die, which was very much not ideal in any way.... I needed something i could do next to my (very manly) scented candles and hot chocolate while i waited for the storm to pass by, something i could do inside, preferably in my own room away from my boss! Thankfully, all i had to do was look to the side where just behind my desk poked the corner of that rear window my friend from Kentucky had helped me score a few months before, and even though there wasn't anything really WRONG with it... i still thought there would be some room for improvement! Here you can see the window as it came in the mail for me, the old urethane that held it to the donor truck still clung to it for dear life all along the edges of the glass, aluminum and gasket and let me tell ya it was a sonuvagun to get that off, i had to be super careful with my box cutter there to try and cut it down from below, i took my sweet time with it too, since i had all the time in the world to burn with this part of the project. I removed the gasket first and made sure to clean it quite thoroughly inside and out, i pulled out so much dark burnt rubber gunk off of it that would have prevented it from attaching to the window again before so if you're doing this make sure to scrub this well, do it carefully too though! you don't want to rip this thing apart, they're decently rare! Here you can see the status of the bottom aluminum rail once i had wrestled all the old window glue off of it with my knife, you can also see the window starting to come apart too! this was because the window sealer in between the rail that helf it and the window was cooked and cracked,it didn't take much more than a gentle tug to make the whole thing fall apart once the urethane wasn't helping to hold it together anymore. Here you can see it while being disassembled further, i started cleaning the crummy glass with an exacto blade to make them as new as i could, i'm glad i took this thing apart too, look at all that dirt and sand in that came out from those rails... no wonder the slider window was so hard to move! That sticker o the back there is about a tornado that happened in West Liberty, Kentucky back in 2012, it's super faded now from having spent years in a junkyard in direct sunlight but it does have the phrase "from the rubble we will rise!" written below the image of a tornado which is the only part that remains easily visible, i think i'll keep it, i think that motto fits well with this whole junker build! Here's some more pictures of the rails being pulled from the glass, you can see the spent urethane slinging to the glass that i later had to clear from it and the railings alike to replace it with new sealant, not my first time putting some gooey stuff in tight spaces! I also carefully fixed that bend on the rail right there with my leatherman, you can't even notice it anymore! And here it is! the one piece i was doing all of this for, heck if there was a way to put this slider window into the existing window frame in the truck i would have done it... turns out it's easier to replace the whole back window than just the slider itself on this trucks... oh well! Man i really need to get better at taking more and better pictures, these are not as good or as frequent as i'd like them to be... anyway, next i poured some 3M Urethane onto the frame slots and carefully reassembled the window, i had to clean a lot of it as it spilled out which was easy enough to do while it's fresh and wet, and to hold it in place i just used a bunch of zip-ties holding it tight, if you do this make sure to not make it TOO tight,or else your slider window may have a hard time sliding out of the way because the bottom and top channels would be a little too close together. And that takes us to where this window is today!.... it's still in the corner of my room collecting dust. thing is, one of the things i want to upgrade is the windsheild gasket from the later XJ models and for that i'll need to take the truck to a professional window remover and installer and pay him to put that thing around my windshield, might as well ask him to do the same with the back window as well at the same time and have both the back and the front professionally attached to the truck, right? so in the meantime it will just be there collecting some dust in the corner, sadly... but! at least all the work of restoring it is done and ready to go for when that day finally comes!

-
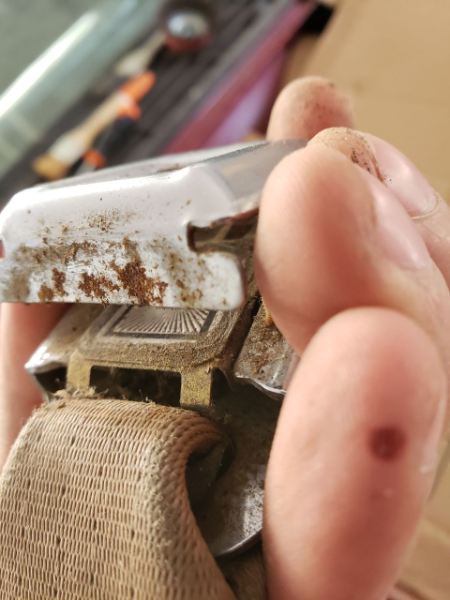
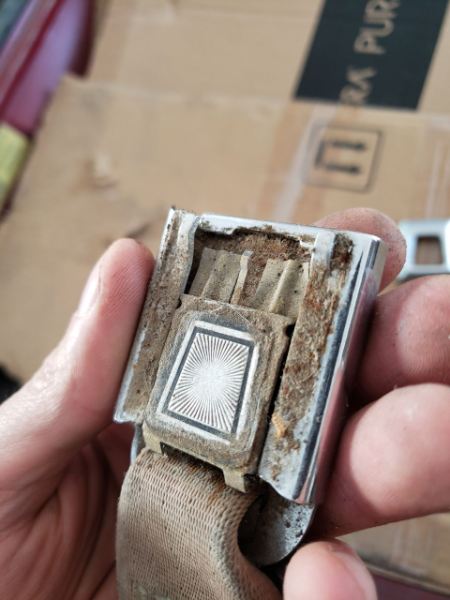
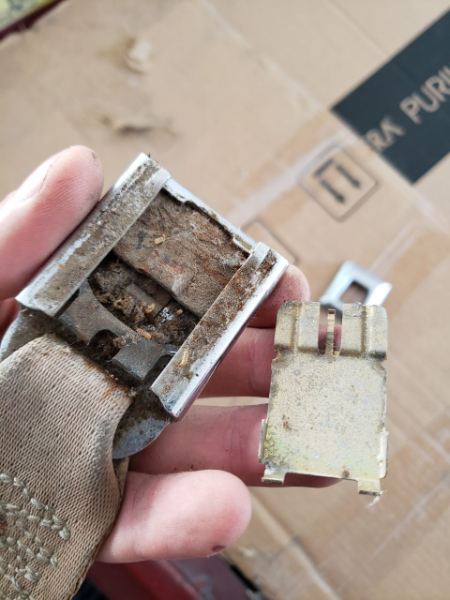
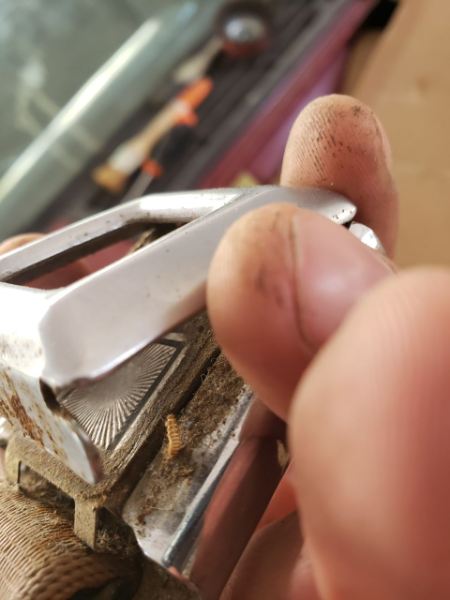
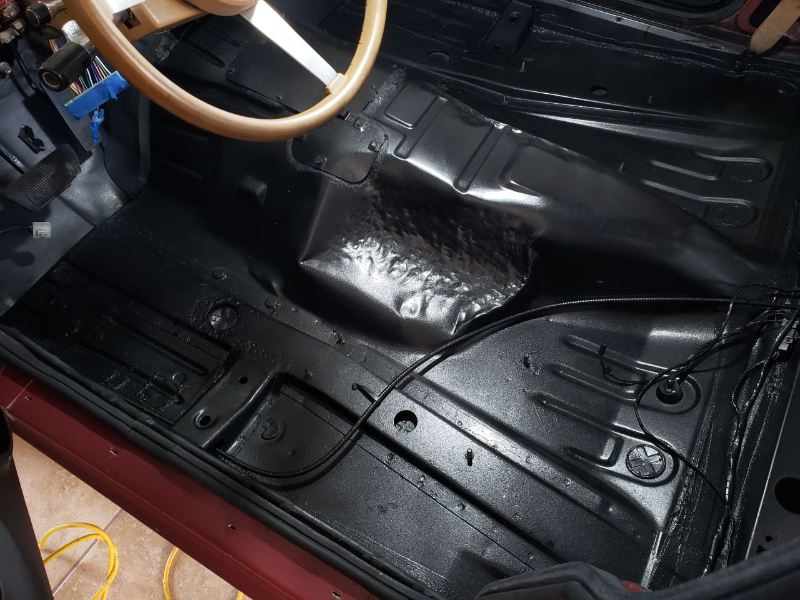
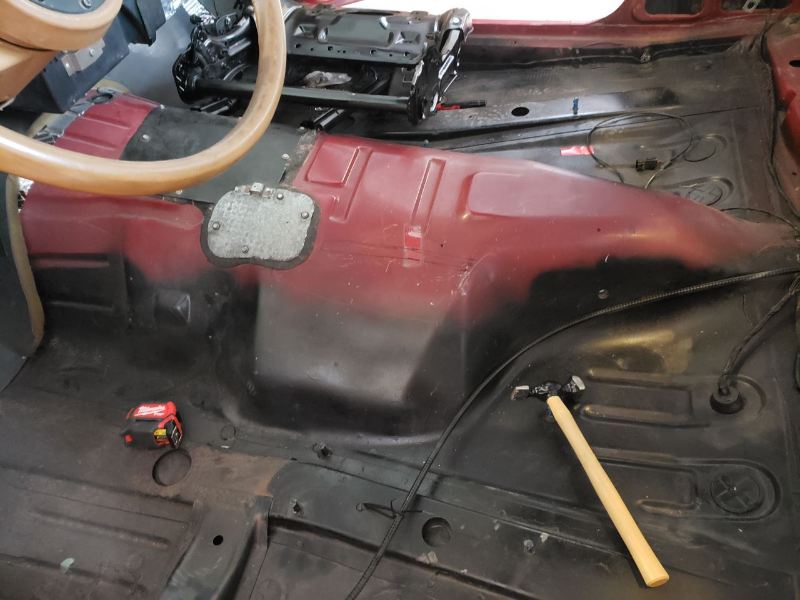
Next up in the list, Carpeting! i needed to make my truck's inside look a little less like a spaceship and more like what it actually it a piece of jun-... Aaah... an 80's truck! I went ahead and washed the old sound deadening matt that came wit the truck and left it out in the sun to dry for about a week, all that recycled cotton and wool take a while to dry up, and i regret doing this while i had lost my sense of smell during me being infected with the kung flu because now every time i open the comanche's door it smells a tiny little bit like cat pee, i suspect the cat got fond of the matt that's now under the glued down carpet i installed and i couldn't smell their sinful escapades while i was putting it in... oh well, guess that's one more excuse to collect those little tree air fresheners... Had to adapt it a little bit to the new bases of course, but it wasn't hard at all to do so! Then i laid the new carpet i had bought for the truck at a local shop on the floor and began taking measurements from the old carpet and making cuts on the new one, i took my sweet time with it and measured everything a good ten times before i started taking the blade to anything, i guess my boss's wife thought i was being lazy or something and she came over to give me a few words, man she used to be so nice but ever since she got pregnant her attitude really changed for the worse, must be all those hormones... here you can see her inspecting the carpet i was about to cut up. I transferred the cut carpet into the cab and carefully began laying it down with spay on contact glue from 3M, i used their industrial strength stuff for this, the green can if i'm not mistaken, everything was going well until my jerk boss came over next and began nagging me too, i guess his wife went on and snitched on me with him, he's always on my behind about something i swear, he's always slacking and not doing anything while i'm out here busting my tail off! he even yells at me if i don't give him part of my lunch every day, i can't believe i still work for these people...here you can see him inspecting over my work, he wasn't too impressed. As i said before, i later found out that i would need to use the original latched for the seatbelt buckles since those are the only ones that fit for now, so the one you see in the picture got removed shortly after this while i solve the seatbelt "problem" I did try my best at revitalizing the old latches as best as i could, so i opened both and cleaned them up, i took some pictures of the disassembly process that may help someone some day, so i'll upload them here! This one even came with a snack for me! yay!~
.jpg.370bf513817023c431e8f8004eb562bf.jpg)
-
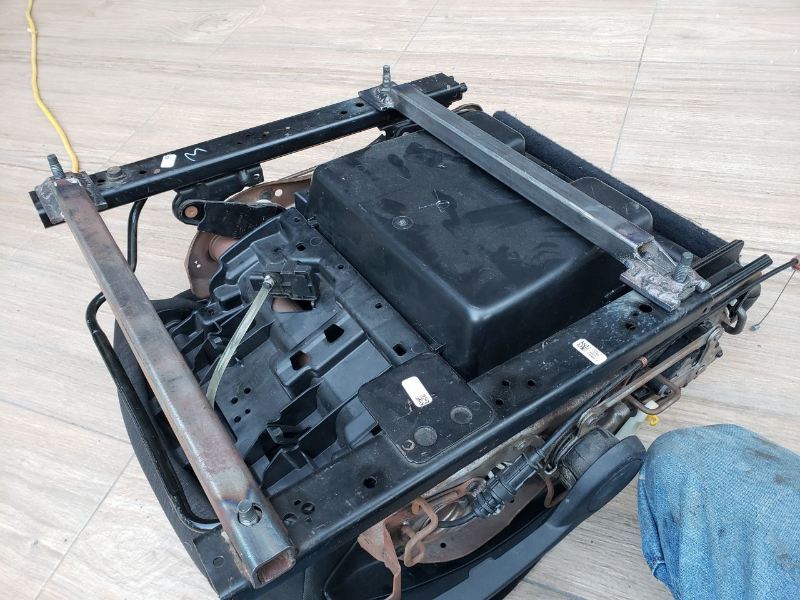
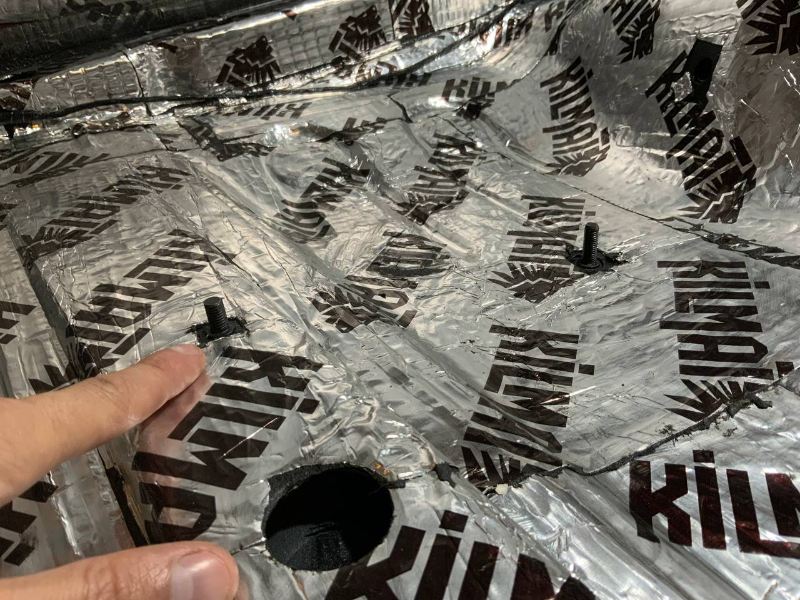
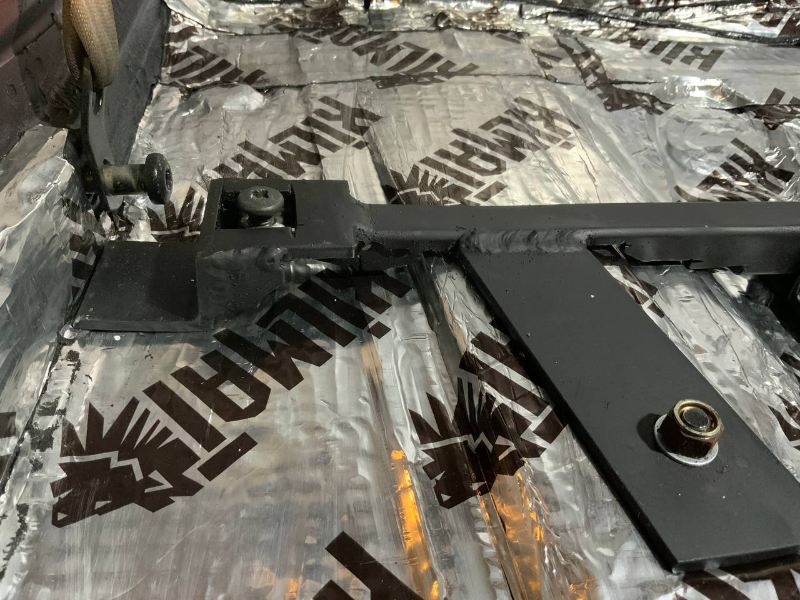
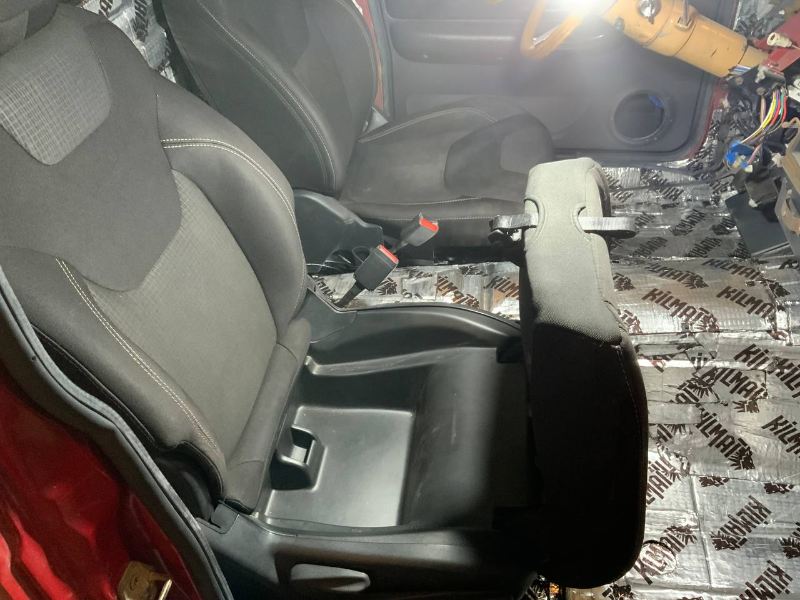
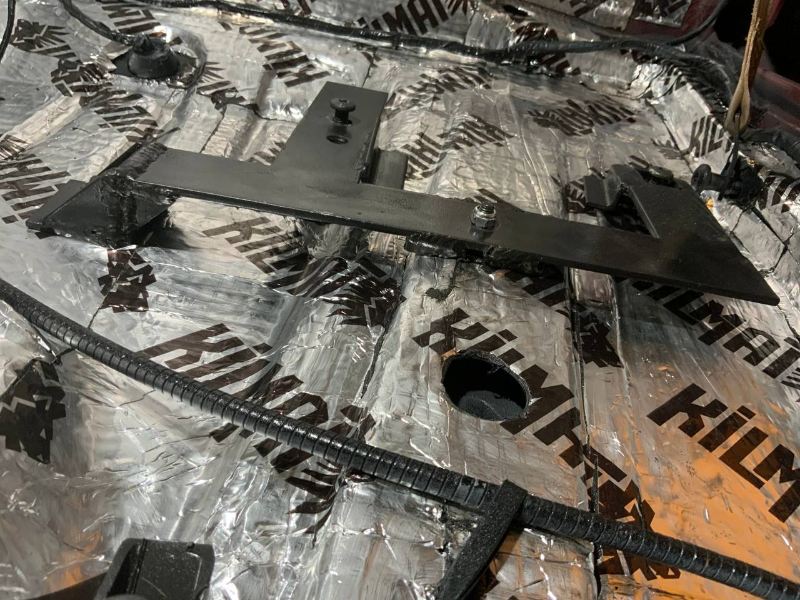
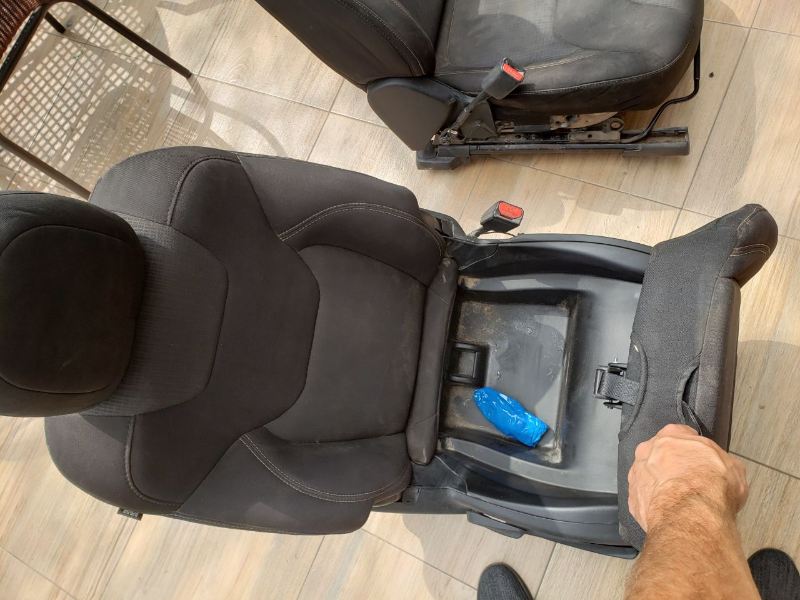
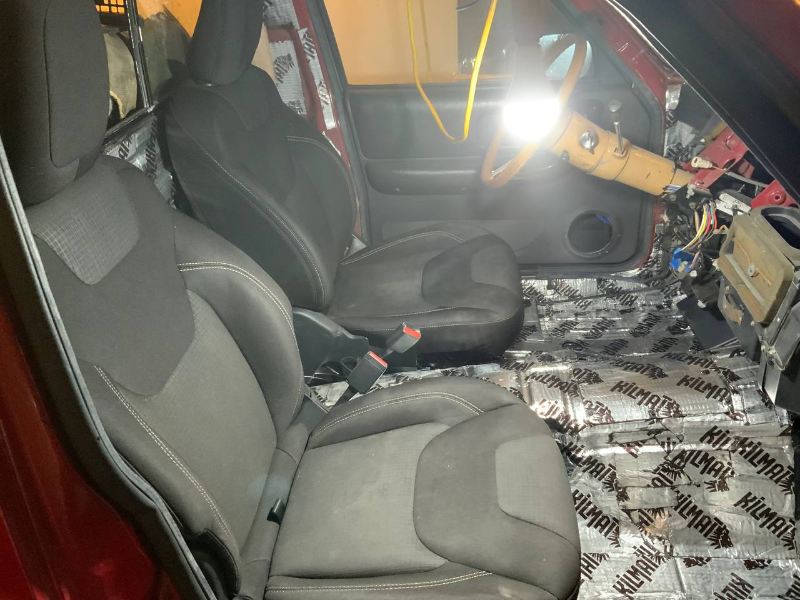
So now that i had a way to fit and attach the pilot's seat's bracket to the floor of the comanche i turned my attention to the other side of the cab, at first i was pretty sure that it wouldn't be as much of a hassle to make this one work as the last one and i was quite right on that assumption! though that does not mean that it was just a walk in the park! If i had to describe the process for either side's base fabrication it would be the pilot's side was a lot more brute force and the passenger's side was a lot more intricate detail in which you had to take your time with, see, this seats are not exact mirrors of eachother, they look similar and both can elevate,slide forward and fold front to back, but the Passenger seat CAN fold all the way forward while the pilot's side stays somewhat upright,!... the passenger's side has that special little hidey nook under the seat while the pilot's side doesn't, instead replacing it with more cushion for a longer and more comfortable ride, on the back of the seat there's a pouch to store stuff in on the pilot's side, but the passenger's side back is not equipped with such. Specially the secret compartment on the passenger's seat was the one feature that gave me the most trouble, in the original 2016 KL cherokee the floorboards run completely straight while the comanche's one had an angle, the compartment stretched quite a ways down and would hit the bade that attached it to the truck if i made the base just like i had done it for the pilot's side, which lacked this obstacle. This meant two things... first, if i wanted the seats to ride at the same height and look as original to the truck as possible while still retaining the little special contraband compartment (i totally wanted to keep the contraband compartment.) Then the base would have to move down and out of the way of it And second, i was going to do one single little modification to the floor of the comanche that i didn't want to make, but was kind of forced to.... but more on this later, for now as you can see in this next picture, the rear part of the base pushes itself as low as it could go (keep in mind it's flipped upside down in the picture, so upwards here is low-wards?... lowards? is that a word?.. Anyway, you know what i mean ) As you an see i could only manage to barely give it enough clearence for the compartment to slide over the base back and forward, but it was enough to do so and still make it stand at the same height as the pilot's side base. And this is what i came up with for the bases on the passenger's side, as you can see the rear one in this case looks a lot different than the one on the pilot's side, instead of jumping over the frame rails on the floor like the other one did, this one had to wrap around it because i had to lower it to much to get it out of the sliding compartment below the seat, the mounting screws were no help at all either, they were way to forward for where i needed to set the bases up for the rails on the seat to be able to use them, so i had to make two long extensions forward to be able to grab them there. Here you can see them mounted on the vehicle, notice the big plate i welded under the rear base on the top left corner of the picture, that's because in that part it was going to be sitting on nothing but the sheet metal of the cab, and i wanted to extend that weight around as much as i could, the bar that extends from there to the bottom side of the picture had to be carved around the transmission tunnel in order to fit, and i added a little bit more support for that attachment point that rests on a convenient flat spot on the floorboards right under where the seat belt anchor lives. And this is the one modification to the floorboards i was talking about, that stud had to be trimmed down because it too was scraping the bottom part of the contraband compartment,i left enough there for the nut to grab onto ti well, and that amount of trimming was enough for the clearance issue to be cleared out! Here you can see it in place, as well as a more detailed view of how that bar had to be cut out to fit around the frame rail. And that's it! i quickly assembled the seats back up, threw them in there and tested them around and celebrated when i confirmed that they both fit perfectly well! All that had work had paid off, both seats fold, slide forth and back and elevate, all the manual controls work on both, are secured to the floor of the cab! the only thing i need to figure out still is the seat belt situation, i'll have to keep using the old latch system because the belt latches that came with this seats have a different buckle than the belts on the comanche's wall... i also would like to refurbish those seat belts and give them maintenance, but i have no idea where to even begin with that!... if you guys gave any suggestions on how to do that, please let me know!
-
Absolutely loving these! i was so close to getting some of those turbine rims as well, but i don't hate the ones i have right now, and i think i'm better off investing that money in a new driveshaft!
-
Fills me with joy to see folks liking these posts! specially if they're helping spread knowledge and making their own projects a little bit easier!
-
Oh hey! i'd love to see the process that you took with that! see if i can learn something for next time!
-
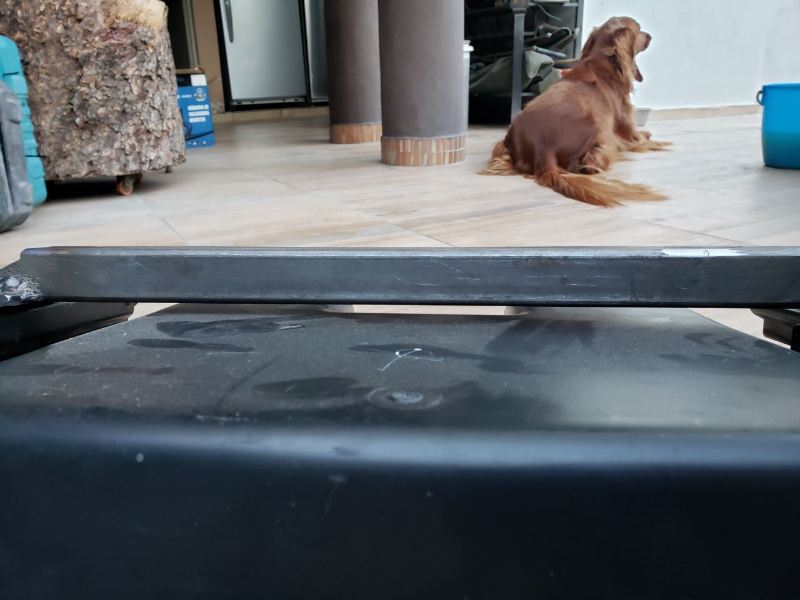
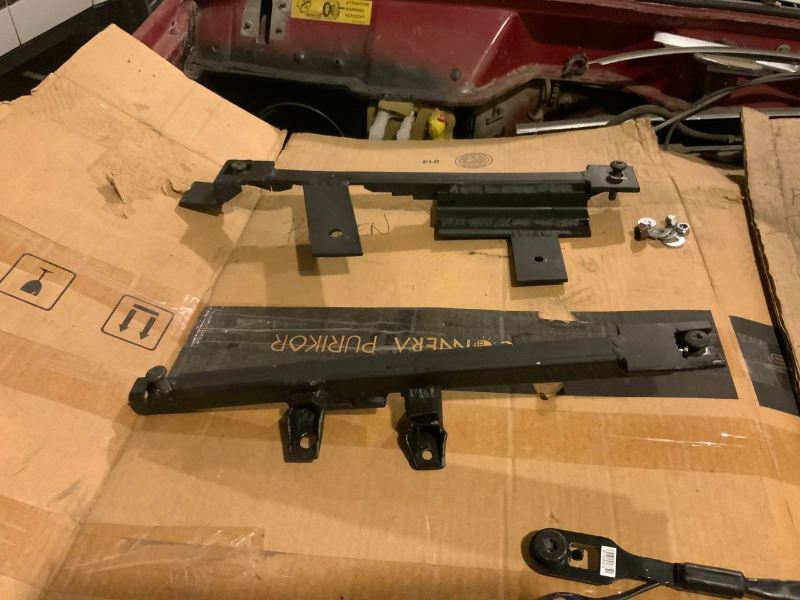
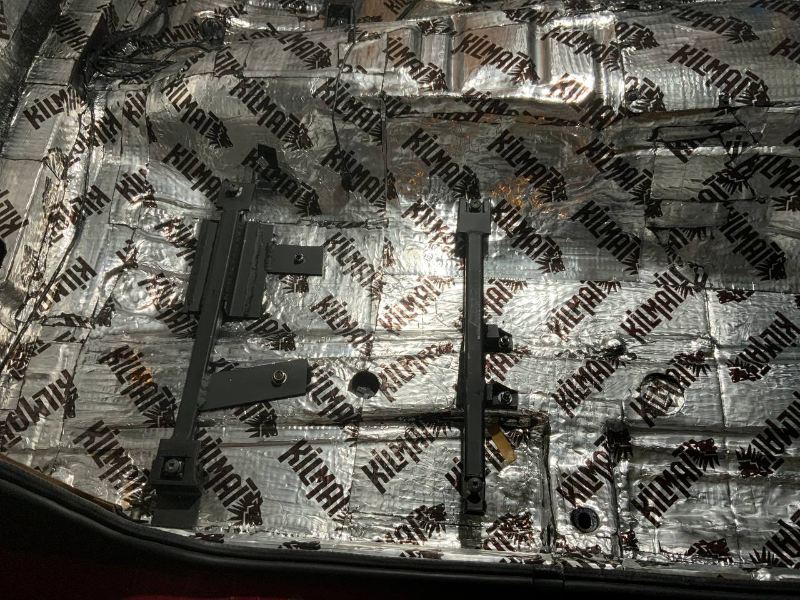
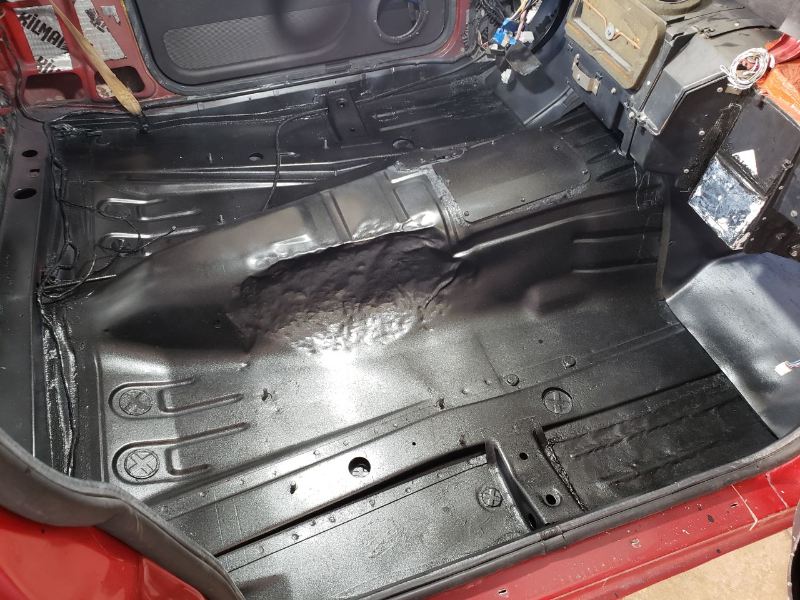
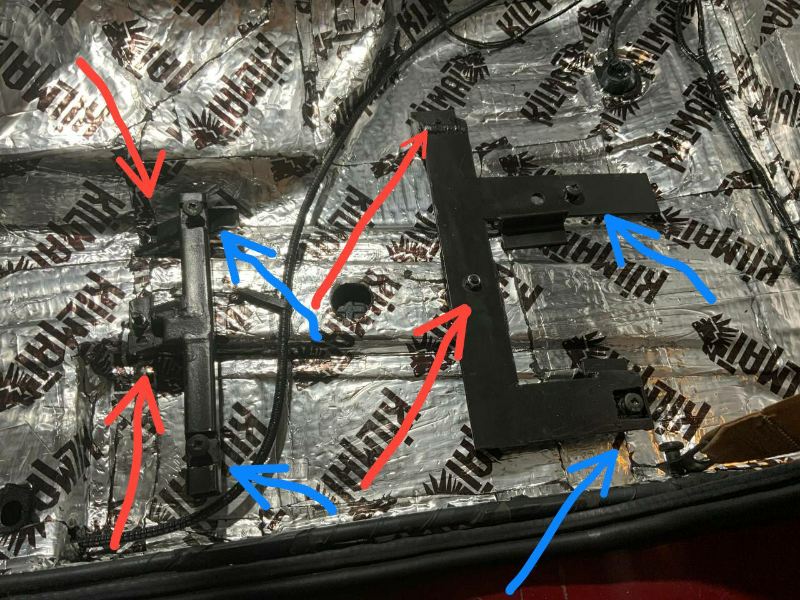
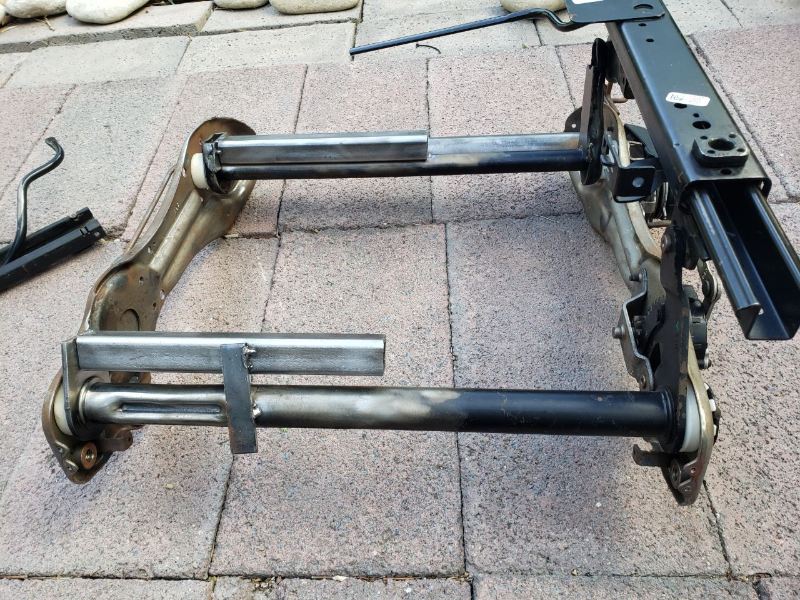
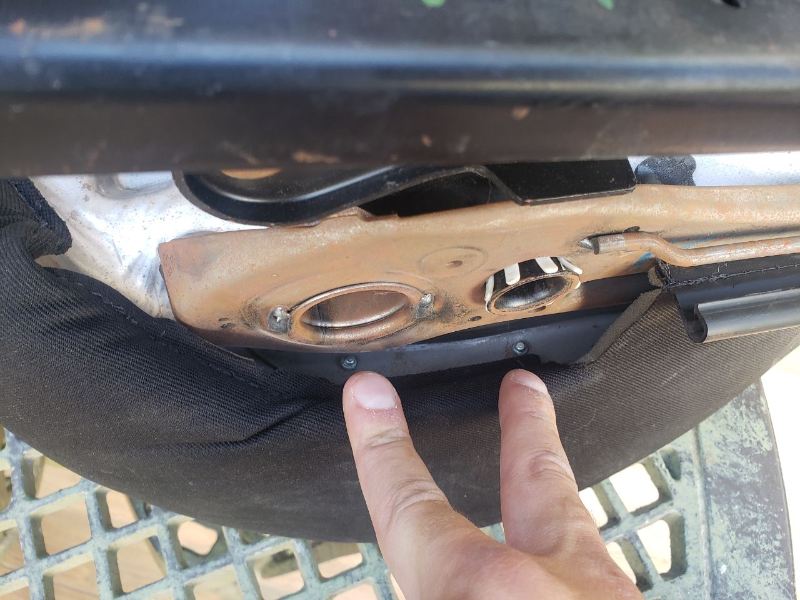
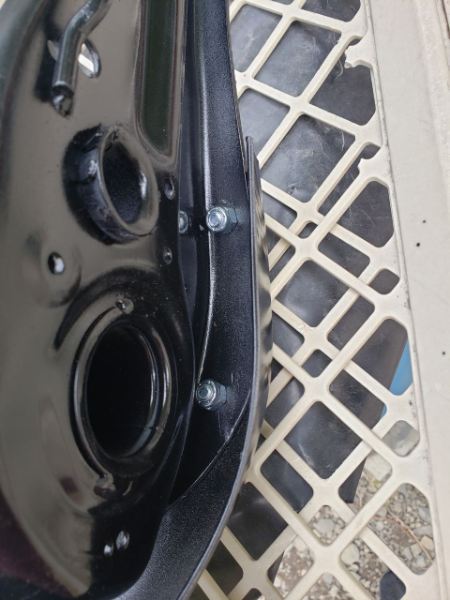
From here forward i had two choices, either keep moving full steam ahead with the Pilot's side seat now that i had the bracket cut to size, or start with the passenger one and get that process caught up as well, after a tiny little bit of braining around it became obvious that the best course of action was going to just finish the one side before starting with the other, that way if i screwed it up at least i would have more experience and just one single seat less to play with. since the start of this project i set a goal that was to try and modify as little of either the truck and the seats while still making it work, the more simple the system was the less things can go wrong, after all, don't get me wrong! i love me some good old over-complicated German engineering! but I'm neither German or smart enough for school... That meant that the next step for us was to make a bracket for out bracket that had the other bracket sittin' on it for the seat to sit on so you can sit well! Okay, Listen here, this is my second language okay? you're going to hear the word bracket a lot in this posts because it's the only word that kind of sounded right for this... stuffs and things and whatnot like what the hell is even a bracket it just sounded like it fits and now I'm stuck with the damn thing like... "EEeeyup.. that's a bracket right there son. Also that thing is one." And now i'm stuck with the damn thing, at least you guys can use the pictures to know what i'm referring to at the time! ANYWAY. the reason why we need this new thing is because the mounting bolts on the 1988 jeep Comanche were never going to line up with the hole patterns of the now heavily modified 2016 jeep Cherokee seat bracket, So in order to tie down the dang seat to the dang floor of the dang truck i needed a dang thing that would fit both them dang things at the same dang time. English is fun. Sadly i couldn't find any pictures of the fabrication process for these things which i will now call the bases for my own sanity but here you can see them laid down kind of the way they will fit inside the truck, as you can see in the front one the mounting holes for the floor are at two different levels cause one of the studs is actually riding on top of the frame rail that sticks out about an inch in that part of the floorboard, and also has little slots on the top tail where the rails of the bracket will lock into, i welded a nut inside that matched the seats mounting screws so that i would never have to worry about it if i ever had to take the seats off, and just focus on the screws that hold the seat down instead. But before we continue i'm sure a good bunch of you know what i needed to do to make even this bases fit, let alone the bracket meant to go on top of them... yes, i had to bang down the tranny tunnel for more clearance, No, i did not like to do it, yes it did feel awful aesthetically ruining one of the last picture perfect transmission tunnels in these trucks just to make these seats fit, but the bends are in a place that nobody can see then, specially with the carpet on, and the damage is mostly reversible since it's just bent sheet metal.. Still, graphic warning for the next two pictures, the picture i posted the other day of the pristine tunnel with a small hammer by it's side was the moment just before i started banging on it, and by the time i was done, this is what i had.... Again... Not proud of having done this, but it works. And yes... the passenger side needed just a tad bit of percussive persuasion too.. Man, i hate those pictures... if god gives me life, time and power of will i'll make that thing look nicer somehow, i swear. There was no way these seats were fitting inside without this, the passenger side looks bad but it actually only needed about an inch or so of being pushed into to clear perfectly well, the pilot's side was the more drastic one of the two, and i'm sure i'll have to re-modify it once i do the 4x4 conversion at some point. After this pictures i went ahead and finished off adding sound deadening to every single little corner i could find until the entire truck was a sea of shining kilmat foil, and with the bases complete i went ahead and placed them in the truck to see how they fit! Here's the pilot's side! i marked the places where the bases attach to the truck with red arrows and the places where the seat hooks up with the bases with blue ones, as you can see the blue arrows line up perfectly from forward to back while the red ones are just... they don't make sense really, jeep just put them wherever they wanted i think. I'm specially proud of the rear one on this side, it's hard to see in the picture but everything youre seeing is at a slight downwards angle that runs high from the back of the cab where this picture is facing and all the way to the pilot's footwell, while the surface of base where the seat is supposed to anchor at needs to be level with the ground below, so to make it stable had to add a small correcting piece of steel where the frame rail meets the base, you can see it there in between the nut that secures it to the truck and the rail, that correcting piece is at an angle too, assuring the base is sitting floor with the flush, but giving the seat the proper angle it needs as well! I also welded in some L-bars next to the places where the seat grabs the base for that little extra support, since those L-bars are sitting on the stronger frame rail instead of the sheet metal of the floor.

-
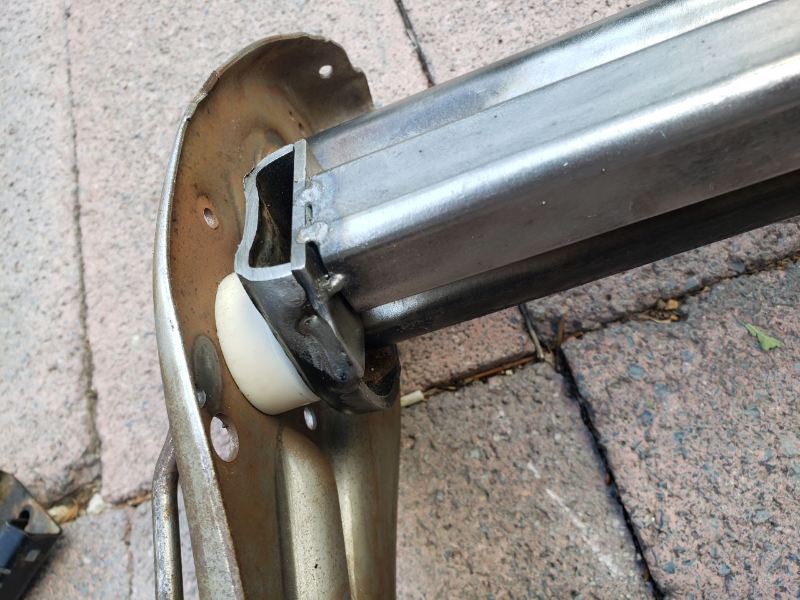
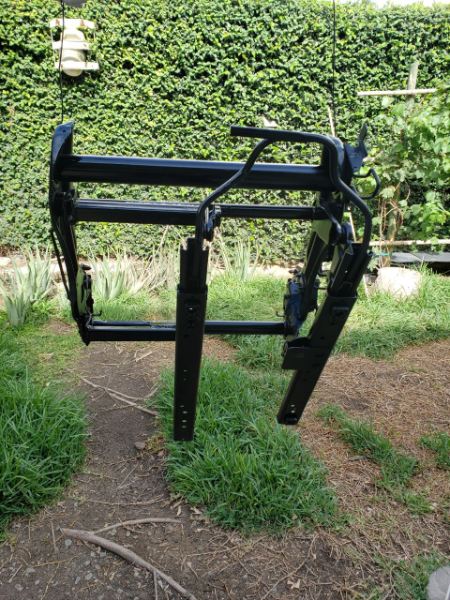
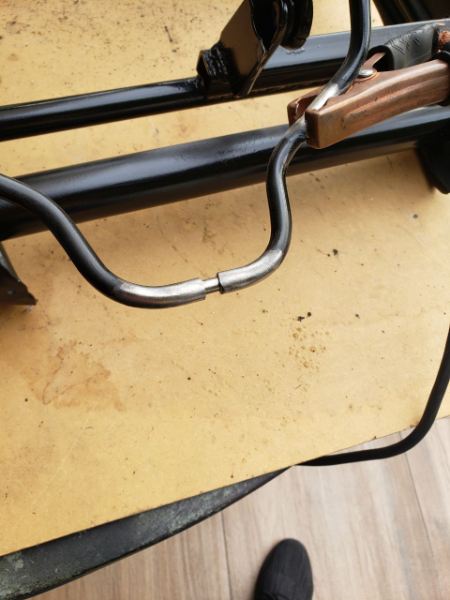
Having those brackets off the seats was absolutely the right move, the complete bucket seats were super heavy, very unwieldy and the doors on the Comanche are just barely big enough to slide them in if you practice enough yoga, and i figured that if i can make the brackets and the sliders work first, then once they had the seats attached those would work too. now that i only had to maneuver the brackets around i could effectively take measurements, make adjustments, see where things fit best and where they worked and where they did not.... the answer to all of that, as i suspected from the beginning was quite apparent, as soon as i placed the brackets inside the truck's bare floor they both spoke to me, Nay, YELLED at me : "LOL we're not gonna fit in here you dolt, this place's way to small and we're too F A T!" Specially this Transmission tunnel on the pilot's side would become the bane of my existence for the next two weeks, there's a saying that with enough fabrication you can make anything work, and that's something that i live by and have very much driven this project forward with that in mind, though i asked myself just one question as i stared at the brackets laying there on the cold floor boards of this old piece of junk... "Just how much to i want to suffer through this?..." Admittedly? this could have been a weekend project instead of entirely consuming 2 weeks of my time, an angle grinder, a welder and a few rattle cans along with some sacrifices here and there would have made this thing so much easier for me, Yeah, i would have probably lost the ability to control the elevation and tilt of the seats, maybe even the sliding forward or back on them as well, maybe they would be a little crooked to the side by the end of it, or off center a little, but so long as they fitted me in the end that would have been fine, right? Frick no, mother pleaser, i want ALL the bonuses and NONE of the downsides! Don't you know me by now? of course it'd rather go the extra mile on things for that little bonus! it was settled on my mind, i was going to have these seats working PERFECTLY AND AS INTENDED inside this comanche, and they and the truck will synergize perfectly together to me the most amazing seats on a comanche ever. Of course, that's much easier said than done... one thing's for sure, both the truck and the seats wouldn't be the same after this... "With enough fabrication, you can make anything work..." I started on the pilot side since i knew that i could make things fit there i could make them fit on the passenger side too, sadly with how tall i am i quickly learnt that that seat bottom was going to need to be pretty low, 6 cm off the floorboard to the bottom of the rail was the number i came up with for this to even have a remote chance of fitting for me to be comfortable, thus meant getting the sliding rails as flat as possible and that meant getting rid of the little awkward legs that made them fit to their original home, you can see the ones i'm talking about in the picture above in the furthest away sliding rail, it's got a centering peg on the front by where the ipad balancing on a tall cup is, and on the other end of that same rail there's a... like an extension?... i've got no clue, Anyway i sent it to hell with a sharp drillbit and a lot of wd40. A few drill bits actually, i just kept slowly stepping them up until the big rivets holding it in place were gone and i was left with a square and level rail to work with... Sadly though, that was not the end of the story when it came to that rail, the The fact that i needed it to be that low, and the transmission tunnel was so intrusive meant that the rail would have to move from the right end of the bracket to more of a center position, i was sure this is also how original ZJ seats worked too so i knew it could be done, but i don't have a sheet-metal stamping machine, just a welder and cutt-off wheels, to i would have to be a lot more tricky. I removed as much surface rust as i could with a wire wheel before measuring an inch up from the rotating tube that gave the seat the ability to adjust it's height, and then after banging on one side of it to make it curve a little bit inwards to fit better over the round tube, i tacked in a one inch square pipe to have something to welt the rail back onto inside the bracket. Here's the pilot's bracket with both extensions tacked onto, the rear one i left it a little taller for a reason which i don't remember, but i made sure everything was square and level at every step of the way, this was crucial, since a wrong angle or a n erroneous measurement could mean an entirely unworkable product in the end, at least to the standards that i wanted it to. Of course, having used a wire wheel on it meant that i also needed to prime and paint it before too long, i hate rust with a passion and destroying it makes me feel good! here you can see the bracket's bracket that i was telling you about, the one i replaced the rivets with bolts and nuts of before, it was a little rusty too, so i made sure to stop that with this nice coat of paint. Though, this coat of paint didn't come before i welded the rail back onto the seat's bracket again, though this time much, much closer to the left side than the right! I wanted it to remain as close to it's original position as possible, so i only pushed as far to the left as i needed, though that was still quite a bunch... All of this for a little clearance... as you can see the adjuster bar still needed a little trim before it could be welded back together, so that's what i did next, i found a thick nail that fit almost perfectly inside the hollow tube that the adjustment bar is made of and then welded them together, then painted that too. trust me, it's way sturdier now than what it used to be before, you can feel it somehow ahaha!

-
Man i don't know about that, considering the absolute gems and treasures some people here have, plus my pile of rust hasn't started in three years and is still on jack stands currently, but i appreciate the sentiment a lot!! <3 It's getting there, though!
-
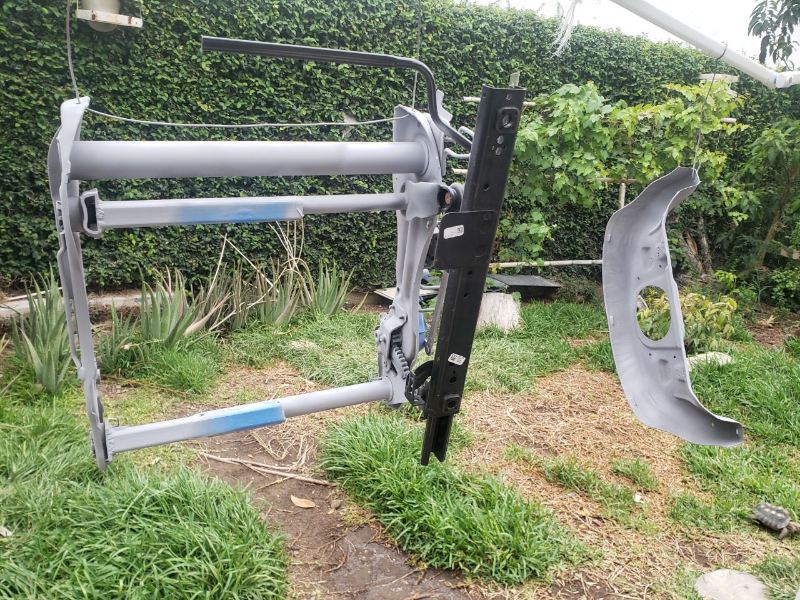
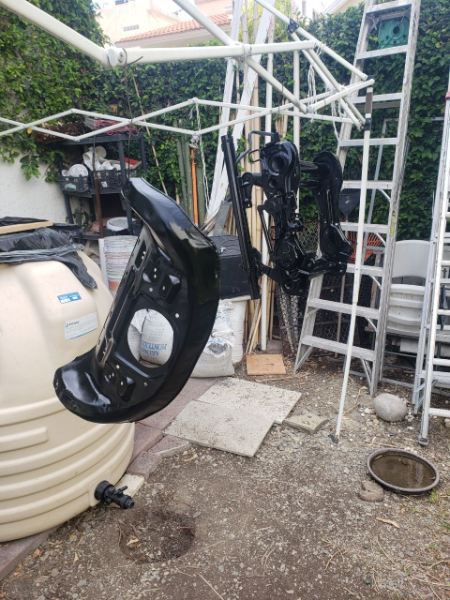
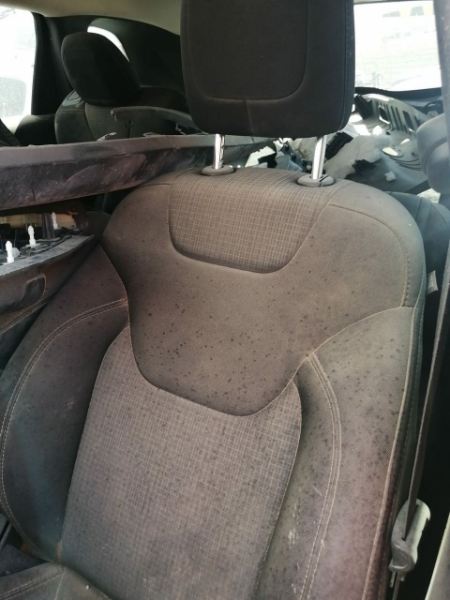
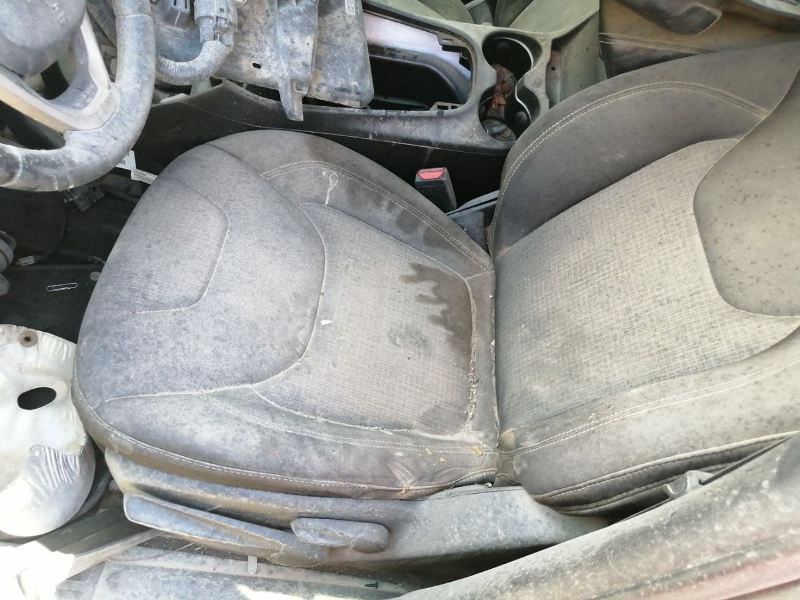
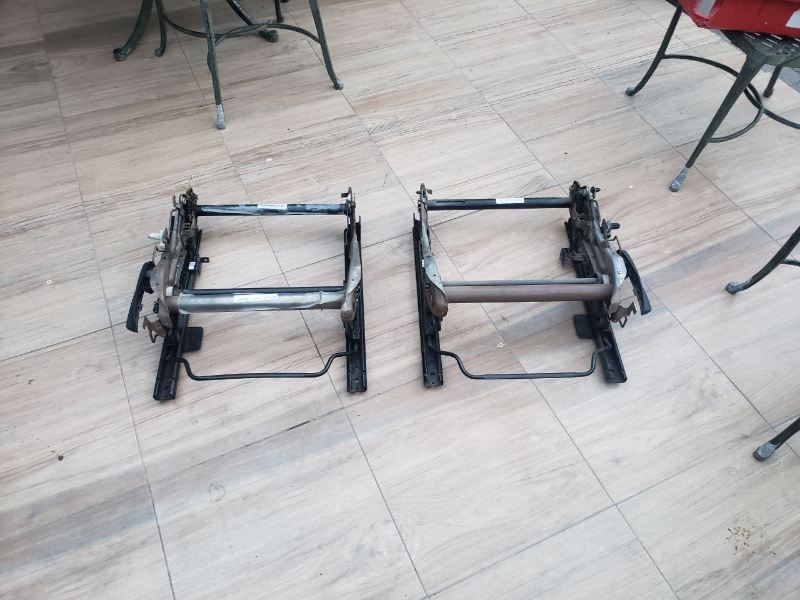
SO what makes a man want to do do this? having a destroyed bench seat, for once, a preference for bucket seats is a second and a desire to actually fit in your tiny truck while still being 6'2" was probably the reason that tipped things for me into pulling this trigger, i decided to do this job once and do it well so i probably made them way sturdier than what i needed to but i wanted to not have even a chance of worrying about this ever again. So i found these seats in marketplace while searching for "cherokee spare parts", and since KL's and XJ's both share the same name i was getting as many results for one as i was getting from the other, but these were all the way over in ciudad juarez, they were not torn, bags didn't go off, they were fabric which is a plus when you live in a perpetual desert like me and they were also manual which was exactly what i wanted since i'm not in any way shape or form good with wiring, and the least of it i have to do the better, they were also cheap and i had a way to bring them over from Juarez to Monterrey easily. They were cheap for a reason though, the weight in dirt and grime on them was almost as much as the seats themselves. Behold, my dirty seats! I cleaned them up as best i could as soon as i got them and then began to tear them down entirely, i wanted just the brackets to work with them easier and to make those fit in the truck by themselves before i built the seats back up And here they were, in my back yard as i got them off the delivery truck! i specially like the passenger seat because it can fold completely forwards, and has a special hidey hole to put you cocai-... uuuh.. Alcoh-... no, not that either... Aaah.. morally debatable substances and high speed lead projectors! Yes! sure enough after a few hours i had the bases buck naked, making sure to take as many pictures as i could of the disassembly process as i went through both! It did take a good while but i was left with this in the end! NOTE! the driver's side bracket had a bracket on it held by rivets that i decided to take out to clean off it's rust and paint, i did so by drilling those out and then replacing them with nuts and bolts. Them's the rivets... And those would be the bolts once the build was complete!

.jpg.d2e7ec172706bf9a57718388ddc67209.jpg)
-
It's Been a little over two years now since i last posted in this thread, i was hoping it wouldn't be my case as it often is with these old trucks, but i apparently became one of the many others in here who's project had to pause for a good while because like kept getting in the way in the most annoying ways, admittedly this hasn't gotten the progress i've wanted it to have but that doesn't mean that it's gotten no progress at all! There has been, in fact quite a lot done to the old truck, though mostly in the interior of it rather than anything else which is fitting cause adapting the gauge cluster to my old truck is where we left off from! man, looking at those pictures makes me nostalgic... the leaves that you can see on the background littering over the floor were made by trees that died a year ago due to a severe drought, and even that seems so distant already. I guess a good place to start posting back in here would be to the most major and significant modification to the interior i've made since we've last seen each other which would definitely be me somehow managing to fit a pair of front Jeep KL seats from 2016 into the interior of a 1988 Jeep MJ! lemme tell ya, it wasn't easy, but it sure was quite fun! I'll explain how i managed to pull this off in my next post, but if you're looking for tips and tricks on how to do this make sure to also read @boxyjeep 's build thread here! Since he managed to pull this stunt off as well!

-

Can someone make a pattern of headliner board
Skylynx replied to fiddlermj's topic in MJ Tech: Modification and Repairs
i'm actually about to tackle that project here in a week or two when i have to tear the interior apart again to fit in the new AC box, i already have the cardboard template on the roof and i think i did a decent job at it, no pictures for now but i'll have measurements of it for you soon i hope. but as i said it'll have to be next week at least since i'll be too busy being drunk in Puerto Vallarta until Monday when i come back and start tackling that stuff. -
Well, that's a sad way to end my day, his tips helped me immensely and still do with my project, i hope Cruiser's family can mourn him in the way they need to and that he's at peace... so long, Sir. i never met you and you didn't knew me... but me and many, many other owe you so much. o7
-
I adapted some 2016 KL seats on my comanche and i'll tell you right away that it's quite a labor intensive thing, it took me about 40 to 50 hours of work to make them fit, and i had to permanently modify both the seats and the floor of the truck for them to be an option. They're absolutely GREAT to have if you want them to fit, but you must REALLY want them to fit to actually make them fit.
-
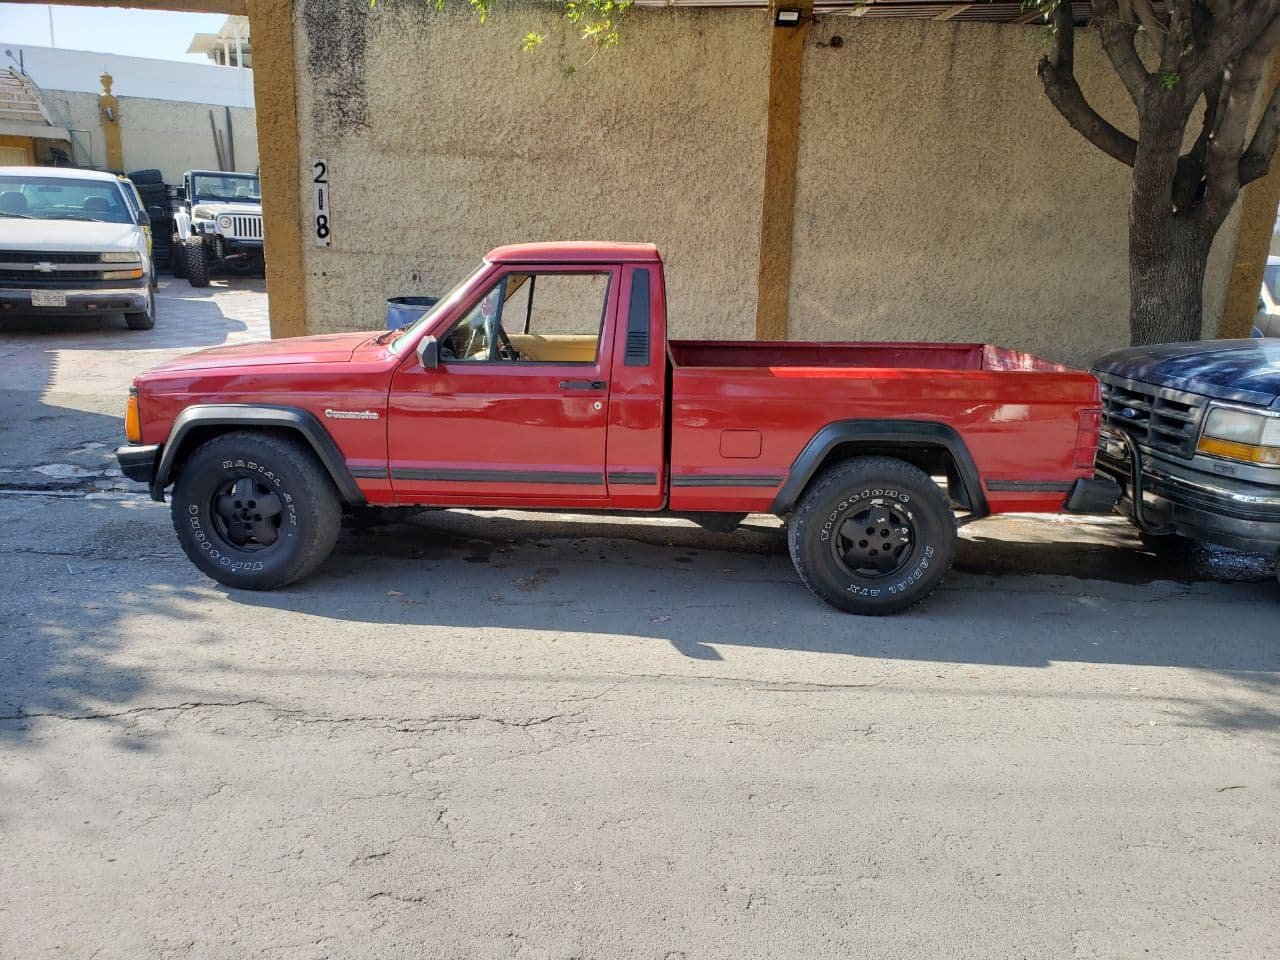
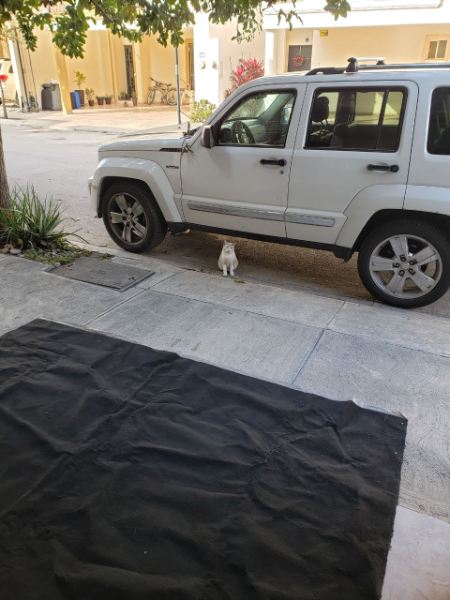
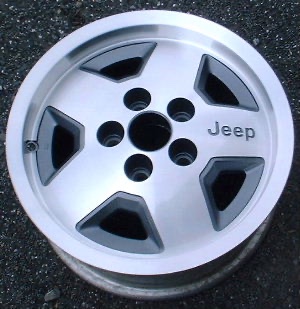
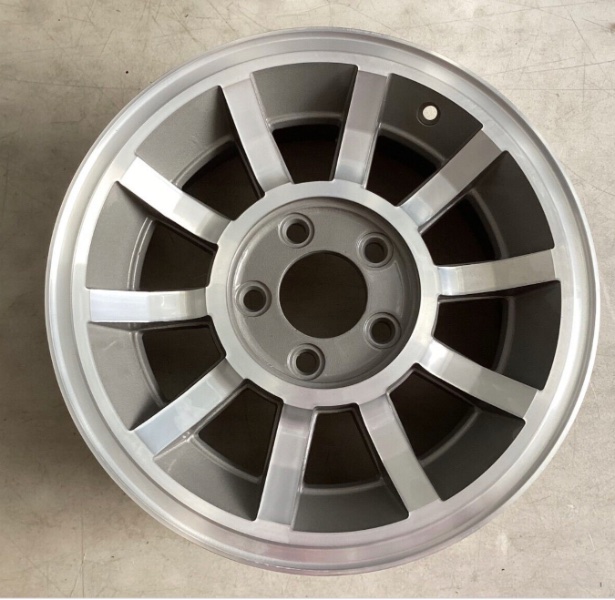
Hey there! I recently bought this kit and it’s on it’s way to me, but this is the first time reading that it could have clearance issues with some 15 inch wheels, i have access to two sets of 15 inch wheels, the ten spoke turbines and the 5 spoke ones in this pic, did you try either of these on your kit? Did they rub? Kind of worries i may need to start looking for another set of wheels here… Also, where in the wheel was the caliper rubbing? The i’m guessing it was at the front but maybe it could be the back of the caliper as well, do you think the rubbing on those wheels could be fixed with a small spacer? I really don’t want to have to get another set of wheels, these two are the only OEM ones that i like how they look! These two pics are the sets of wheels that i have.
-
New Injectors issues. (Maybe?)
Skylynx replied to Skylynx's topic in MJ Tech: Modification and Repairs
Nope, perfectly straight and functional as far as i can see -
New Injectors issues. (Maybe?)
Skylynx replied to Skylynx's topic in MJ Tech: Modification and Repairs
And that's where i think i'm running into issues honestly, cause my injectors move up and down super easily with just a tiny bit of force and one of the more than 10 PO's this truck has had in Mexico alone made sure to make those clips disappear, i just don't have them. Does anyone have a part number for them? i try to buy new instead of going junkyard hopping if i can -
New Injectors issues. (Maybe?)
Skylynx replied to Skylynx's topic in MJ Tech: Modification and Repairs
this relaxes me greatly, actually! Thank you! i'll try them on like this and if i have issues later i'll try and modify the rail's bases, i'll be back to this thread to update it when i get some time with them like yours are -
New Injectors issues. (Maybe?)
Skylynx replied to Skylynx's topic in MJ Tech: Modification and Repairs
Just tried that too, the holes in the base of the rail still doesn't align with the holes to be bolted down, and when pushed back to align it loosens the grip it's got on the injectors... Same story. I think i might need to modify the bases a little, either drill new holes in order to push the rail forward or somehow making the bases sit lower onto the intake, still undecided on what to do... -
New Injectors issues. (Maybe?)
Skylynx replied to Skylynx's topic in MJ Tech: Modification and Repairs
Here’s a side by side with one of the new and the old injectors, the old ones are about a milimiter or two bigger, but it shouldn’t account for this much of a difference I don’t think?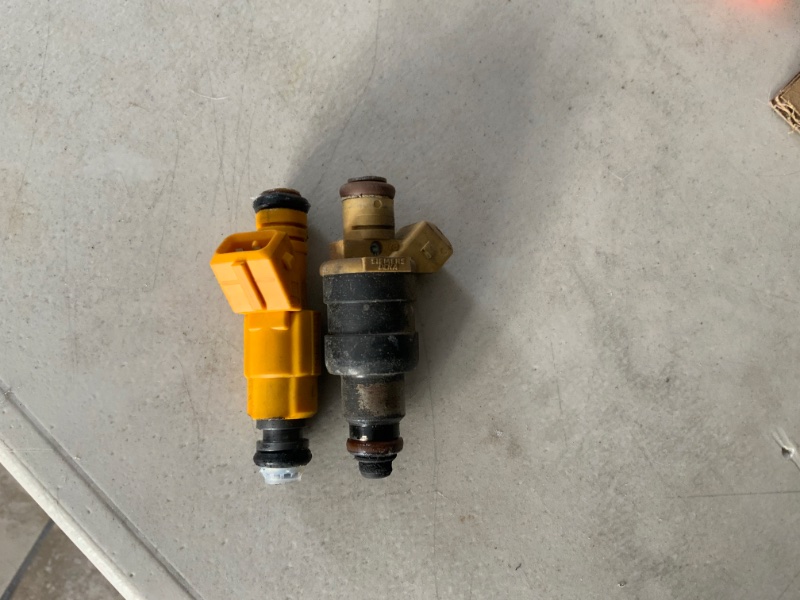
-
New Injectors issues. (Maybe?)
Skylynx replied to Skylynx's topic in MJ Tech: Modification and Repairs
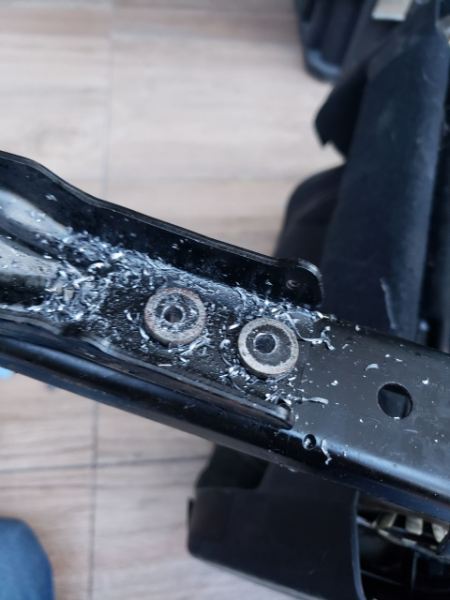
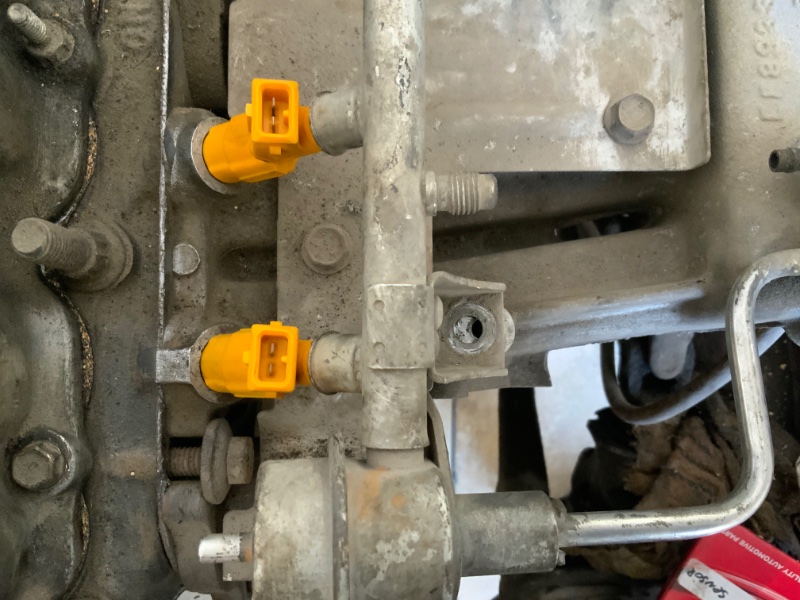
Here is them with the fuel ral being loose and then pushed down to mesh with the injectors well, the rail’s bases get pushed forward and no longer align well with the holes, so when you tighten the bolts to hold them down it gets pulled back and off the injectors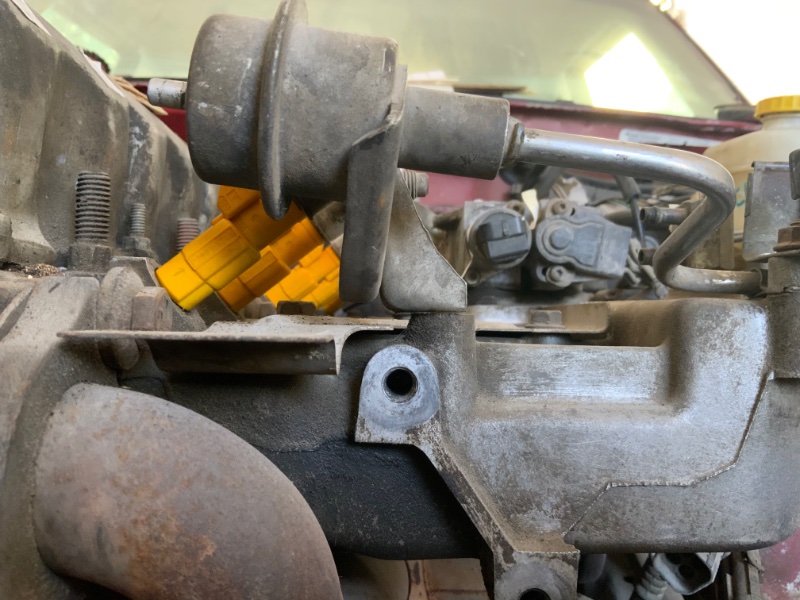
-
New Injectors issues. (Maybe?)
Skylynx replied to Skylynx's topic in MJ Tech: Modification and Repairs
Oh yeah, the rial is clean and cleared of anything the old injectors left behind i made sure of that, and if the bolts that hold the rail down to the intake are off i can make the rail sit down onto the injectors perfectly on both sides, the problem comes when i try to tighten them down to secure the rail, it starts to move back and “sit upright” and pulling away from the injectors -
New Injectors issues. (Maybe?)
Skylynx replied to Skylynx's topic in MJ Tech: Modification and Repairs
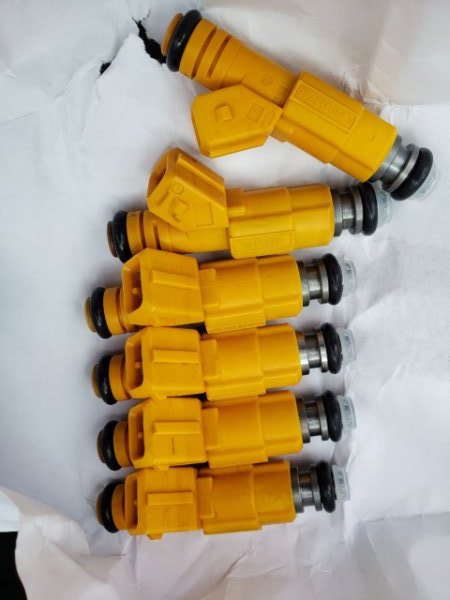
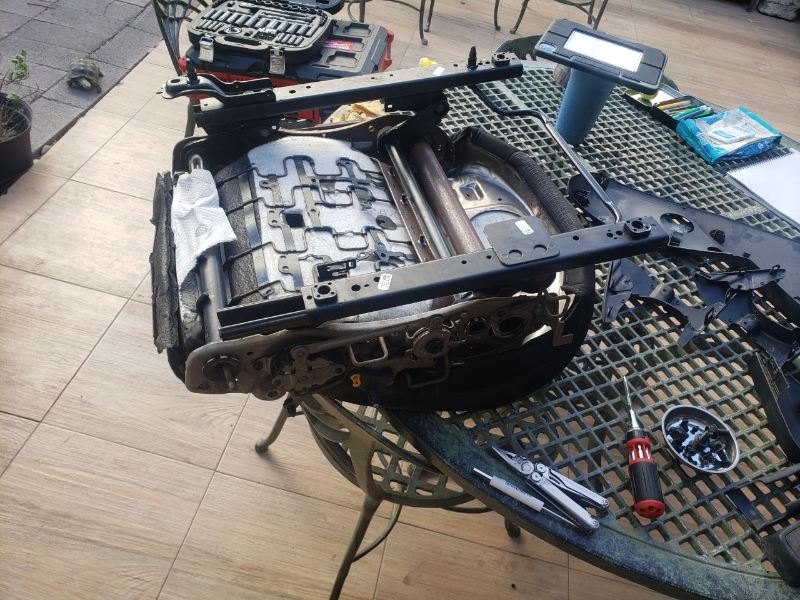
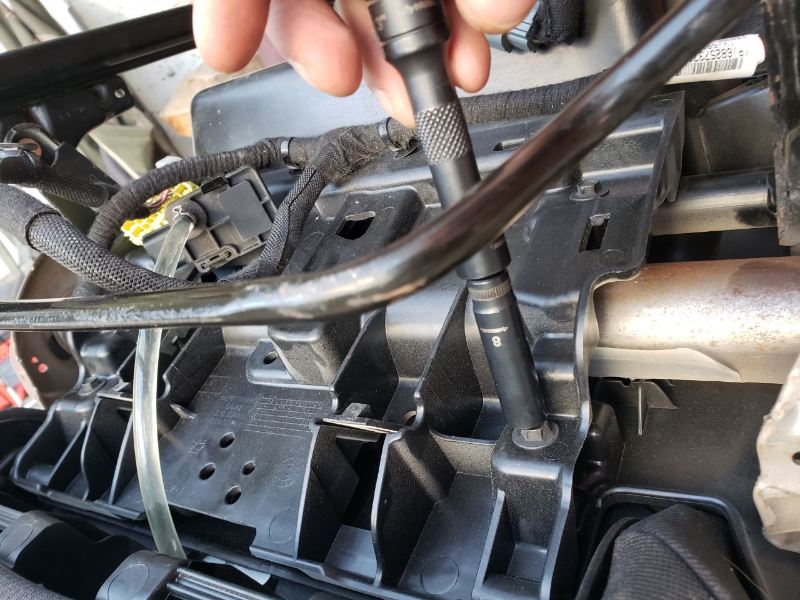
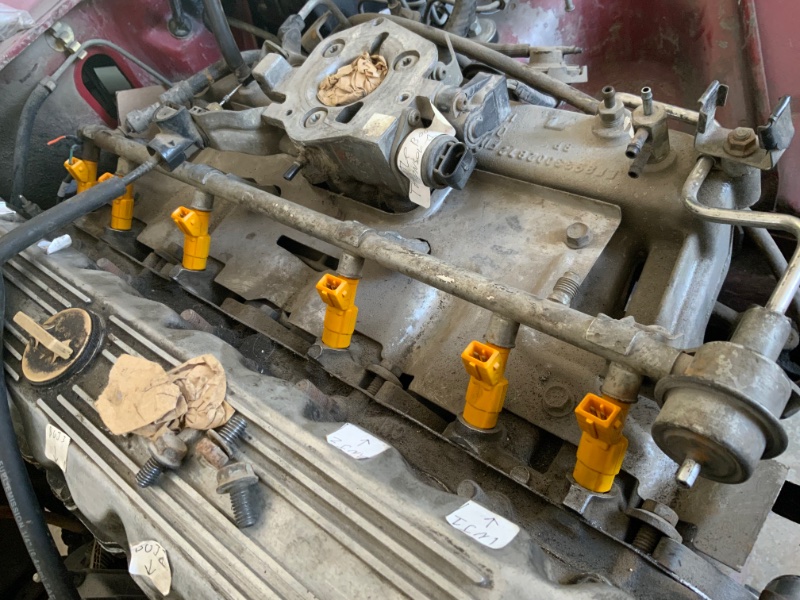
Today i installed them on the truck, i took the fuel rail off the truck, cleaned it and then added vaseline to the o rings on both sides to make them slip into their holes easier on both sides, so far so good! The "problem" i'm running into now is that they don't appear to be long enough for the fuel rail to properly grab them once i put the bolts onto the fuel rail supports again, in this next picture you can see the first injector in the frame being pushed as far as it'd go into the fuel rail, leaving a gap in between the injector and the engine below, the next injector further down the picture is pushed as far as it'll go into the engine, making it so that there's only a few millimeters of that upper O-ring to sit inside the cap. I've still got some time to work on some other things in the truck, so i have time to figure this out i think, and for now i've pushed all the injectors as far as they'd go into the engine, figuring if any gap is there to exist it best be on the side of the rail and not because the injector is not sitting properly inside the block, but they move up and down super easily and i suspect just driving vibrations will knock them loose bouncing up and down, let alone let thek keep a good seal on the fuel The fuel rail is sitting way too tall and to the back, what should i do? should i modify my rail in any way? and if so, how? has anyone ran into this same "problem?" Is it even a problem at all or am i just over thinking things?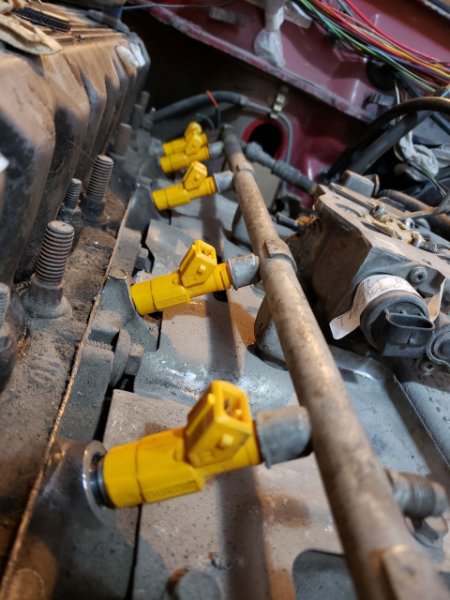
-
I'm in the process on finally putting my truck back together in the best way that i can, and while doing research here and in other sites it was pretty ovbious that the best injectors for my renix 'manche would be the 4 hole Bosch 0280155746, testimonies vary from moderate to drastic but they all agreed that these things were an improvement, so last year i ordered a set of 6 of them from ebay.