


coolwind57
-
Posts
992 -
Joined
-
Last visited
-
Days Won
6
Content Type
Profiles
Forums
Gallery
Everything posted by coolwind57
-
I went oval rearward. I think I read that somewhere is why I did it that way.
-

Quick upgraded oil filter nipple question...
coolwind57 replied to coolwind57's topic in MJ Tech: Modification and Repairs
You're thinking that even as oil pressure begins as the engine starts, that the filter will not fill up completely? -
MJ Load Sensing Valve Delete Procedure
coolwind57 replied to HOrnbrod's topic in MJ Tech: Modification and Repairs
Looks like it. I'll crawl under there tomorrow and see. -
map sensor throttle body connection on renix
coolwind57 replied to dkmcgowan's topic in MJ Tech: Modification and Repairs
I had read this prior to my working on it. Instead of tapping and inserting a fitting, I chose the quicker route of retaining the rectangular rubber TB insert and just ran my copper tubing directly into it (via the lower opening). I'll likely do your technique when I have more time to remove and clean up my throttle body real good. So, I suppose what I didn't know is that although that rectangular rubber insert in which the tubing inserts, does have a hole all the way through it, the metal behind it does not. Sound correct? -
Last night, I upgraded my valve cover gasket to the awesome and expensive FELPRO PermaDry blue gasket. Hoping to dry up the side of my engine now. Today, was the appointed day for my first oil change. I went ahead and upgraded my oil filter nipple with the Mopar 3/4"X16 nipple that I bought from a Jeep dealer. Removal of the old nipple required a looong 22mm deep well socket and took a huge amount of force to break that baby loose. The main purpose I chose to do this is that it would allow for the use of future, more common-more easily sourced oil filters. My choice of filter was the massive WIX 51773. I read several opinions on using oversized filters and I'm comfortable with my decision. Some guys go ballistic with their opinions but I have not yet found one comment of anyone blowing up their Jeep by using them. I figured the extra oil capacity in the engine might be a good thing. Check out these pics of this monster: And finally, I fixed a major drivability issue that I was experiencing on the way to work this morning. Last night, while installing the FELPRO valve cover gasket, I snapped the all-too-brittle MAP Sensor Vacuum line in two different places. I tried taping and using silicone caulking in vain. So today, I replaced the plastic line with copper tubing. I saw that some guys were using 3/16" steel brake lines, but you pretty-much have to use a tubing bender to make that work. My soft copper worked perfectly for me and I easily made my bends by hand.
.thumb.jpg.dc83b4564ebc55a15da5d4525bb1136a.jpg)
.thumb.jpg.32382c64b75a7590750641ece2f054ed.jpg)
.thumb.jpg.23c1a9d588bcf3904a736d70b0285871.jpg)
.thumb.jpg.69e44aeaeaf1ea1824ec22becef54ee2.jpg)
-
map sensor throttle body connection on renix
coolwind57 replied to dkmcgowan's topic in MJ Tech: Modification and Repairs
Today, I replaced my MAP vacuum line with copper tubing, as you see in the pic below. Reviving an old topic here, but I noticed this: and this: Fellas, my top orifice is indeed open. I know this because I removed the rectangular block that the vacuum tubing inserts into. Both holes are wide open; neither are plugged. I did temporarily plug the top hole with my finger just to see if it affected idle, but I noticed no difference. Probably should plug it, right?.thumb.jpg.5fbe05bbb4a0be55e123c2c808e94b93.jpg)
-
Quick upgraded oil filter nipple question...
coolwind57 replied to coolwind57's topic in MJ Tech: Modification and Repairs
Cool, I kinda assumed this was the case, but was a bit concerned about the length of the old pipe nipple and its functional relationship with my much taller WIX 51173 oil filter. You horizontal filter guys probably can't fit the 51173 filter can you? This sucker is massive! Just did my first oil change. To the fill mark, it took 7 quarts!.thumb.jpg.25740c6f79b3fc3bf443e7d68619ea15.jpg)
.thumb.jpg.926d61bcc401bb6ec64ea11a25144707.jpg)
-
Was wanting to replace my oil filter nipple with the non-metric nipple today. Pulled the filter off to find a very long tube coming up from the old metric nipple. I did get the Mopar 3/4X 16 SAE nipple earlier, so I was expecting a like-looking metric nipple. Am I missing something here...should I be concerned about losing the elongated pipe nipple and going with the much shorter SAE nipple--especially since I plan on using the very-much-taller 6.93" WIX 51773 oil filter? Check that sucker out below. I'm off to buy a (very) deep well socket to get this sucker off now, I suppose. I think I read somewhere the old one is a 22mm.
.thumb.jpg.2102740b94638757c711f4a4bb26d41f.jpg)
-
MJ Load Sensing Valve Delete Procedure
coolwind57 replied to HOrnbrod's topic in MJ Tech: Modification and Repairs
Awesome. Do you have an "AFTER" photo yet? -
Just did my floors last week. I used ChassisSaver followed by rattlecan spray bedliner on new and old sheet metal. For interior, I then used that duct wrap product from Home Depot. Ran me $18.77 each and I used two rolls. This is the self-adhesive foil/foam stuff. I think this is it: https://www.homedepot.com/p/E-O-12-in-x-15-ft-Self-Stick-Foam-Foil-Duct-Insulation-FV516/100028603 I feel good about my chosen solution.
-
Now that my wife knows what a "redneck' is (she just arrived in the Country last year), she believes that the truck's looks are the epitome of that term. She has a more "refined" type of taste, you see. As for the lift in the rear, I think the PO placed an Add-A-Leaf in between the overload and the rest of the spring pack. With my measurements and advice from this forum, I'm showing only about an inch of lift in the rear. About 2-1/2" up front. I am still running the original Spring-Under-Axle, SUA. Not exactly a direct bolt-on. There is a bit of trimming involved. The LCA bushings have a slightly longer metal bolt channel (?) that I had to cut down in order to fit in the frame buckets and axle attachments. The UCAs required some trimming of the attachment buckets on both ends. I did a little trimming of the arms themselves, but it was very minor. I got my direction from the forum as there's lots of information with pics here to help guide you. Have your angle-grinder with cut-off wheel handy. It really wasn't that big of a deal. Getting the dang arms centered to where the bolts fit back in was often times a BEAR. Two times, I had to use a come-a-long to pull the axle rearward and bottle jacks to push the axle at required angles. That was the toughest part. I certainly had to use some patience and creativity to get them bolts in at times. I'm still unsure of the diameter of my sway bar. I picked this one up from a junkyard XJ and I chose it because it simply was bigger than my MJ bar. I recall it was likely from just a regular ol' XJ...not sure if it was an UpCountry or not. As I had said earlier, I bought Moog K80035 end links, designed for the rear of F-350 trucks from Rock Auto. I nailed a great clearance price of $6.42 each. This added another 1" or so of height to better clear my coil springs. Yes, I've very satisfied with the new ride quality.
-
Here's some pics of what I'd been doing these past couple of weeks for my front suspension. I put in brand new WJ Upper and Lower Control Arms. I found good prices online and went for it. My old, original Lower Control Arms (LCAs) had some pretty wallowed-out bolt holes, so the new WJs HAD to be a big improvement. My original Upper Control Arms (UCAs) looked to be in pretty good shape. The bolt holes weren't so wallowed out and the rubber bushing, although surface cracked appeared to be pretty-dang good. After 28-years, they were not toast. Of course, I had bought UCAs, so I proceeded with replacing them. There's lots of post describing how to do the slight modifications to make these much stronger arms work in our MJs (or XJs). it is quite amazing when you compare the parts side by side. The MJ/XJ arms flex when you twist them. These WJs do not. Notice that my tires are still making a bit of contact on that LCA on really harsh turning (the Wife). Believe me, it is MUCH better than the original as far as tire contact. I don't even feel it now. And the passenger side: I had also replaced my track bar with new and I have a larger anti-sway bar (from a junkyard XJ) with new Ford F-350 rear end links that I installed for added end link height. Followed this all up with a machine front-end alignment and it feels like a different truck now.
(768x1024).thumb.jpg.289c2f3b64ee61b7c7caecc16afe231e.jpg)
(768x1024).thumb.jpg.4d90b2bbad3e227b107b445d78364d99.jpg)
-
Here'a a quick shot of my MJ I took a few weeks ago. As I had mentioned, it is a low-mileage truck and the body panels and frame are in good shape, which was the big appeal to me. I dislike the rattle-can camo paint job and my wife REALLY hates it. But, as I had mentioned above, the plan is to strip it down and spray it with primer this Fall/Winter and maybe Monstaliner it in the Spring. I'm thinking Olive Drab. I saw a couple of examples of Olive Drab with retro military white stars on the doors and thought that was cool I may do that. The original PO had the truck lifted. The 2nd PO had no clue about the truck and only had it for a year or so. I'm the third owner. Based upon measurements taken from advice here on the forum, I think I'm running 2-1/2" lift up front and 1" lift on the back. You're looking at 31X10.5R15 mud tires there in the pic.
.thumb.jpg.2cd88d60b30c26d9f7faeaed2e1061aa.jpg)
-
Its not a bumper. Its a brush guard. If it came from an Cherokee XJ, then it should work just fine on an MJ. Wish it was available for $50 in my neck of the woods.
-
Worked like a charm, thanks! Spent 12-bucks and 10-minutes and Its a done deal. Sometimes one cannot see the trees from the forest.
-
I swapped to XJ bar a few weeks ago. I am assuming it's a 26mm, but I have not measured it. It came from a common XJ, and it is noticeably larger diameter than what I had on my MJ. That was good enough for me. My original rubber bushings were in good shape--better than the ones coming off the XJ and I was able to reuse them until I had more time to research my new size and buy new poly bushings later. Same experience here. I assumeded it was going to be much simpler, but AutoZone made me realize that I had to take more time to find out exactly what I have now. Next time I'm at Harbor Freight, I'll buy myself a caliper to measure. Speaking of front sway bars, I have two stripped-out bolt holes on the passenger side where the bar bolts to the rail. I had performed a swap recently to a larger diameter bar and the original bolts gave me fits during removal. Good grief, am I going to have to remove the front bumper to get a nut inside the rail to securely fasten these bushing brackets? Looks like I can have nearly full access from the open (front) end of the frame rail. Any tricks or hacks other than drilling out and retapping? (already tried that--failed miserably) Looks like maybe Jeep welded in nuts but I may be wrong.
-
Little over an hour from me. Seems like a good deal to me on some good, commonly-seeked out parts. https://evansville.craigslist.org/pts/d/jeep-parts/6336188187.html
-
Ok, so I've had my MJ for a couple of Months now. PO had put 31s mud tires on with a mild lift. Anyhow, for like the first 2-3 weeks I kept hearing mini explosions going on under my truck just as I left my driveway and begun to acquire speed on hardtop. I scratched my head during this time to figure out what the heck was causing this. Here's what is happening: Gravel easily gets stuck in my MT tires. Once I build up speed on hardtop, a piece of gravel gets dislodged and freakin' crashes inside the wheel wells and also, all-to-often, into my brittle plastic inner fenders. My inner fenders are absolutely trashed now. This has affected front inner fenders only. The wife and I laugh now when we occasionally hear this happening-- thinking of how it had me perplexed in the past. Time to get new inner fenders I suppose. I hope new ones are not so dang fragile and if so, I will have to think of how I can better prevent breaking them so easily. Thought I'd share in case another newby is also in the early days of head scratching over this alarming sound.
-
Death wobble is getting old
coolwind57 replied to creep_in_the_jeep's topic in MJ Tech: Modification and Repairs
HOrnbrod, did you marry a Pinay? My newlywed wife is from Mindanao. I will share a recent experience I had on the death wobble or shimmy conversation. I've had nearly all of my steering components replaced these past few weeks, culminating in a machine front end alignment. I still had some occasional shimmy and a bit of pull to the right, even after the alignment. Didn't seem to be all the time, which was aggravating. Somewhere during the component upgrades, I had put new front pads on my brakes. For the next week or so, I kept smelling brakes so I eventually pulled my pistons out of the calipers and cleaned them up, assuming the rust on the metal pistons were causing it from retracting fully away from the rotors when I took my foot off the brake pedal. I continued to smell the odor and at the same time fight shimmy and slight pulling. Long story short, I went ahead and replaced my rotors, along with new calipers. BAM! Fixed my brake problem AND now all shimmying and steering pull is magically gone. They were not retracting fully, causing my steering issues. I recommend one checks his brakes when you've gone through all the other steps in trying to correct less than ideal steering. -
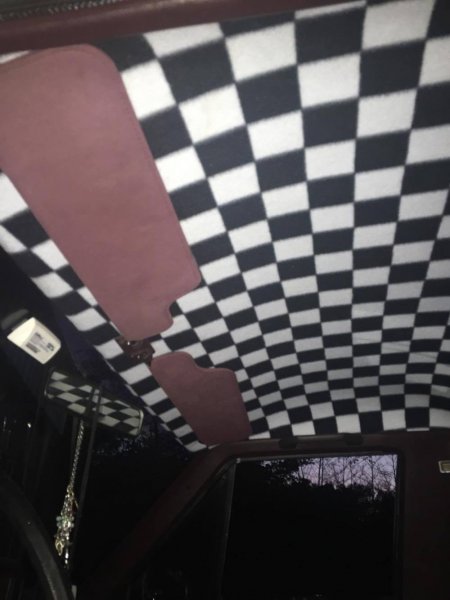
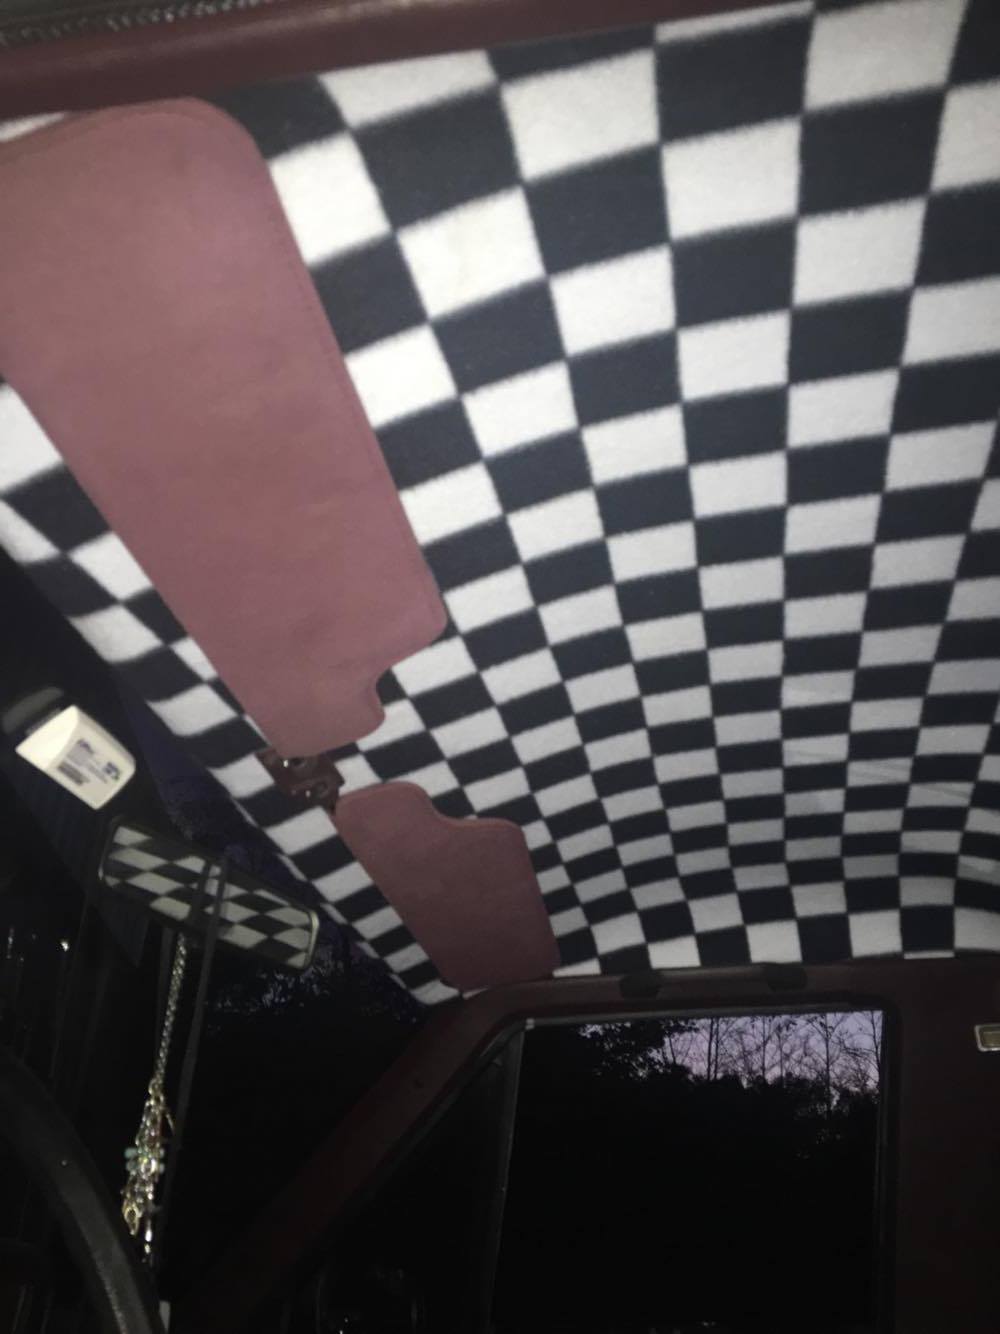
Here's a shot of my headliner I put in last Month. The original was hanging down and looked terrible. I picked up this material in a fabric store. I'm not like sheep, and I gotta have something different from everyone else. I just couldn't go with plain ol red. Saw this fabric and knew this was the one. It is a fleece. My wife's friend asked if this fleece material was going to make my truck hot. I got a good laugh out of that. Thought I'd like the contrast, so I kept the visors as they were. A bristle brush, some 3M spray adhesive and some patience is all it took. I think it turned out great.
-
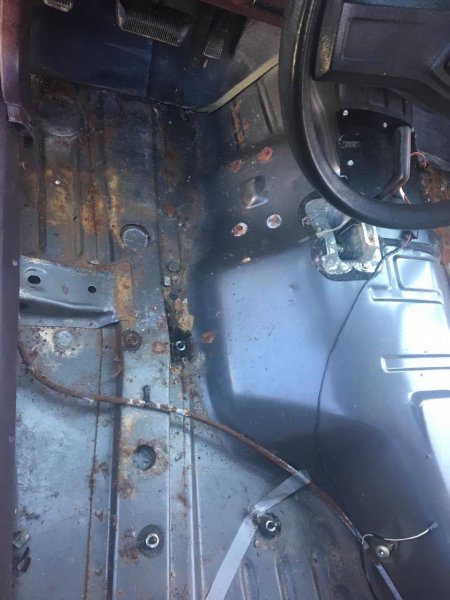
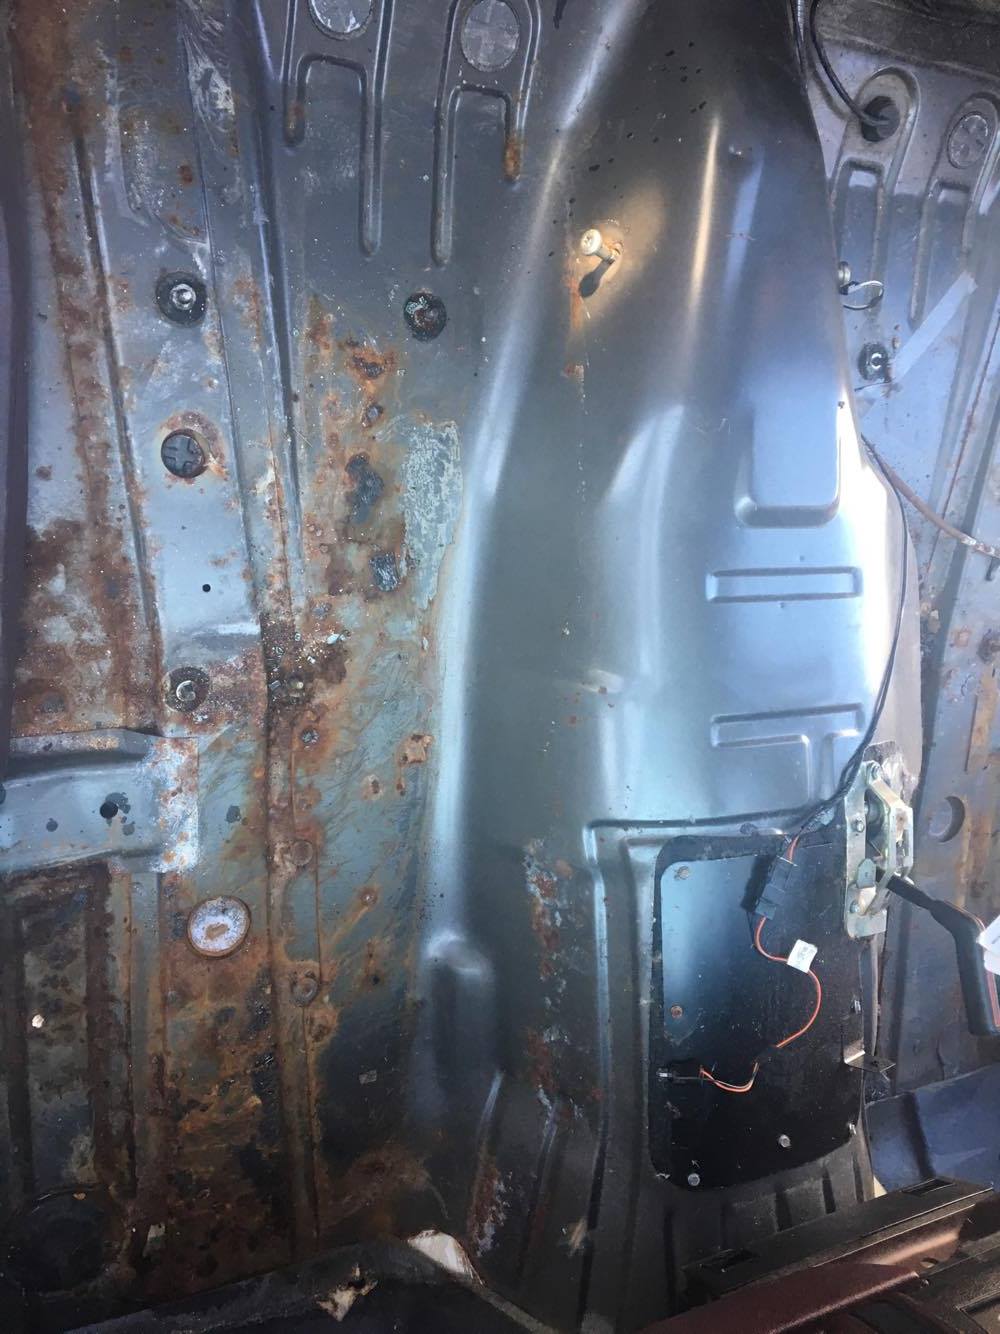
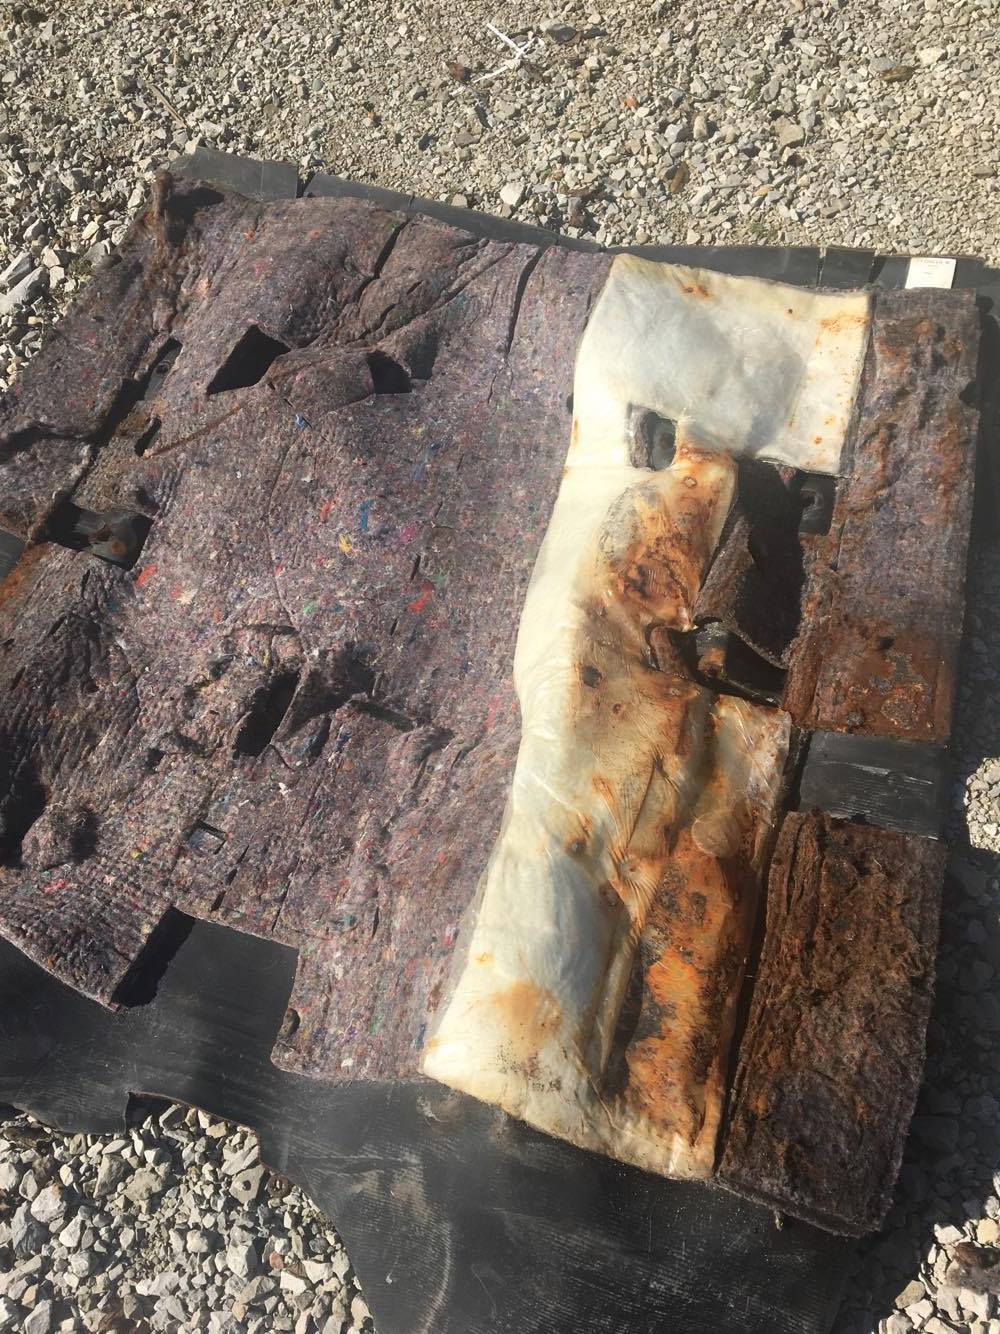
So I bought my 89 in late August 2017. I had an XJ a few years ago, and even drove one as a staff car during my USMC days. I always loved the look of these Comanches and felt strongly that one would meet my needs. Anyhow, my initial plan was to slowly restore it but my 2nd vehicle, a Mitsubishi Montero Sport gave up the ghost. So until my wife gets her driver's license, I suppose my MJ is our daily driver in the interim. She had 97K original miles on her and I just rolled over 100K on Thursday. Column shift Auto. D30/D35 4x4 Long Bed. Original color was silver but someone rattle-canned her camo, which is flaking off (thankfully). My plan is to use Monstaliner once I get the body under control. I'm hoping to have her in primer before Winter hits and maybe be afford to coat her this Spring. Lots of front end suspension/steering work done so far. This morning I put new Caliper and Rotors on. My driver's side kept sticking on me right after I replaced the pads last weekend. I pulled the piston and cleared corrosion thinking that was the cause, but no luck. It was a good thing to replace it all anyway. The rotors were really shot. I'll get some more pics on here, as I have already performed a bunch of work already. I'll list and show pics of what I had already done a bit later, but today was the dreaded pull-up-the-carpet day. Actually, I'm pretty thrilled that it wasn't worse. Man, I'd seen some horrifying pics on the forum and consider myself very lucky. I'll start with the worst side (passenger): Driver's side: I was thinking the carpet seemed much heavier that it should've been as I tugged and pulled it out. Well, check out this photo. The bagged white padding area was absolutely soaking wet inside. I can't believe it was holding what seemed like 30lbs of water! Crazy. Well, back to it. I've got some interior sanding to do now. I have my ChassisSaver ready and hope I can get it painted on and dried in time to take my hottie wife out to Harvest Homecoming Festival tonight.


-
MJ Load Sensing Valve Delete Procedure
coolwind57 replied to HOrnbrod's topic in MJ Tech: Modification and Repairs
Yep, you're right. My bad, I spoke inaccurately and poorly. What they actually appeared to have done, if I'm correct, is disconnect the sensing valve and plugged in a new metal brake line at the rear T in its place, then using the emergency circuit brake line in reverse to "return" pressure to the proportioning valve. I think that's what's going on. They thought they could just return it back instead of plugging it up or replacing the faulty height sensing valve. Regardless, its a very poor, lazy way that essentially makes a dead loop with potential problems coming sooner or later. I really need to trace and ensure the brake line coming from the HEIGHT SENSOR BRAKELINE orifice (on the diagram provided by Goose XJ88 above) is feeding the soft rear brake hose directly. I can then block off the REAR BRAKELINE orifice on the front proportioning valve and block the rear T where they had installed the new brake line you see in my photo. I will then completely cut out the brake line, REAR BRAKELINE from the truck in its entirety. When I can get to this all, I may just run brand new brake line back there, tearing all the old lines out when I remove the bed this Winter. I'm thinking I will add an adjustable proportioning valve maybe to my dash. If it works that well in real life as it seems on paper, then that would be cool. -
Front stabilizer bushing failure
coolwind57 replied to thejum57's topic in MJ Tech: Modification and Repairs
Absolutely perfect plan would be to park it till you get your new end links installed, I can't disagree with that. As for me, I respectfully listen to the opinions of others, such as those expressing theirs that driving without a sway bar is a gamble. To some, it can be seen as absolutely insanity. I see risks and I weight them. In my day or two of driving without a sway bar, I knew it was not ideal and I had considered that there were perhaps risks. But after trucking along for a while, I honestly didn't feel as if I was driving a poison vehicle made of nitro glycerin either. I believe continuing to drive your truck as we see in the picture may have another risk for you to consider as well. You may have issues with that one attached end-link side bearing down with forces while the other side is moving around unattached, possible catching or shoving the end link into the coil spring or tire or something. Man, who knows what is going on under there, with turning, swerving and pot holes. Of course, you'd also certainly need to prepare yourself for a possible different feel than what you're used to on turns and banks. If you make the decision to drive your truck--still as we see it in your picture, then i might suggest that you remove both end links untill you get new ones on. Again, the "book", better route would be to park it and drive something else till its fixed. I made the decision to drive my truck for a couple of days with my sway bar assembly (bar/end-links) removed as I awaited my parts to come in. My decision was based mostly on my 2nd vehicle was down and I had no other vehicle to get to work. I know my route to work, the turns, the distance, the traffic and I made my call. As Dzimm noted, I also hardly noticed any difference at all, but let me assure you that I was much more cautious as I felt it was less than ideal, especially since I am 2" lifted. Take mine and Dzimm's opinions as you see fit. They're just our opinions based on our experiences and you have a few different opinions here to choose from. Feeling a least bit funny about this, then you'll likely decide to "go by the book." That rarely hurts. -
MJ Load Sensing Valve Delete Procedure
coolwind57 replied to HOrnbrod's topic in MJ Tech: Modification and Repairs
Currently working on other projects for my MJ, but I couldn't resist inspecting my rear brake system. Check out this Load Sensing Valve Delete the PO performed: Load sensing valve body is still installed on the truck though not connected to diff cover. Looks like they just disconnected the old line from it and let it hang in the breeze. Then ran a new solid line from top manifold straight back up front, looping a return back up front. What gets me, is that PO just installed a brand new brake booster with master cylinder like 5-months before I bought the truck. Man, that would had been so cool if he wouild had known about the dual diaphragm upgrade. This guy had owned the truck for a year and complained about lack of good brakes to his local repair shop in town. According to him and a receipt I found, they put on brand new shoes and hardware. He complained that it didn't help, so they installed a brand new booster and master cylinder. No telling when this sensing valve "delete" was performed. I will say that my brakes are adequate...feels like old truck brakes to me. I'll find the time and money to sort this all out and upgrade maybe this Spring if she continues to hold up for me.(2).thumb.jpg.2a53985c00f058103ee2deb761fe5ff6.jpg)
.thumb.jpg.c6f7c285283a9d2172cecfc17886d80c.jpg)
-
I replaced my lower window seal (runs horizontally along the bottom of the glass) with junkyard 97+XJ seals. Much better design and cost only a couple of bucks. Takes a little trimming near the mirror, but SO worth it. As for the vertical piece that runs along the front track (separating the triangle glass and the movable window glass), I pulled out the old brittle material and replaced it with home depot flat weather stripping. Can't remember the exact size off the top of my head, but it was self adhesive and the PERFECT size. I ran it inside all three sides of the U-channel. I did only remove the old channel all the way down until about 1/4" from where it disappears inside the door. It was not brittle there and in great shape once it entered the door interior, so I cut it off there. This Home Depot weatherstrip has an adhesive back and I think the contact area where the glass is lightly ribbed. These two items are my favorite, most impressive mod so far, I love it! And cheap. Made a HUGE improvement on wind noise. All done and said, I'm probably at $15-18, both sides.
.jpg.e075bf1855af8374e175cc075e29aa3f.jpg)
.jpg.5209269407a2a10717223ea848f5a261.jpg)
.jpg.0877c6287eec5eb3c36dcb7c1edf3b41.jpg)
.jpg.5ad0c6f204be29b6f6547a17a7a2badb.jpg)
.jpg.e2b5d8a0e713ccf5346e70338069a809.jpg)
.jpg.8b20230fb1b9198182db11e3f48f1e56.jpg)
.jpg.7065cfd10d6a21d1856cc8ed10ca2614.jpg)
.jpg.f295501f946b9f5874d62d7f86c3e226.jpg)
(768x1024).jpg.115a843be48b1648df056e9e62fe1bb8.jpg)
(768x1024).jpg.a51641d4665ab14a9830b12d2dbb6f44.jpg)
.jpg.decfcada8691fff361aa00699fff63b5.jpg)

(2).jpg.0aacbe2f86d44589426d31e8e177a81e.jpg)
.jpg.ba90894b8a24948271af17a629bfeb4d.jpg)