ThatJeepGuy
-
Posts
352 -
Joined
-
Last visited
-
Days Won
2
Content Type
Profiles
Forums
Gallery
Everything posted by ThatJeepGuy
-

Jeep Comanche Behind the seat Molle Panel!
ThatJeepGuy replied to ThatJeepGuy's topic in MJ Tech: DIY Projects and Write-Ups
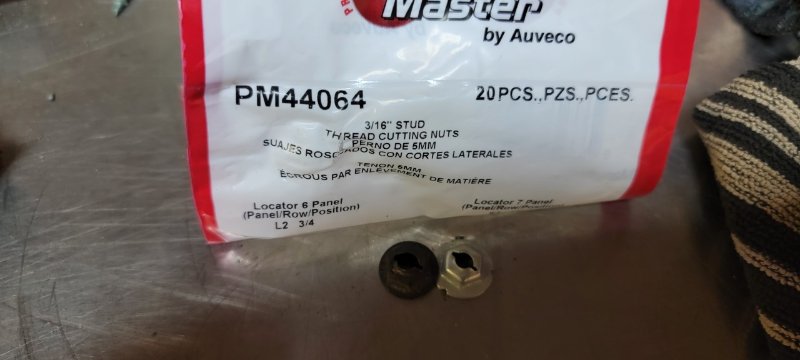
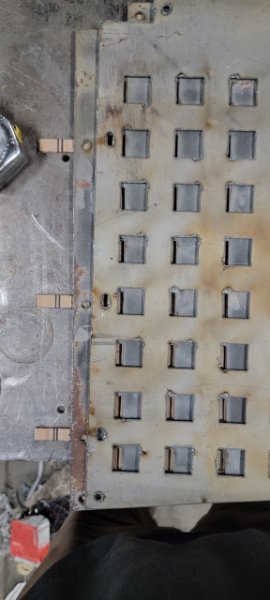
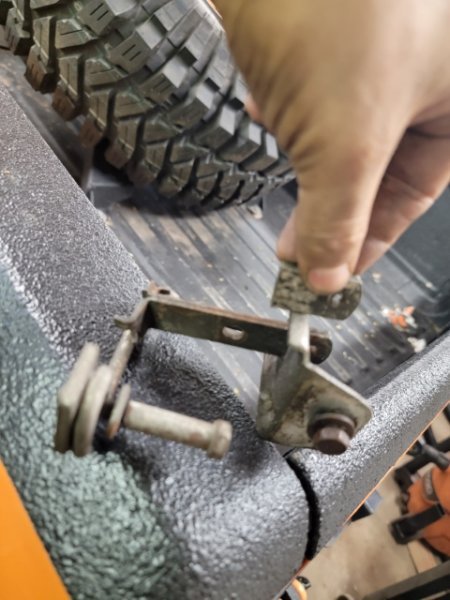
This night wasnt the most productive, mostly cleaning up the mess from all the plasma cutting and also flap disc work to the slag leftover. I did however get the correct PAL nuts for the trim studs. original stamped nut on the left and the new large surface nut on the right. I say large surface nut because the guy at the parts store made a reference to these being available as a small or large surface nut. This bag of 20 only cost me $7 and some change. Very satisfying fitment! its looking to be a bit warmer this weekend so i may get out and test mount this panel then.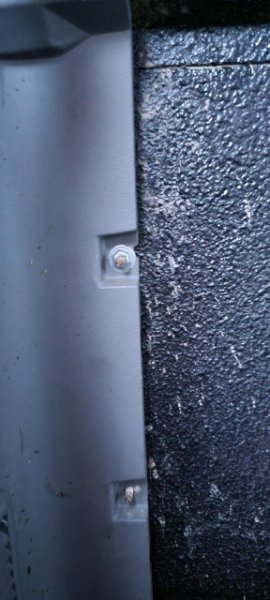
-
Thank you Yes it's slow going. I won't say I have too many jeeps... but I have a few jeep/projects and the progress is touch and go with all of them. Currently playing with design and fitment of this molle panel for the back of the cab. There is a thread in the DIY section on it for more detailed pics and progress
-
Jeep Comanche Behind the seat Molle Panel!
ThatJeepGuy replied to ThatJeepGuy's topic in MJ Tech: DIY Projects and Write-Ups
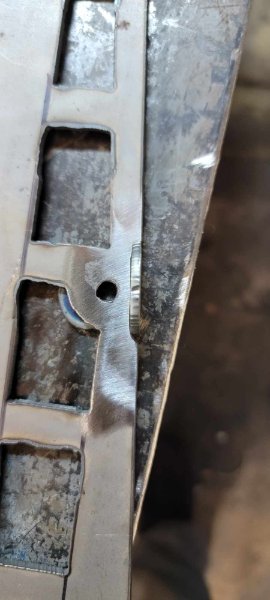
So i made a mistake, for #1 - I cut more than 1 panel without any test fitting. Now for #2 i also neglected to consciously consider looking at other molle panels AND also did not test any molle gear on my template before transferring to steel. The design behind my panel would work but is not what i had in mind. 1" x 1" squares with a 1" gap doesn't line up well with the molle gear i have on hand. This led me back to the drawing board to either modify what i have on hand or start over! Soo i decided to just knock a little more material out of my current templates. Instead of 1"x1" grid I went to 1" tall by 1.5" wide and .5" side gap. Did nothing to the 1" vertical gap. Fwiw doing this by hand with my plasma cutter wasn't terrible but its not clean soo bear with me on rough edges. Top half is with the extra material cutout and the bottom half is only drawn out for material removal. Thankfully this was a satisfying solution because the fit looks propper now. I have yet to get my hands on extra Pal nuts or the rivnut/nutsert kit i ordered so just some placement test fitting tonight. The other immediate change i decided on could go either way but when i designed the template it was intended on sitting directly on the crossmember in the cab ^as pictured above^. These bottom L tab mounts are only 1/8" thick but with if i leave this panel as is it would lift the panel that 1/8" and also make for some potential alignment issues with the Pal nuts on either side. I could either knock 1/8" of material off the entire bottom of the panel OR notch the panel enough to clear each L tab. I'm digging the notch setup! Just as soon as the extra hardware and rivnut/nutsert kit shows up I'll get to mounting this panel up good.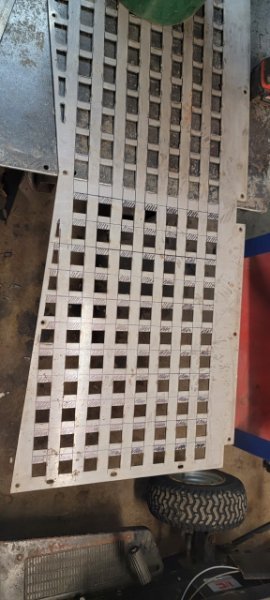
-
Jeep Comanche Behind the seat Molle Panel!
ThatJeepGuy replied to ThatJeepGuy's topic in MJ Tech: DIY Projects and Write-Ups
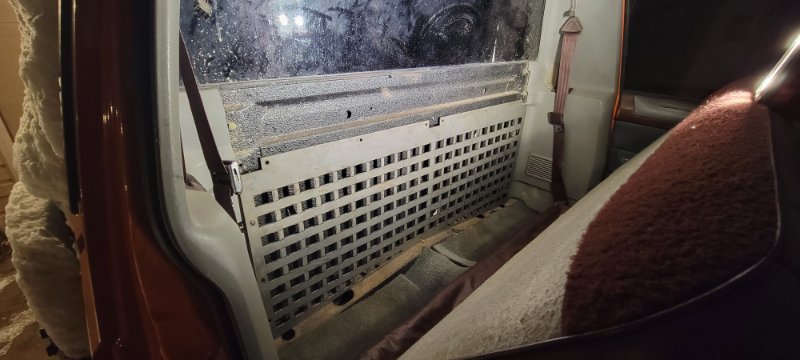
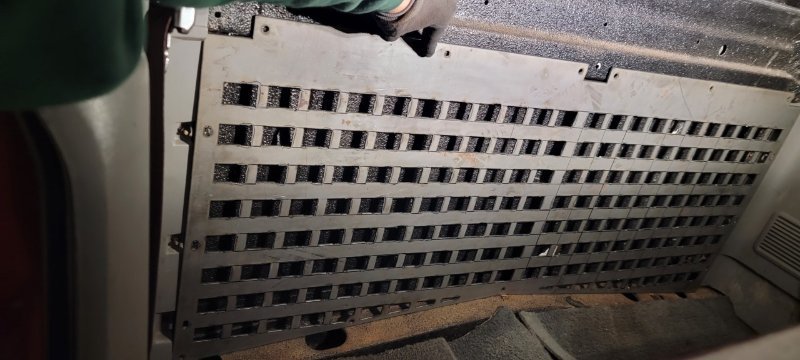
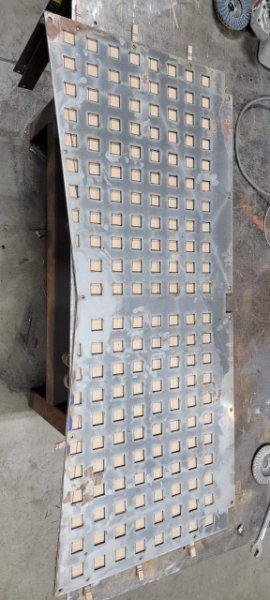
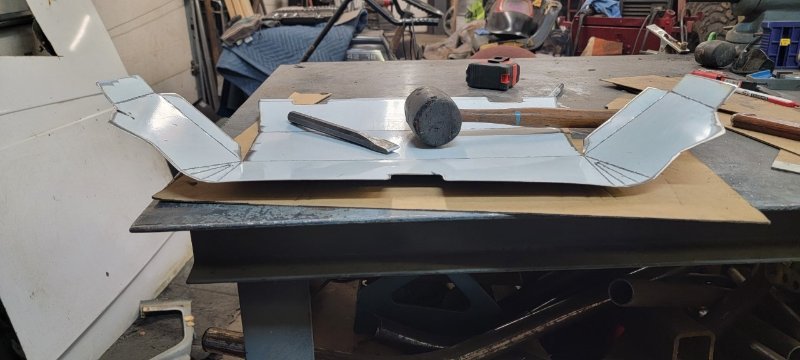
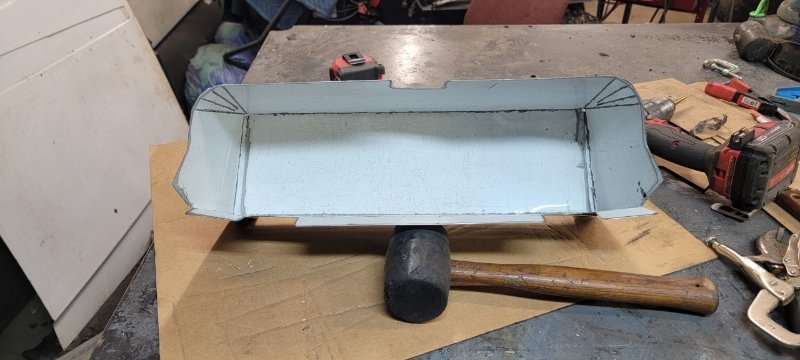
I got setup for some cutting some steel this weekend and got some 1st versions in hand. Soo the plan while i had the time was to get 3 of these cutout. 2 of them for the MJ's i have and then 1 for a buddy of mines truck. I decided to ditch the attached tabs all together all the around this panel for ease of shape and also to cutdown on wasted material leftover. There was also a safety concern for handling these panels with thin pointy tabs hanging off 3 sides. Instead i will make these mounts separate. After the 1st panel was cut out i decided these side mount holes could use some adjustability so they got slotted Bent up some Z tabs for the side mounts and then some L tabs for the bottom edge. Again added slots to the tabs for adjustability so these panels fit properly and align with those PAL nut studs Will be sharing the finished install just as soon as i get these cleaned up and some paint added.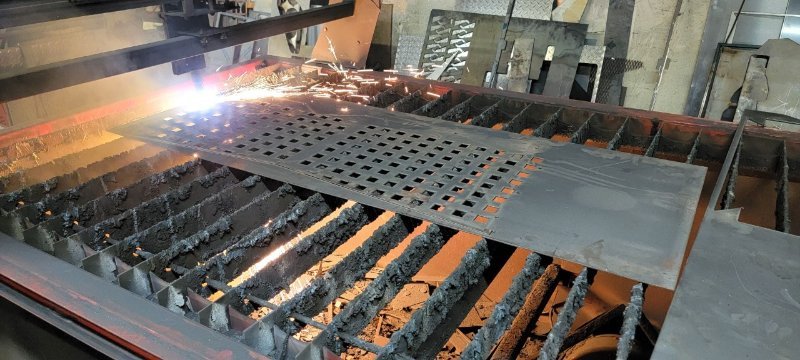
-
Jeep Comanche Behind the seat Molle Panel!
ThatJeepGuy replied to ThatJeepGuy's topic in MJ Tech: DIY Projects and Write-Ups
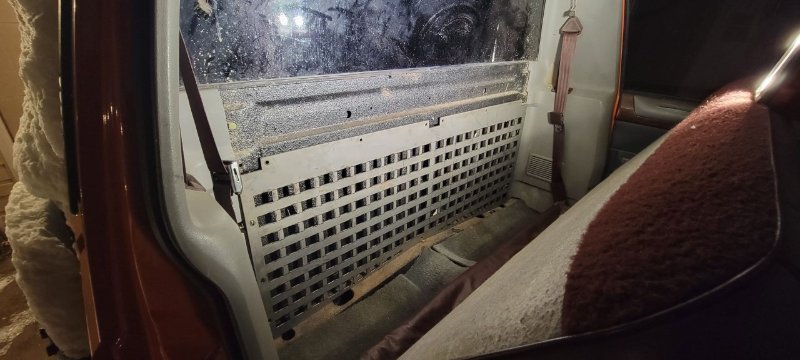
Soo the bigger picture behind this jeep, the bed of this MJ currently has a fuel cell which butts up to the cab, the battery which is on the passenger side of the fuel cell, an 8"x12" Trans cooler with cooling fans currently floating around over the passenger rear wheel-well and then lastly a 37" spare tire directly above where the factory spare would be. Things are crowded back there! Now don't mind the mismatched looking wheel/tire combo this is just simply the latest picture I've taken and I don't have one of the bed setup itself. I use to DD my other 87 MJ which is now a truggy I must say how much I missed driving it especially when it had a usable bed. I think we can all appreciate that. Soo with all this being said this Orange mj has zero usable bed space which I have plans to clear all of that up but comes back to my angle of the utilizing the space behind the seat for secure orga ized storage. Both of these trucks and many others are going to benefit from this molle panel compared to a bulky box or ammo can or etc in the bed or externally mounted elsewhere.
-
Jeep Comanche Behind the seat Molle Panel!
ThatJeepGuy replied to ThatJeepGuy's topic in MJ Tech: DIY Projects and Write-Ups
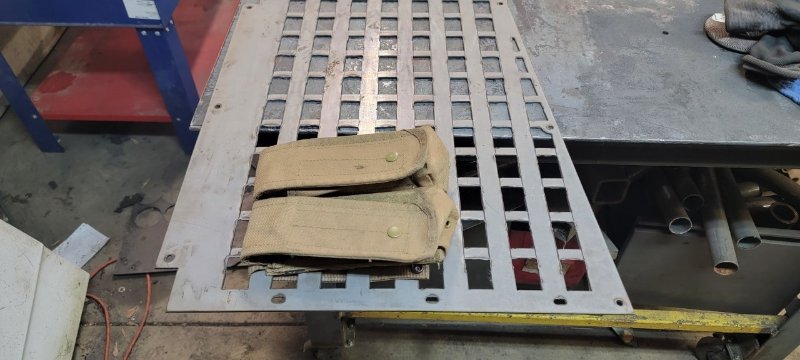
I want to have the ability to run a rifle case as I plan to use this truck for hunting in the future. Basic etc for various pouches - so jumper cables, spare choice parts, small tool assortment. Some recovery gear and emergency stuff as well. All of this securely stored inside and out of the way without having to worry about various things sliding or shifting around under the seat is the goal. Sure I could run a bed box but then that takes up bed space. Nice job! I like the "Comanche" in the middle there, that's a nice touch to break up all the holes. How is it secured the the body and is that stainless or aluminum? -
Jeep Comanche Behind the seat Molle Panel!
ThatJeepGuy replied to ThatJeepGuy's topic in MJ Tech: DIY Projects and Write-Ups
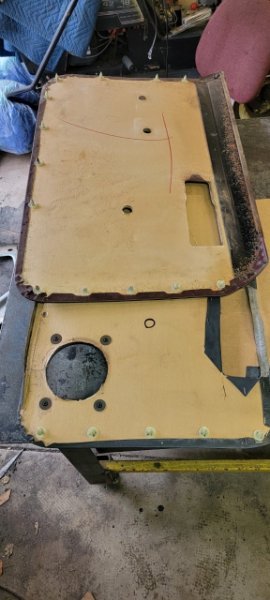
Cut out and test fit is promising Looks even better with the back trim panel in place as well! Now lets talk about these side tabs. For 1 the 1/2" wide tab isn't gonna do it for me, I'm gonna go for 5/8" minimum maybe aven 3/4". Also potentially going to knock them off all together and instead go with an S bracket that mounts between the panel and interior. These bottom tabs are also going to fatten up some as well. All five of them are going to be 1"x1" tabs Going to connect with a buddy of mine that does plasma cutting for me from time to time this weekend. We'll see how this goes, i know steel prices are definitely not what they used to be :O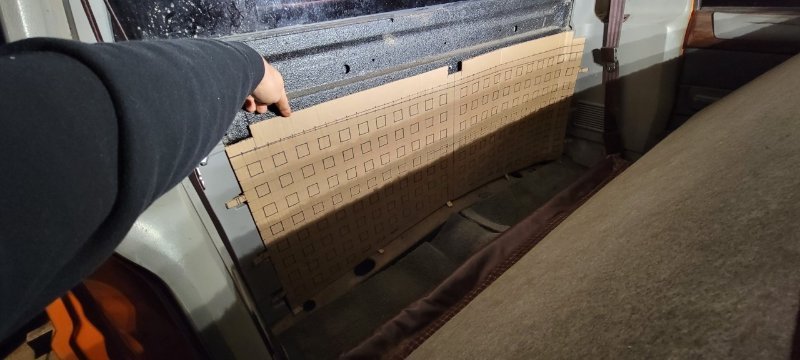
-
Jeep Comanche Behind the seat Molle Panel!
ThatJeepGuy replied to ThatJeepGuy's topic in MJ Tech: DIY Projects and Write-Ups
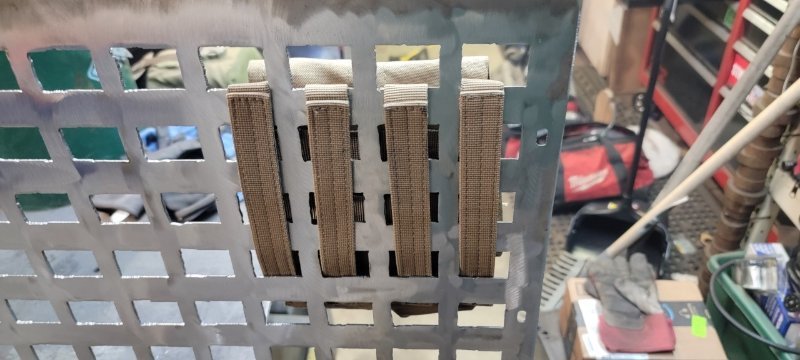
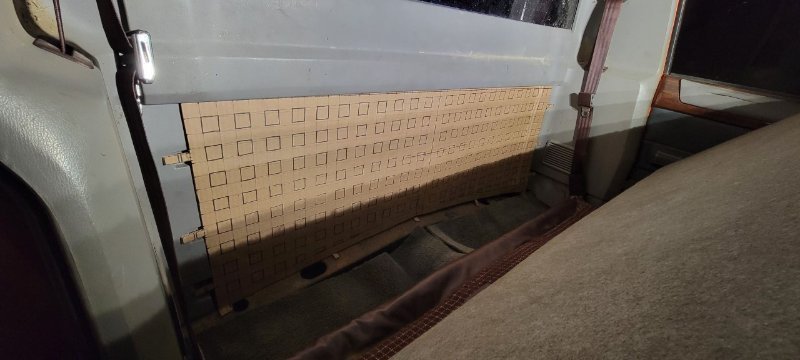
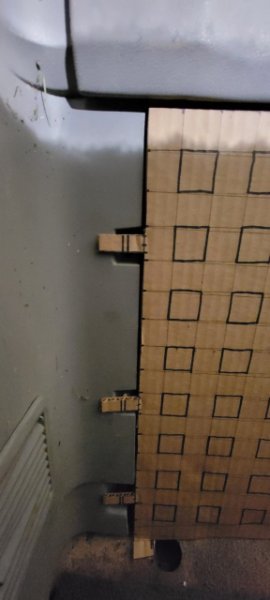
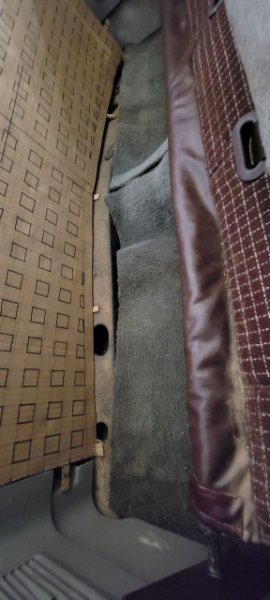
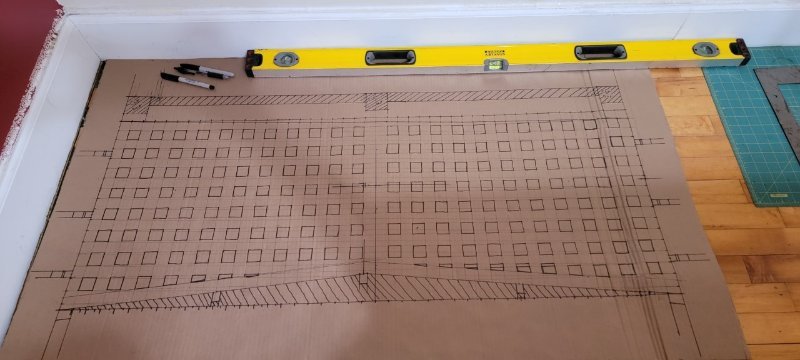
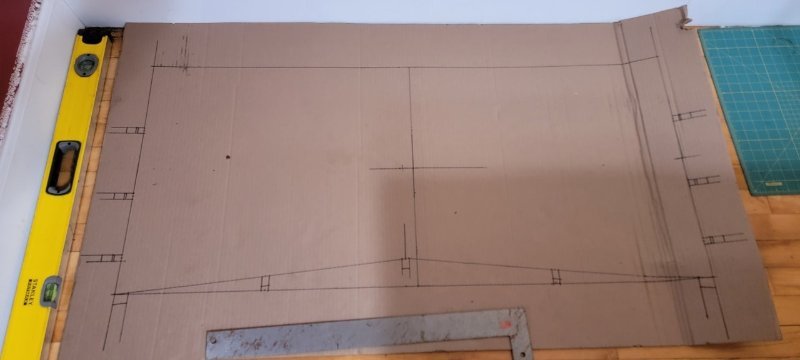
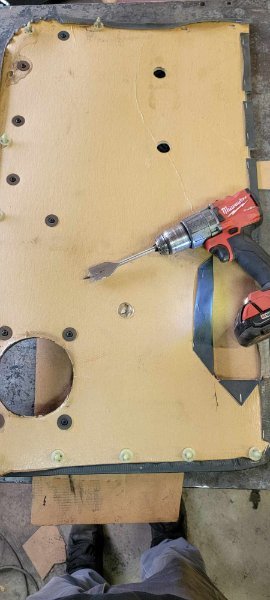
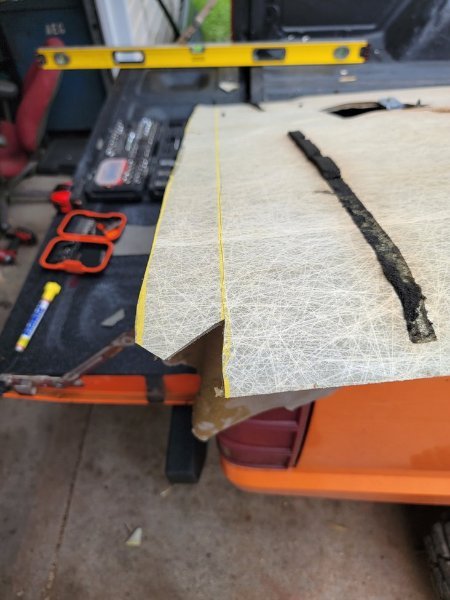
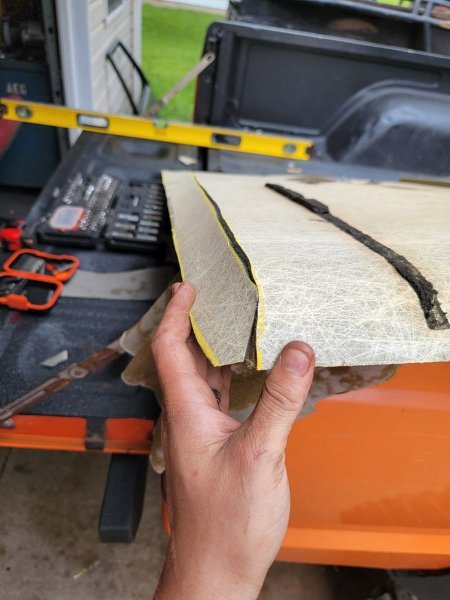
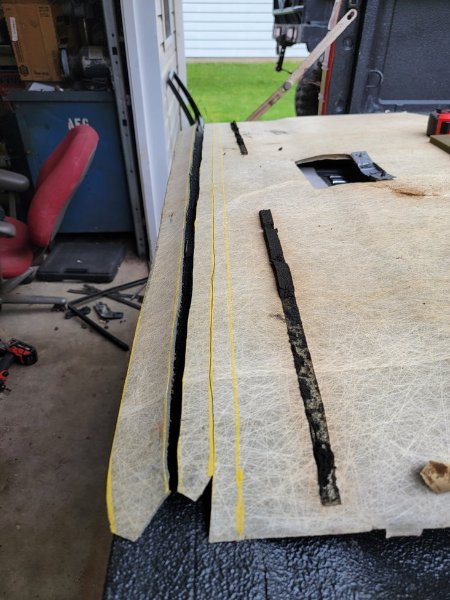
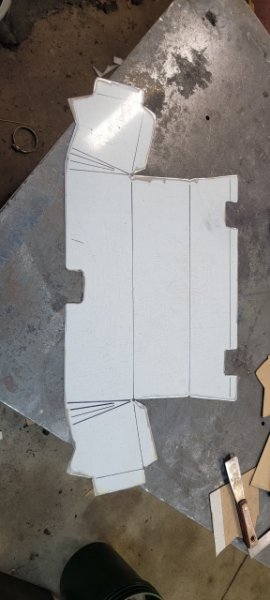
Cardboard is the best start for something like this especially when your a hands on kinda fellow. The basic outline is 20.5" tall by 46" wide And about 2 hours later with a couple mistakes i have this masterpiece. 1"x1" molle panel. For now it has a complete 1" border but i'm contemplating 1/2" border instead. This would give me 22 squares on each row and one 1/2" hole in the center. This would also give me more holes on the bottom to utilize as matching the hump in the floor definitely takes a bite out of this panel. That side tabs are only 1/2" wide to ensure they will fit in the notches with the B-pillar mounts. Bottom tabs on the corners are 1" wide and the 3 in the middle are also 1/2" wide for now but that could change. Top edge is wide open for however many mounting points i see fit. The corners and center are clearanced for the factory trim tree's to fit flush without obstruction.
-
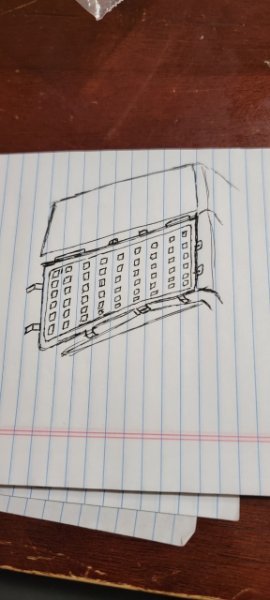
So this is something i've wanted to make for some time now and while i started working on this midway through this summer its looking like i'm finally going to be putting some steel under the cutter! Please enjoy my doodle for example of what I'm trying to achieve here Picture frame worthy work So the inspiration for this little project is the fact that the MJ's i have do not have the carpet trim for the back side of the cab. This could easily be supplemented with cardboard, fabric and spray clue but that would just look fitting and not serve much purpose. Now a Molle panel on the other hand provides storage options that are nearly limitless while also covering the exposed cab which in my opinion is about the only thing that carpet trim does. I've brought this up before to the masses and one of the consistent critique's is the mounting setup. There was multiple requests for a "No additional holes" setup and retain only factory holes - Sorry, if that's what your hoping for its not gonna be here. In my setup (IDEALY) i would retain the 4-6 factory PAL nuts along the sides with some L brackets that offset the panel to be level with the B-pillar trims. The top edge of the panel will secure directly to the interior brace in 4 spots via riv-nuts. These would space out evenly between the factory trim tree's on either side of center. Now the bottom side of the panel would secure again using L brackets and riv-nuts in 3-5 spots along the bottom interior brace.
-
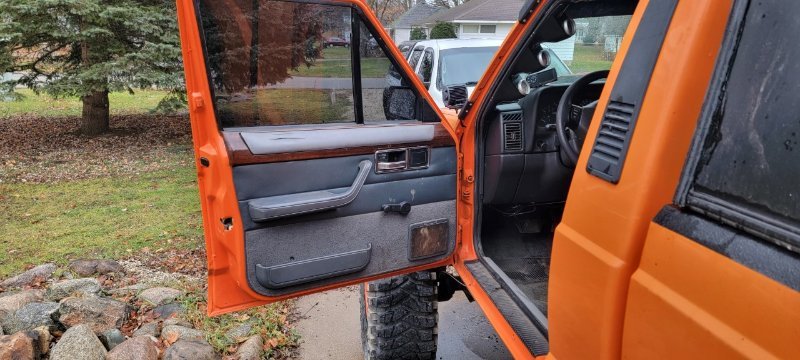
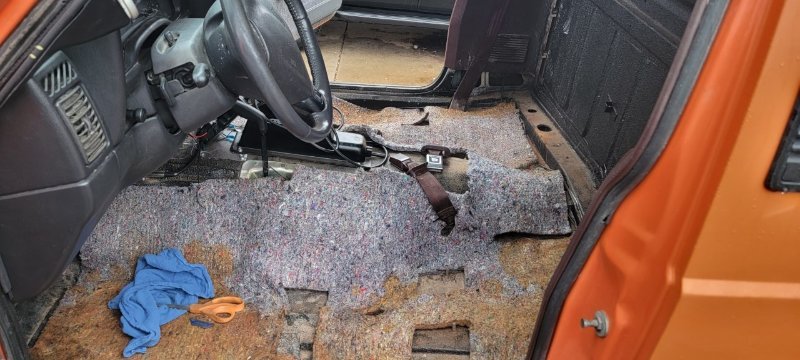
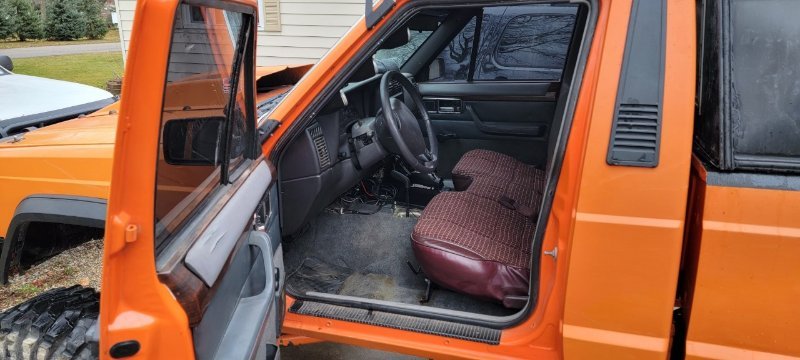
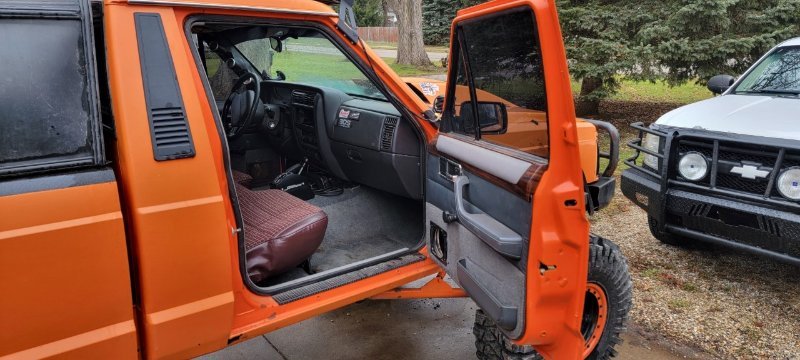
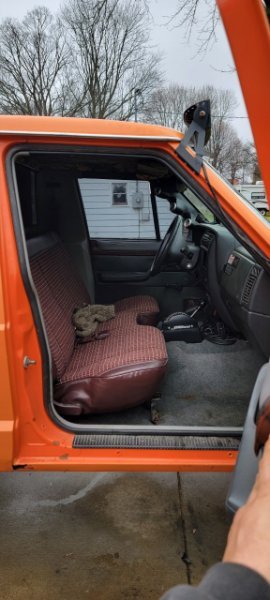
Some interior changes, out with these burgundy door panels and in with some 2-piece wood grain and grey door panels. The new panels were from a limited which off course they had power windows soo a new hole for the window crank had to be made. Pilot drill bit and then a 1" paddle bit made easy work of this. Cut a + into the interior side fabric and then crank windows it is! So i do need to find the retainers for the upper part of the door handle. Also gonna be on the lookout for a completely black door handle trim. The speaker grille will get replaced/deleted as well. Currently no speakers in the doors soo either a cleaner looking flush beauty cover or an actual speaker and round speaker grille will go in so long as it still clears the window crank. Floor insulation from a 92 XJ fit fine enough for my needs after some trimming. Followed up by the carpet from the same 92 XJ again with a little trimming here and there I'm satisfied with its overall fitment. Bench seat re-installed with all new nuts A little hard to make out in this picture but i dug into my shed for this grey set of MJ interior trims. The original burgundy B-pillar and rocker trims will likely go under the paint can to get this closer to a color matched interior. The bench seat i have not decided on just yet whether i have it re-upholstered or just go with a simple seat cover.

-
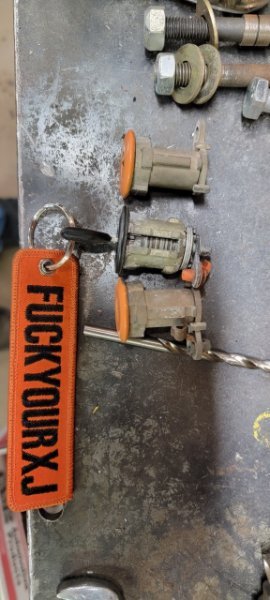
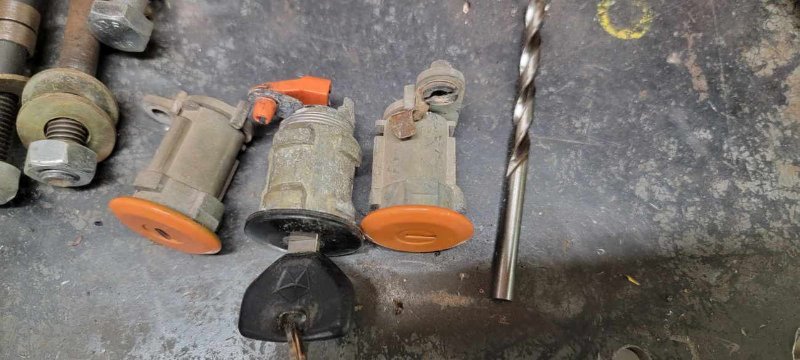
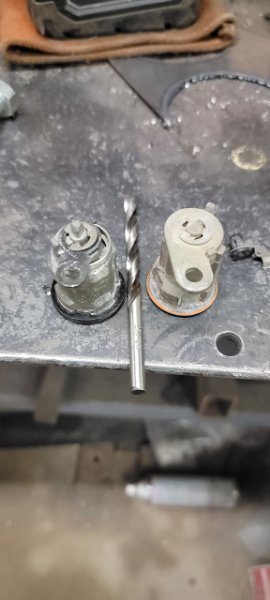
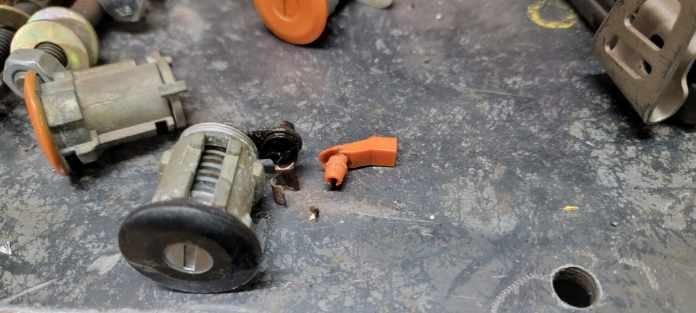
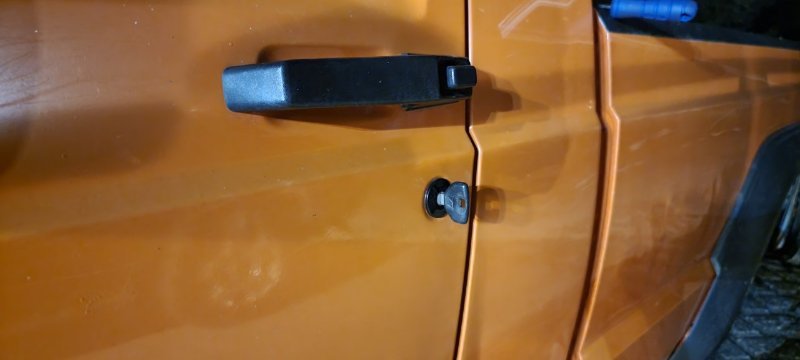
Now onto my next endeavor - 1 key to rule this truck from end to end! To start i literally just pulled a key from another 97+ xj in the yard and verified door locks and glove box matched and worked properly. The ignition was a very straight forward swap over. These door locks however took a little finesse to get done! Ill highlight the major differences as far as i can tell these are original lock cylinders to the truck so we're talking about 87 doors/cylinders going to a 97+ lock cylinder. There are 4 steps or cutouts in the door which align the cylinder specifically and also keep it from twisting - it seemed like 3/4 if not all 4 notches needed to be opened up to fit the newer cylinder. - This was easily remedied with a half moon file work and some patience. File some and check fitment- repeat until clean fit! If you compare you can prolly make out the slight different in size Next up is the orientation of the rod keepers and also the diameter hole the keepers need. Old style are the metal clip and new style were the purple or plastic clip. Both newer cylinders were drilled out with a 5/16 drill bit. There is some thickness difference as well but in the end it hadn't made much a difference, i will say though you will easily bend the newer style tab if its not secure when you drill - go nice and easy for this part! After fitting the old style rod clip to the new cylinder i used a smaller drill bit the clean up the fitment some as removing and installing it from one cylinder to the other kinda smooshed the fitment some. Some break away or lube here was helpful for final install of the rod. Aftermatch fitment is exactly what i was hoping for! The retainer clip was re-used on both doors and secured the cylinders nicely into their new homes.
-
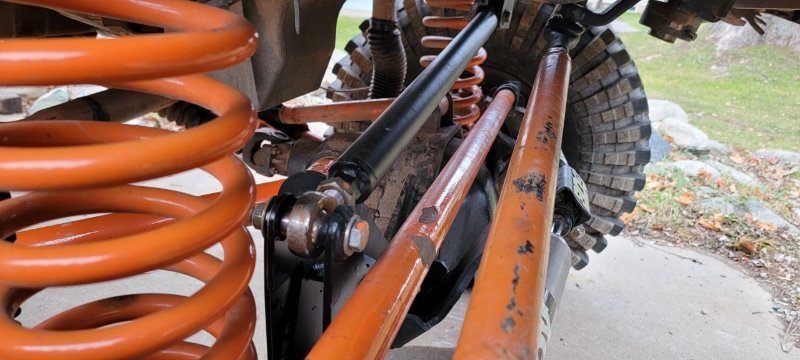
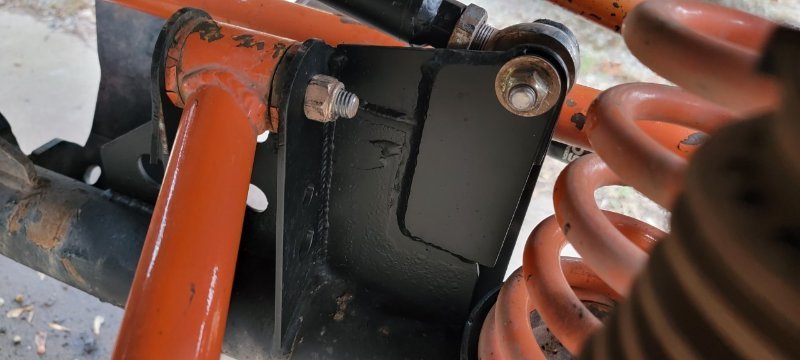
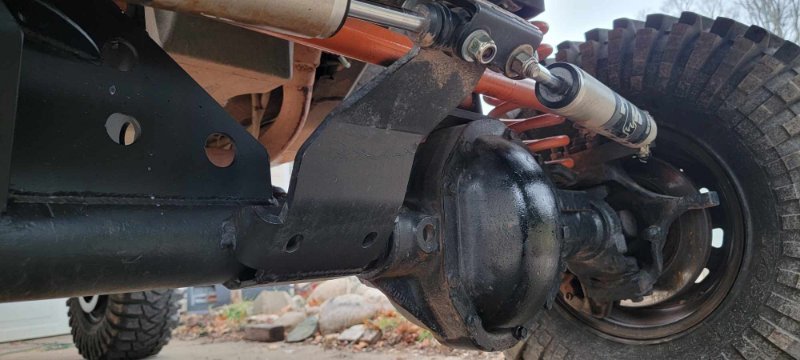
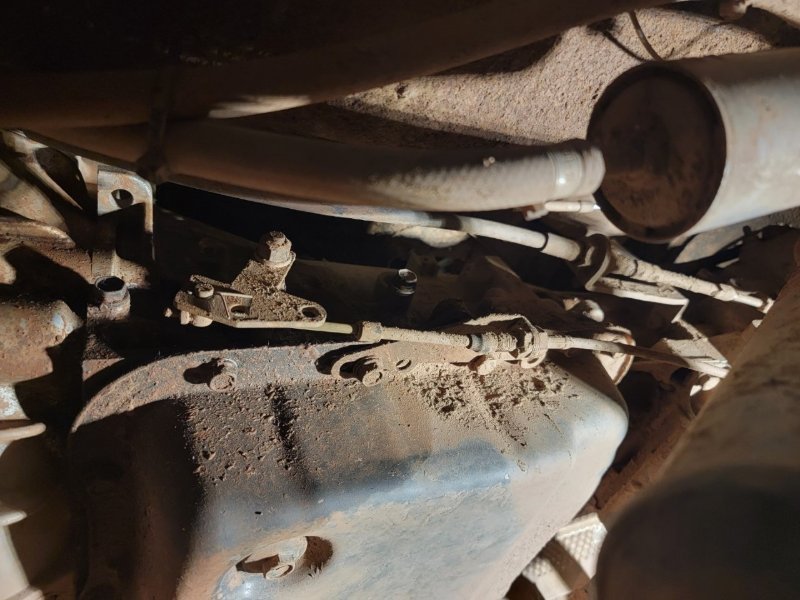
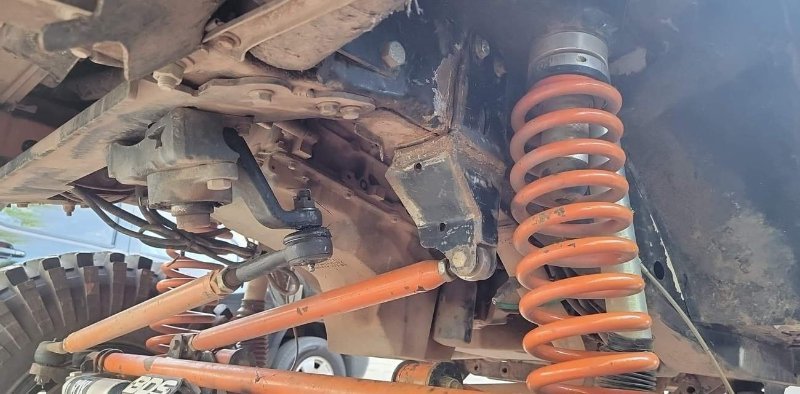
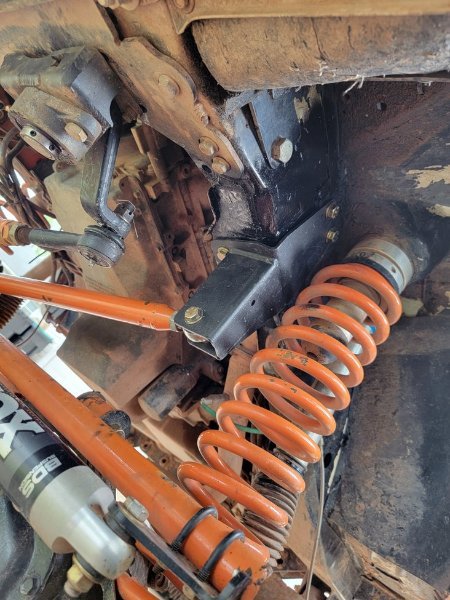
I then reluctantly dropped the truck off to my fab guys shop to make things a little easier for the both of us on changing the track bar setup. Track bar bracket on the axle side got modified to match the steering angle and also lengthened by an inch or two. Trimmed and fitted the steering stabilizer bracket for a more parallel setup to the steering and also flush with bottom of the axle tube. New tie rod ends and also fixed one of my high steer arms as the taper for one of the joints was blown out. New Barnes4wd leaf spring perch's and those fat n s3xy u-bolts. I also found a new pair of Rustys AAL long springs so we tossed them in there to get things back to a more level riding stance. We decided against the barnes shock mounts and he cut me some custom brackets that offset a little farther away from the axle tube for a little more shock clearance. Waiting for his plasma table to cooperate fully before we cut out a custom molle panel for behind the seat inside the cab. Panel will mount directly where the factory carpet panel would sit in the back. Maybe not by factory mounting holes alone so for the purists out there - this won't be for you
-
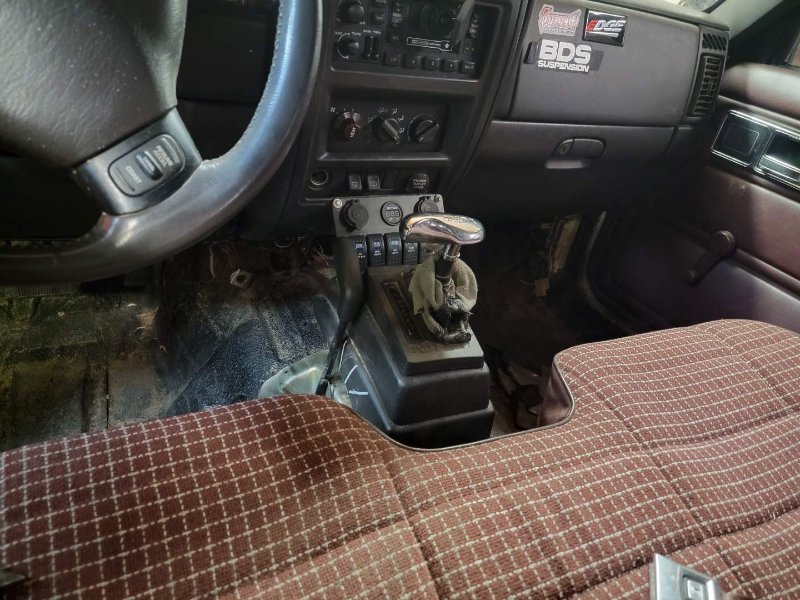
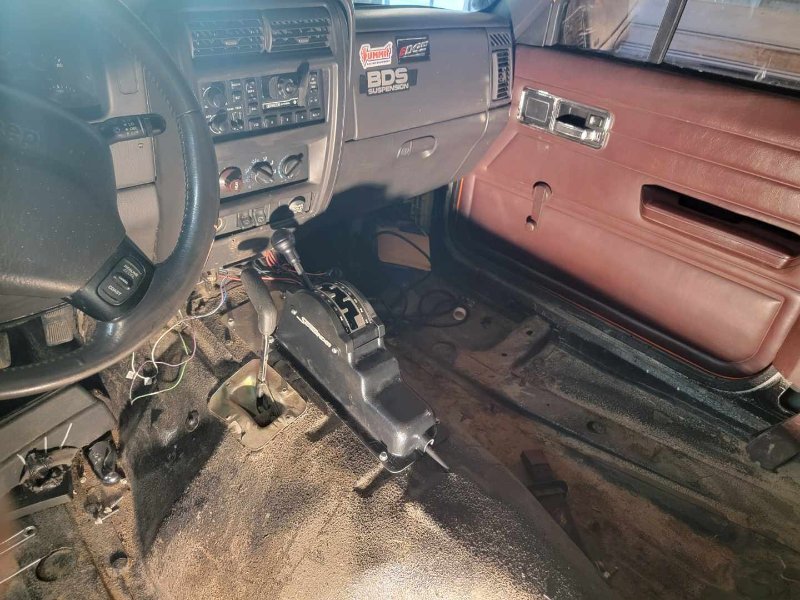
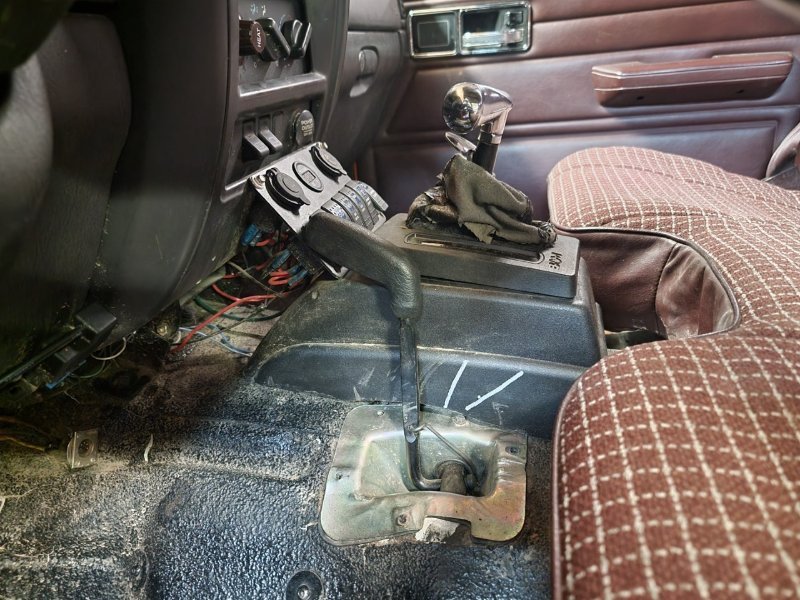
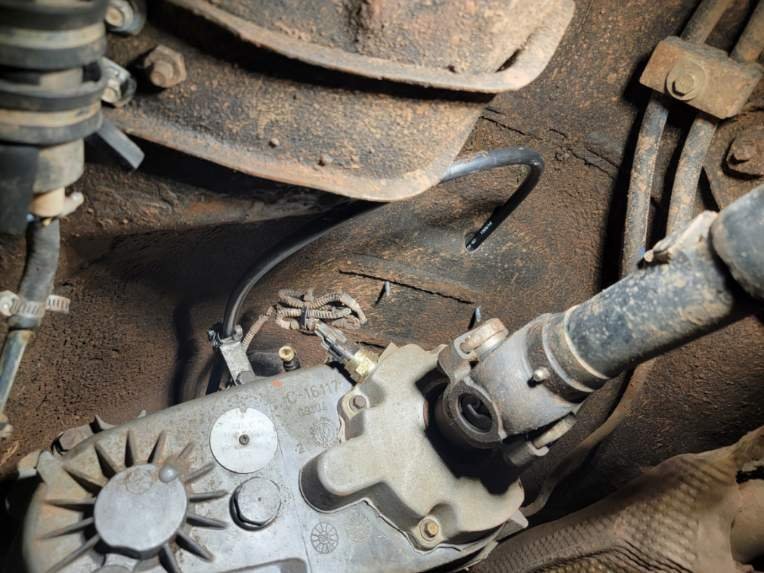
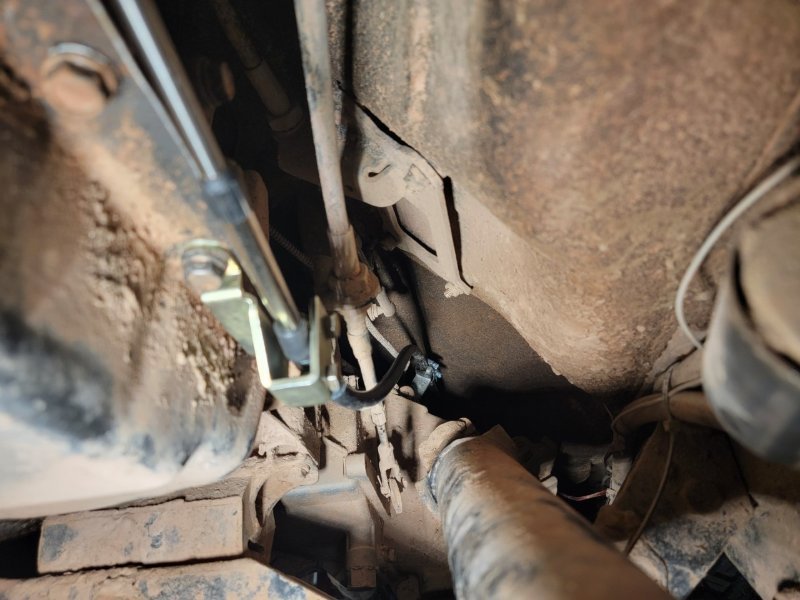
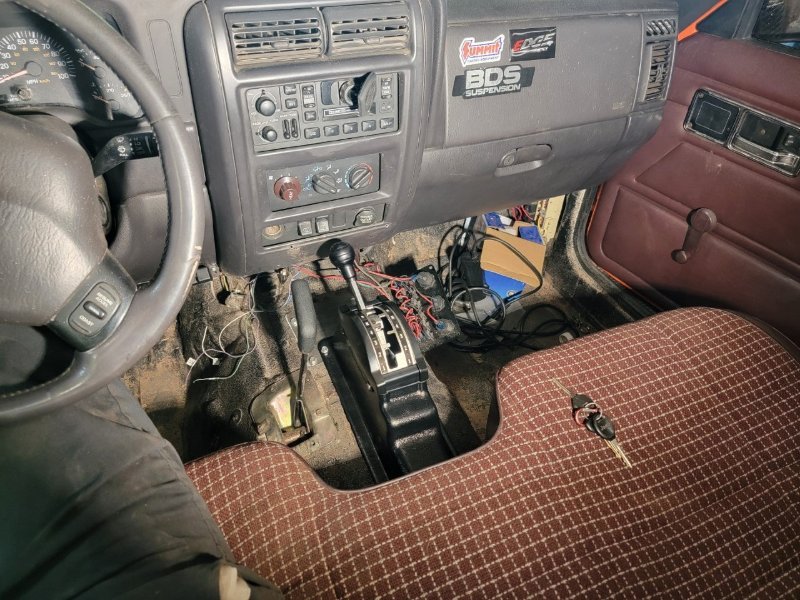
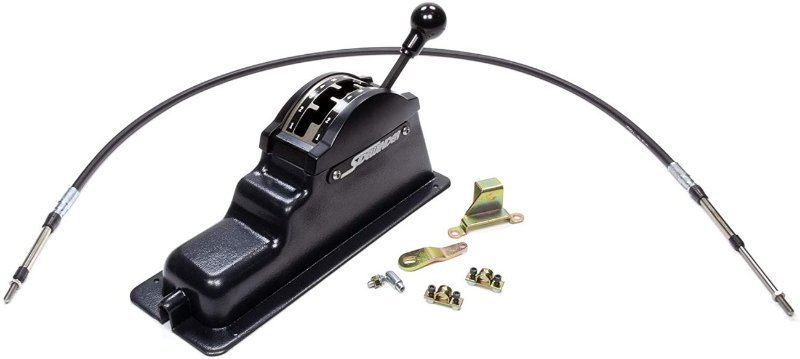
So lets address this shifter for a little bit I'll be honest here, i was oblivious on how to take advantage of a ratchet shifter prior to this truck. Sure i understood the concept and how it works but the actual function and use - i didn't really make the connection. After going through this truck for a little bit troubleshooting some other issues i was digging slamming the shifter up through the gears! Getting full throttle and little rev limiter between the shifts is music to my ears It had its drawbacks though - like the gear indicator wasn't working so it always showed "park" and it wasn't always making the shifts. So i was set on changing things up after all! Not much for setup process here - Literally removed old unit, setup mount brackets and drilled the new hole for the cable. Then it was adjusting the ends till i could slip through each gear and remove the ball/socket without any deflection from the shifter arm or cable. This was a surprise for me - not only cable shifted trans but also there is a cable shift setup on the tcase as well! So i had a small issue when laying out the cable - the cable was basically laying right across the yoke/ujoints at the top of the front driveshaft I hit the junk pile and came up with this old hood latch setup. With a little chop and drill i had this little pedestal to anchor the line to. a couple tube clamps will keep it in place Now back inside with the bench seat installed - still want something more to cover the tcase shifter and while initially i figured i would just modify a factor mini console - I'm not so sure anymore. This sidewinder setup is a little taller than expected so its back to the drawing board on console ideas. I'm also changing things up with the extra switch panel that was secured with roofing hardware to the dash. This one is just a little bulky for my interests though i do like me some excessive switches!
.jpg.f46df0faf503daacd19a5a397b9e3ca0.jpg)
-
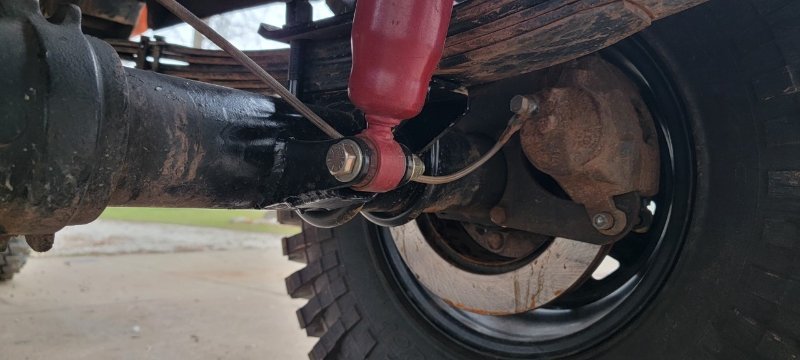
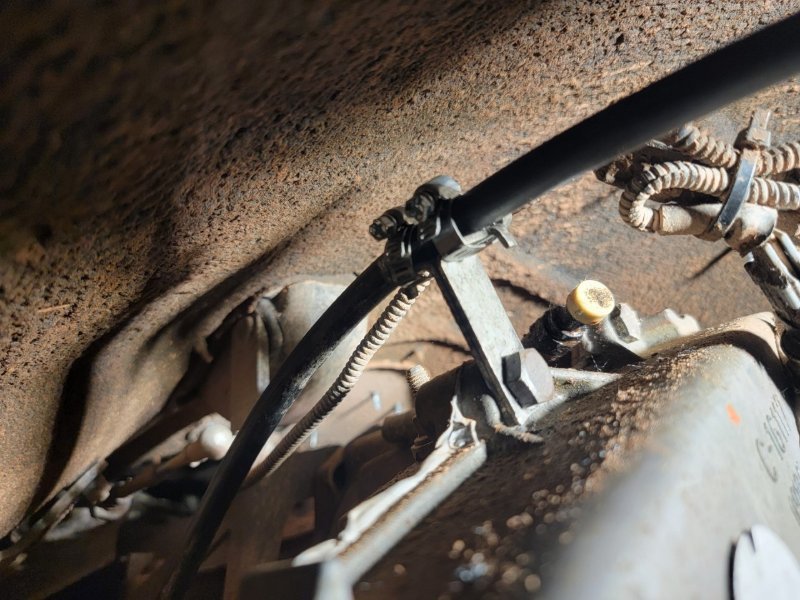
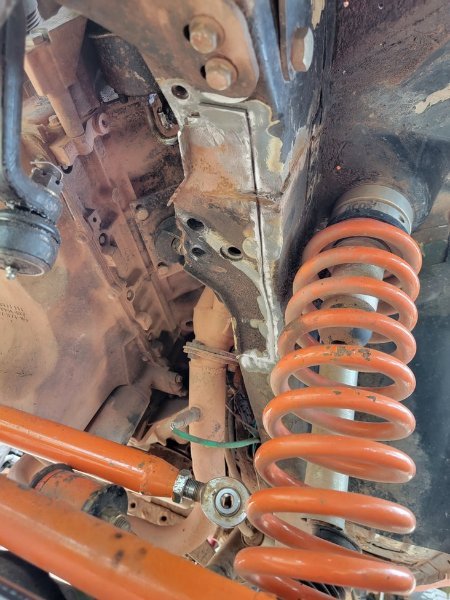
Shocking i'll bet starting this one off with amazon's finest chevy lowering shackles coming in at $39.21. Good for something like a 2.5" lift~ So this MJ sits a little more level now! As expected the former blue monroe shocks were wasted but coming full circle i still had these red shocks hanging in the shed. These shocks have been on my 87 Truggy MJ build, and also my 98 Rubicon XJ build. Still some life left in them so they can ride for now until i have the coin for a better pair of shocks. Also have new shock mounts for the axle but figure I'm just gonna wait till the new shocks are around and then i'll deal with cleaning up the tubes and welding the new ones in. What a surprise all four track bar mount bolts were lose. literally spun 3 of the 4 nuts free with my fingers. Cleaned off some of the old weld to make things smooth and ready for a new mount. also cleaned up the unibody seam so i could fully weld it in. I have done this on a few jeeps now and in my opinion it has helped keep the unibody together longer vs the cracks that develop around the steering box bolts. Now wouldn't ya know it - the pitman arm wasn't even tight either. Add to that this track bar was built using (2) RH heim joints. So if you follow what I'm saying to adjust the track bar length and get the axle centered under the jeep you have to remove one end AND THEN twist the bar to adjust it. "PALM FACE!" losen up the jam nuts and twist the bar and it just channels left/right changing nothing for length. SOO a new track bar is in order- in the flavor of bigger 7/8 heim joints and of course a R/L heim to make this right. This track bar mount i had laying around isn't matching the steering angle so potentially a new custom mount all-together may be in order. Thankfully after going through all of this and replaced one of the TRE's because it was Really bad- the other i'll do later once I'm under the front end again - this drives Soo much better already. Also while i've gotten use to using the B&M shifter I did order up a new setup that's a bit less finicky. I've played with another jeep that had this shifter and i definitely preferred this setup more. The gated shifting is something new but there surely won't be any accidental shifting with this setup!
-
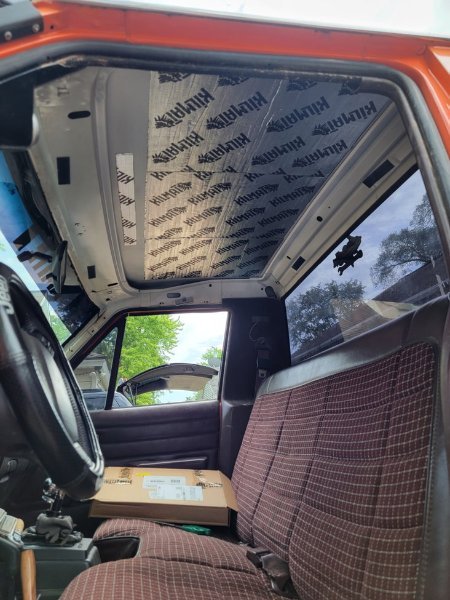
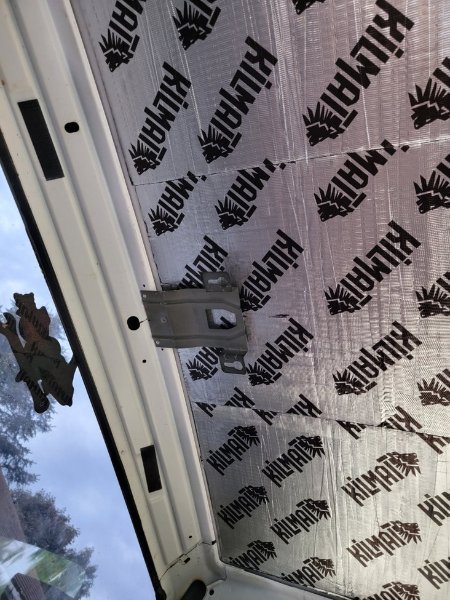
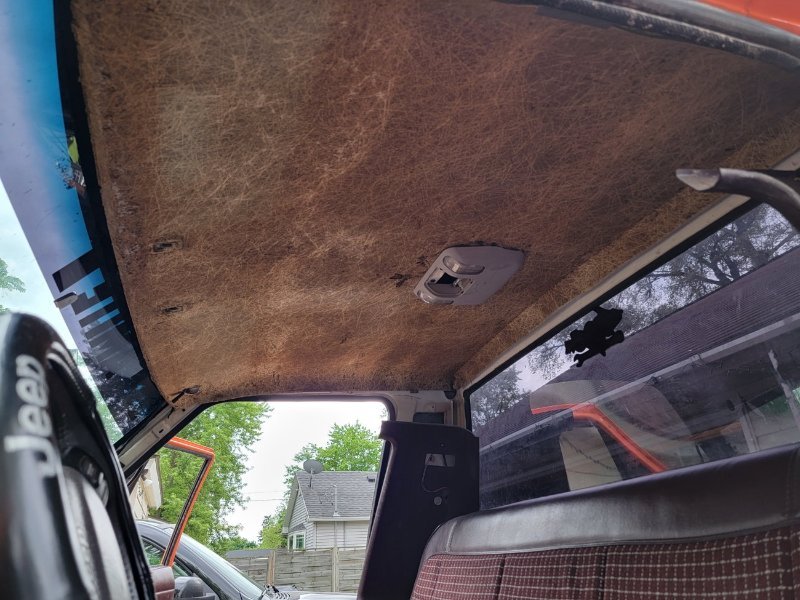
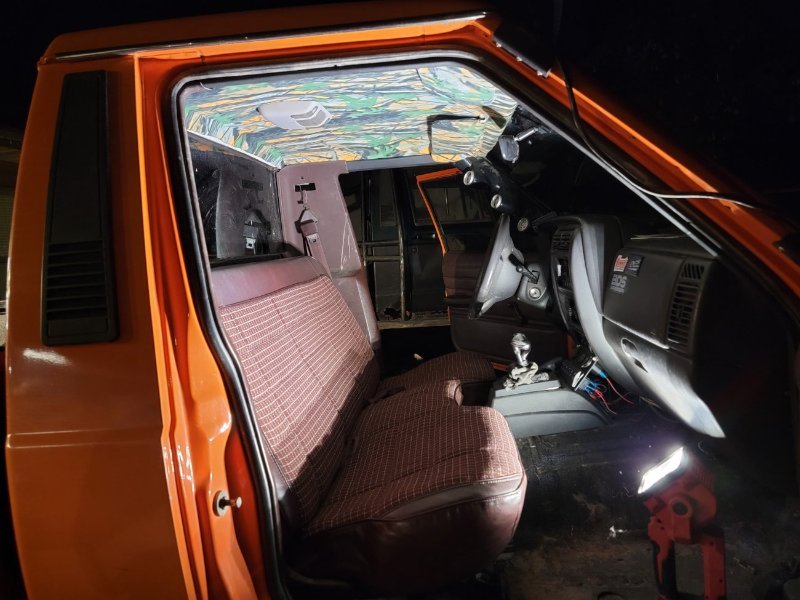
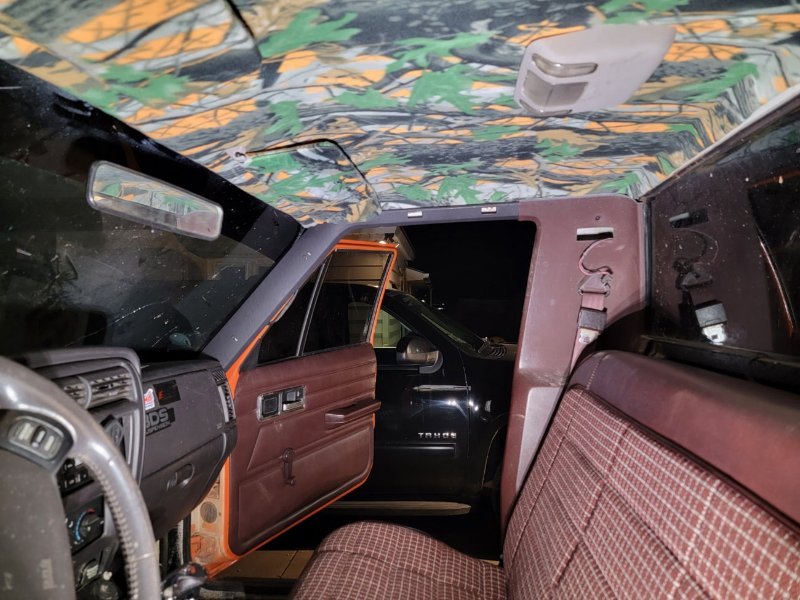
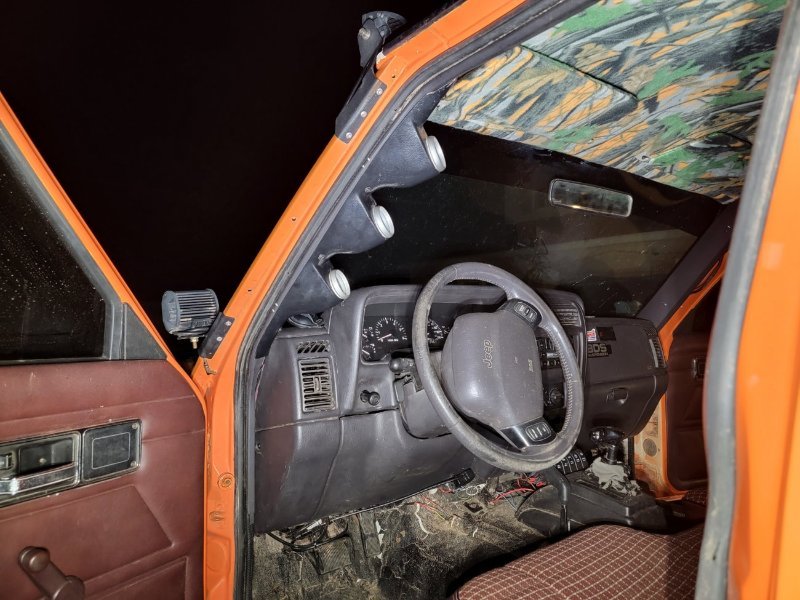
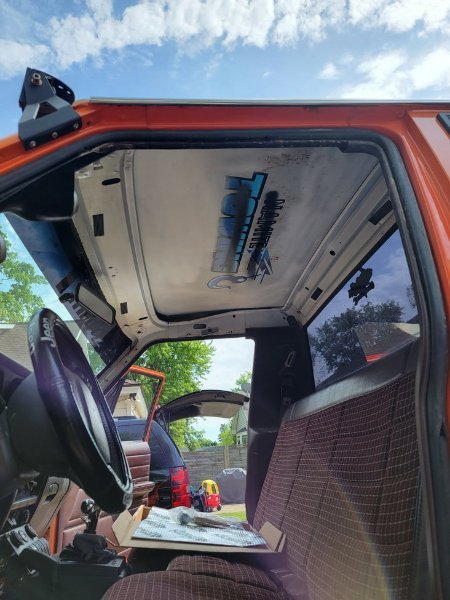
Then I took advantage of the nice weather and got to figuring out this headliner and interior some Ive been in an MJ or two over the years without a headliner at the very least and its like getting kicked around in a tin can when things hit the roof. I got a box of this kilmat for try out for sound deadening so basically because it was already clear access i figured id throw a couple squares up there. A light introduction into the application of the kilmat itself is the least that comes of it and I'm good with that. Noticable difference or not? i'm pretty satisfied with how well it stuck to the ceiling and also there wasnt much of a lingering smell after all said and done. To start off - i grabbed a headliner out of the junkyard from a newer bodystyle XJ. I also grabbed the overhead lamp and factory hanger/bracket to go with it. This is skipping a few proper steps of how the process actually worked out but ultimately i mapped out where the overhead console was going to be sitting after i had the headliner trimmed and fitted, then modified the overhead brackets overall length to line up where i needed it. Trimmed about 1 5/8" off the end of it and then secured it to the MJ's factory inner cross support of the B-pillar using a couple rivets. With a centerline drawn for reference the point here wasn't for an indestructible mount - just merely a solid anchor to keep the light fixture from bouncing. Now onto the actual headliner trim. I did a blind cut to get it out of the XJ in the yard - basically split half the rear doors and just razor'd the thin across. There is a factory squared edge about the same spot of the rear grab handles in the ceiling. I started here with my cut for overall length (thats front to back length). I only cut the outer layer of the headliner - this was it will fold down easily and still be attached. The end got cut all the way through and also the corners cut off. Rolled the edge over and test fit - sry but no continuous pics from the repeated install process but it was still too long. Drew another line about 1" forward and again - trimmed just the out layer and test fit - close but not there yet So finally just about 3/4" more and another outer later cut and then also removed that first initial chunk as it was only hindering my fitment at this point. With these 2 cut lines the headliner folds over and secures into place nicely. The overhead console also fits nicely and keeps the center of this headliner supported. Headliner was recovered in a high cotton fabric. It was just a convenient amazon find of wooded camo and some hunters orange for color. Sun visors also got recovered and mounted up. I nabbed the a-pillar trim panels out of another newer body xj and secured them in place. This pillar pod setup was secured with just the one roofing screw but now its secured with 4 - factory style phillps head screws. Eventually i'd like to get the factory gauge cluster working as nothing on it works currently- if not the factory cluster then prolly a filler panel and custom gauges in place instead. Just need a grab handle and some of those newer universal interior lights that are pretty commonly swapped into these MJ's. Maybe some krylon paint matching as well in the future?


-
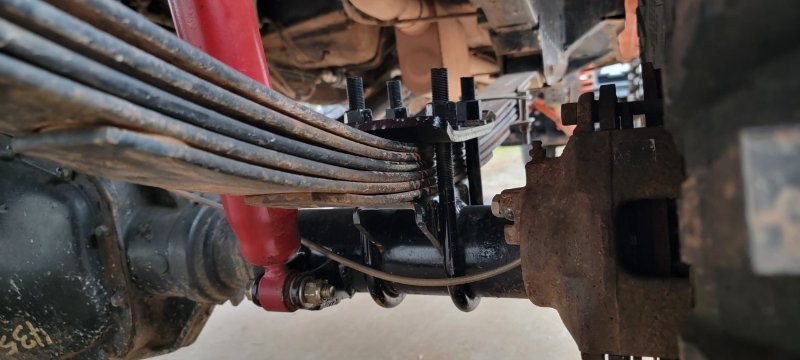
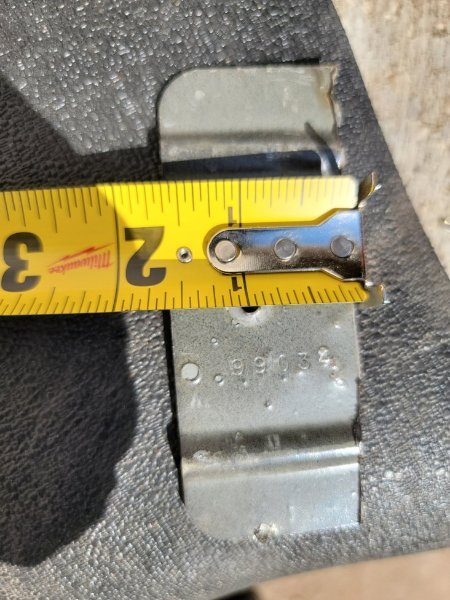
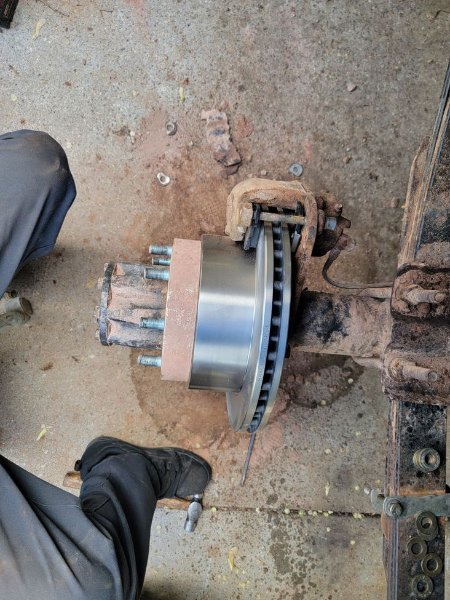
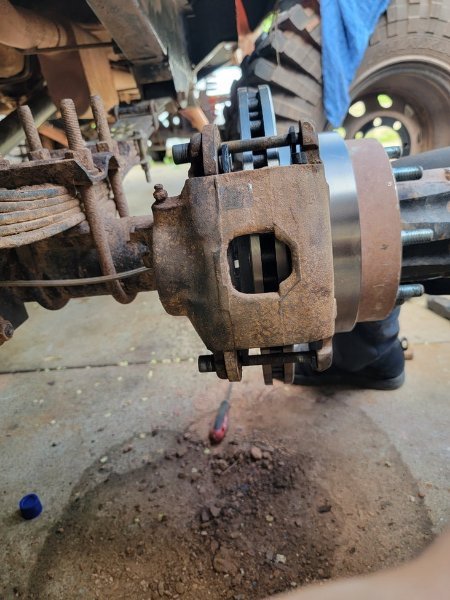
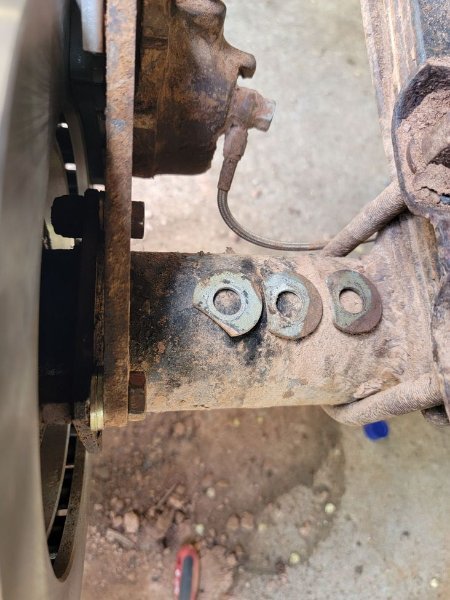
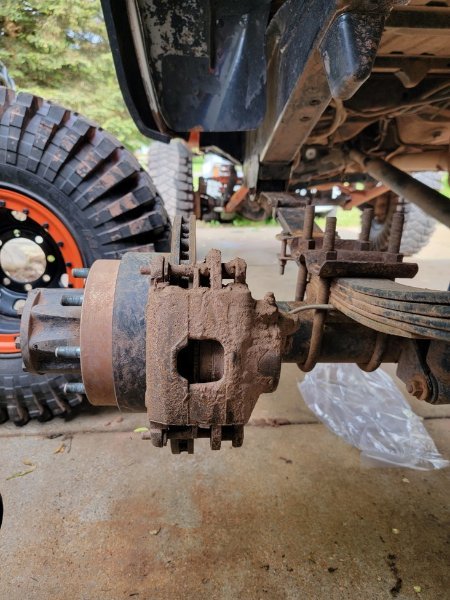
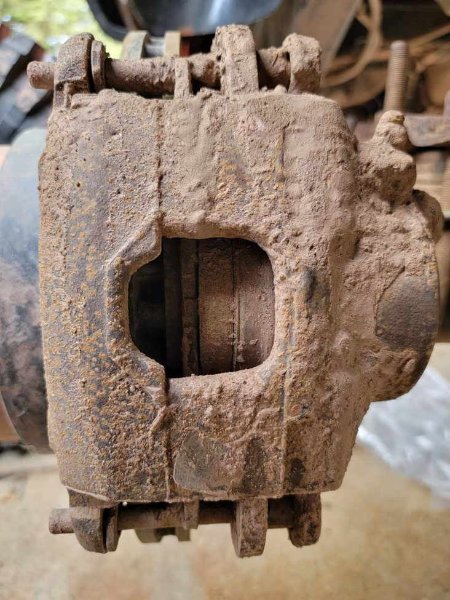
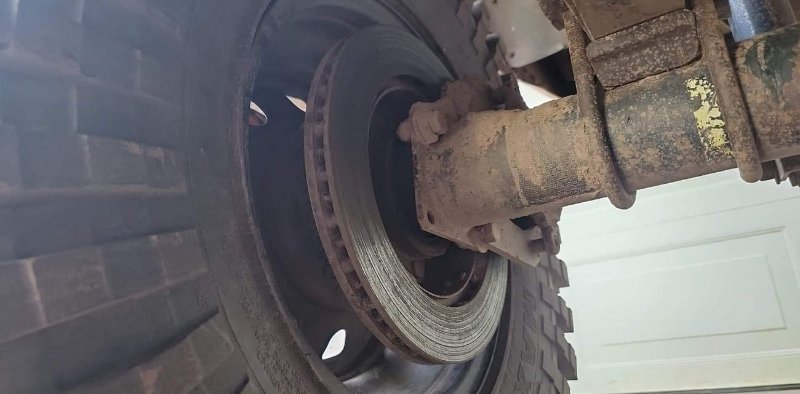
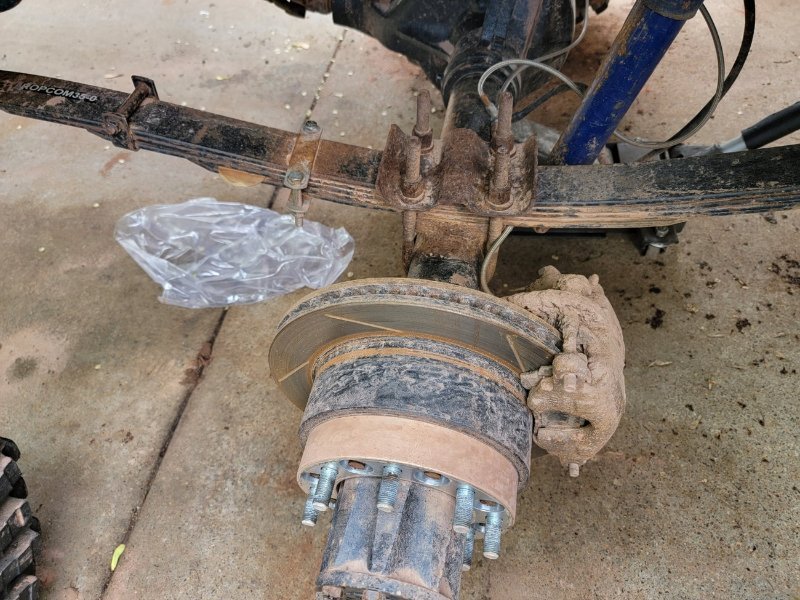
Lets start this by stopping dead in my tracks for a change! All four of these pads in the rear were metal-metal = Crazy! The pistons on the calipers were definitely extended out to their max! So a new pair of E350 van single rear wheel brake rotors and early-mid 80s chevy JB6 caliper brake pads and its looking a bit more functional now. All of this from Rockauto for $127 shipped! I had to re-shim the adapter brackets as well. With the new pads in place the caliper would not clear the rotor and the pads were digging into the rotor as i tried to force it into place. A very precision deal here - formerly just 1 grade 8 - 3/4" hole washer between the bracket and axles flange. Now its equipped with 2 grade 8 - 5/8" hole washers per bolt.
-
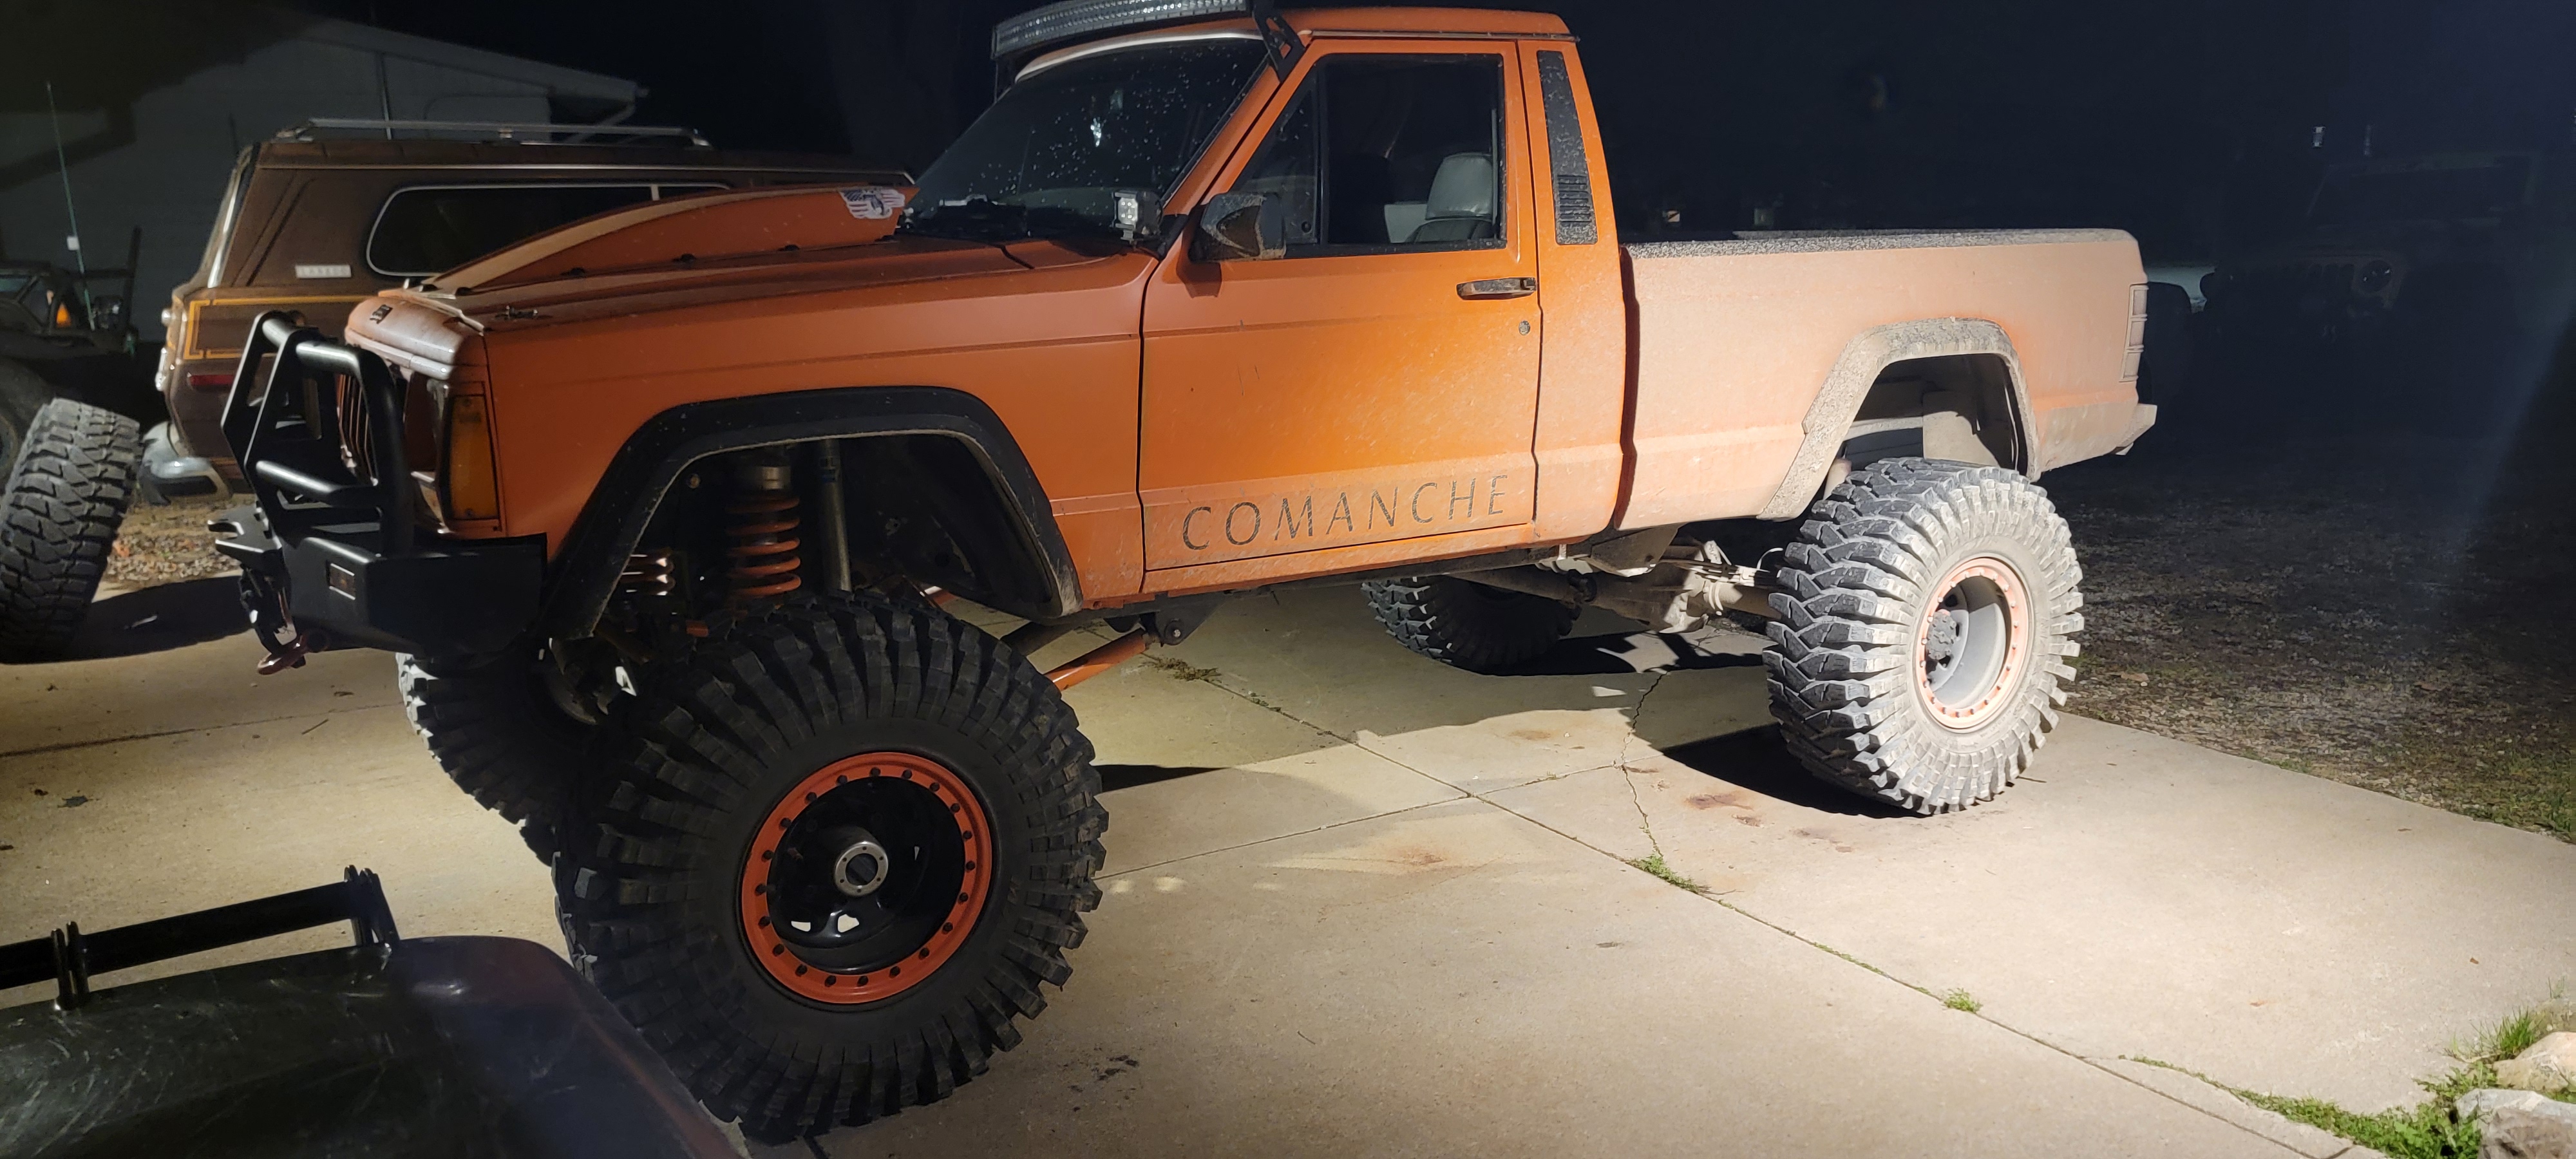
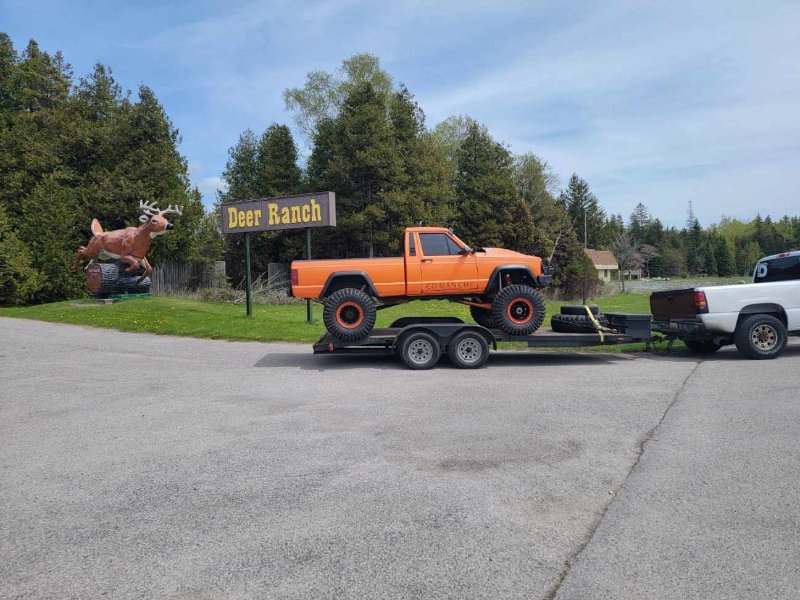
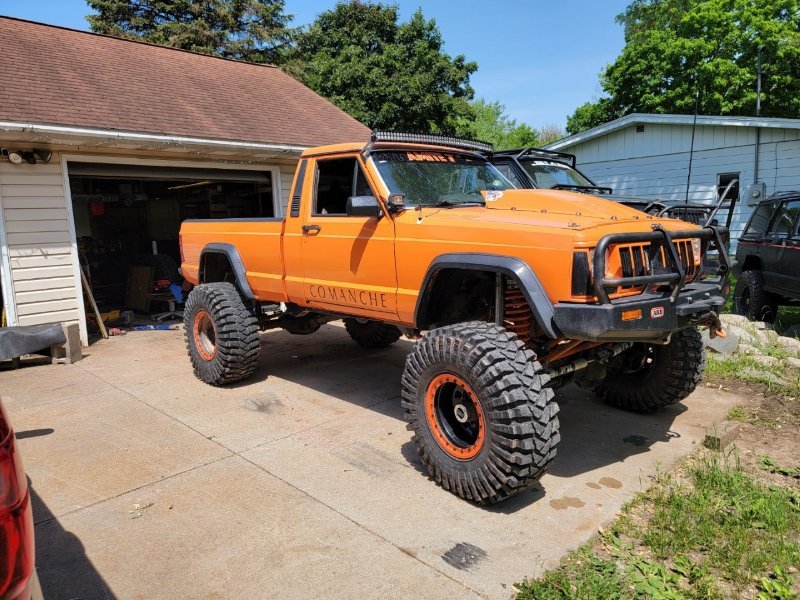
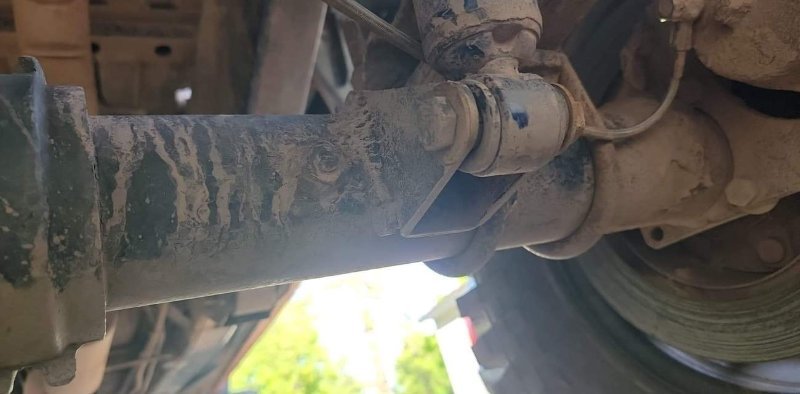
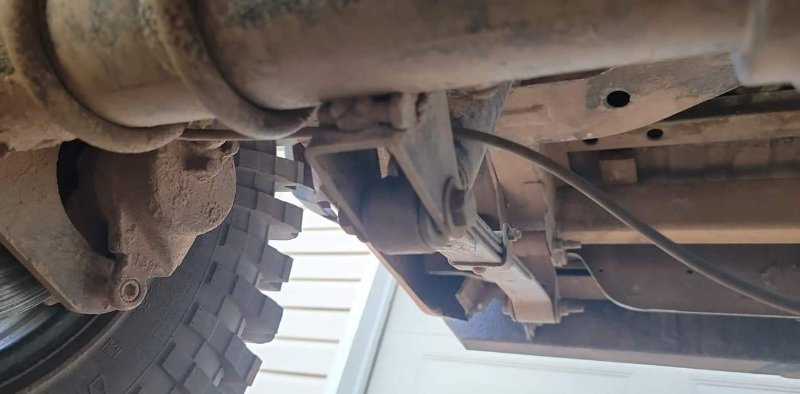
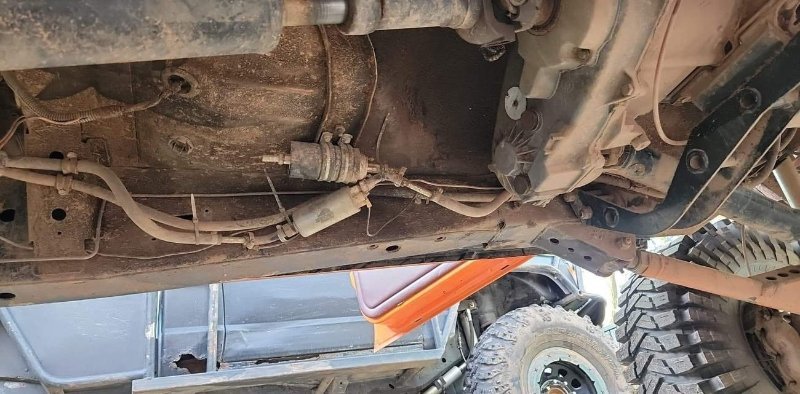
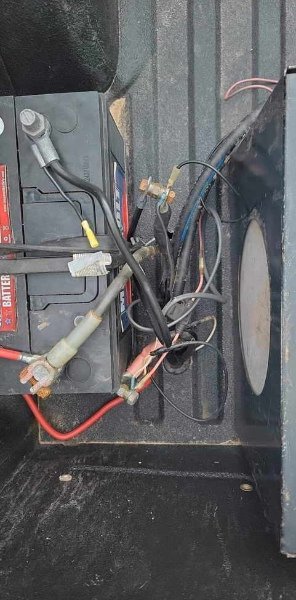
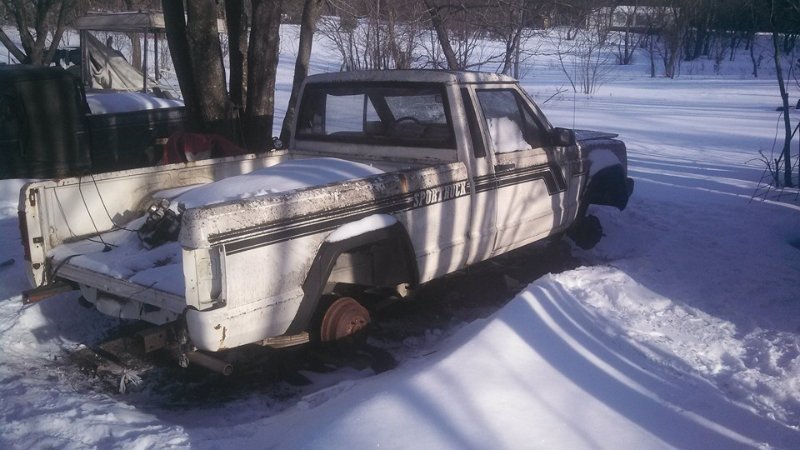
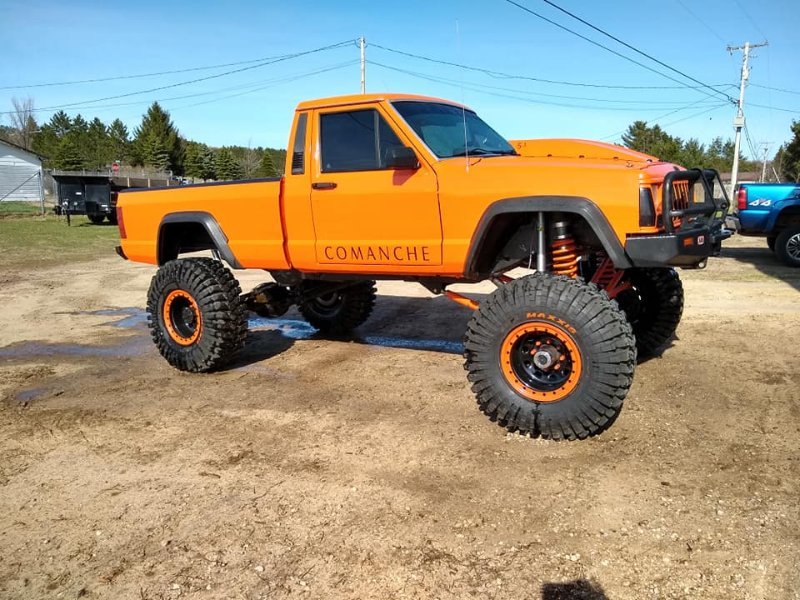
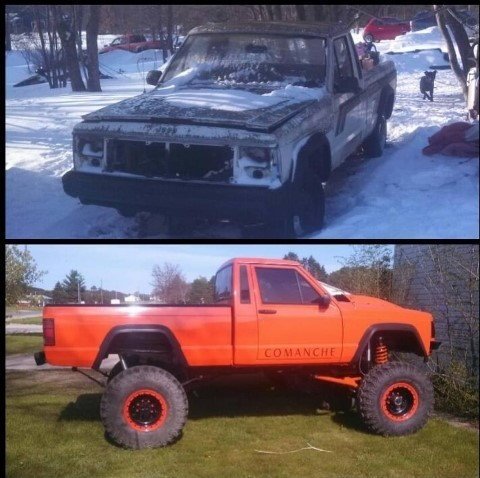
Soo then we speed up a bit to more recently as of this summer 2022. I had seen this jeep hit the marketplace a couple times over the years (OG builder bought in February 2016, finished and sold around summer 2019). Each time only momentarily looking over the sale and then dismissing it quickly. Each time the price and timing just didn't match my abilities. Funny thing is that when i came across the OG builder at the annual Jeep Blessing i got to mentioning how the MJ was up for grabs again! I had once again dismissed it completely but for some reason after our weekend trip for the event i couldn't help but think the purchase over again. Soo after a conversation or two with my secretary (wife) this was actually a possibility after all! I struck up a conversation with the seller and we came to a deal. The kicker was this truck was over 7 hours away into Michigan's upper peninsula! A quick conversation with my brother and we were set for a road trip that very weekend! I will say that the deal went smooth, we made great time managing a 1 day turn and burn round trip. This is where it became Very Very clear that this was going to be a Rebuild project! The things i found before handing over the $$ were lets just say less than desirable. The truck had not been treated with as much care as it should have been leading me to the conclusion that these prior owners after the initial build must have more $$ than they did knowledge or ambition to make repairs. The brakes overall were not in great working order, low and behold the rear brakes were well passed overdue for replacing with this metal on metal action. To my surprise the seller had bragged about how he was still driving it to work 1-2 times a week! Yikes!! The springs if you can't tell are pretty well sacked/warped, the additional improvised rusty spring clamp was a clear indicator these would need some attention. I also don't approve of the factory style leaf perch or u-bolts either. Something like this especially being V8 swapped should have something more along the lines of the Barnes4wd or Ruffstuff specialties extended perch's at the least. Notice that factory monroe shock - big surprise both these rear shocks are blown. can't share these shocks without pointing out the muffler shop weld job on these shock mounts. Also the remains of a bolt head welded to that axle tubes for a former shock setup. Thankfully they atleast tried to make up the gap at the top and bottom with some bolts and even more poor welds. It clear to me the original build shocks were broken off at some point and this was their solution No sense in removing a bad fuel pump when we can simply zip tie the replacement to it right? This track bar has had a bad day or two or 3. Its been welded back together a couple times and even was welding directly to the unibody at some point. The bolts holding it in are not very tight and from the view of the coil spring the track isn't adjusted properly either. This lovely little disaster is the current battery setup. Bolts through some brass couplers connect both the pos/neg cables from short leads to the jeep. What a mess! We can absolutely do better than this! My final gripe is the lack of headliner. Riding in a tin can would be acceptable in an aggressive wheeling machine or a beater but this is essentially neither of those!

-
Ive been frequenting this forum enough lately that i figured its time to share the process. So i should start off by clarifying this is 100% the start of a Bought Not Built project. I'm not typically fond of this situation as i prefer the Built Not Bought moto. My exception to this deal is the fact that i followed the original build until completion and absolutely adored the Jeep! As you will soon see, i very much took on a Built but now needs Rebuild Project hence the Title to this thread. This is an 87 comanche, it had been sitting for some time and was scooped up then blown apart and LS swapped! At this point it has a 6.0L LS, 4l60e trans and 241C tcase. KP Dana 60 up front and a ford 10.5 out back. Long arm setup with radius arms, high steer knuckles, locked front and rear axles. 5.38 gears etc etc etc. The original builder finished it and a relatively short while after sold it off to focus other projects he had.
-
Thank you. I drafted in high school as well. I'm familiar with that egg drop assignment too though we had to construct a carrier device out of toothpicks. The egg drop was kinda a mess but my drafting was on point! ;) I absolutely enjoy doodling and drafting my ideas before hand so this process was no different. Duplicating the template and then exploring my materials and abilities (Keeping it cheap!) to make this steel version has been a pleasure. Definitely feeling like i nailed it!
-
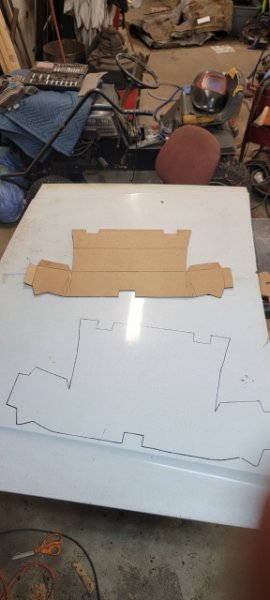
More glovebox work. Thinking about the amount of work ahead of me on the 1st metal version of the glove box tray had me thinking of a simpler solution to keep on this metal version. Fortunately i found a bigger sheet of the same cardboard material i made the 1st template out of, this made for a duplicate single piece glove box tray. Bends and dry fitment of this version was excellent and soo the easier way i could duplicate exactly that was to go with thinner sheet metal. This led me to the parts pile out back and an old XJ hood - perfect use of a rust hood! Traced out and cut out, then duplicated the bend lines. I then grabbed a chisel and rubber mallet and went over all my bend lines. 2 passes, 1 light and 1 hard and this version of the tray got pretty simple to form and manipulate and before i knew it the tray was basically in final shape! its a beautiful thing! I marked up the mounting holes and after i source a few sheet metal retaining clips and hardware i'll drill the holes and mount it up officially. For the over lapped section(s) my thoughts for now is to use a couple rivets to secure is final form.

-
Glove box rebuild progress again! My template's transferred to metal and then hit them with the plasma gun. Guide piece and drag so cuts not perfect but functional. Small cutouts for hinge(s) and latch by free hand. This 1st assembled cutout fits really well (especially as one piece ) but could be tighter. As is right now the overall opening is just a little oversized. If I were to tighten the fasteners down it would have to favor top or bottom. Some trimming will fix that! Material is 13g sheet metal - absolutely could be done with thinner material but i state again - utilizing leftover materials so it is what it is.
-
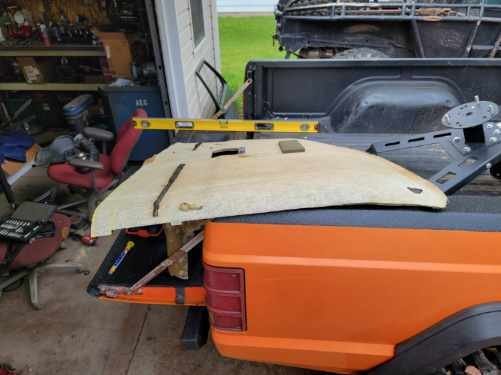
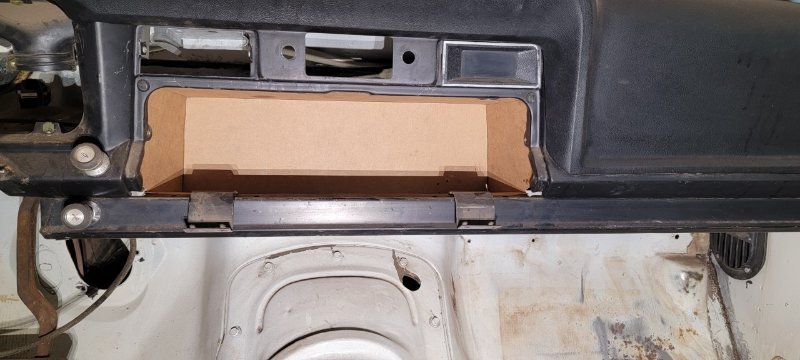
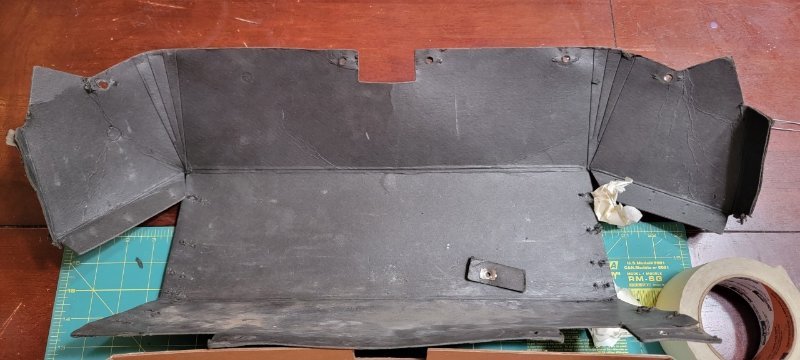
Midway floor progress interruption! Got to thinking about what else i can do on the days I'm not in the garage, like when I'm stuck at work... That glove box tray has been calling me! It says "Hey I'm just a cardboard type material and i will absolutely deteriorate over time! Take advantage of your empty dash and make me a steel twin!' I could not resist! I carefully dissected the the tray and removed the staples which kept this things form. Laid it out flat and while i wanted to duplicate this as one piece like it comes originally however the cardboard material I'm taking advantage of at work arent in big enough for a single piece version. As it is making all these bends in one sheet of metal is not what i intended anyways. I don't have the tools or skills to make that happen! Soo instead i traced the various corners and fold points and transferred them over in just 5 pieces. With the help of some masking tape this version fit remarkably well. Like a Glove! Absolutely well enough to give me the confidence in making a couple changes and then transferring them to steel soon! Fwiw I'm aware BJs offroad makes a plastic variant of this (Unsurprisingly can't speak of this side project and not be reminded of them) and its not terribly priced. However i have more time and materials than extra $ at the moment. Taking a break on the funds through the holiday - this gives me something to play with in the mean time... Along with prepping the floors as well off course.
-
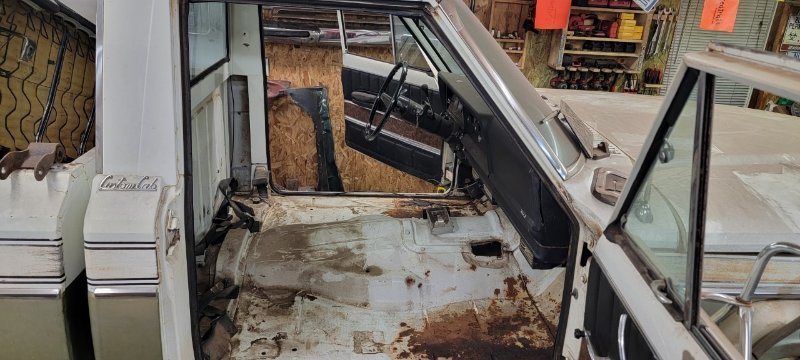
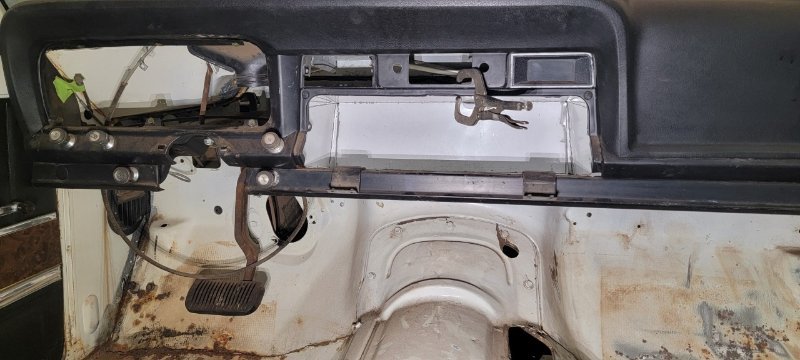
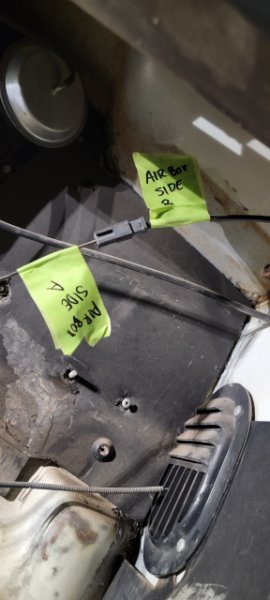
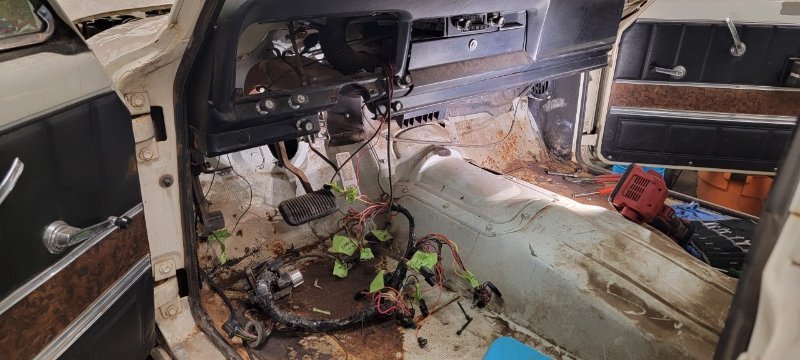
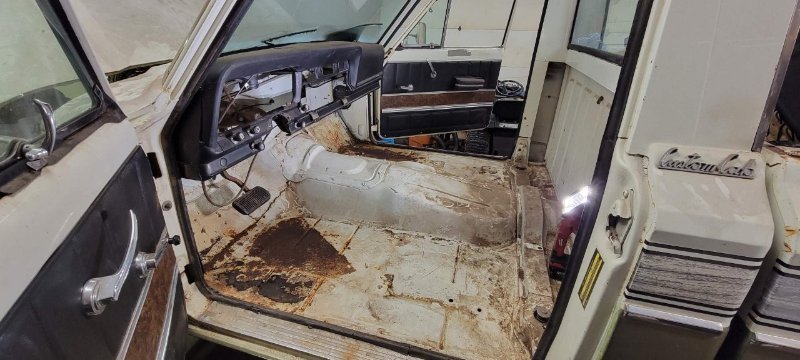
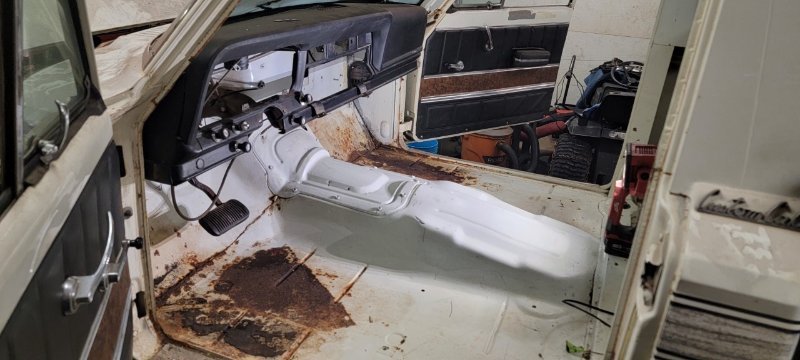
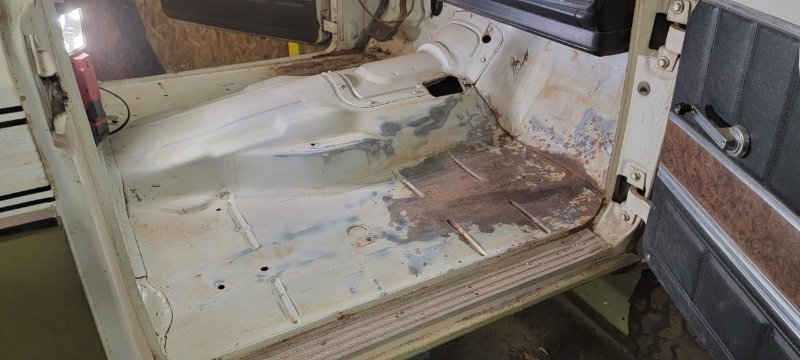
Back into the dash we go! This wasn't nearly as complicated as i had anticipated. What you see on the floor there is the entire wire harness from under the dash. interesting side note - I didn't realize the 2 knobs on either side of the steering column and lowest part of the dashboard are for side vent doors. This makes sense as being part of the hvac system but had never considered separate knobs to control either drive/passenger side. Creative word play and painters tape clears up some of the confusion of what is supposed to go where. Also closer pic of the side vent and cable to adjust blend door. Finally gutted! Gave it a quick wash with some purple power with an exception to the surface rust on the floors, this cab looks excellent! And so i started sanding out the passenger floor. Started course with 80grit and finished it off with 320grit. Gave it a wipe down to end my evening in the garage. Going to hit the finer spaces with a wire brush and then hand sand those out by hand the next time i get out there.
-
Very happy with its overall condition, besides a boat/trailer combo hitting the front driver fender and apparently a tree or something denting the brow over the windshield its a very straight solid truck. Rear bed seams are the worst part of this whole truck but for the price and relative condition for its age. I got a very good deal to say the least.
-
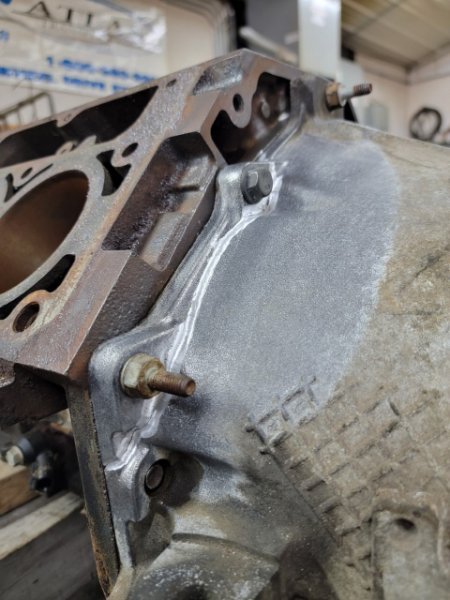
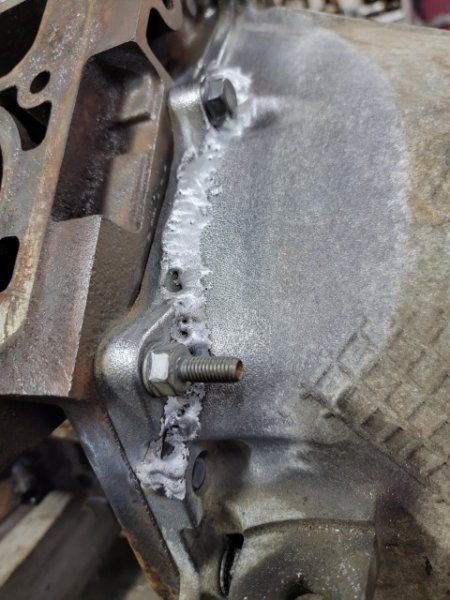
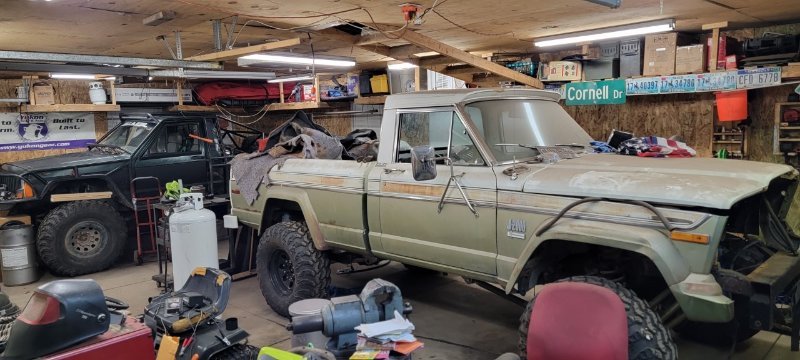
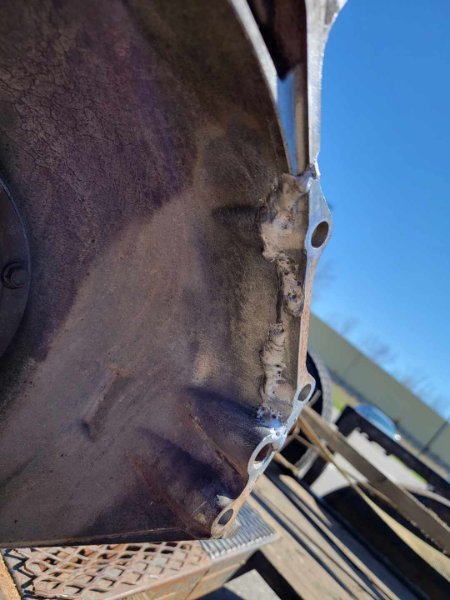
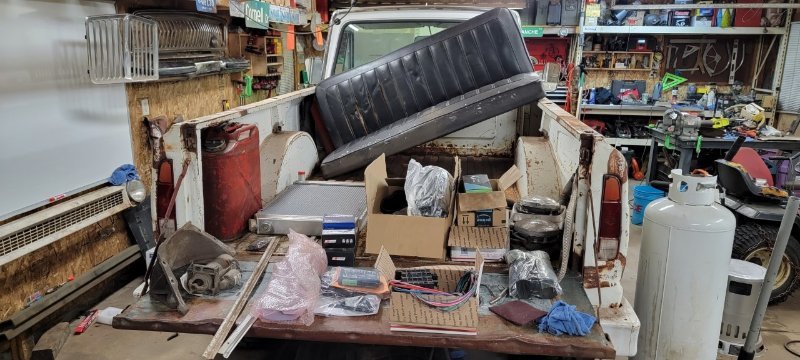
i really need to keep up on this... So i managed to get this bellhousing "repaired". For your viewing pleasure i bring to you my very green attempt. Went through 2 cans of brake clean wire wheeling the heck out of it. Then went back over my work with a stainless steel brush. Repeated the process again after opening up some of the area with a deburring bit. Will it hold up? No idea - i guess we'll see The truck has basically sat the majority of this summer otherwise. Sure i got the rear axle cleaned up, shaved, re-geared and locked up. I also got the 241C HD built and mated to the trans as well. Only recently have i finally gotten my sights back into getting somewhere with this project. Gutted the garage in preparation for winter and slung the Truggy into the other corner of the garage for a change. Instead of pulling the Jtruck in through the single stall door like i have in years passed, this time around i decided to park it perpendicular to the doors and retain straight through access to my tool box and bench. Also gives me space to tinker with other things if i need to. Started out by cleaning out the interior of all the accumulated parts and etc. Quickly followed up by emptying out the bed. All that remains are the goodies i soo eagerly want to make use of finally! Gonna start back into this with the interior of the cab. Clean up the floors and prep them for some raptor liner. Also make my way into the dashboard to remove the steering column, cluster and airbox. Then i can get a gist of the wiring and also better access to get that raptor liner up into the firewall as well.