

87MJTIM
-
Posts
3037 -
Joined
-
Last visited
-
Days Won
9
3 Followers


87MJTIM's Achievements
")
MJ Maniac (8/11)
-
looking for your Comanche literature
87MJTIM replied to Pete M's topic in MJ Tech: DIY Projects and Write-Ups
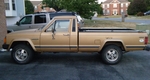
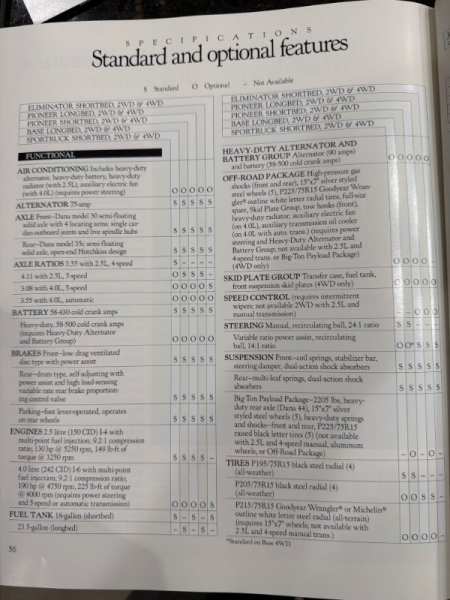
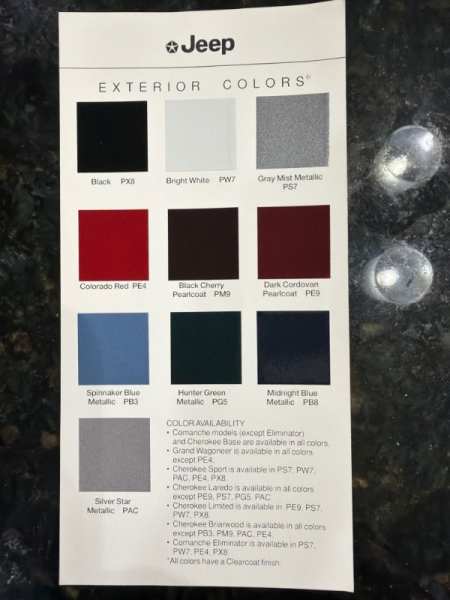
1991 Jeep Book and color swatch from my 91 XJ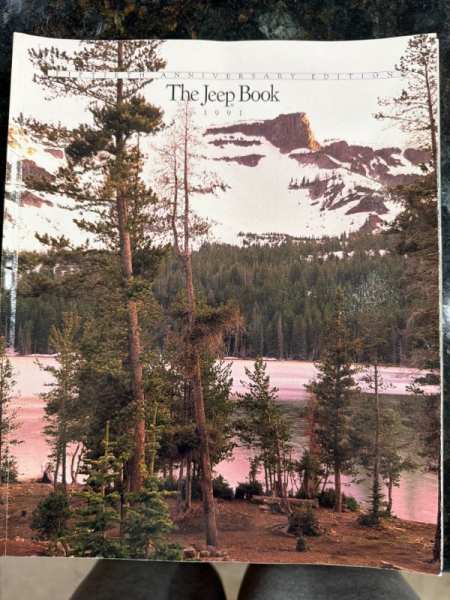
-
I can remember when dirt was young.
-
One of my brothers bought a 64.5 Mustang coupe with a 170 3 speed in ‘78. He joined the Air Force in 1980. My dad bought it from him. I drove it to high school for two years. It wasn’t a fast powerful car. But it was fun to drive.
-
Fuel system venting - high level of vacuum in tank
87MJTIM replied to 87MJTIM's topic in MJ Tech: Modification and Repairs
Follow up/Conclusion: I tested the pressure in the tank by placing a baggie over the cap held in place with a rubber band. When I opened the cap, the baggie filled up like a balloon. So, it was pressure and not vacuum. I looked at the system to figure where to start testing for the problem. The easiest place to start was the EVAP canister. I used a vacuum pump on the vent line in the engine bay at the EVAP canister. I pulled 15 lbs. vacuum and it held steady. I did the same testing at the 'T' connector at the tank. The line to front was clear; it did not hold vacuum. However, both lines to the Roll Over/Vent Valves (RO/VV) held vacuum. Great! Now I have to drop the tank. I bought two RO/VV to have ready. Finally, the weather cooperated for me to do the work. I moved the drive shaft out of the way. I dropped the tank skid plate. I disconnected the wires, hoses, and fuel lines from the tank. Using a Harbor Freight trans jack, I lowered that tank. Thankfully, it was below a 1/4 tank. Once I lower the tank, I saw the problem. During the truck's restoration, when the shop placed the bed on the rear frame, the vent hoses got crushed under the bed's ribbing. No air would flow through the lines. I tested the RO/VV and both were working fine. I replaced the vent hoses, being careful to route the lines so they would not be crushed. I reversed all my steps to get it back together. Thankfully, I had no spare parts laying around. -
This thread discuss CC diagnosis EDIT - corrected link
-
Fuel system venting - high level of vacuum in tank
87MJTIM replied to 87MJTIM's topic in MJ Tech: Modification and Repairs
It's vacuum. When I open the cap, the air is pulled in to the tank. After testing it, found that it was pressure. -
Fuel system venting - high level of vacuum in tank
87MJTIM replied to 87MJTIM's topic in MJ Tech: Modification and Repairs
I am the original owner. The 87 4.0 didn't come from the factory with the resistor. It was a later addition and dealer installed TSB. I can access the pump/sending unit from under the truck. It is side mounted. -
I have recently noticed a very high amount of vacuum in the tank when I open the cap. It started shortly after I swapped the OE pump/sending unit to the MTS pump/sending unit. The factory service manual doesn't cover the gas tank venting system, neither does the Renix fuel injection system cover the venting system. The new pump is much louder than the OE pump when priming. Does anyone have a diagram and/or diagnosis of the system? Is it possible the new pump is causing the high vacuum? BTW - My 87 did not come from the factory with a ballast resistor. It never received the dealer installed ballast resistor.
-
Replacing a lower door skin
87MJTIM replied to A-man930's topic in MJ Tech: Modification and Repairs
I bought them for my doors. I didn’t do the bodywork though. I’m pleased with the results -
The first step on the road to recovery is admitting you have a problem. It sounds like you are ready to take the first step.
-
-
Sounds like your CPS wires. Look in the engine bay at back of the valve cover for a connector
-
Cruiser and Hornbrod used go back-n-forth about Renix v. HO. I hope it was all in good fun...but reading the threads, I wondered if they would come to blows in person. There was a member that used to throw comments that were either off topic or the advice was incorrect. I recall Hornbrod replying with requests for support for the suggestions. The member would either: change the subject, not reply, or come back with an "Oh, Yeah!!" Other members stop replying to his posts. I have not seen him on here in few years.
-
Is that a CJ3A in background?
-
I removed the grill and ran along the bottom of the radiator with zip ties to hold in place. I had to take off the LF head light cover and fish the wire behind the light bucket.