reson46 Posted March 1, 2023 Author Posted March 1, 2023 To get everything to clear the steering box I bought a bracket kit to move the alternator up top and place the steering pump right under it. I eventually ended up using the accessories and brackets that place the belt closest to the engine, which I think is the C5 spacing.
reson46 Posted March 1, 2023 Author Posted March 1, 2023 For the radiator I already had a Flex-a-Lite aluminum radiator with the lower hose on the driver side and upper on the passenger side. For the hoses I used a combination of 90s attached to a Ford (I think it came off a Aerostar or Windstar) thermostat housing.
reson46 Posted March 1, 2023 Author Posted March 1, 2023 I was pretty happy with how the exhaust turned out. I wasn't looking forward to it. There was a lot of stuff in tight spaces that I needed to work around, but once I started it went really fast. I bought a couple of universal mandrel bent exhaust kits, a couple different Ys, hangers, and pie cuts to get everything to work well together.
reson46 Posted March 1, 2023 Author Posted March 1, 2023 For the fuel system I used the stock pump, a Corvette filter/regulator, AN fitting, and PTFE fuel line.
reson46 Posted March 1, 2023 Author Posted March 1, 2023 For gauges I went with Autometer. I think the fuel gauge in this pic is the wrong one. I order the wrong one initially. I think this one read backwards. I modified the stock cluster to fit the gauges. Used some LEDs to light up the turn signals, high beams, and check engine light. I put all the wires through a connector so the cluster can be removed easily.
reson46 Posted March 2, 2023 Author Posted March 2, 2023 For the transfer cases I had the doubler that was built with Jeep cases that included three pinion planetaries and the narrow chain. I had been collecting 231Cs and 233Cs whenever I would find one for a good price. Out of all these I wanted to end up with a double with six pinion planetaries and a wide chain.
jeff351 Posted March 2, 2023 Posted March 2, 2023 outstanding thread! I literally just spent 3 hours sitting here going through this build.
neohic Posted March 2, 2023 Posted March 2, 2023 4 hours ago, reson46 said: Let's see if I can prove you wrong. Awesome to see this back at the top!
19comanche86 Posted March 2, 2023 Posted March 2, 2023 If you’re using a corvette power steering pump you need to shim the flow valve down inside or you will blow the seals out of your steering gear box. I just went through it with my truck. Corvette pump operates at 1300-1500 PSI and the stock gear box wants 700-830PSI. There is a company called Scram racing that makes a kit to shim the flow valve edit - looks like your using a PSC steering box. Would still check in to that. Would hate to see that get blown out.
reson46 Posted March 2, 2023 Author Posted March 2, 2023 There was a lot of wiring going on during all of this. I used the Camaro harness that I thinned down to just what was needed for the engine and transmission.
reson46 Posted March 2, 2023 Author Posted March 2, 2023 I think this set up and placement ended up moving the transfer cases around two inches forward. I got a new rear driveshaft, shortened the front driveshaft, and had to change my carrier bearing mount to move it forward too.
reson46 Posted March 2, 2023 Author Posted March 2, 2023 I decided to run a heavy duty solenoid to run all of my key on accessories. I also used a couple of bus bars for most of the power connections - one running off the solenoid and the other directly off the battery.
reson46 Posted March 2, 2023 Author Posted March 2, 2023 Made a bracket to mount the computer on the passenger inner fender. I ended up added a couple of thicker aluminum strips down the back to stiffen this.
reson46 Posted March 2, 2023 Author Posted March 2, 2023 Around this time it was the weekend before our Rubicon/Fordyce trip, I needed to leave by Tuesday, and I haven't even started this thing. I spent that weekend working non-stop to wrap up the last few things in hope of making the trip. I did end up getting it started. It ran great, but it was leaking almost everywhere, the alternator would charge, the gauges wouldn't work, and all those other little things that come up on a major project like this were not complete. At that point I was exhausted and knew I didn't have time to fix everything I wanted to before the trip. It was on to plan B. I loaded up the red MJ and hit some of the easier trails with my father around the Lake Tahoe/Donner area while everybody else ran the Rubicon and Fordyce Creek.
reson46 Posted March 2, 2023 Author Posted March 2, 2023 After I got back from CA I took a break and didn't do much to the MJ for several months. Then 2020 and COVID happened, which ended up giving me a lot of time for MJ work. So I got back to cleaning up all those little things and redoing a few things I rushed on.
reson46 Posted March 2, 2023 Author Posted March 2, 2023 The rear main seal was a big issue. So I got to take the transmission out and replace it. While I had the that apart I also replaced that plastic barbell. Also replaced the well used torque converter bolts.
reson46 Posted March 2, 2023 Author Posted March 2, 2023 With the 4.0L my passengers were always very impressed by the middle of summer heating performance coming from the transmission tunnel and floor. With the transmission out I made an effort to tame the interior temperature.
reson46 Posted March 2, 2023 Author Posted March 2, 2023 Replaced the front marker lights, sockets, and added LED bulbs.
reson46 Posted March 2, 2023 Author Posted March 2, 2023 When filling the cooling system or checking the level I was not happy with the amount of stuff floating around. I decided to add a coolant filter. I don't think I've seen any junk floating around since I added this.
reson46 Posted March 9, 2023 Author Posted March 9, 2023 Finding a cooler that fit the limited space left in the bed was not easy. So I made a mount that works with a couple of coolers we already had. I built it so that I could still take out the spare tire without removing the cooler mount.
reson46 Posted March 9, 2023 Author Posted March 9, 2023 I didn't have a lot of room for an intake and air filter. I wasn't interested in a hot air intake. This version completed sucked, but it at least worked while I was working through other issues.
reson46 Posted March 9, 2023 Author Posted March 9, 2023 I ended up using a later model LS MAF sensor with a Spectre mount, a few silicon and rubber elbows, and some oval to round exhaust tubing to make somewhat of a cold air intake.
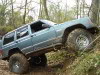
reson46 Posted March 9, 2023 Author Posted March 9, 2023 By December of 2020 I finally got it to a point where I was comfortable taking it wheeling for the first time since 2015. We went to Evan's Creek on a rare clear day for December.
Ωhm Posted March 9, 2023 Posted March 9, 2023 1 hour ago, reson46 said: OT: Love that vintage six drawer Craftsman's top box. I have the same one and it's still in use. Got mine in the late 60's'.

Recommended Posts
Create an account or sign in to comment
You need to be a member in order to leave a comment
Create an account
Sign up for a new account in our community. It's easy!
Register a new accountSign in
Already have an account? Sign in here.
Sign In Now