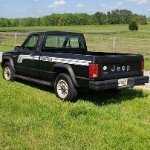
farmboi Posted June 28, 2022 Share Posted June 28, 2022 Brought this home to be the new farm truck. 1989 Base model SporTruck, 4.0 2wd, original and unmolested. Got it from the original owner's family, it was only titled in their name for a couple months. The only rust I can find on it is surface rust on the roof and a stripe on the tailgate where the topper has worn off the paint. Test drove it at 45-50, runs decent, no wobble Plan to use it on the property and for short runs to get feed, fuel and such. Need to get it running better, upgrade a few things then maybe paint. An upgrade to 4wd is in its future somewhere down the line. Link to comment Share on other sites More sharing options...
farmboi Posted June 28, 2022 Author Share Posted June 28, 2022 Noticed the busted ballast resistor when I went to test drive it so that was the first thing to get replaced. Oil in the air box so Cruiser54's valve cover mod moves to the top of the list Ordered all new vacuum harness and a fel-pro VC gasket Link to comment Share on other sites More sharing options...
farmboi Posted June 28, 2022 Author Share Posted June 28, 2022 Scored some center caps for my turbines $60 for the set on Ebay Link to comment Share on other sites More sharing options...
farmboi Posted June 28, 2022 Author Share Posted June 28, 2022 Waiting for parts so gave it a thorough cleaning inside in out. Removed the topper. Was going to remove the running boards, but they're kind of growing on me. Pretty sure the topper and running boards were either put on at the dealer or right after purchase. and threw in dash and seat covers to cover up cracks and tears Link to comment Share on other sites More sharing options...
farmboi Posted June 28, 2022 Author Share Posted June 28, 2022 Valve cover mod complete. The tubes had actually been drilled at some point but had not been cut off. Judging by the amount of oil in the air filter, just drilling them doesn't do much of anything. No shortage of baked on gunk, much cleaner now. Link to comment Share on other sites More sharing options...
farmboi Posted June 28, 2022 Author Share Posted June 28, 2022 New vacuum harness installed as well as a new air filter that isn't soaked in oil Put in a fel-pro VC gasket while doing the VC mod Also performing Cruiser54's cleaning and refreshing tips as well as general cleaning as I go. Link to comment Share on other sites More sharing options...
farmboi Posted June 28, 2022 Author Share Posted June 28, 2022 Big 7 upgrade Really love this product, pretty easy to complete as all the wires are marked with the locations. Threw in some battery terminal covers while I was at it. Link to comment Share on other sites More sharing options...
motownXJdad Posted June 29, 2022 Share Posted June 29, 2022 On 6/28/2022 at 3:50 PM, farmboi said: Big 7 upgrade Really love this product, pretty easy to complete as all the wires are marked with the locations. Threw in some battery terminal covers while I was at it. all solid mods for a new Renix owner lol, I'm going through the same process on my 90'. I'm following, also jeepcables.com is a veteran owned company👍👍 Link to comment Share on other sites More sharing options...
WranglerMangler Posted June 30, 2022 Share Posted June 30, 2022 On 6/28/2022 at 12:21 PM, farmboi said: Noticed the busted ballast resistor when I went to test drive it so that was the first thing to get replaced. Oil in the air box so Cruiser54's valve cover mod moves to the top of the list Ordered all new vacuum harness and a fel-pro VC gasket Do you have a part number for the resistor? I tried my local Napa but apparently got the wrong one because the truck will start and immediately die, went back to a junkyard resistor for now. Link to comment Share on other sites More sharing options...
farmboi Posted July 4, 2022 Author Share Posted July 4, 2022 On 6/30/2022 at 1:34 AM, WranglerMangler said: Do you have a part number for the resistor? I tried my local Napa but apparently got the wrong one because the truck will start and immediately die, went back to a junkyard resistor for now. Got it on amazon Crown Automotive Fuel Pump Ballast Resistor Air and Fuel Delivery # 33000682 Link to comment Share on other sites More sharing options...
WranglerMangler Posted July 4, 2022 Share Posted July 4, 2022 Awesome. Thank you. Link to comment Share on other sites More sharing options...
pizzaman09 Posted July 5, 2022 Share Posted July 5, 2022 Nice build. I purchased my Comanche because I just bought a farm that I am cleaning up. I really purchased the farm for the land to build a house on while simultaneously fixing things up and cleaning up junk. They make great farm trucks. The new owner of the first Comanche I owned purchased it to use as a farm truck too. Link to comment Share on other sites More sharing options...
farmboi Posted July 12, 2022 Author Share Posted July 12, 2022 Couldn't stand to look at it anymore. Had to have the roof done even though I'm not ready to paint the rest of the truck yet. Link to comment Share on other sites More sharing options...
Pete M Posted July 14, 2022 Share Posted July 14, 2022 On 7/12/2022 at 3:19 PM, farmboi said: Couldn't stand to look at it anymore. Had to have the roof done even though I'm not ready to paint the rest of the truck yet. I totally understand this sentiment. Link to comment Share on other sites More sharing options...
farmboi Posted September 18, 2023 Author Share Posted September 18, 2023 Where this seat bracket meets the floor has been screaming at me to pull the bench seat and vinyl floor to check the floors. After hosing the nuts down with PB blaster for a few weeks I got it done. I was really hoping I could re-use my factory floor, but it cracked and split in several obvious places, so maybe carpet is in my future. Link to comment Share on other sites More sharing options...
farmboi Posted September 18, 2023 Author Share Posted September 18, 2023 I knew that area was going to be the worst based on the rust on the nut/bolt/seat bracket. I am pretty damn happy that it wasn't as bad as I expected. These pics are after I shop-vacced it and gave it a wipe down. I think it looks worse in the pics than it actually is. Just surface rust, seems like there are more rust stains than actual rust. Some of the paint is just coming off onto the sponge which is a bit disconcerting. Link to comment Share on other sites More sharing options...
Drahcir495 Posted October 3, 2023 Share Posted October 3, 2023 On 7/12/2022 at 3:19 PM, farmboi said: Couldn't stand to look at it anymore. Had to have the roof done even though I'm not ready to paint the rest of the truck yet. Wow . . . The floor looks to be in great condition Link to comment Share on other sites More sharing options...
farmboi Posted January 29 Author Share Posted January 29 I did find a cluster of small spots on the passenger side where the rust ate all the way through the floor. The largest of them about as big around as a pencil. It wasn’t visible from underneath because the undercoating was still intact. I poked them out, cleaned them up with wire bore-type brushes and drill bits and then put painters tape underneath and filled with POR patch. Some weren’t all the way through, just divots, but I went ahead and filled those too. Link to comment Share on other sites More sharing options...
farmboi Posted January 29 Author Share Posted January 29 I ended up having 3 small leaks that needed attention, all on the passenger side. 1. Top of windshield dripping directly onto floor. The rubber floor kept it from doing any real damage over the years. Siliconed it. 2. Antennae grommet through side wall (pics). Replaced grommet. 3. Rear cab seam. Will replace seam sealer when I pull bed to paint it. Smeared some rtv on it to make sure that's what/where it was, which sealed it for the time being. First pics show grommet popped out; second pic shows trickle of water coming in there. Link to comment Share on other sites More sharing options...
farmboi Posted January 30 Author Share Posted January 30 The dash was pretty rough and needed to be replaced. Figured while I was at it, I might as well upgrade to a cluster with some gauges. Link to comment Share on other sites More sharing options...
farmboi Posted January 30 Author Share Posted January 30 Dash swap was actually way easier than I thought it would be. Originally bought a dash online because the local junk yard rarely has any but UPS destroyed it. Then one came into the junkyard, so went and pulled it (and it was cheaper). Tutorials for this are great but I actually learned quite a bit by pulling one at the junkyard that helped at swap time, so kind of worked out for the best. Link to comment Share on other sites More sharing options...
farmboi Posted January 30 Author Share Posted January 30 While it was out, I took the opportunity to remove all the aftermarket splices from the previous owner over the years, hoping that’ll rectify the parasitic power draw(s) that keeps killing my battery. Also did a fairly thorough cleaning and wiped everything down. Link to comment Share on other sites More sharing options...
farmboi Posted January 30 Author Share Posted January 30 I decided to go with a ¾ cluster. I’ve got a PRNDL, so ¾ made it easier on me. I remember using a trip odometer a few times back in 80’s before the novelty wore off, meh I don’t need one, and a tachometer won’t really be missed much either. End result is a bit of a bastardization, but I got the gauges I wanted, and it was a fairly easy swap just moved my speedometer/odometer over and only had to mess with the PRNDL fuel gauge slightly to make it work/fit. Added in the requisite sensors and everything works as it should. Plan to put the fuel needle back on when I fill the tank. Link to comment Share on other sites More sharing options...
farmboi Posted January 30 Author Share Posted January 30 No shortage of tags. Lots of wires still had their I.D. tags on them which I thought was pretty cool. There was a tire pressure decal tucked in there and another decal fell out as I was moving stuff around. Link to comment Share on other sites More sharing options...
farmboi Posted January 31 Author Share Posted January 31 The floor was in pretty great shape anyway but did the typical preventative treatments and hosed it down with a couple coats of paint. Link to comment Share on other sites More sharing options...

Recommended Posts
Create an account or sign in to comment
You need to be a member in order to leave a comment
Create an account
Sign up for a new account in our community. It's easy!
Register a new accountSign in
Already have an account? Sign in here.
Sign In Now