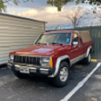
AdroitKirby Posted August 10, 2021 Posted August 10, 2021 First off, I'd like to say that at this point a whole lot of people's MJ are probably anachronistic. But I looked up the word on the search bar and no one had used it yet, so I'm claiming it out lack of creativity. So I bought this truck back in 2017 in Dripping Springs, TX. Apparently, the truck came from Dallas, TX or about 3 hours away. Still Texas! Anyways, there was already a few "mods" to it. Namely, the elimination of the vacuum heater valve and A/C delete. The PCV system was also disconnected for some reason. Trip odometer has never work nor did the gas gauge. 200k+ miles when I bought it. Engine has a rod knock. Drove from Dripping to Austin then 6 hours to my hometown with no problems though. Sat in my hometown for about 2-3 years before I could personally do anything to it due to college. Over that time, the clutch bottomed out and then the clutch itself was replaced. Not much else aside from that. I was pretty sure the floor pans were rotten. It looks like whoever used this truck used as a work truck and would usually take the easiest choice to keep the thing running. I respect that but I now I have to deal with it hahaha. The windows would get stuck if I rolled them all the way down. Mirrors wouldn't adjust. Oh and plexiglass. Some details: 1991 Pioneer I6 4.0 HO AX-15 2WD Dana 44 Here are a few pictures some years after I bought it and after my step-dad got rear-ended at a very slow speed. They're not great but I don't seem to have many pictures from that time or from when I bought it but I do have some ancient ones from when the dealership posted pictures:
Pete M Posted August 13, 2021 Posted August 13, 2021 looks like a solid truck, just needs a little TLC. that bumper is totally fixable. just talk to a body shop.
AdroitKirby Posted August 13, 2021 Author Posted August 13, 2021 Yeah, I've done quite a bit to the truck by now. I just haven't gotten around typing it up just yet
MiNi Beast Posted August 13, 2021 Posted August 13, 2021 Well look forward to more updates. Nice ride 👌
AdroitKirby Posted August 13, 2021 Author Posted August 13, 2021 Okay so that summarizes everything that happened to the truck between 2017 and April 2021. Now, I will say that due to money constraints, I have mostly taken to getting things functional with either functional parts from the same year or a supposed upgrade. I only get to work on the truck for about a week every several months since the truck is p far away from me. So I apologize for any of the times I should have probably cleaned something more thoroughly or anything of that sort. So I was home for about 5 days and I pretty much spent them on actually getting familiar with actually working on the truck. My other vehicle is a Subaru Legacy 2001. At least it's a manual. I pulled a brake master and booster from a rolled over '95 XJ. I also order a bunch a parts to my family's house where the truck is at. This included a replacement fuel sending unit + pump and some parts for the A/C system, including the heater core and evaporator core. At first I was planning on seeing how far I got with changing the MC+B and the fuel sending unit. If I finished that, I'd see if I had enough time to change the cores. So across the 5 days, I ended up changing the MC+B, with it taking me several days to make the new brake lines so they would seat properly. Took me four tries but I got it done. At the same time, I ended up dropping the rear axle and dropping the gas tank so I could dump out the sediment inside the tank. Both those things too me WAY longer than anticipated. Both from low experience and also from surface rust that kept falling on my face. The truck was also sitting at a 15 degree incline and my head was sitting towards the lower side, so all the blood kept going to my head. By the end of the week, I got both of those things set up. I drove it for about 5 miles before I had to head back to Austin. Now here's some pictures of the truck while working on it and some pictures I took for reference after everything was done:
AdroitKirby Posted August 13, 2021 Author Posted August 13, 2021 Gas tank before cleaning. I didn't think of taking a second one after cleaning because I didn't really think I'd do anything else with them: Here's one I took while trying to make the lines. It was a PITA: And here are pictures of my broken and rusted fuel sending unit that was inside the tank. I still have it and I'll probably try to refurbish it so my gauge reads the right way (turns out I installed a RENIX pump) but it currently stands as it was:
AdroitKirby Posted August 13, 2021 Author Posted August 13, 2021 And here are the reference pictures I took, since it makes it easier to what my truck may be missing and such. Also, this gives a better idea of the state of the truck. Paint is withering away. Rust in certain spots: My brother's dog, who kept taking the tools and hiding them from me:
AdroitKirby Posted August 14, 2021 Author Posted August 14, 2021 SKIP TO NEXT POST IF YOU DON'T WANT TO READ A WALL OF TEXT AND WANT PICTURES After this, two months passed but I think I had an obsession spree where I compulsively went to the junkyard during that time. Just looking for stuff that I could replace on my truck. I'm just going to list the parts I found or ordered. Since I was just taking stuff from different years I decided to try to keep track what vehicles I took from: From a '91 XJ Laredo Door cubies (or whatever they're called) Chrome door handles Grab handle (better condition that the one on my MJ) Front headight chrome bezel Vanity mirror harness Center light (since the headliner is damaged and since I'll have to replaced it, I thought I might integrate the headliner center light into the MJ) 1 .45 +P round From a 94' XJ Sport A/C compressor and that one rare liquid line going from the evap core to the R/D R/D for the connection fittings Upgraded battery cables and grounds From a '95 XJ Base trim (different one from the one I pulled the MC+B from) Dash assembly (one visible hairline crack that I made while pulling the damn thing) Spare thermostat for the A/C system From a '93 XJ Sport A/C compressor (I just wanted the A/C clutch plate (it was in better condition than the other one I pulled but there was no way I was going to take that off while at the junkyard so I removed it and then replaced it with the one from the '94 XJ. I then returned it. Before putting the better clutch assembly, I replaced the bearing with an NSK bearing.) Header panel 8 Remington 12g slugs From a '93 XJ Limited (this one was from a different city. Didn't realize it wasn't a pick n pull but one where someone else pulls the part for you) RX-173 (it works after I tested it with a battery and a spare speaker I had) From an '89 XJ Laredo (This one had a full RENIX cluster but was crushed before I knew they were rare RIP) Header panel chrome bezels (I know they don't precisely match post HO header panels but I'm determined to make it fit ) Windshield chrome trim Chrome tilt column lever Bumper guards Cigarette light panel + light + cigarette lighter itself (it matched the way my headlight switched looked) Grey instrument cluster bezel Chrome drip edge (only right side, left side was damage BY ME, to no one's surprised Underhood light (the retractable one) I tried taking off the CC stalk but I tore the cable RIP From a '96 XJ Sport (This one has a D30 with a 242 TC) Visors 242 4WD Lever bezel Courtesy light Headlight harness w/fog light harness Fog light + rear defroster bezel, button and lights (Gunna use the rear defroster as a hold button down so truck can start similar to clutch down to start) Underhood lining Battery holder Non-breakaway mirrors From an '01 XJ Sport: Exterior + Interior window weatherstripping Bracket for cruise control servo/vacuum actuator From a '98(?) ZJ Laredo: Door weatherstripping From a '97 ZJ (Idk what trim it was): 136A alternator KC Daylighter Spot beams + harness (they were $7 each so I figure that'd I'd take them) CC servo/actuator From an '87 XJ (forgot the trim level but this one has the AMC black interior): Chrome drip edge (left side) Misc: Original shift lever Parts ordered: Remaining A/C hoses R/D Condenser Steering wheel (the one that had a steering dampener or whatever) Window cranks Replacement cables + rotor+rotor cap (nothing fancy, the one from RockAuto, just preventive since the old wires looked pretty bad 703 4-hole injectors Okay, so after the two months of collecting stuff, I was able to go home for about 6-7 days. My stepdad got the bumper fixed but there is still damage on the actual bed under the rear light. This was a bit hectic of a week, with me spending 12+ hrs a day outside and getting killed my mosquitoes due to the high humidity. First day I installed the CC servo but since I couldn't repair the CC stalk, I left it as it was. I replaced the steering wheel since I had to take off the steering wheel either way. I then started with the front of the truck, taking off the header panel, headlight harness, drive belt, ac delete pulley, idler pulley, alternator and bracket, and air box. I then took off the interior trim pieces, headliner (there's two holes in it more than likely created by humidity leaking into the cab but more on that in a bit), bench seat, and carpet. It was here that I saw the holes on the floorboards. I knew they were there before and they were supposedly fixed but apparently not (according to my stepdad). Either way, I was originally going to put sound-deadening but I decided to wait until that was patched up. I took out the dash and HVAC box to replace the heater and evap box. I was already on my 4th day by this point. The thermostat removal from the old core was annoying as all hell. BUT I managed to remove it without breaking it. I did the putty thing someone on here suggested. I got that done and placed it back into the cab. I then put just the dash back in. Wish I had pictures so I wouldn't have to type all this out but I digress. I only have a few so I'll remember for next time. Right after this I swapped the injectors. Would have cleaned it a bit better but I was running out of time, and I'm going to have the engine rebuilt other components cleaned/finished either way before bringing it to Austin. Airbox went back in, then the A/C components, heater hoses, 136A alternator, new idler puller, new belt, and the rest of the front end parts. Then came the radiator and new condenser. I ran into a bunch of rust bolts but due to lack of pictures, I'll save the text. I also installed a new parking brake cable and I have a parking brake once again. The PO simply tied a cable to the original cable once it tore and tied it to the lever. Obviously, I tore after a while. Also install the chrome door handles and fixed the the right side door not unlocking/locking from the outside (plastic retainer on the latch and the rod came loose from the latch itself. Used an extra retainer I had). I ran the system under vacuum over night (after testing that the pressure held). I tried to fill it, ran into issues, and had to leave before it worked. I wasn't able to install the drip edge (I would have had to resize it), bumper guards (forgot them in Austin), and a few other parts but for the most part, I felt alright with the overall progress. My stepdad took to an A/C shop and there was only two leaks (probably from the O-rings) and that the fuse(or relay) had blown (more than likely because the truck had not had A/C in more than a decade or two. Either way the A/C blows cold now. I broke the retainer for the blend door cable. Pictures in the next post. Trying to keep all the text in one post so it's easy for people reading this to skip it and go to the pictures. I'll probably take a lot more pictures next now that I can share them and not bore people
AdroitKirby Posted August 14, 2021 Author Posted August 14, 2021 Disassembled (somewhat) front: Picture of disassembled (somewhat, haha) cab. Also, RUST: Someone put this to "fix" the window from window getting stuck all the way down: Wasp nest on my engine block because my mom doesn't like letting my stepdad drive the damn thing after someone rear ended him. I think it died when I turned the truck on to move in unto the driveway. I need to have the intake cleaned, along with the TB. But I ran out of time. Injector hole before and after: After everything was reassembled, A/C system in place: Interior and exterior at the end: Not everything way quite fully assembled yet but A/C works now. Spot beams are not hooked up yet. Radio connection seems to have disconnected. And a few other things.
AdroitKirby Posted August 14, 2021 Author Posted August 14, 2021 As to what I am at the moment, I recently ran into some smoker/vent windows and pulled them for $8 a piece. '93 XJ Laredo. Low quality pic: From the same XJ, I ran into a fake wood grain cluster bezel. The door panels with the wood grain were also there but I didn't have any money left haha (they also didn't match my interior): From the aforementioned '91 XJ Laredo, I took some chrome breakaway side mirrors. They don't move with the lever so I'll probably take some time fixing them. From the '96 XJ Sport, I pulled the A/C blend door cable retainer and a full cluster since my trip odometer wasn't working. Left kicker panel from a 2.5L '94 XJ Sport. Someone beat me to the turbine wheel caps. Turbine wheels are still there I also bought the heater valve from combination of the different XJs in the lot(I think I kept the '96 one), which I'm hesitant to reintroduce into the system. But I guess I'll decide down the line. Windshield wiper arms from a '98 XJ Base for when I go to fix my wipers. Then @Jeeper1093 sold me the actual chrome drip edge, so I won't have to shatter my brain trying to cut down the XJ edge! But as of this post, that is currently where I'm at. Things to address aside from the stuff I just bought to install: Floorboards Sound/thermal deadening Paint-job Engine rebuild + subsequent engine clean up Power steering pump rebuilt/replacement(it's leaking) Header panel swap + pre-HO chrome bezel install/mod Suspension maintenance (Decide whether to turn into 4WD or not before suspension fix) Transmission and rear diff maintenance Rear glass replacement (there's rust right near it and it will have to get repaired when it's time to paint the thing so I figured I might as well have actual glass on the slider window Door checks need the bolt/thingy that retains the door from slamming you Bolts for the underhood light Window regulator replacement New tires Fuel sending unit fix Possible shift lever knob original replacement Tailgate handle refurbish (kind of started it last time but it didn't end up the way I wanted it to) Bed mat or bedliner(?) Softopper(?) Radiator/hose replacement when water pump is replaced with engine rebuild Bench seat adjustment lever fix Headliner refurbish Chrome bumpers(?!?) CC Stalk install Decide between gray vs wood grain bezel/trim Possibly sand away the gray paint on the steering column so it matches the steering wheel. Part of it is already worn away either way Radio connection + new speaker + front tweeters(?) Fog/spot beam wiring (I'll probably set it up so I can have both a fog wiring and a spot beam wiring and just swap the connector depending on what I put on the bumper) Acquire front and TC skip plates(?) Service brakes Cargo light(?) Get a battery that actually matches the size required I guess I have my work cut out haha. It'll probably take me a hot minute and quite a bit of money
Pete M Posted August 15, 2021 Posted August 15, 2021 On 8/14/2021 at 12:12 AM, AdroitKirby said: I guess I have my work cut out haha. It'll probably take me a hot minute and quite a bit of money you're describing most all Jeep projects.
AdroitKirby Posted August 15, 2021 Author Posted August 15, 2021 58 minutes ago, Pete M said: you're describing most all Jeep projects.
AdroitKirby Posted September 24, 2022 Author Posted September 24, 2022 So, I had the engine rebuilt. I was only involved in buying the parts prior to sending it to get rebuilt and in picking the paint they used on the engine for looks. The rest of the engine bay is still not particularly pretty. My fuel economy bumped to 15mpg city and 18/19 highway. 17 mpg average. I forgot to take pictures, haha. It's now getting repainted. I'll upload pictures once I see it (and if I actually like the way it came out lmao). Either way, I discovered a hole in the exhaust. Not sure how much that affects fuel economy, but it definitely heats up the body under the seats (where the exhaust is leaking). There's also the thing about the EVAP system not working so the gas tank is consistently pressurized. I got some powered chrome mirrors off a '91 XJ, whose roof was crushed by the yard for some reason. Cannot explain as to why. The other XJ on the yard was also crushed. Sucks because it looked like no one had taken stuff from them yet. Either way, the problem will be figuring out the wiring and where to place the switch to move them. I also got the headliner redone, and the rear window replaced, as the sliding glass door was plexiglass. More updates once I go pick it up. I also had the floors repaired/welded with new floor pans. And bought the original 5 spoke aluminum wheels that came with the truck originally from a junkyard. Pulled them from a '91 XJ, and the printed date on the wheels even read a build date a day prior to mine. So close enough I guess! Got 2 pairs of chrome door handles, and a few other misc parts. New tires too. Ill get around fixing the suspension/steering at some point, but I'm already dreading it
AdroitKirby Posted November 2, 2022 Author Posted November 2, 2022 So I got a 4WD '96 AX-15 with an NP231 from a junkyard. Still have to go pull the front axle BUT here's how it looks with new paint: Still needs a polish and a few details worked out
Gjeep Posted November 3, 2022 Posted November 3, 2022 Great looking MJ — the High Output Laredo that should have been.
AdroitKirby Posted November 9, 2022 Author Posted November 9, 2022 Picture I took prior to adding the Softtopper and changing the front to full c h r. O m e (including passenger mirror) I really need to remove the remaining paint of the aluminum wheels. Plan is to leave them in plain aluminum with maybe a clear coat
AdroitKirby Posted November 9, 2022 Author Posted November 9, 2022 So while I like the factory power options. I've decided that I like the manual windows more for now. So I'm only adding power mirrors and doors. Idk where I'm going to put the mirror switch yet. I have the crossbody harness for a 91' but door harnesses from a '95. So I'm going to have to figure that out. The actuator has already been cleaned and installed. I also have spare wiring to figure out how to mount and wire the single door lock on each door. Aside from that, I still have to pull the front D30 in 3.07 from the same XJ I pulled the transmission and tc from. Anyways, here's some pictures for the moment. Some taken at night because it's my favorite time to drive this damn thing Picture of inst cluster and dual-clock setup for DS time A hope for a 242 case: Doors at the monent: Transmission and TC removal. $400 in total: Our donor A 1984 Dodge Rampage at the yard (RIP) [1B7EZ64C6ED171760]
AdroitKirby Posted November 17, 2022 Author Posted November 17, 2022 Found another RX-173J at a JY yesterday that looks to be in better condition than the one I have atm. Will have to test. Moreover, I had two issues the last two days. With the cold running over Texas at the moment, my oil filter went loose and spewed most of my oil out of the engine. Tightened it and problem was solved. Second, my electric fan decided to go for a joyride and run straight into my power steering pump. Had to pull one of the 8 blade fans cause that's all I could find at JY for cheap. Looks a bit damaged (rubbing) due to a loose support leg, so I'll have to fix that before attaching it. Getting 19.5 mpg highway now that I fixed the leaking crankcase vent hose.

Recommended Posts
Create an account or sign in to comment
You need to be a member in order to leave a comment
Create an account
Sign up for a new account in our community. It's easy!
Register a new accountSign in
Already have an account? Sign in here.
Sign In Now