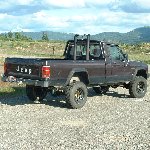
Stacks Posted June 10, 2012 Posted June 10, 2012 Hello all... new to the forum but not to Jeeps. Had this post almost done and got fat fingers and lost it all so I will try again. I have a '97 TJ that has reached it's intended build level so.... being recently retired and needing something to help keep me out of the pool hall. I decided to take my '89 Mj that I had used as a work truck and do some upgrades/mods to make it more trail ready. It was a stock 4.0L, 4x4, long bed, BA10/NP231, D30/D35 with 3.08 gears. Yes that is what the tag said... 3.08!! It now has a D44 from and '87 Cherokee, 3.54, SOA and the D30 has been re-geared to 3.54 and 4" coil springs installed. The engine has been completely rebuilt with .030" over bore and the head was also rebuilt. There is a CompCams 68-232-4 cam installed, 24lb injectors from a 318 cid Cherokee, home brew cold air intake with K&N filter, no 'cat', 18" glass pack and dual 3.5" stacks. There aren't very many detailed photos during the work as i hadn't found this forum until quite recently. I'll do better on the next mods.!! :oops: I am in the process of making a new front bumper, rear was done long ago! The first pix are just a progression of what it looked like when I got it in 2004 to what it looked like just before I started the new front bumper. With that.... some pix!!! MJ in 2004 when I got it... cost $200 with no engine but there were two 4.0L in the back!! MJ 2004 as it started its time as a work truck. MJ on the job 2007 MJ spring 2012 MJ early May 2012, roll bar, stacks, wheels and tires done. MJ May 24, 2012 SOA and front lift done. MJ May 24, 2012 SOA and front lift done. MJ May 24, 2012 SOA and front lift done. Here's a few of the engine work. The yellow pulleys and such are the result of boredom while waiting for the engine to get back from the machine shop!! Intake install. Intake install. Torquing the valve cover bolts. Engine complete with QC inspector standing by!!! Molly, aka, QC inspector would quietly crawl under a rig with you when you weren't looking and then.... a huge cold, wet nose would start snuffling at your nearest ear!! I got a lot of lumps on my head from that but a lot of laughs too! Molly was half German Shepherd and half Giant Schnauzer and 100% sweetheart!! She was also the best watch dog I have ever had. I had to put her down this spring as everything started to shut down on her. She was 16 in Nov. of 2011. She is greatly missed!! Had her since she was 8 weeks old! OK... more pix!! Engine complete. Engine in place. Engine in place. Engine in place. Next pix are of the roll bar and stacks being made. The roll bar is just cosmetic, made of 2" black iron pipe and the stacks are a Ford Econoline drive line, 3.5" OD. No 'cat' on the MJ. I made my own "Y" pipe/2 to 1 splitter, got an 18" generic glass pack from a local muffler shop, a couple 2 1/4" 90 deg elbows, some 2 1/4" flex pipe and... there it is!! Roll bar base section. Base section detail. Roll bar assembled. Stacks positioned. My roll bar frame tie in bracket. My roll bar frame tie in bracket. Roll bar and stacks installed. Stacks plumbed in. Muffler, "Y" pipe and flex pipe. The next is a short video of what the MJ sounds like with the stacks on it. Always wanted a pickup with stacks!! The link will take you to photobucket. I could figure out how to imbed the video here. Sorry!! Here it is MJ video with sound!! Turn up your speakers!!! This is a bit long for one thread but.... what the heck... just an old guy having fun!!!! More to come. Thanks for having a look and any and all feedback is appreciated. I thank everyone on the forum for the tremendous wealth of information, tips and tricks and photos here on Comanche Club!!! Keep it rollin'!! Larry
Tux_Fan Posted June 10, 2012 Posted June 10, 2012 Never been a huge fan of stacks but I really like your work. Its a pretty sweet looking truck too.
Stacks Posted June 14, 2012 Author Posted June 14, 2012 Now that the SOA lift is done on the MJ.... had to do my utility trailer too so the trailer tongue didn't go uphill at a 45!! lol Next is replacing the beat up/aged parts of the trailer. The tailgate is done as can be seen. Another on going 'build'. Onward and upward!! Larry
Zenobian_84 Posted June 14, 2012 Posted June 14, 2012 Nice job on the exhaust and SOA lift. :thumbsup: I always did like Maroon MJs. :clapping:
Stacks Posted June 17, 2012 Author Posted June 17, 2012 Tux_fan.... Thanks! Yeah stacks are one of those things ya either like or they are disgusting and silly. The ones that slay me are the ones you see on a fleet side pickup that come up outside the body! :shake: Red Rocker79.. Thank you! Eventually there will be a cross bed tool box to hide the stack 'plumbing'. Just have to snag a few more pieces of the diamond plate like the trailer fenders are made of at the local Pacific Steel scrap yard. I guess maroon is as good a call on the color as any. If you look at a place where the clear coat is still there it almost looks root beer colored and it isn't brown as can be seen from the left front fender.... Comanche Limited??... don't think so!! lol Finished the new lower rear shock mounts this evening and will get pix tomorrow and posted up. Used pieces of the D44 factory brackets that I cut off to make the new mounts. Hopefully this will give me a long enough distance between mounts to have a decent amount of travel. Time will tell!! More later!! Larry
Zenobian_84 Posted June 17, 2012 Posted June 17, 2012 If you look at a place where the clear coat is still there it almost looks root beer colored and it isn't brown as can be seen from the left front fender.... Comanche Limited??... don't think so!! lol Larry Hey, anything's possible. I turned my '87 SporTruck into a one of a kind SWB Laredo with some upscale interior :brows: You wouldn't believe some of the envious comments I've gotten from people I've met. :yes:
Stacks Posted July 2, 2012 Author Posted July 2, 2012 OK.... keep forgetting to get pix of the rear shock mounts. Grrrr... soon!! Working on the new front bumper. Last night was a major blue smoke night in the garage. Have the frame tie-ins built and was in the process of installing them so I could put the bumper in place and tack weld it. Was having problems getting the 3 bolts into the steering gear started. Maybe a little Captain and Coke would have helped!!! :headpop: To make a long story short.... the hidden stuff that is on too many vehicles bit my butt. That darn conjoined pot metal spacer that goes between the steering gear and the frame, of which I was obviously totally ignorant, had slipped out of place. :wall: Finally saw it but not before I had messed up the threads on one hole in the steering gear. Fortunately it was the very bottom one so I drilled it out and will double nut it with three tubes of loctite!!! Another mistake I did catch is that the drawing I was using for the bolt hole spacing for the frame tie-ins may be correct for an XJ but not necessarily for an MJ AND the hole placement isn't symetrical side to side on my MJ. There's nearly a 1/8" difference. I was going to have a local shop owned and run by a 4 wheeling friend, make the plates for me. He suggested making some templates in addition to the drawing. I made cardboard templates and then transferred them to 1/8" masonite to check my work. That is when I discovered the differences and the fact that each side is different. At any rate... got the materials and made the plates myself so I could fit them as I went. I've babbled enuf.....the blue smoke seems to have cleared out of the garage so I'm off to try the bumper thingy again!! Camera is in hand! Later, Larry
Stacks Posted July 6, 2012 Author Posted July 6, 2012 OK!!!! The new front bumper is built, painted and installed and the rear bumper stripped and re-painted. Below are some pix during the project. Bumper is made from 6" C-channel, shackle tabs are 3/4"x4" flat strap and the frame tie-ins are 1/4" plate. Started off with a dimensioned drawing of the frame tie-ins and soon learned... wasn't for an MJ!!! Got lucky before I started making swiss cheese out of the plate steel. Made some cardboard templates, transferred them to 1/8" masonite and used those to do the test fittings. Transferred those to the plate and all went well. Well.... if you disregard the steering box spacer goof up. :oops: My anti-Murphy Gremlins are in intensive anti-Murphy retraining. They mess up again and they are outta here and I'll get a fresh batch!!! :rotf: The bumper is nothing fancy.... just solid and functional. I didn't taper the height on the ends as I didn't want to chop off any of the fender and it would also expose too much 'stuff' to suit me. I may add a hitch tube with re-enforcing to the bumper later for a hitch tube mounted winch. Didn't want the extra overhang of a permanently mounted winch. There will be some cosmetic additions to the bumper. 1/8" diamond plate will be used on top of the bumper to close off the gap between the bumper and the bodyworks as well as beneath the bumper to give some protection to some of the front end parts. The top piece will be welded in place but the bottom pieces will be bolted on to preserve access to the frame tie-in bolts etc. The new front shocks were installed too. Just Skyjacker hydro ones for now. Next project is lower control arms, longer and with a bend in them for axle clearance. Enough babbling... pix below as well as a link to the Photobucket album. Thanks for having a look and as always any and all feed back is appreciated. Later, Larry Too cheap to buy new 6" C-channel so got some pieces at the scrap yard and made a piece long enough! :banana: Just another fitting!! Here you can see the 1/8" masonite templates. Tightening the last of the frame tie-in bolts!! Link to Photobucket album Thanks again!!
Zenobian_84 Posted July 6, 2012 Posted July 6, 2012 That is one good looking front bumper. :yes: I really like how it wraps around to the fender flares, :thumbsup: gives it more of a stock look than a lot of others I've seen.
Comanche County Posted July 6, 2012 Posted July 6, 2012 :thumbsup: Good rescue, looks like you're having fun with it which is what these Jeeps are for. Did you keep the topper?
Stacks Posted July 6, 2012 Author Posted July 6, 2012 Thanks Red.... things tend to sneak up on me when I'm out on the trails and I'm looking one way and that vengeful rock or tree comes at me from the other way. :mad: The wrap around saves sheet metal work. Metal working isn't my forte!! On another note... would a photo of my under hood decal be of any help for you for your decal graphics? Let me know and I can get some pix of it for you. Comanche Country... thanks and yes I still have the topper. It's made/marketed by Brahma. It's still doing protective duty behind the garage covering spare axles etc!! :D Yup puttering on my Jeeps keeps me out of the pool hall and also makes it so I have to walk to being crazy instead of just rolling over to get there!!! :rotfl2: Have a great weekend everyone!!!! :waving: Later, Larry
Zenobian_84 Posted July 6, 2012 Posted July 6, 2012 Thanks Red.... things tend to sneak up on me when I'm out on the trails and I'm looking one way and that vengeful rock or tree comes at me from the other way. :mad: The wrap around saves sheet metal work. Metal working isn't my forte!! On another note... would a photo of my under hood decal be of any help for you for your decal graphics? Let me know and I can get some pix of it for you. Comanche Country... thanks and yes I still have the topper. It's made/marketed by Brahma. It's still doing protective duty behind the garage covering spare axles etc!! :D Yup puttering on my Jeeps keeps me out of the pool hall and also makes it so I have to walk to being crazy instead of just rolling over to get there!!! :rotfl2: Have a great weekend everyone!!!! :waving: Later, Larry Wouldn't hurt to have a few pictures of it on hand. :thumbsup: You can PM with a link to 'em if you want. I might look into getting myself a topper like yours one of these days. That spare roof rack on top would be mighty useful... :yes:
Stacks Posted July 14, 2012 Author Posted July 14, 2012 OK... longer and bent lower control arms are done. painted and installed. Must have been holding my nose right, 35 minutes start to finish to swap out both lower control arms. :D Here's a couple of pix. Yes.. lousy welding! :roll: We picked up a refurbished plasma cutter this week. Now it's back to the front bumper and the diamond plate 'ginger bread' dress up for it now that I can cut long straight lines!! :banana: More later!! Larry
Stacks Posted July 28, 2012 Author Posted July 28, 2012 Here's some pix of the first part of the 'ginger bread' stuff for the front bumper. The top is done and awaits installation. It's just sitting on the bumper in the pix. Still debating on whether to weld it on or bolt it on. Hoping to do something similar for the bottom only angled down. That's the next part. Progress is a little slow cuz it's too warm to work in the garage during the day so it's a little in the morning and some at night til the noise is too loud for the neighbors!! :mad: Have a great weekend everyone!! Larry
Stacks Posted November 26, 2012 Author Posted November 26, 2012 Hope everyone had a great Thanksgiving with family and friends!! I ate so much I'm still waddling a bit!! Here's some more pix of what's been going on with my MJ. I'm doing a removable winch mount so I can use it front or back. Modified the front bumper for a hitch receiver and an additional frame tie in. There's also a photo or two of the beginning of my brush guard. Initial work on front bumper for receiver. Sure love the plasma cutter... hate my shakey hands when I have to freehand it!!! lol Additional frame tie in fabrication. Frame tie in fitting check. Frame tie in fitting check. Frame tie in assembled and ready to install Winch mount 'hot glueing ' :P Hmmmm... an almost passable weld. Trial fitting check. Trial fitting check. Fair lead and lifting handles installed. Fair lead and lifting handles installed. Receiver plug. Receiver plug. Control box mounting. Fitting check. Putting part of brush guard back on. The piece laying on the bumper behind the winch is the plug in set up for an onboard welder. Decided not to use it for winch power. Finished installation with home brew snatch block. Power connections will be done to battery cable ends on battery that have threaded posts for aux connections. Again... any and all feedback is welcomed!! Onward and upward!!!!
89Comanche4x4 Posted November 27, 2012 Posted November 27, 2012 looks good i like what you did with the front bumper
huck731 Posted November 29, 2012 Posted November 29, 2012 nice build. you are pretty good at metal work. I am in the custom metal fab industry so I have all of these materials at work....... whene you had the topper on, where did you mount your cb antenna and the cb itself. I have a location picked out in the truck but am up for new ideas. the roll bar is pretty nice also, gave me some ideas on building my own.
Stacks Posted November 29, 2012 Author Posted November 29, 2012 89 Comanche4X4...the basic bumper is pretty plain but functional and probably a bit of overkill in the mounting dept. Thank you! Huck 731... Thank you! I am a rank amateur at metal working, trying to learn though. If it was wood... much less of a problem. I'm getting to where my welding is almost pasasable. More projects and more practice!! The antenna, which is actually a ham radio 2 meter VHF antenna, was on a mag mount mounted at the back of the cab centered right to left. A CB antenna could be mounted in the same location for good all around reception and transmission. My radio is mounted overhead above the rear view mirror. I'll get a photo in the morning and post it here so you can get an idea of how it's mounted. Very simple. I mounted it very similar in my TJ. The roll bar is more cosmetic than functional. It's just made of 2" black iron pipe. I have a pipe bender but it's a cheapie and crushes the pipe even on minor bends so I just pieced the rollbar together. The upper loop should be a bit wider and a bit taller just to look a bit more functional. There's a frame bracket already in place from the factory and I have a graphic of the factory pieces that anchor the rollbar to the frame tie in bracket if you might want it. I didn't find it until after I had made my own but isn't that how it usually works?? lol Have fun!! Larry
jimoshel Posted November 30, 2012 Posted November 30, 2012 When you were welding on the winch, should have covered the cable. One weld splatter and instead of a 8,000 lb cable lt becomes a 7,000 lb. That said you do good work. And don't apologize for having fun. That's the whole idea of growing old,,,er,,I mean maturing. To have fun. :thumbsup:
Stacks Posted November 30, 2012 Author Posted November 30, 2012 Yup, I screwed up on not covering the cable!!! I did check afterwards, carefully, and could not see any splatter that got on the cable. Even took a magnifying glass to it!! Yeah... a bit of over kill. That seems to lurk in the shop for some reason. Most likely a product of breaking things over the years!! :doh: Old/olde is a 4 letter word!!!! Somebody told me once that when I made it passed 50... then I didn't have to grow up!!! I kinda like that idea!! :banana:
jimoshel Posted November 30, 2012 Posted November 30, 2012 Growing old is mandatory. Growing up is optional. If you're going to spell old. olde, then do you have to spell fart, pharte?
huck731 Posted November 30, 2012 Posted November 30, 2012 sure, lets see that graphic. the problem with my cb is that it is a cobra 29 ltd classic, one of those full size jobs. I have been thinking of bolting it to the backside of the center counsel, but that won't work if I go to a bench seat.
Stacks Posted December 3, 2012 Author Posted December 3, 2012 OK... finally got the pix of the overhead radio mount. It's been in place for 7 years. Yup... time to pull it and de-rust and repaint and yes, I need to put a headliner in too. Not a big priority right now!! lol Front mount is via sun visor clips. Rear mount is wedged between window frame and head liner. It has never moved or rattled. Plenty of clearance for this radio and the metal could be contoured to the shape of the roof closer for even more clearance for the Cobra 29. Metal is 1/8" sheet steel. That's what I had on hand when I decided to do this. Some 3/32" would be easier to shape. Just another shot that shows the vertical clearnce better. Here's a graphic of the factory roll bar frame tie in bracket. The one I made is similar but is one piece. Hope this gives you some additional ideas!!! Have fun!! Larry
Stacks Posted February 28, 2013 Author Posted February 28, 2013 Here's a teaser on the next part of the project. ;) ">http:// I have run into a couple issues with the install. 1) The RENIX intake manifold will not fit with the Clifford headers. The front two header tubes angle back too soon and the bottom front corner of the intake runners contact the header tubes. The fix was to get a '99 intake manifold. Fits great. That leads to the other issues, the mounting of the RENIX fuel rail on the '99 manifold and getting a different power steering bracket to match the manifold. Also modifying the HO throttle body to accept the RENIX TPS and rigging a new mount for the throttle linkage. More pix as I progress. Oh, also put in an A/F mixture gauge that accepts two inputs, hence the bung in each collector. I will have the muffler shop down the street make the new head pipes, add another glass pack, put in a balance tube and plumb it all to the stacks via flex couplings. More later!!! Larry

Recommended Posts
Create an account or sign in to comment
You need to be a member in order to leave a comment
Create an account
Sign up for a new account in our community. It's easy!
Register a new accountSign in
Already have an account? Sign in here.
Sign In Now