jonb8 Posted March 16, 2012 Posted March 16, 2012 Very nice MJ, I wish I had the money to build one right. I also wish I had the will power to keep it out of the mud, brush, rocks and tree's. :doh:
adam518 Posted March 16, 2012 Author Posted March 16, 2012 After seeing Rymanrph's rescue green truck, I decided that my MJ must have Ravine wheels. Since the Jeep will likely be a relatively light shade of silver metallic, I wanted a darker wheel to contrast the truck's color. I ordered a set of 5 hyper black Ravines today. Here's what I have coming: Hyper black is more or less a pewter or gunmetal look. Basically, they finish the wheels in black and then a translucent silver is applied on top of it to give it the look it has.
adam518 Posted March 17, 2012 Author Posted March 17, 2012 Just in case anyone out there didn't know...I'm a total dumb-a**. Tonight, I thought that it would be quick and easy to press my old u-joints out of the front axle shafts so that I could finish up the front end this weekend. I have no idea what the issue is with my frigging u-joints, but every single one of the joints pushed through the cap. It was a major pita. I cannot say I've done 100's of u-joints in my life, but have certainly pressed out several dozen and not even one time have I blown out a cap...now every one? :dunno: Gees...and when it was all said and done, the driver's side inner shaft flange looked a little off to me. I grabbed the calipers and it turns out 'ole genius me collapsed the ears about .040, definitely enough that it is now garbage. All is well now...I am home and after about 4 or 5 beers I remembered that my Comanche is supposed to be all about fun...and that it is. So to heck with the shaft, here's to good friends, tonight is kinda special
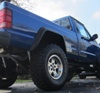
adam518 Posted March 20, 2012 Author Posted March 20, 2012 OK, so I was able to sneak an hour or two with the MJ yesterday. Got the axles & drum brakes all set up. All that is left to do with the rear is hook up the brake lines. Oh...I ordered a rear driveshaft today from Tom Woods and a new inner axle shaft for the driver's side from Superior to replace the one I mucked up...this thing may actually make it back on the road one of these days. Take a look at the shackle angle in this last pic...I'm not overly thrilled. The rear shackles are leaning back toward the front. Before I finished up, I loaded about 700 lbs of catalogs in the bed. Hopefully, that may help it settle a bit. With the catalogs in the bed, the shackles are leaning ever so slightly toward the rear, kind of like the should be when unloaded. I was thinking if it doesn't settle enough to correct the shackle angle, maybe I could redrill the shackle bracket to get the angle perfect. Any opinions?
Rymanrph Posted March 20, 2012 Posted March 20, 2012 Man I like those hyper black Ravines better than mine. Are you going to run spacers?
buffalob Posted March 20, 2012 Posted March 20, 2012 Curious issue you are having with the front sitting overly high. I just put the hell creek 4.5" full leaf packs under my short bed 88' and rubicon 4.5" coils up front...I sat so much higher in the rear, that I added another 1.50" spacer to the coils. The rear leafs will probably settle a bit, but for now with nothing in the bed I am still about 1.50" lower in the front than the back. And yes the whole truck sits higher than I thought it would...so I went with AEV pintler argent (basically gunmetal) wheels. The wheels are 8.5 X 17 with 4.25" backspace, originally I was going to stick with 32" tires... but with the added lift and the AEV wheels I bumped up to 285/70/R17 tires...over all just a hair under 33's. I too went D30 front & D44 rear with 4.56 gears and the same bilstiens...Love it. Man I dig your wheels..what size and backspacing are they? Your truck looks great...seems like we are following a very similar build plan. Bob
adam518 Posted March 20, 2012 Author Posted March 20, 2012 Man I like those hyper black Ravines better than mine. Are you going to run spacers? I figured that I would install them first and then see what it needs. The wheels should be here this week, but before buying tires, I plan to test fit my current XJ wheels and tires to see how they fit. My XJ has 33x12.50 Cooper STT's on 15x8 AR Bajas. The Bajas have 3.75" of backspacing. I really like the way your truck looks with the tires tucked in under the flares. I like that my wheels stick out on my XJ, but am hoping for a little different look with the MJ. It may end up riding on 32x11.50's to keep the extra width from being an issue and maybe I could run a small spacer and still keep the tires tucked in a bit. There's always 33x10.50, but that's too narrow, imo. Anyway, I have always felt the most useful tire size that doesn't exist would be a 33x11.50 R15. BTW, I think the brighter silver wheel you have work better with you color choice. With a medium/dark shade of green and all black trim, the silver gives a nice contrast.
adam518 Posted March 20, 2012 Author Posted March 20, 2012 Curious issue you are having with the front sitting overly high. I just put the hell creek 4.5" full leaf packs under my short bed 88' and rubicon 4.5" coils up front...I sat so much higher in the rear, that I added another 1.50" spacer to the coils. The rear leafs will probably settle a bit, but for now with nothing in the bed I am still about 1.50" lower in the front than the back.And yes the whole truck sits higher than I thought it would...so I went with AEV pintler argent (basically gunmetal) wheels. The wheels are 8.5 X 17 with 4.25" backspace, originally I was going to stick with 32" tires... but with the added lift and the AEV wheels I bumped up to 285/70/R17 tires...over all just a hair under 33's. I too went D30 front & D44 rear with 4.56 gears and the same bilstiens...Love it. Man I dig your wheels..what size and backspacing are they? Your truck looks great...seems like we are following a very similar build plan. Bob Hey Bob. The wheels have 5.5" of backspacing, so I am sure it will need spacers. I don't know just how much spacer yet. How high this thing actually sits will determine my tire choice and that will dictate just how much spacer will be required/needed. It's funny how we used the same parts with such different results. Mine still appears to be relatively level. The front has actually settled a decent amount with just the weight on the spring and sitting on jack stands. My last measurements are on my desk at work, but if memory serves, it has about 5.25" in the front and just over 5" in the rear.
buffalob Posted March 20, 2012 Posted March 20, 2012 I will be under the truck this weekend and will compare my measurements with yours now I am curious... I'll also try to put my hands on my part numbers for all the front end components. There are pics of my truck in both introducing my comanche and before and after threads on here somewhere, all were taken within the last month or so. I aslo started with a 2 wheel drive truck. our build intentions are so similar...I may need to pick another color...lol Later...
JeepcoMJ Posted March 20, 2012 Posted March 20, 2012 redrill the holes for the shackle angle. and the front control arms are too short...crazy bends in your springs when they should be straight vertical
adam518 Posted March 20, 2012 Author Posted March 20, 2012 redrill the holes for the shackle angle. and the front control arms are too short...crazy bends in your springs when they should be straight vertical Those were taken when they were just installed. It settled and inch and a half or so...coils are now straight, however I am still concerned about the control arm angles. They are steep...just not as steep as you seen in the pics. I'll try to get some updated pics posted.
adam518 Posted March 20, 2012 Author Posted March 20, 2012 I wasn't able to take any pics tonight before leaving work, but decided that it wasn't going to settle enough to truly help the control arm angles, so I ordered the CAD kit from Rocky-Road tonight. This is the point at which most other forums explode into the long arm vs short arm debate and that CAD kits will fall off in a stiff crosswind, 3-link set-ups have been known to prey after small children in the night and that radius arms & y-link designs are likely to run off with your wife. :dunno: For me...I have used their CAD before on my XJ. It's well designed, tough, rides good and allows me to use the components I already have, so it kind of comes down to $$. If dirt were dollars, I do still like the Rock Krawler 3-link design if for no reason than to do something a little different with this build. Oh well, the CAD will work well for my purposes.
adam518 Posted March 30, 2012 Author Posted March 30, 2012 I was able to stay a little late tonight and get my CAD installed. :banana: I also added a 3/4" spacer to the driver's side coil spring as it had settled more than the passenger's side. It was enough that it was bugging me. Now, it sits within 1/8" from side to side measuring from axle tube to the frame rail. After the install, the control arm angles look tons better. After getting home, I noticed the pics could have been better...the calipers are hanging right in front of the CAD.
adam518 Posted March 31, 2012 Author Posted March 31, 2012 Had to run by the office today, so I quickly installed my Tom Woods cv driveshaft...not much to take a pic of but I thought it looked pretty.
adam518 Posted April 15, 2012 Author Posted April 15, 2012 Wife gave me a pass to work on the MJ all day. I was hoping to get more done than I did, but it always seems that stuff takes about 4 x's as long as I plan. I didn't realize it, but 1991 2wd dirve calipers & caliper brackets are different from 1996 4wd calipers & brackets. At 1st, I thought I would redrill the caliper '96 brackets for the larger caliper bolts, but the calipers rubbed (barely) on the rotor. So, I removed a little material from the calipers to clear the rotors. Even still, the calipers we a tad thin (I think they were designed for a rotor that is not as thick). I just about had the driver's side done when I stripped the bolt hole where the caliper bolts to the bracket. Anyway, a trip to the pull a part for a new caliper bracket (and a front driveshaft I needed anyway) and I was good to go. I picked up a couple of reman proper '96 calipers and all is well. Gravity bled all four corners forever to get fresh fluid in the whole system and the brake pedal is rock hard. Cleaned the front driveshaft, installed a new front u-joint, painted it and got it installed as well. All I need to do now to get it on the road is install the drag link & tie rod, finish the tansfer case cable linkage install and do the header swap and exhaust installation.
adam518 Posted April 19, 2012 Author Posted April 19, 2012 Seat opinions anyone? I have pretty much decided on Corbeau seats. Originally, I was hoping to find '97 up XJ 2 door seats, but they have proved elusive & it is nearing the point that I will need seats. I talked to Corbeau and most of their reclining seats will fold forward to at least a 45 degree angle so that I can access the rear. Both of the seats I am looking at have the ability to fold forward & both have bolsters small enough that it shouldn't be a pain to get in & out of in a lifted vehicle. Here's my two choices: A4 in black & grey suede Moab in grey vinyl I like the idea of the simple Moab seat in vinyl. It is relatively inexpensive. Vinyl is easy to clean and very durable. However, I can't stop going back and lusting at the A4. Has anyone used either seat or have any opinion?
Rymanrph Posted April 19, 2012 Posted April 19, 2012 I can't see your pictures, but I looked them up. I think it would be hard buying seats that you can't sit in, but the A4s look like very nice seats.
adam518 Posted April 20, 2012 Author Posted April 20, 2012 I finished the install of my Novak Transfer case cable shifter tonight. It was a bit of a pita. The jamb nuts are large and there isn't a lot of room to maneuver a wrench properly. From the install pics on their website & instructions, it looks as if there is more room in the trans tunnel on a TJ. Their pics looked right roomy compared to the space I had to work with. Also, there's a bracket that attaches to the ends of the studs that hold the transfer case to the trans. My bracket wouldn't fit and I had to remove some material from it to get it to fit. I called Novak and evidently I am the 1st one out of thousands per year with such an issue...oh well. The guy wasn't exactly rude, but he wasn't exactly friendly either. It's not my intent to bash anyone, but in the future if I am in the market for something Novak makes and they have competition on the part, then I'll go to their competition. It is installed now & shifts properly. Before installing the shifter handle, I ground the detent off the shifter bracket so it no longer has the goofy "Z" gate deal when going into 4-lo. Now it is straight front to back with four smooth positions.
buffalob Posted April 20, 2012 Posted April 20, 2012 I dig the first seat option though I am not a two-tone type. Give me the same thing in dark greay or black not both. I went with the cable shift (TJ) kit by advanced adapters for the transfer case NP231 also from AA came with a fixed yoke and brand new waited a while to get it. minor issues with the install, agreed there is minimal room and more adapting ...no pun intended was required. In the case of the advanced adapters kit it is already straight front to back and shifts smooth and easy. only b*@$£...I have been waiting(still) for the correct shift arm for a cherokee (without the TJ dog-leg) in order to re mount my console without having to hack it up. The solution I am going to take involves a sawzall and welder :brows: how else am I to mount that spiffy momo knob to match the one on the AX15? My 4X4 conversion is complete and I am thrilled though it seems I need to learn to drive it all over again not used to a new clutch and the difference from the peugot tranny to the AX15. I will post up some pics after I get the truck back from fessy-built. she is up at Jarod's shop having the bumpers built. Another perfect day in the rockies. Bob in Denver
Motion Offroad Posted April 20, 2012 Posted April 20, 2012 Our opinion on the Corbeau's over the years; don't get them in sued. It just seems to fade so fast, and "wrinkles" so bad after it's been used for awhile. The black turns a purplish color. Corbeau makes great seats, we just haven't been happy with them in sued.
camjeep3 Posted April 20, 2012 Posted April 20, 2012 The A4s look like they would be difficult getting in and out, Just my oppinion. I have a hard enough time getting in mine, having to climb up in such a little area :roll:
adam518 Posted April 20, 2012 Author Posted April 20, 2012 Our opinion on the Corbeau's over the years; don't get them in sued. It just seems to fade so fast, and "wrinkles" so bad after it's been used for awhile. The black turns a purplish color. Corbeau makes great seats, we just haven't been happy with them in sued. Thanks for the advise. I was worried about that and called Corbeau. The guy who I spoke with was very nice and assured me that the suede was just as durable as the other materials. I appreciate your response because I had just about decided to go with the suede. By the way,are you guys a Corbeau dealer? If so, pm me a price for the Moab's in solid dark grey vinyl. It looks like most everyone on the internet has the same pricing. I assume that Corbeau has map pricing for their dealers, though some offer free shipping.
adam518 Posted April 20, 2012 Author Posted April 20, 2012 The A4s look like they would be difficult getting in and out, Just my oppinion. I have a hard enough time getting in mine, having to climb up in such a little area :roll: The bottom bolsters on the A4 are relatively small, but dragging my rear across them over time would probably cause them to wear quickly. Maybe the Moabs make more sense...but those A4's sure look sexy
adam518 Posted April 22, 2012 Author Posted April 22, 2012 Here's a couple of pics of the front steering linkage. I picked up a V8 ZJ solid tie rod at the pull-a-part to replace the sissy hollow tube MJ/XJ tie rod. I used a Go-Fer-It insert to move the driver's side tie rod end over the knuckle. I did the same thing on my XJ & using the Currie steering system, but the tie rod wouldn't clear the driver's side sway bar link without removing a lot of material from the link. The ZJ link has plenty of clearance due to the bend. I have it installed flipped 180 degrees from the factory. The adjuster was originally on the outboard side, but it wouldn't clear the sway bar bracket. It works perfect flipped and is tons stronger than the old MJ/XJ tie rod.

Recommended Posts
Create an account or sign in to comment
You need to be a member in order to leave a comment
Create an account
Sign up for a new account in our community. It's easy!
Register a new accountSign in
Already have an account? Sign in here.
Sign In Now