

1987Comanche
-
Posts
1073 -
Joined
-
Last visited
Content Type
Profiles
Forums
Gallery
Everything posted by 1987Comanche
-
Georgia: '92 4.0 Ho, Ax-15, 2Wd
1987Comanche replied to 1987Comanche's topic in Member Projects: Your Comanches
Been working on Georgia for the past few evenings. Fixed the interior lights, added the under dash courtesy lights, added the headlight delay module, replaced the missing windshield trim, and replaced the exhaust system with my jy spare system. It turns out the Renix SWB exhaust and HO SWB exhaust are very close but not identical. I had to cut all the welded tabs on the pipe, lengthen them by about 2.5", and move them back about 3". The HO cat is larger, which effects everything else downstream. -
Yep...after 3-4X you get pretty good at it ;) . The tough part is keeping track of the tow hook brackets. There's a funky nut that goes in the frame stub just behind the alternator. Keep close track of that...easy to lose if you forget it's not welded to the frame.
-
You don't need to remove those 4 plastic pop rivets. They merely hold the soft part of the inner fender to the molded plastic part of it. Fold the soft flaps towards the outer edge of the fender, then pull/roll it out of the way. It will hang down out of the way and you can access the front bumper bolts & horns.
-
Maura Gets A Facelift. 1990 4X4
1987Comanche replied to Biotex's topic in Member Projects: Your Comanches
Did your new camera arrive?? -
Removing Oil Pan On 4.0L With 4Wd
1987Comanche replied to dinghyboy's topic in MJ Tech: Modification and Repairs
I've done this 4 or 5 times. Put a set of jack stands under the LCA mounts, let the suspension hang free, drop the pan, use a combination wrench on the oil pump bolts, and drop the pump into the pan. You can change the RMS this way in about 3 hrs if it doesn't require too much cleaning. -
TSB=technical service bulletin. I looked it up from my archives: TSB # 18-54-89 Revision A M/T ECU: 53007842 A/T ECU: 53007843 These P/Ns were superceeded by a later number. The M/T ECU that I have is the superceded # (look for a MOPAR Reman tag on the ECU...has the P/N). As long as everything was hooked up correctly the fact that the engine came from an auto shouldn't matter.
-
There's a documented TSB on cold idle/driveway die out when cold. The factory ECU mapping is not correct for all temps. The fix is a MOPAR reflashed ECU with the correct tables. I don't remember the P/N offhand but there's a M/T and A/T version. I can verify the remapped ECU solves this issue...found that particular piece of unobtainum and ran it in my '90 for 2+ years.
-
For what it's worth my '87 2.5 had 3 different clusters in it: Base (out of a '90 4.0, speedo cable fit), 3/4 cluster (came with the '87), full cluster (out of either an '89 or '90). Of these clusters two of them were in the '90 4.0: base and full cluster. I had no issues with speedo cables in either truck. Also of note I upgraded the cluster in the '92 and found there are 2 different 91-96 H.O. clusters. '91-'92 with a conventional albeit electronic speedo, and '93+ with an odometer that's sealed in the speedo housing via plastic welds at the front. The '93 + also has a small plastic/lexan window over the odometer and is made by Mitsubishi. The '91-'92 does not.
-
Georgia: '92 4.0 Ho, Ax-15, 2Wd
1987Comanche replied to 1987Comanche's topic in Member Projects: Your Comanches
Pulled the dents on the pass side out this weekend. The rocker, cab corner, and front of the bed had decent dents/creases from the accident. The rocker is unchanged but I pulled the dents 80% or so of the way out (didn't want to paint it). A big C clamp and some body tools did the trick: Also took Georgia to 2 Pull-a-parts today and she did well on the 100 mile + trip though I need to chase down the oil leak. I now have a fully functional instrument cluster, windshield trim, and assorted other bits & pieces I needed. -
Georgia: '92 4.0 Ho, Ax-15, 2Wd
1987Comanche replied to 1987Comanche's topic in Member Projects: Your Comanches
Yep. I used Permatex Clear RTV silicone adhesive sealant to glue the badge on. I also used it to fix the 4 screw holes in the back of Georgia's cab (aftermarket amp). I was trying to figure out how to scrape the residue from the "Cherokee" badge off the fender and found the combination of Goo Gone and an ice scraper (non marring plastic blade) worked really well. -
Maura Gets A Facelift. 1990 4X4
1987Comanche replied to Biotex's topic in Member Projects: Your Comanches
Looking good, especially like how the roof turned out! I'm glad you decided to stick with white too :thumbsup:. Are you planning to put the towing mirrors back on her? -
Georgia: '92 4.0 Ho, Ax-15, 2Wd
1987Comanche replied to 1987Comanche's topic in Member Projects: Your Comanches
Georgia's clutch started acting goofy this week so I replaced the master cylinder. Seems ok for now but I have to keep an eye on it. Also replaced the radio and removed all the weird wiring from at least 2 old stereo systems. Added the carpeted panel for the rear of the cab that I scored from an '88 Elminator in the jy and started tending to some of the body work. The PO drove through some kind of industrial paint that WILL NOT come off the driver's side. Replaced the LR fender flare wtih one from the parts stash. Absolutely no complaints about the condition of the body: Also I no longer have a Comanche/Cherokee. I have a Comanche/Comanche Sport (sticker will not come off without collateral damage...). -
Georgia: '92 4.0 Ho, Ax-15, 2Wd
1987Comanche replied to 1987Comanche's topic in Member Projects: Your Comanches
Managed to get a lot done on Georgia this past weekend. I had to replace most of the accessories (idler pulley bearing was bad, A/C compressor got a delete pulley, and alternator started squealing). Continuing my trend of getting defective parts from Mexico, reman alternator #1 was bad out of the box. Alternator # 2 (reman in China) seems ok so far. I changed out the e-brake assy and now have one that works :banana: It was, however, a PITA to change. Why skillfully hide one bolt behind the fuse panel?? In any event it's done. Also went for my alignment this weekend. No issues from the accident :thumbsup: They had to order shims for the LCA so I have to go back in a few weeks. -
Maura Gets A Facelift. 1990 4X4
1987Comanche replied to Biotex's topic in Member Projects: Your Comanches
What are you going to use? Braided stainless brake hoses? :crossfingers: :popcorn: -
http://greenville.craigslist.org/ctd/3618123536.html
-
Georgia: '92 4.0 Ho, Ax-15, 2Wd
1987Comanche replied to 1987Comanche's topic in Member Projects: Your Comanches
Seat of the pants comparison says the power is about equal. I haven't done a compression test on Georgia but after 246K I'm sure she's lost some. Maura's compression, by comparison, should be off the charts. The idle of the H.O. is more stable than that of a Renix and the aftermarket support is much wider. If a H.O. donor came by for cheap I wouldn't pass it up... -
Georgia: '92 4.0 Ho, Ax-15, 2Wd
1987Comanche replied to 1987Comanche's topic in Member Projects: Your Comanches
Thanks! Hit a milestone today. Georgia was finally healthy enough to drive to work!! That being said there's still lots to do. Both the interior and exterior are still in desperate need of a cleaning, radio doesn't work, interior lights don't work, speedo gets stuck at 47mph, one turn signal doesn't work, etc, etc. But she's our plying the roads again...brought a new dishwasher home tonight with her too -
Bonjour! Comment ca va? C'est un bonne voiture parce q'elle est un Renix. En France Renault pieces d'auto sont belle. En les Etats Unis c'est mal. Le motor 2.1L c'est l'expertise de Automan2164. Vous searchez dans le forum pour le homme.
-
Georgia: '92 4.0 Ho, Ax-15, 2Wd
1987Comanche replied to 1987Comanche's topic in Member Projects: Your Comanches
Finished the brake system. OE master cylinder had leaked horribly, stripping the paint off the LF wheel well. Calipers were full of spiders and the LR wheel cylinder leaked and made a mess. I replaced the brake hoses, calipers, pads, rotors, wheel cylinders, shoes, & drums and put in a '96 XJ dual diaphragm booster with a '97 ZJ master cylinder. -
Input Shaft Seal Leaking, Or Is It?
1987Comanche replied to Biotex's topic in MJ Tech: Modification and Repairs
Interesting. Any pics of the old input shaft seal? Think it got rolled over on install? -
Maura Gets A Facelift. 1990 4X4
1987Comanche replied to Biotex's topic in Member Projects: Your Comanches
Those torx bolts are a joy to remove. You missed out.... You sending the tranny out for a full rebuild? I see the bellhousing is already off. Hope the tooth is ok this morning. That didn't sound like it was pleasant at all. I always cheat, drop the trans a bit and reach up to pull the 4 bolts holding the whole assembly in. -
There is no crank difference between the Renix M/T 4.0 and the A/T 4.0. There is, however, a difference between the Renix crank Dia and H.O. crank Dia. As you stated the correct pilot bearing for a renix running an internal slave AX-15 is .590 ID and 1.1OD. H.O. pilot bearing used for external slave AX-15 is .75 ID and 1.0 OD. If you are mating an external slave AX-15 to a Renix engine you need a 0.75"ID and 1.10" OD pilot bearing. You can, however, convert an internal slave trans to external slave, then the original .590" ID and 1.10" OD pilot bearing works just fine.
-
Engine Rebuild Questions
1987Comanche replied to Trapn6.0's topic in MJ Tech: Modification and Repairs
Look for my thread on the ATK reman 4.0 engine I put in my '90. The first engine from them was a horror story...it started spitting up cam bearings shortly after I put it in. -
The problem isn't necessarily making the light come on, rather it's making it go out when you go back to 2WD. If you cap the vacuum line at the CAD motor and leave everything else connected the 4WD light will come on. When you go back to 2WD, however, there's nothing to bleed vacuum from the line and the switch stays on. Ask me how I know....
-
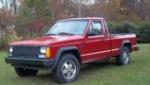
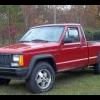
Georgia: '92 4.0 Ho, Ax-15, 2Wd
1987Comanche replied to 1987Comanche's topic in Member Projects: Your Comanches
Finished the front end up. I think it came out well: