
drcomanche
-
Posts
445 -
Joined
-
Last visited
Content Type
Profiles
Forums
Gallery
Everything posted by drcomanche
-
Vakarian's Comanche 'Trailbreaker'
drcomanche replied to Vakarian's topic in Member Projects: Your Comanches
Sure, I can pass them off to you whenever or wherever. And, obviously, I wasn't at Budd's Creek. Truck was just on the cusp of being done. Next year though. -
Vakarian's Comanche 'Trailbreaker'
drcomanche replied to Vakarian's topic in Member Projects: Your Comanches
It's all good. I have some some extra wheel well plastic liners if you'd like them. Took them off of Frankenstein and don't need them anymore. I also have some of the metal retainers, I think, but I did see on facebook that the fab guys hand made a few, so they may have that settled. -
Vakarian's Comanche 'Trailbreaker'
drcomanche replied to Vakarian's topic in Member Projects: Your Comanches
It looks really good so far. Very well thought out. Almost makes me want a new front bumper. -
DrComanches Project "Frankenstein"
drcomanche replied to drcomanche's topic in MJ Hardcore Tech: Epic Journeys to Greatness
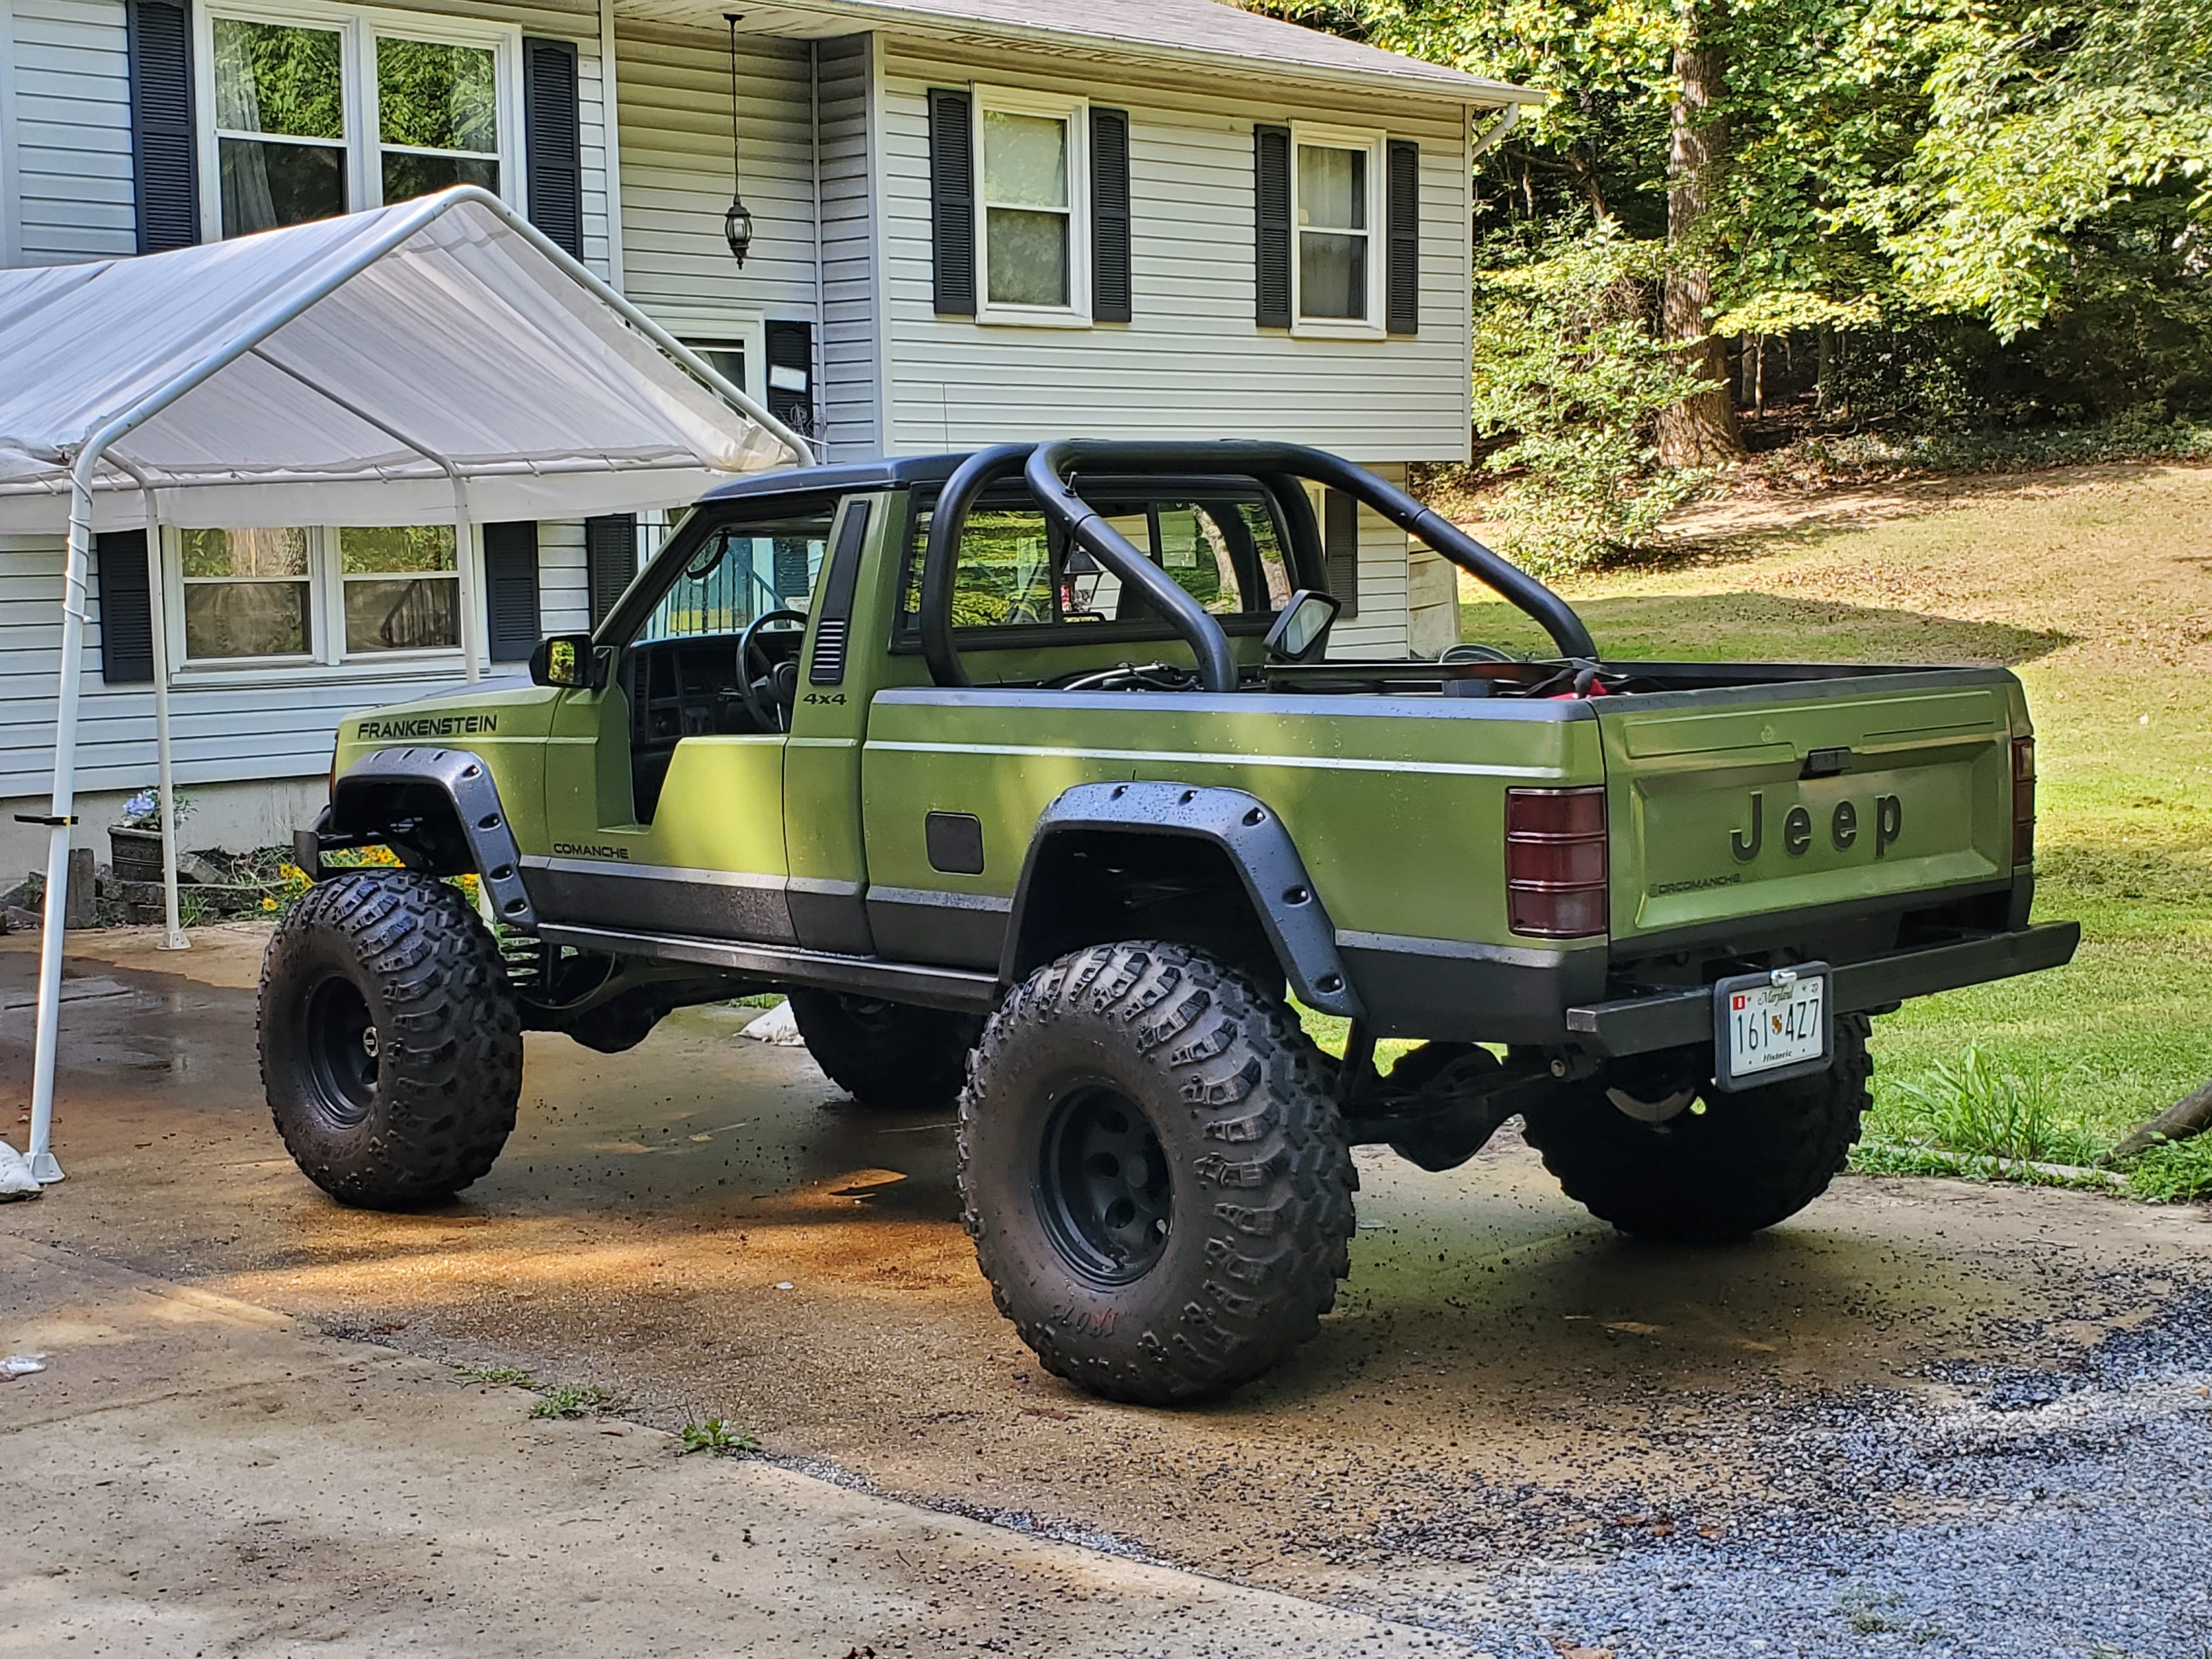
Again, it's been a while since I've posted but progress is moving along very quickly. I'll keep it short on the overwhelming details and give a basic idea of what's been happening. First of all, I figured out my tail light wiring issue. No amount of trailer harness boxes ever fixed it, so I decided it was as good a time as any to just open up the entire harness under the drivers side dash and work out all the electrical from there. While poking around, I kept coming back to the fact that the brake lights should be dealt with by the turn signal switch assembly. While taking all those connectors off, I finally found a guide picture that told me what color wires coming out of it belonged to what signals(It took a while to find one as the wiring manuals were always different or wrong). Turns out, I had no input for the brake lights for the switch to use, so I pulled one of the unused wires out(ignition chime, I believe, since I don't have that) and use the metal tab on the end to make my brake light wire fit in. Plugged it all up and everything works. Finally, I soldered and heat wrapped up all the wires and put it back together. In the mean time, i also replaced my very old shocks and all of my tie rod ends on the front. The old shocks were in pretty rough shape with most of them not having any resistance(and seeming to be filled with water). I replaced them with Skyjacker BlackMax shocks(really trying to keep with the black and green theme). The tres were JCR 1 tons and it took some real effort to break the old ones loose from the rods. But after replacing them, I greased up all the fittings I had, including the ball joints, u joints, and drive shafts. Afterwards, it ran smoother than it ever has. Turning was effortless now, and putting new ones on allowed me to correct the steering wheel offset. I also tightened up the pitman arm, which had worked it's way loose. Fortunately, no wear on the splines. I did notice that my wheels have some camber difficult, leaning in at the bottom, but I don't have any older pictures from before the front axle work to compare it to, so I'm not sure if it's been like that or not. It's not an incredible amount, but it's noticeable. I finally received my new(to me) wheels and tires for it. I took a while prepping the tires(cleaned and degreased then coated with a heavy duty conditioner). I also needed to install some small spacers to keep the tires from rubbing and to change the lug pattern to the wheels. The biggest difficulty was the front wheels being a hairs width too small in the center to fit the hubs through. I lightly sanded it a bit, working slowly to keep it even and now they fit snug. The only issue now is that I need to balance them better. I tried tire beads because I've had good results before with them, but this time, it's just too random. It shakes and shimmies sometimes, bounces around when excellerating, and causes all kinds of problems, but only some of the time, like the beads sometimes get it right and balance properly. I purchased some stickers from Jeepsticker.com just for my doors since I'd rather go with heavy vinyl than emblems. They looked so good I asked him if he could possibly do some special custom stickers for me. He's currently working on it. I also got my hands on some Napier fender flares and installed those as well. Getting the first cut out was a nightmare and despite my constant questions, I did eventually manage to figure it out and get them all mounted. Now, the truck is in having the rusty rockers cut out and replaced with some 2x6 1/4" steel tube for rock rails. I took it back to the guys who did my frame repair, since we had talked about it previously and they do really good work. With that and a few other smaller details around the truck, it should be done in a few weeks. And now for the pictures The leaning tire Some of the rusty floor board that will be get repaired with the rockers The bed after the cut. Never realized how much bondo was on that section. It really shows. One of the fenders after being cut out. I tried to smooth it out as much as possible. The new shocks All installed Tires after a good cleaning A comparison of after conditioning A close up. They have some rock rash as they were used before but the tires were pretty much brand new. Also go the center caps on. Door Stickers New Rod ends I also took the cab vents off to redo the foam seals around the edges and repaint them since they looked bad before. How they looked before, cracked and flaking paint. The bottom one was after sanding it down. New wider seals that I left around the vent section because the cab bends in there so it provides a better seal. Finished product. That Ace Truck bedliner is about the most versatile, easy to use spray on I've ever seen. Such a good product. The flares I received had what seemed to be a bad cut on one that made it not quite line up, but in the end, it wasn't a big deal. Me checking the torque numbers on the spacers to make sure. Before flares After flares Getting steadily closer to finish(relatively) -
Vakarian's Comanche 'Trailbreaker'
drcomanche replied to Vakarian's topic in Member Projects: Your Comanches
Oh, hey, you saw Frankenstein out there. Nice to see some other Comanches in the area, I was about to leave a Comancheclub business card with them for you in case you weren't on here. So you're the lucky one getting that nice new bumper? -
Welcome to Epic Tech!
drcomanche replied to johnny quest's topic in MJ Hardcore Tech: Epic Journeys to Greatness
This will be an incredibly useful resource to a ton of people. Can't wait for it. -
Tail Light Splice Circuits?
drcomanche replied to drcomanche's topic in MJ Tech: Modification and Repairs
I have a set of wires that bundle and go towards the back(my fuel pump set, tail lights, basically anything rear electrical) that have the leads to the tail. The wires under the dash that are the source are part of a huge bundle. I ran multimeter tests to determine which was which. When I first posted, I thought it was less about the incompatibility of the wires and more that it's just a mess of connections, but now, it's very clearly a wire setup for a Cherokee vs. the Comanche. It was from a 94(they said. I'm inclined to believe it for the most part because of other items the engine has). And as far as how much, it's really hard to tell. It's a hack job under there. Even the engine bay was a spliced together wreck. So, as far as I can tell, both the engine and the cab are spliced harnesses. -
Tail Light Splice Circuits?
drcomanche replied to drcomanche's topic in MJ Tech: Modification and Repairs
Back again with some more info since I've been spending all my time trying to fix this issue. Here's what more I know: I purchased a tail light wire converter(for trailer wiring) to throw in the linkage (finally found that on a hot rod forum) that effectively turn my 4 wire system into a 3 wire. Seems simple. Just wire it in how they say to and all should work. I've been through 2 different companies now, and both have the same issue. I can hook up all the necessary wires to each other, but it won't get a signal through. When checking with a multimeter, it shows there is no signal coming out of the box. Nothing was making it through. When I checked the input side, though, the turn signal that should have been active on one wire was active on all 3(stop, right, left). So the signal is backfeeding or crossing to the other input wires. This happened with the 4 to 3 wire converter and (I purchased a 3 to 2 wire one since it's only really the turn/stop I need to fix) the same results with the smaller one. I've scrutinized wiring for days and can't get this to work. I don't know why these boxes aren't doing what they're supposed to. On an interesting side note, which may be of help, when I have the 4 to 3 hooked up, I can get the turn signals to work if the Stop light input wire is connected to either end of the running lights wire(both input and output, even when they aren't connected). No idea why it does, but it does. My best guess here is a ground on the brake wire circuit? But when it's all hard wired together(turn signals for each side and stop wired to the running light line) it works fine, just no running lights, so wouldn't the symptoms repeat? -
January 2018 ● DRCOMANCHE's '88
drcomanche replied to neohic's topic in Comanche of the Month (MJOTM)
New update is finally up with some nice new pictures. -
DrComanches Project "Frankenstein"
drcomanche replied to drcomanche's topic in MJ Hardcore Tech: Epic Journeys to Greatness
As promised, here is the big update for the MJOTM. It's a little late, but better at least I made it in time for January. I got some help to get the bed on after I finished the repair/repaint on it. I ended up cutting a 2' by 1/2' holes in each wheel well to get the rust out and allow access to the inside. I painted everything up and used some reformer on the bed inside, to stop the rust if I could, but it isn't terribly important. The bed didn't have a whole lot of life left, and I didn't invest an extremely large amount of time and effort into perfection. Putting the gas tank back on without help was kind of a nightmare, and I had to rig up a pretty shoddy system to get it in there. I ended up just drilling holes through the base of the bed itself for bolts to go through and used some wide thicker washers to distribute the weight of the tank since the jbolt holders on the bed were rusted out. This is only really a temporary solution until I upgrade to a fuel cell. I kind of rebuilt the fuel pump assembly. I replaced the pump itself and the strainer, refitted my wires, sanded the corrosion and rust off, but I didn't have any fuel proof paint, so I couldn't coat it back up again. I also replaced the fuel filter, hose clamps, and some of the hoses that were looking bad. So I left off with my frame being done and waiting for the leaf springs. It took quite a while for me to get them and any time I called they told me they weren't sure when it would be in. I received them about midway through January, but even then, UPS decided, for reasons unknown, to separate them. They delivered one of them and marked the entire package as completed, and I had to do the phone thing for a while. In any case, it took another week to get the other leaf. After I got it, I bolted it up. I purchased some u bolts from summit and had to get new drop shackles for it, despite that I already had a set. I couldn't find any new bushings for them(No company that sold them sold the bushings separate). I bolted everything up and eventually put the tires on and dropped it off the jack stands. In all the wait time I had with the leaf springs, I looked into the poorly hacked wiring harness for the taillights. I sat down with a wire diagram and clipped/soldered the entire harness back to its former glory, then rewrapped it. I eventually installed the rear bumper and put the plate holder back on and then popped the harness back in with some fresh new clips. With it back on the wheels, I hooked the battery back up and started it to see how everything was running. I triple checked the bolts, and put the driveshaft back on, reconnected the brake lines and wires along the frame. The list was getting shorter and shorter and most of it was detail work. Touching up the paint, torquing bolts, general cleanup but in between all the days in the freezing cold and whatnot, I ended up getting pneumonia. I broke out my power bleeder and bled out my rear brakes, which was fine for the drivers side, but the passengers side started hemmoraging fluid out of it. It took a little looking but it was just leaking out of the banjo bolt. For some reason, no amount of torque could stem the flow. After trial and error, and trying not to lose all of my fluid, I was taking it off and found metal file to start evening the edges, hoping it would stop the leak. Eventually(an hour later), I got it to stop and seal up. Adjusted the proportioning valve and all was well(I hoped). The next order of business was figuring out the lights. The problem is that there's two parts of harness, one early model renix to the lights, and one late model chrysler from the column, leaving me with a 4 wire setup from the column and a 3 wire setup to the lights. I spent an unreasonable amount of time trying to find wires that worked or not in the rats nest of a harness splice. Eventually, after mulling around online trying to find answers, I found a topic from Pirate4x4 talking about the roughly the same thing I was lamenting over. The suggestion was to take a trailer wire converter for 4 to 3 and wire it into it so I could have the multifunction bulbs(turn/brake). I had to go a long was away to find it but did eventually. I wired it up and.... I kind of worked. Something is lost in transition with the box that makes it so that I have to incorrectly attach 2 of them together just to get turn and brake, but I don't get any running lights. I didn't really find a solution but it was workable for the daytime. I also took some time to try to solve my door issue. When it's on, theres a gap at the top where you can see outside (fully closed). I read that they can get bent out of shape, so I went to town trying to bend it back, and it seemed to work. Until I looked closer and noticed it was simply using my top hinge as a fulcrum and the bottom hinge was pulling away from the body... So I hammered that back in and simply left it as it, a little gap won't hurt too bad. So after a long while, I finally got the chance to test drive it. Being excited to try it, I overlooked some warning signs I really shouldn't have. For starters, it was idling at around 2000 rpms. I thought, I'll only drive it around the block, no big deal just to check for other problems. It was VERY difficult to get into gear with it idling so high and when I started driving, my brakes were very spongey and poor. I proceeded with the test drive(should have stopped) and ended up at a stop sign and it wouldn't let me put it into a gear. I tried for a few minutes(to the dismay of those behind me) but no dice. I gave it one more back an forth toss to get it in and..... The shift knob snapped off, springing the shifter back into second, and stalling it out. I sat in disbelief for a second and then went to start it again. Even without the knob, I could get it into gear somehow. Except that it wouldn't start. It wouldn't even turn over. So some people helped me push it back further on the back road and I started diagnosis. First of all, the jolt from the stall managed to, somehow, knock my negative battery terminal loose. After fixing that, it started but still left me with the issue of shifting. Needless to say, I managed to get it back home. I discovered after really thinking on the rpm issue that it was probably a vacuum issue based around the brakes. And, lo and behold, the brake booster hose managed to pull off of the intake manifold. Problem solved. When taking the upper half of the shift column off, however, the crowbar I was using finally popped it off and sent the other end into my head. I brushed it off. Not my smartest move, but it was just a bump. Until I went inside later and realized that it actually gave me a little gash. Could've gone to get stitches, but it was small enough that I just made a butterfly bandage and let it heal itself up. Today was the day for its first real drive after I replaced the shift column and patched it all back together. In the time doing wiring, I did get rid of some of the terrible wire connectors and properly soldered and shrink tubed them(at least the ones I knew actually went to something). And now, the trail of pictures. The bed in the garage. Some of the damage. Not too concerned with it. The wiring harness after I finished putting it all together again. The bed with the first coat of paint. I did some paint on the bottom and in the channels to give it a little more life, but it wasn't incredibly important. The finish is far worse on it than on the body, partly because it's a temporary bed, and partly because it was too dark to really get a decisive look at the finish. The cuts in the wheel wells. Again not perfect, don't need it to be. The gas tank "solution" I also drilled the rivets for the spare holder since its not necessary "what's left of my bolts" I still haven't decided what to do with the tailgate, so here it sits The harness before I pulled my old rollbar out and sanded it all down smooth so I could refinish it. The new bump stops on there. They took a little modification since the bolt holes weren't quite in the right spot. The bedliner border The new shackles I also installed my new offroad lights and got them all wired in. Also a pic of the painted hood underside. The rollbar primed in base metal primer and then bedlined. Painted the fuel cover black too Painting the bedrails(just for looks) Destroyed J bolt holders The doors off. The door itself My weird way of getting it to stay... Not the best, but it worked. The filler neck screws weren't catching that well Rollbar test fit Bumper on Wires in Leaf springs all loosely mounted I got these cherokee pigtails for a few bucks and scavenged the much nicer seal rings as well as some bulbs out of it The axle up and mounted The assembly all taken apart It down on the ground for the first time in 3 or 4 months The pump with all the new equipment sanded and mounted. The weird way it's held together Had a problem with my brand new door handle where the button kept sliding to the side and getting stuck there, causing me to have to pry at it and ruin its finish. I eventually took it apart and looked at the spring, which was very weak and warped, so I replaced it with the button and spring from one of my other door handles. This sweet relay box that doesn't actually have anything to do with my wiring. I'm too scared that something may still be running through it to remove it though. Some of the wires I connected properly Shifter off The broken end A look at the rats nest I'm dealing with. Clipped wires, capped wires, wires connecting to wrong wires, wires that do whoknowswhat Didn't want to run inside for paper to work out which wires were sending which signal. This was the compromise The piece I got that didn't seem to work all the way. And the pictures you've been waiting for of the finished product(sans tailgate and doors) New Shocks next Definitely more to come later on, too! -
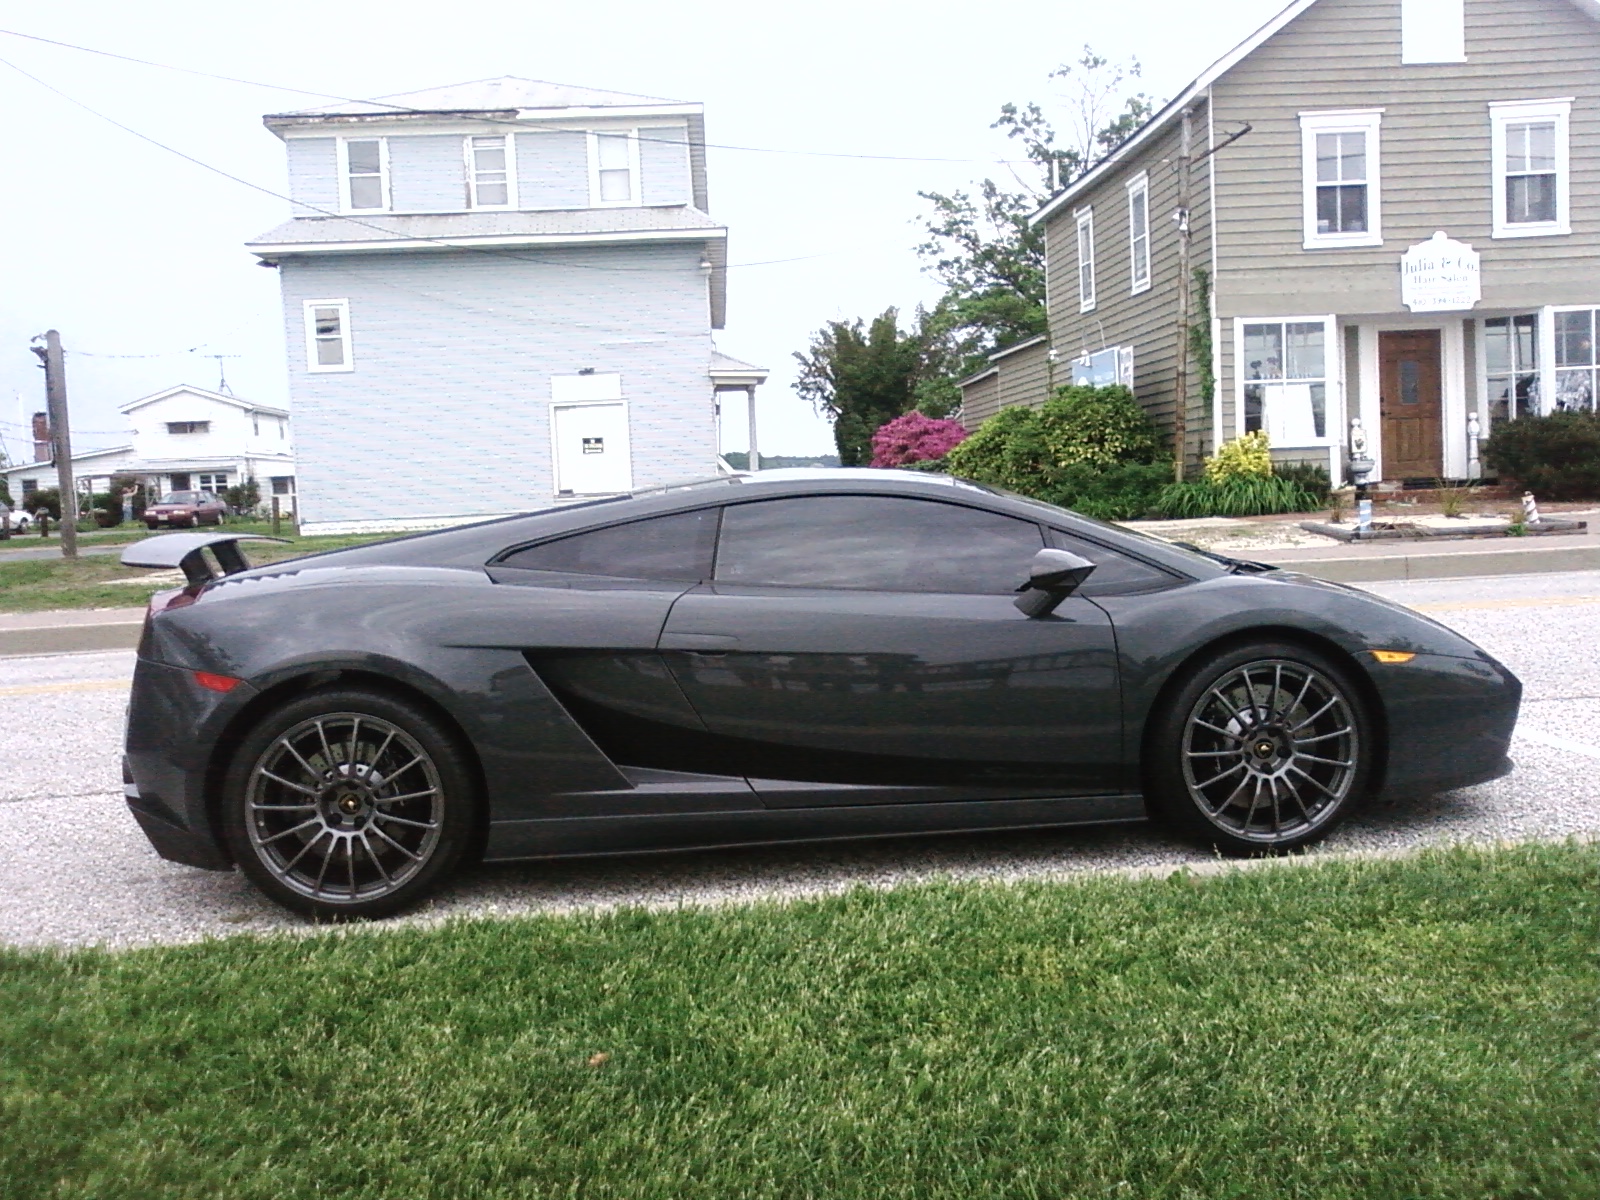
Boy, if I'd had known this post existed I would have tried harder to get some pics. Just saw a Maserati Quattroporte and an Audi R8 today... Here's one from a few years ago in Southern MD though. Lamborghini Gallardo Superleggera

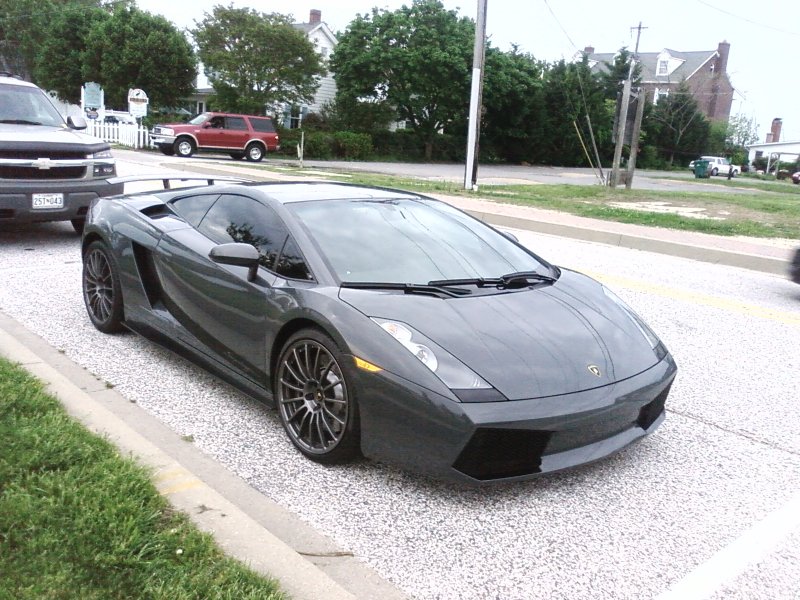
-
Windshield wipers not working
drcomanche replied to dustyinthedirt's topic in MJ Tech: Modification and Repairs
Can you hear the clicking of the relay when you turn them on? -
Tail Light Splice Circuits?
drcomanche replied to drcomanche's topic in MJ Tech: Modification and Repairs
So, from what I can tell I should have 2 wires (one for right one for left) coming from my turn/hazard/stop light switch or relay(not really clear on which I should have). Instead, I have 4 wires each separated out for stop, turn right, turn left, and hazard, that are live respective to whichever operation is functioning. I'm not entirely sure where to go next for this, as I'm either missing a critical component that I'm not sure exists, or what I have is so mangled, electrically, that it just isn't working as intended. I'll try to pry more into finding where the wires go today. Do post renix era comanche and cherokees (since this was a 94 swap) have a relay or multifunction switch dedicated to meting out the activation of the wires? -
Tail Light Splice Circuits?
drcomanche replied to drcomanche's topic in MJ Tech: Modification and Repairs
Thanks. I'll mull it over and see if I can't figure out what's what on here. Hopefully it isn't too bad with the cherokee engine splice. -
Tail Light Splice Circuits?
drcomanche replied to drcomanche's topic in MJ Tech: Modification and Repairs
Ok, so the blue wire is running lights. If that's the case, where do the hazards, turns, stop light wires meet up? Cause under the dash, I have all three separated. -
Tail Light Splice Circuits?
drcomanche replied to drcomanche's topic in MJ Tech: Modification and Repairs
I mean I only have 3 available wires running to the tail lights. But in order to have night running lights, there is a 4th wire. So I'm asking if it is possible to have the live running lights and the stop light or signal lights on the same circuit, attached to a single wire. There would be 2 live wires attached to one wire running to the lights. I'm not sure if that would blow a fuse or bulbs or just be a hazard. -
So I recently rebuilt my tail light harness(connected all the right wires, soldered, and heat wrapped) so I could have it all fixed and working. The issue, however, is that because the prior owner/builder(I use that term lightly) did an engine/cab harness splice that was connected in all the wrong spots. I reconnected the ones I needed using a multimeter to see which was which and now I have turn signals and stop lights in all the right places. The issue I run into is that now I don't have any nighttime running lights(lights that come on when the headlights are on), which I found were on a separate wire that I verified with the multimeter. There's only, at most, 3 wires going into each light, so my question is, can I hook 2 live wires into the same circuit without overloading it? I'm not entirely sure how it used to function(I feel like there was a multifunction switch for it) but now it's either sacrificing the turn signals, stop lights, or the running lights. If I can't connect 2 wires to it, is there some kind of hub I can buy to connect them at lower capacity?
-
January 2018 ● DRCOMANCHE's '88
drcomanche replied to neohic's topic in Comanche of the Month (MJOTM)
Thanks everyone. I know it doesn't look it's best currently without all the parts on it, but I guarantee it'll be awesome when it's done(Plus a lot of work went into this next update). I finally received my leaf springs, so I can throw it all back together again. -
DrComanches Project "Frankenstein"
drcomanche replied to drcomanche's topic in MJ Hardcore Tech: Epic Journeys to Greatness
Yeah, I did. I purchased a special product from Eastwood. I think there's a pic of it in one of the updates up there. Basically is a heavy duty rust reformer that seeps in to every nook and cranny. It comes with a length of hose with a special nozzle on the end that you can insert into the rail and slowly pull it out, painting the inside as you go. I had to jerry rig it with a bit of hanger so I could get a more rigid structure, but it worked well. As for rattle can jobs, they can be fantastic looking if you do it right. It's all in the amount of time you dedicate to it. Prep work is key. I had a lot of hours in sanding and priming till I got a silky smooth surface. And I'm probably going to pull more hours into it in spring to clear coat it. -
DrComanches Project "Frankenstein"
drcomanche replied to drcomanche's topic in MJ Hardcore Tech: Epic Journeys to Greatness
It's painted with basic rattle cans, but it's far from a perfect coat. Because I was outside, I had some considerable trouble getting good coats. It has imperfections(sags, wrinkles, and the occasional bug landing) all over that I'll have to sort out in the spring, but in the overall, it did turn out quite nice. For the POR, I ground the frame down to metal and just used a standard paint brush to get the coats. Up close, it isn't that pretty, but I'll be damned if that thing ever rusts again. -
It certainly does make this one stand out, so hopefully this is one of the positive updates on it.
-
DrComanches Project "Frankenstein"
drcomanche replied to drcomanche's topic in MJ Hardcore Tech: Epic Journeys to Greatness
Been working on it some more over the course of the week or so. I began working on the bed, which started with me cutting a chunk out of the wheel wells where it was rusted through. I'm probably not going to patch it up, and if I do, it'll be a screwed in temp piece. The bed itself isn't far from death, so this is just to hold it out a bit longer while I work out the logistics for a tube bed. The gas tank strap holder on the bed is too badly rusted for me to continue to use it, so I'm just going to bolt the tank down in the bed. Been planning on going fuel cell anyway. I'll need to grab some longer lines and some waterproofing, but overall, should be pretty easy. . The frame rails are finally done. I finished up the interior of the rails with some Eastwood interior frame coating, giving it a solid 3 or 4 coats across the entire frame. Hopefully, that will address the rust issues on it, or at least keep it at bay for a while until it can be pulled in for a true resto. Some of my parts started to arrive with the exception of my leaf springs, which should be here tomorrow. The bushing kit I purchased had 1 1/2" bushings for the upper shackles, but my shackles are aftermarket units with a 1 1/4" opening, so I'll need to buy more of those. I finished painting the fog light sockets and got the front end all squared away as well. The hole I cut in the wheel wells. It at least allows me better access to the underside there. The rusty torn up j bolt holder The bed so far. Not a perfect job, as I said, it's not meant to be. Didn't do the bottom yet because its a bit hard to get the grinder into right now. The rusty scrap I cut out of the wheel well The frame coating with the wand it came with. Had to hackup a clothes hanger and tape it to it to give it some rigidity. This was about the best and only pic I could get of the coating after it's in. Great coverage on it. Had one can pop the spray valve off on me. Got all over my face and jacket too. Oh well. A pic of here mostly patched up. The bushings Something else I noticed while grinding. This is my interior floor boards. Still pretty solid but the edges are rusted through. Not a critical repair though. I also added some of the black plastic edge guard to my doors so when I remove them, I don't bang up the paint. I had some extra, so I also added a few beads around the truck to sharp cut edges. Unfortunately, I don't have any pictures of that though. -
Did a little work to both of them today. For G.O., there used to be a bed cap on it that wasn't properly sealed up on the edges, so some fairly aggressive rust formed around the bolt holes(since they didn't use clamps but rather drilled through the bed rails). I sanded them up to clean metal and did a light couple of coats of heavy duty rust preventative paint. It doesn't look perfect or anything, but that's a mute point, since it's getting bedlined next year. I also to the time to replace my dry rotted window sweeps with some nice new units from Advanced. The unfortunate thing was that whoever shipped them to advanced bent the box literally in half so they were a little misformed. I really didn't want to go back out so I tried them anyways. They still seal fine, but they are warped somewhat. The mileage is at 115k, so not terrible. Yeah, I was really happy to get this one in addition, but there was a long period where I thought I was going to have to scrap Frankenstein due to rust issues. Out with the old And in with the new. They need some time to break in on it. Some of the rust And some dabs of paint to keep the metal clean in the meantime. What I meant by bent. You can see the other one still in the package at a 90 degree angle there.
-
The main spring on one side was snapped in half(and so was the second leaf. Someone used it hard), so that makes bastard packs with the main out. I believe my lift comes from the upgraded shackles and the spring over conversion. I'll try to find a diagram and see what's close to it, and try to make a pack out of that. As far as load goes, it doesn't really haul much but a spared tire and a few tools.
-
My plan was to upgrade to coilovers and a 4 link in the not too distant future, so I didn't want to offload a ton of money on springs if I didn't have to and when looking a few years ago(can't remember the exact time frame), I remember seeing them a bunch and only popping up for maybe 100 a piece. I'll take a look at general spring and, I guess, try to plan around having them for a bit longer. Thanks