

skidoo_j
-
Posts
988 -
Joined
-
Last visited
Content Type
Profiles
Forums
Gallery
Everything posted by skidoo_j
-
I know you said you were just looking for the board. but smsheadliners makes a great headliner already upholstered. I was his second guinea pig and love the quality work. I know after removing my headliner I would have never been able to re-upholster it as it practically disintegrated in my hands. he's on this site as a1500. he did a group buy early 2013 for 100 shipped. I think he's charging around 135 right now. http://www.smsheadliners.com/
-
 I added it to my 4.0 89 with out any issues:
 -
Renix Extended Idle Work Around.
skidoo_j replied to skidoo_j's topic in MJ Tech: DIY Projects and Write-Ups
Alright here's a quick half @$$ video. Was shot with engine warm. Again this was done on an 89 4.0 that has been very unmolested and no previous wiring issues, so anyone who attempts to follow what I did its on you to do your own due diligence. This includes following the wiring schematics yourself and ensuring your wire loom has not been hacked up already. You can or could fry ... if your loom is messed up. http://www.flickr.com/photos/skidoo_j/12776209564/ anyone wants to edit the post to embed the video that's fine www.flickr.com/photos/skidoo_j/12776209564/ -
The Purpose of the extended Idle was in police vehicles when sitting still using extra accessories to prevent too much strain on the motor. For post 93 jeeps there are a plethora of how to pages on how to add this feature Why would you want extended Idle or a higher idle? well many reasons, winch recovery, lights, On board air, overheating (assume good clutch fan) After several hours of research all that I've found for doing the extended idle was for post 93 vehicles where a police version was available. After reading pages and pages of forums discussing the post 93 and people just begging for how to do it on pre 93 vehicles but I was unsuccessful in finding it. I acquired a 90fsm and searched it my self and found no direct options listed. But then Blue88Comanche suggested piggybacking the up idle from the ac circuit. Yeah it's not a true extended idle and the idle isn't increasing to 1k rpm like the extended idle but 300-400 rpm increase is plenty for my purposes. Again Back to the wire diagrams I went.... What I found: There are two inputs to the ecu for the A/C. One from the physical switch giving power to the a/c circuit then a second that comes off the a/c thermo. The ECU looks for voltage on these two contacts then increases the Idle expecting the draw from the ACpump. Connections c2 and d2. An attempt to further explain the a/c electrical: when a/c is selected power goes to the low pressure switch at the condenser, comes back into cab and is split; one of these splits goes to the ecu at d2. A second split goes to the a/c thermo then runs back to ecu at c2. a third leg supply power at the a/c relay for both the aux fan and the compressor, but this power is controlled through a relay by the output of ecu a12. when c2=d2(12volts) idle increases expecting the load and at the same time a12 powers the relay in engine compartment closed and the compressor is activated with the fan. I don't have A/C So I was not concerned with what I did. And alot of the A/C circuitry is not there just stuff in the factory loom... If you have a/c and want to retain the use of a/c a few relays maybe needed to break different circuits, and probably cutting and tapping into wire as they enter the ecu rather than tying into them down stream in the harness like i did. Wire diagrams referenced are from the 90 fsm 22,74, 75, 76 I did this to an 89 4.0 although based on the wire diagrams for the 2.5 it should be the same too, but different pins on the ecu, connector behind the fan switch listed below is the same though. The HOw: It's pretty simple, Remove dash bezel, remove stereo, loosen the heat controller. Look for this six pin plug behind the fan controller. Mine had 5 wires on the female side and only 2 or 3 on the male side Decide your location for your high idle switch and your 12 volt source (I used a tap off cig lighter as i already have a modified circuit controlling that power). You'll run the switched power to the connector and connect it to pins a and b a light green wire and a light brown wire. I got two jeep connectors from a male donor plug and wired it in the the male side of the factory plug so it's clean: (this is a soldered connection heat shrunk with dual wall then I wrapped with electrical tape for stress, anal or overkill you choose) I fed these contacts off a "fan diode assembly" that was a donor from the jy with a/c. There are three connections on these the two outsides are source in and the middle is output. They do not allow back feed and are rated to 1.5 amp (since everything is on relays and just the ecu no worries) anyways on one leg I tied my manual aux fan switch and the other leg to my future elocker switch. When I use these I clean them, and change the gray and orange wire so that the two inputs are the same color, when this is in the factory position the grey wire comes from the thermostat in the radiator, the orange "in" is from the a/c circuit and the orange "out" controls the fan relay. nice and finished and works flawlessly:
-
I took the time to look up the bearings and seals. 2.893" for OD on seal. listed for an 88. The hole on the D44 backing bracket is 3.005" and is 0.124" thick. Either ring will probably work. I think the last set my father made was turned at 2.910 OD. The ring had very little play when in the bracket and marry's the seal perfect. We used a bore and drilled the bracket to 2.920" When you bore out the zj backing plate I suggest getting it as close to the size of the bearing /seal with out causing conflict. I say this because if you drill it out to 3" and you're using the 2.875 it could be plausable for the ring to settle low by the 1/8" difference and cause premature wear. to resolve you could just tack it to the retainer ring (would also make assembly easier) or just be really careful during install And I'm still thinking the Early rings based on teraflex's website is what you should have purchased. Or just got both sets. After all what's $32 dollars if it causes premature bearing failure or worse. Plus they would have taken the wrong set back so at most you would have been out a few dollars in return shipping. When it's printed in writing on their site stating one thing, and the sales associate is not 100% confident I go with what's written because it's easier to prove fault. And the biggest thing i've learned is that these jeeps are never the same, not even from the factory. Have friends with 2-89 xj, 1-89 mj, and 1-90 xj we do an electrical mod on one go to the next and wire colors differ, but they "should Be" the same.
-
The rings they produce are for their kits. Not JY pulled parts. So the thickness will be close and probably "good enough" They refer to the kit that will fit a dana 44 in a cherokee as an "early" kit. http://www.teraflex.biz/rear-disc-brake-kit-jeep-early-80-s-model.html#second Take the measurements yourself. You can look up the bearings and seals for the year the axle was made. YOu will or rather should replace the bearings and seals new anyways as they have to be pressed off when you put those rings on. With that said once you have your new seals and bearings you can measure your OD and ID for the ring. the thickness is the difference in thickness from the dana 44 mounting plate to that of the zj disc brake. When I made mine It was closest to the measurements provided in the second link i sent you earlier. Which differs from the ones teraflex sells by a few thousandths. I still have a dana 44 drum bracket in my yard so if you want that thickness I can go mic it for you and then you can subtract it from your zj parts. I've done 3 of these conversions now with out any issues. I've used the zj parts all three times. and am getting ready to do a 4th. the three sets thickness varied slightly as each was a different year, talking a couple thousandths of an inch for pressed parts cast in different molds in different years. here are their measurements that i Have from all my research for the two teraflex parts. Old: 3" od x 2.25 ID x .230 Thick DBK: 2 7/8" x 2.25 id x .228 thick
-
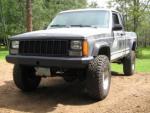
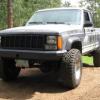
Nice Mj On Ebay
skidoo_j replied to Comanche County's topic in Craigslist/eBay... i.e. Not Your Stuff
He converted to an open cooling system, but kept the closed bottle??? What in the and why? And it looks like he's using a second windshield washer bottle for his overflow bottle. Best part is the tubing appears to be surgical tube over to the tank. from his listing: -
You can take the measurements yourself that you need. The ring need to be same od as your seal and as thick as your new disc bracket. (disc bracket thickness minus drum bracket thickness) You're trying to retain the same preload on the bearing. With that said I'm fairly confident you need the "early" http://www.teraflex.biz/rear-disc-brake-preload-ring-for-early-kits.html here are some references. http://www.naxja.org/forum/showthread.php?t=967146 http://www.billavista.com/tech/Articles/Dana_44_Rear_Axle_Disc_Brake_Conversion/ http://www.nwjeepn.com/images/Axle/Ebrakeadapter.pdf http://comancheclub.com/topic/39924-explorer-parking-brake-cables/?hl=disk&do=findComment&comment=401978
-
Okay so here's what I've researched: Ecu contacts: A12 controls the a/c clutch relay. D2 gets the signal from the climate control switches C2 is fed from the theromostat switch. The power feeding the thermostat switch is taped to same wire as d2. So D2 and C2 are compared and output a12 to turn on the pump. Does anyone know if the Thermostat switch (right side of blower housing) is a Normally Open/Closed or ????? If normally open I just need to get power to D2 if normally closed i need power to both d2 and c2 to mimic a/c running. The thermostat is available as both a factory part and a dealer installed part, not sure how it changed the wiring. 5600 2688 1 w/Factory Installed Air Cond. 5600 0222 1 w/Dealer Installed American Air Cond Picture is from crown.
-
Thank you very much. I'm very happy with my purchase :)
-
I found plenty of write-ups on Naxja and around the web when I was looking into this last year maybe you saved some in your favs? I've searched naxja and everything I've found and read is a bunch of posts on people with 93+ having issues getting the true extended idle to function. And it seems most of them have issues finding which wire it was as it changed every few years. About every 15 posts someone asks about options for pre 92, with no resolve their request just seemed to go on ignored. But I assume taping or rather over riding the a/c circuit is pretty simple, but that would be easier if i had A/C. So I"m not sure what actual wires are already there to tap on to to provide the desired effect.
-
This is your power distribution on our renix era vehicles. Those are all fusible links I've yet to figure out a way to determine which wire goes where other then trial and error or when something burns one out you find out which it is as they get stretchy in the area between the ring and the large bulb. then you can label what it was.
-
one of two smallers is for windshield fluid sprayer motor bigger flat is for washer fluid level not sure what second small is for. I see you don't have a brake master
-
Looks like the aux fan relay
-
Alright so what's the Renix work around for adding the extended Idle. On a different post it was brought you can trick the a/c system to increase idle 200 rpm. I'm looking at the 90 fsm and find 3 a/c inputs in the the ecu. Anyone know if i'm to tap at the ecu or if it's possible to tie in at the heater control? I do not have a/c. Thinking this would be useful if I go OBA so while i have the dash open was thinking of running the wire for future needs. Thanks in advance.
-
Zack this why i don't want the CV or double cardon shaft. better pic of what i don't want in post # 22 Regarding premature bearing wear would not be an issue. There are baffles and slingers inside the diff that will lube it even at that angle. When it's at that angle it is a trick to filling it as you still need to put the same volume of oil as before, so a hill is really nice so you can get the nose of the vehicle down. Otherwise you can get a new rear diff cover with a higher fill plug. You can obtain a new longer SY from many places. A bit of research and you'll find ones you can get from a junk yard, or you can get a new one off ebay or from tom woods. I did eventually go sye after doing same thing you're doing. I however did not got with a double cardone shaft as I did not want to re-cut and weld my perches. And was not going to use shims as I didnt want more lift. I went sye because I was with a buddy in an xj that managed to pull his driveline from his transfercase, it broke when spinning, dumped all his fluid and we had to be towed because he couldn't run it in fwd as the rear of the transfercase was wide open with the yoke out.
-
It's not needed. Your next hurdle you will encounter is with this much lift and keeping stock rear end you might look into getting a longer yoke so you have more spline engagement at transfer case.
-
If you still have a slip yoke this is completely wrong!!!!! You will have tons of drive-shaft vibrations. When using a slip yoke style you want the pumpkin slightly down from parallel to the transfercase/transmission. If you are using a double cardon drive line and a SLIP YOKE ELIMINATOR (SYE) then you want the pumpkin parallel to the drive shaft as pictured.
-
Here's good resources. http://www.4crawler.com/4x4/CheapTricks/Driveline-101.shtml#Double-Cardan-Measurements http://www.4x4wire.com/toyota/tech/driveline/ http://www.pirate4x4.com/tech/billavista/PR-shaft/
-
2* down is best from my research as long as you're staying with stock shaft style and not going SYE
-
Factory Switch Pod Options
skidoo_j replied to skidoo_j's topic in MJ Tech: Modification and Repairs
I'm fairly confident that the Renix ECU does not have the contacts or circuitry for the extended Idle. So it's not as simple as just installing the switch. Based on all that I've read even some of the years that "should" be able to have an extended idle modification requires drilling the ecu to add the contact so the switch will function. If you have a source that show otherwise and that the RENIX system can have the Extended Idle installed Please let me know. But keeping to topic thank you for posting it as an available Pod / switch combo. -
Factory Switch Pod Options
skidoo_j replied to skidoo_j's topic in MJ Tech: Modification and Repairs
Isnt' this on 91+ only or was it available for renix era too? -
I've searched our forums and did not find this as a topic. And only occasionally has it come up indirectly. What factory Switch Pod options were available for our trucks? Years make a difference etc? What I've found or seen: Left side of steering wheel: Fog Only Fog / Bed light Fog / Rear Defrost (Cherokee) Rear Defrost only Right Side of Steering Wheel: Trans Power Comfort Only Trans Power Comfort / Rear Wiper (cherokee) Roll Bar Light Switch Any other Options out there?
-
Still looking for a set anyone have a set on a shelf? Or maybe a parts truck? Money in hand!
-
Two comanches with factory roll bars for 2800!!!! WTH. http://mansfield.craigslist.org/cto/4271604102.html 1986 & 1988 Jeep Comanches FS/FT - $2800 (Bucyrus) 1988 Jeep Comanche odometer: 203000manual transmission My health has been bad enough that I've decided to just cut my losses and get rid of these how they sit. I will not be performing any repairs, even if it might only be something relatively minor, because my condition just will not allow for me to be leaning over into the engine bay for long. And since they are just driveway decorations basically, I'm not paying someone to perform them either. I'll just say these are "as is" and provide as much info about them as I can below to hopefully get these moved fast. Here's your chance to have a great little truck that has everyone coming up to you and asking how you managed to put a truck bed on a Cherokee. Asking $2800obo, will sell the '86 separate for $1000obo. Will not sell the '88 separate unless the '86 sells first, NO payments, cash only. Will trade both for a 2000 or newer Crown Victoria Police Interceptor only. Don't waste my time with any other offers. I need something reliable that will last, nothing fits that better than a P71. Email is the best way to get in touch with me, or you can text before 8PM but I'll probably be slow to respond. BRING A TRAILER, neither one can be driven currently. The '86 2.8L AX-5 w/external slave Command-trac 4x4 The Good: Holley Fuel Injection Edelbrock Intake Manifold Edelbrock Valve Covers Factory LWB Roll Bar Near mint rare black interior (small tear on driver side vinyl of the lower seat) 3/4 Gauge Cluster (no tach but has everything else) Comes with: New Monroe Sensa-Trac shocks, front and rear (rear are load adjusting ones) New Master and Slave Cylinder New Motor Mounts New BFG AT T/A KO tires (235/75 R15) All 3 hubcaps that are not in the pictures Spare rear solid window The bad: Slave cylinder is out Brakes are shot Broken brake line in the rear Right rear wheel is locked up Motor mounts are shot Typical Ohio rust belt rust The maybe: PO claims the engine was rebuilt 30k miles ago but couldn't find the receipt to prove it. I kind of want to think it's true though with the kind of money that was spent on upgrades for this engine and because it seemed to run better than the 2.8 I had in my other '86. Take that with a grain of salt though since I don't know for sure. There is no battery or fuel in it, bring your own if you want to hear it run. Like I said though the motor mounts are cracked, because of that I won't let it be ran if you are not serious. It's also not tuned at all and runs pretty rough, no smoke though. It does fire right up. The '88 4.0L I6 BA-10/5 (5spd) Command-trac 4x4 SWB The Good: factory swb rollbar factory skids on the gas tank and t case xj bucket seats with the big bolsters full center console cargo light interior lights package factory dash clock ford 302 19# injectors 1 inch throttle body spacer rustys intake tube sunroof (doesn't leak) 4.5 inch lift 97+ xj side view mirrors h4 headlights with built in city lights factory front tow hooks new larger CCA battery Comes with: daystar red superkit clutch kit engine and transmission mounts full felpro engine gasket kit 1997+ steel valve cover with the baffle new tail pipe custom tube nerf bars stock radio spare driver and passenger side window glass ton of other parts I know I'm forgetting (enough to fill a Ford Escape) The Bad: Rear main leaks Needs tires Track bar is off because of a broken link Coolant line burst while out and about recently in the extreme cold (1/24/14) Fires right up, runs and drives fine. I did start on the rear main fix since it's so easy on these engines but because my health went downhill all I ended up doing was an oil change basically. Put some Delo 400 in it since it's better and thicker, as well as a new Wix filter. It really quieted the thing down from when I got it and it had 10w30 in it, still a noisy high mileage 4.0L "diesel" with all it's rattles and taps though. The BA-10/5 is one of the smoothest shifting manuals I've used in an old truck.