AnotherOldJeepGuy
-
Posts
817 -
Joined
-
Last visited
Content Type
Profiles
Forums
Gallery
Everything posted by AnotherOldJeepGuy
-
 Thanks! Even knowing what numbers to look for I can't find this info in the FSMs posted. Interesting, the 84-93 FSM posted looks a lot like what's in my Haynes manual, probably not a mere coincidence!
 -
Recommended Fuel Pump
AnotherOldJeepGuy replied to fiddlermj's topic in MJ Tech: Modification and Repairs
I took a look just for curiosity on eBay and found several of the Bosch pumps. I also noticed this apparent alternate from Herko at 1/2 the price. Not an endorsement, just what I saw. Says it is compatible, perhaps anyone here has used it and can comment? -
-
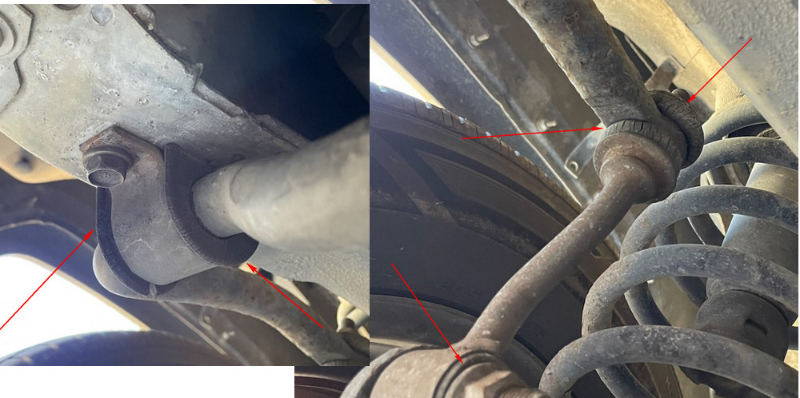
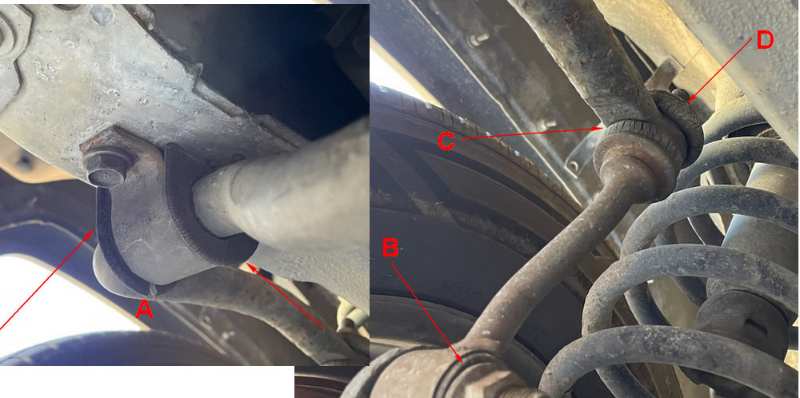
Parts are on order. My Haynes manual doesn't include torque number for any of these points, can anyone tell me the torque I should be using at "A", "B" and "D" from my pic?
-
Re-Seal my sealed beam light
AnotherOldJeepGuy replied to AnotherOldJeepGuy's topic in MJ Tech: Modification and Repairs
Well I have at least one example of a 1990 Renix with blinking side marker lights . -
Hmm, that's interesting.... I know I had a pretty good visible leak at the VC before I replaced that gasket, so seems like you are on track for replacing that next. Others on here can comment with much more expertise than I where else to look when you don't actually see the leak. Without any justification for why I would do it, I guess I would just top it off the first time and see if it drops a second quart. Maybe it just was not full enough at first? I actually have a calendar in the garage and I write down mileage and oil level on the stick every Sunday morning before starting it up. Of course I am hoping the new OFA gaskets will do it for me, but I won't celebrate until it actually happens .
-
Just wondering @hgeranium, since it's been a bit since you finished, are you seeing any other drips now?
-
FYI, if you think you might want to swap these o-rings, RockAuto has the large one (FEL-PRO 70301) currently for $0.66! Of course you can't get it by itself for that cause of shipping, but if you have other stuff to order, you can add it in for next to nothing.
-
Thanks, perfect timing I was placing an order today!
-
Re-Seal my sealed beam light
AnotherOldJeepGuy replied to AnotherOldJeepGuy's topic in MJ Tech: Modification and Repairs
OK I went back out to the Jeep to investigate the lights and the mostly work. When I said "mostly work", what I meant by that was 1 time out of many, the FR Bottom did not blink, it remained constant on instead. But all times but once all the expected to blink lights did blink. And I don't have the stuck light on my dash right now. So technically I don't really have anything to fix, so I won't! This seems like a good time to add in this bizarre operation just to see if what I see is "normal". I don't know that it is new, seems like I noticed it before, but still while I have a light conversation going.... If the headlights are on, the turn signals alternate SIDE-FRONT-SIDE-FRONT. But with the headlights off the SIDE AND FRONT bulbs blink on/off at the same time. So bizarre! BTW this same bizarre operation of simultaneous or alternating on/off depending on if the headlights are on/off is the same at both sides, and it is also the same if I engage the hazard switch instead. Since blink is blink, I don't really have anything to fix here, but it sure makes me scratch my head! Anyone else have this same scenario, or do I just have a haunted Jeep?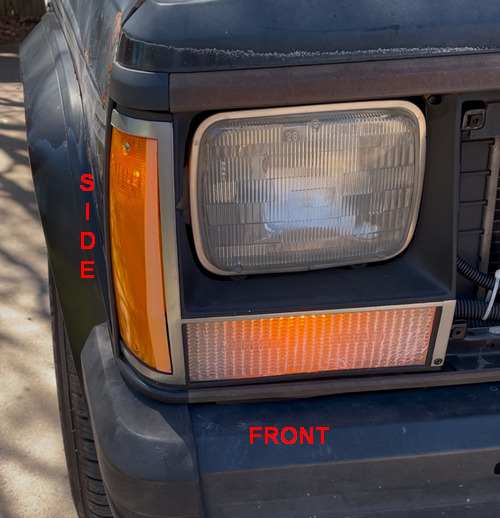
-
Re-Seal my sealed beam light
AnotherOldJeepGuy replied to AnotherOldJeepGuy's topic in MJ Tech: Modification and Repairs
Will do. I am suspecting something that I touched since this problem was not there before. So something like the wiring to the bulb, but I'll just look it all over and hope I find something to fix! -
I'll be back in there today to work on my turn signal that failed after doing this job, I'll take a look where you suggested. A more permanent connection would be way better!
-
Re-Seal my sealed beam light
AnotherOldJeepGuy replied to AnotherOldJeepGuy's topic in MJ Tech: Modification and Repairs
I took your suggestion and just put it back together. Lights do look brighter, not sure I could put a number on it but some amount brighter. Will probably improve another notch with I put in new headlamps. Of course no good deed goes unpunished! I have an issue with one of my front turn signals now . The side fronts blink, but the RF blinker up front isn't blinking, so my turn arrow is constant on on the dash telling me it is not happy with something. Arrrgg. -
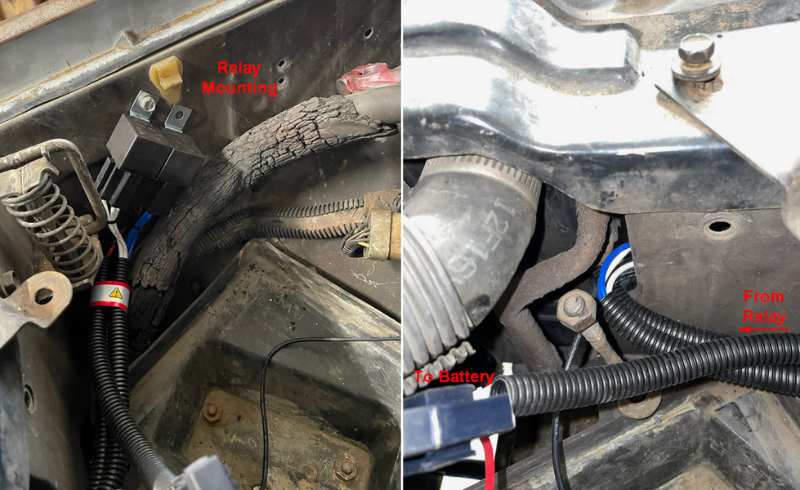
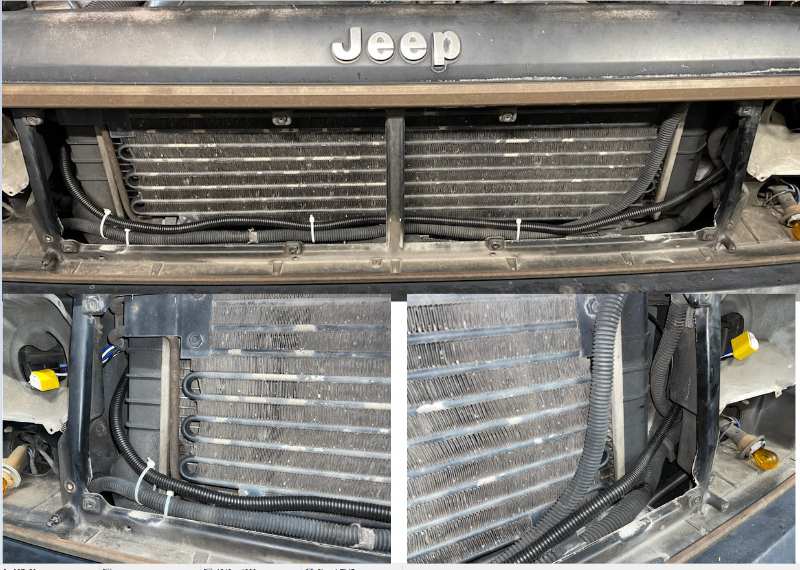
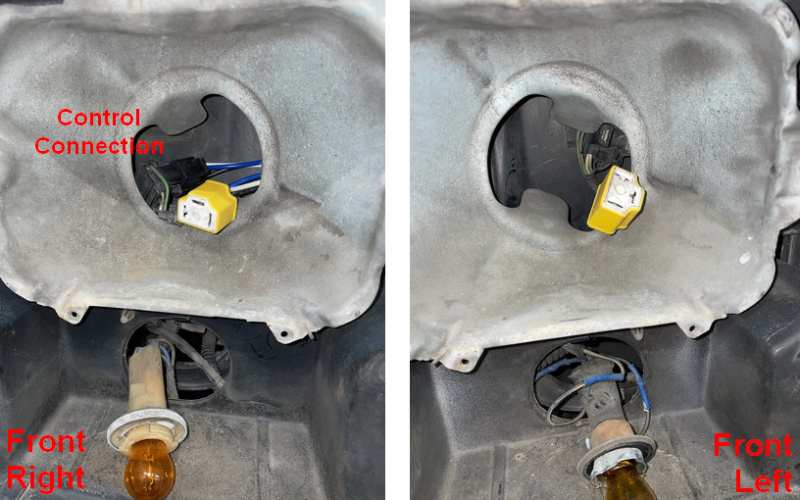
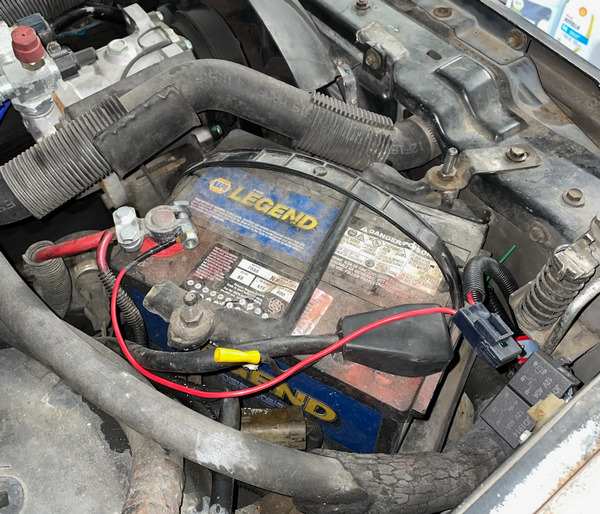
Thought I'd post the status of this job I finally took on today. I did remove the grill and light trim. I have not put the bulbs in yet because of the light side story here, but for the benefit of others that might want to do this I snapped a few pics. Do not start this if you are in a hurry, or if you don't like puzzles, cause routing the harness is a nontrivial task! The routing opportunities are limited, and in some locations a tight squeeze. But if you do go for it perhaps these pics will help. Here is where I ended up mounting the relays and the initial route from there out to the light housings. Here is the routing to the RF and across to the LF light housings, in front of the radiator as suggested by @87MJTIM. Here is the final power connection. I am not crazy with this end result, and I may revisit this, possibly adding a power block somewhere or maybe taping in someplace in the covered area just behind the battery
-
Re-Seal my sealed beam light
AnotherOldJeepGuy replied to AnotherOldJeepGuy's topic in MJ Tech: Modification and Repairs
Turns out both sides have the same problem, so I have 2 to glue. Don't really know what the best glue will be, seems like something with a little give might be best, like silicone caulk. Again this is temporary anyway just to see what the harness improvement is. And given both lamps were already compromised, not sure how much I'll be able to tell anyway, but we'll see. -
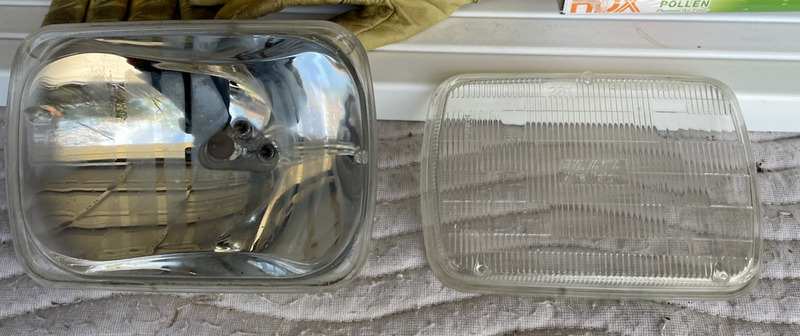
I am just getting around to putting in my light harness (see this post) and I am removing the lights to do the job, and I have discovered my headlamp is no longer sealed! I don't see any cracks, it just looks like the glue that was holding the front on failed (it came out in several pieced looking a bit like a worn out gasket). But it all looks fine other than it being 2 pieces instead of 1. Anyway, I realize the obvious response will be just buy new bulbs. And I'll put that on the list, but I kinda want to see how much improvement I get from the harness alone first. I plan to just re-glue this light and put it back in until I get new ones a bit later. I don't really see any issue doing this, anyone want to chime in on why I shouldn't do this, I'm listening!!
-
I cleaned off the threads where I could reach them, can't get to them in the "A" pic location really with my oil can but I'll get some spray in there but I dripped penetrating old from the can on the rest. I don't think I'll need that on the driver side since another pending repair is my leaking PS pump and/or hoses, so the lower bolt on that side has be well lubricated for a couple months at least already.
-
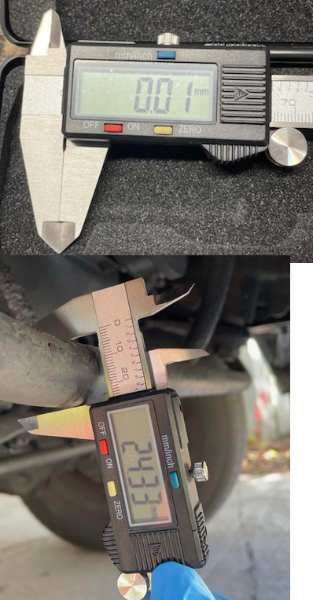
Looks like I actually need the 24mm. Good thing you pointed out to measure! It isn't obvious in the pic but I did clean off the bar at the point I measured. Luckily RockAuto has that also for essentially the same price, in rubber, DELPHI TD4104W. BTW my "zero-ed" meter read 0.00 when I clicked the pic but apparently it flickered to 0.01. I don't think I'll worry too much about 10um.
-
I think I'll go with the longer wait, more time for my oil to soak in.
-
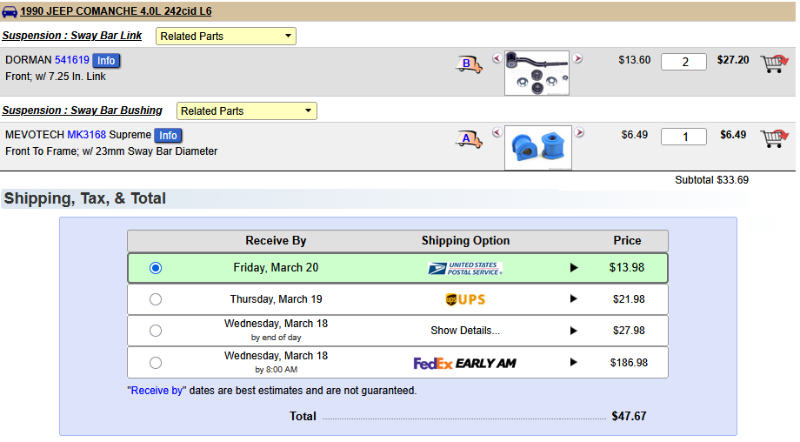
Yeah, RockAuto price is quite a bit better. Haven't measured to see for sure if 23mm is what I need so I'll do that before ordering, but assuming that is correct here's the parts at RockAuto.
-
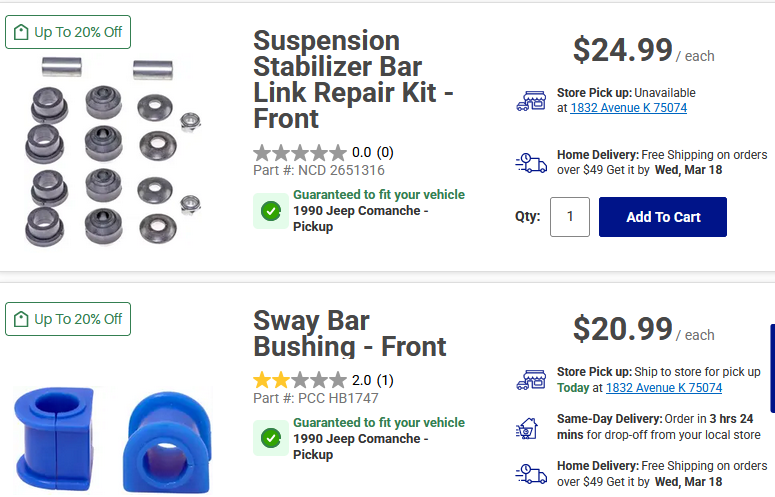
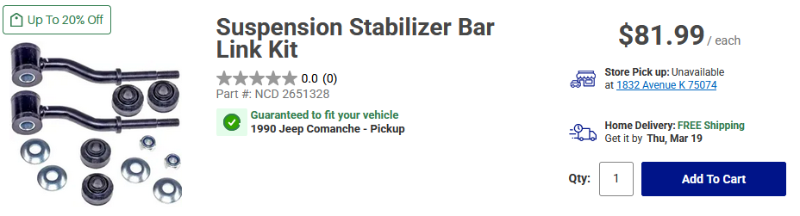
Ah, it sounds like there is potential for any/all of the bolts, or things that are threaded, to be damaged either already or when the job is done. @DirtyComanche, I think this is what you are recommending, (although this is the NAPA part, I didn't look up RockAuto yet.) Plus the "blue" bushings in my OP.
-
Well, I guess we'll see if I can tell.
-
Yikes! OK. I'll give the penetrating oil lots of time to work in, and I'll not use the extra large breaker bar!
-
Thanks! I would have not thought I could do this with the truck just setting there, that's good to know that weight on wheels isn't part of the equation. I'll be sure to try and soak some oil into the threads. Which are you referring to that I need to measure (A, B, C or D)? And are you referring to the diameter of the bushing itself or the hole? Although if I get them out, I can just measure everything! :)
-
It looks like these rubber parts are not too difficult, or expensive, to replace. They are original and full of cracks. Should I replace them? And are the parts below the right parts? Clearly the new rubber would look better, but what are the benefits beyond looking better? (Will I even be able to tell the new parts are there unless I am looking at them?) My truck runs smooth, although it doesn't take bumps as well, that it, "I hear things thump a bit" on a bump. It looks like replacement is pretty straight forward, it is? Any special tools or "not obvious" things I would need to know first? Like, if I take off a nut will thing fly apart that I can't get back together without a LOT more trouble that is looks like!? Thanks in advance for the advice! NAPA Parts