

Salvagedcircuit
-
Posts
1381 -
Joined
-
Last visited
Content Type
Profiles
Forums
Gallery
Everything posted by Salvagedcircuit
-
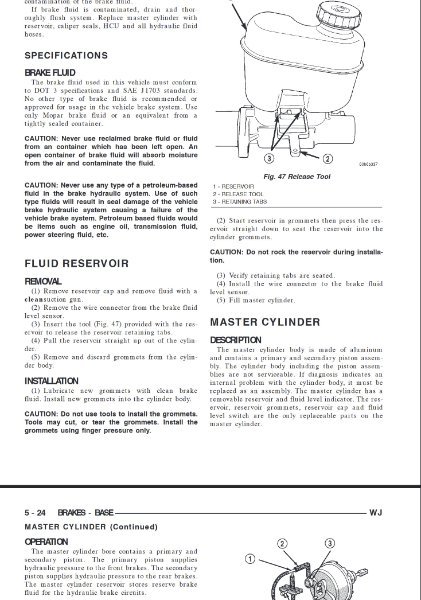
 Here's a snapshot from the WJ service manual. Here's the master cylinder properly labeled. Well, That's all folks Is there anyway to know if I damaged the master cylinder or prop valve by having the lines reversed? I ran the comanche 5 times at 40mph for brake testing.
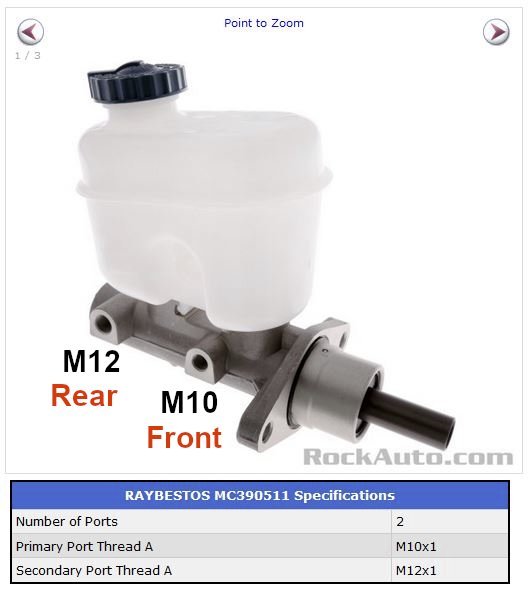
-
I'm looking back through the WJ service manual to see if I can straighten this out. Thanks for all the input. I really, really, really appreciate it. Seriously, Thanks. I'm hoping this is the solution.
-
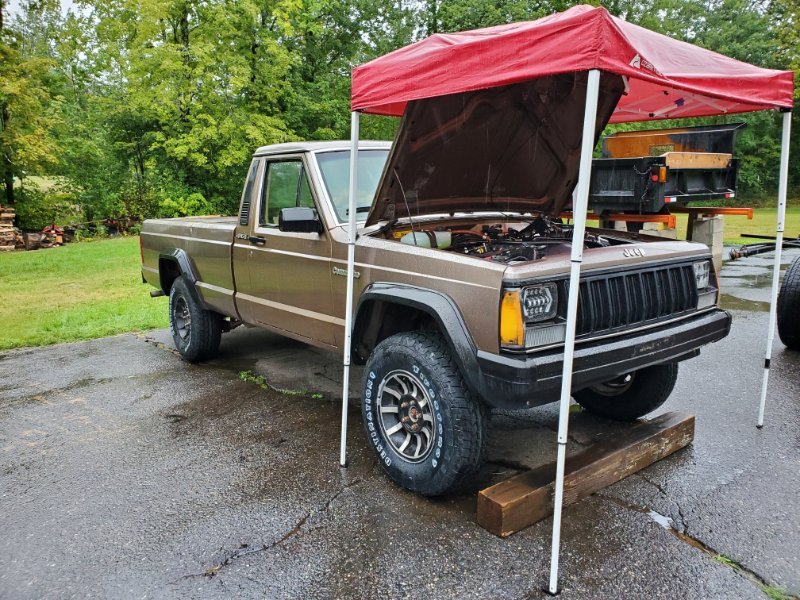
My first restoration - 1989 Comanche Pioneer
Salvagedcircuit replied to Jeeptard's topic in Member Projects: Your Comanches
If this is a '92, he already has the open style cooling system (i'm jealous) Nice find! -
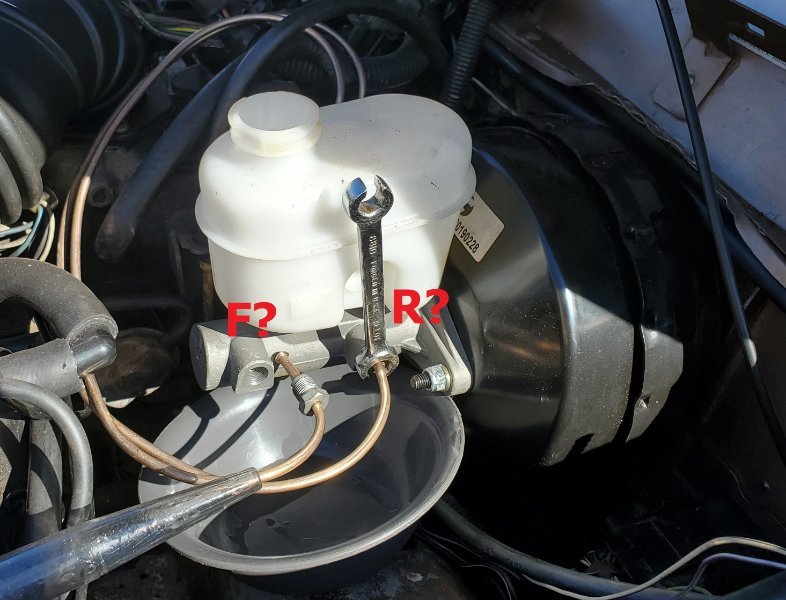
I guessed that the front of the unit is for the front and the rear is for the back. Again, Raybestos makes no effort to provide any documentation about the item. They don't even list the part on their website. I'm calling their tech support now but I am conveniently getting an answering machine.
-
Just edited the original post. distribution block and rear prop valve removed. It is possible that I connected the two lines from the master cylinder to the prop valve in the reverse manner. There was no documentation with the raybestos master cylinder stating what each line was for. I have to double check my photos. Thanks for all the input guys.
-
Problem: Finally completed the WJ dual diaphragm brake upgrade. My front disc brakes don't seem to be doing anything. Bleeding does not yield stiff pedal. Symptoms: After a quick 40mph test on a closed paved road, Rear drums grab and get warm. They get to about 210f with a thermal gun. Front brakes barely hit 90f, so they don't seem to be doing anything. Observations: no brake fluid leaking anywhere. No fluid leaks from front calipers, rear drums, rear axles, master, or prop valve. When bleeding entire vehicle, brake fluid flows easily from all brake fittings. Work Done: Removed original master, booster and distribution block removed prop valve under bed installed new WJ Cardone 5C-473163 booster + Raybestos master MC390511 combo. master cylinder properly bench bled. 1in travel on shaft at most, according to cardone. Pumped for 15min. no air bubbles. master properly aligned to booster outside vehicle and then installed into comanche. new DOT3 fluid used new wilwood 260-13190 prop valve new nickel chrome brake line to the rear axle drum brakes removed all old brake lines to the back new fittings. old front passenger brake line old front driver brake line new rubber brake lines on all wheels old passenger front caliper new driver front caliper new passenger and driver caliper brake pads disk brake fittings in up position, not down, so calipers should be installed correctly. bled entire vehicle 8 times. No more air bubbles last 4 times bled. bleeding does not yield a stiff pedal. bled vehicle in proper passenger rear, driver rear, passenger front, driver front fashion. bled system with prop valve in middle and then again at 30%, no change. I bleed vehicle with engine off. When engine on, pedal becomes soft. Engine pulling vacuum well, I removed many vacuum leaks, but there may be some I missed. I called wilwood on 10/31 about the brake problem I have. the technician mentioned that I need a 10lb residual pressure valve for rears. This would be installed right after the brake line out of the prop valve. He mentioned that many car companies implemented a 10psi pressure valve into the master cylinder distribution blocks on older vehicles. He mentioned this helps resolve the rear drums locking up before the fronts. While this may help resolve that issue, I don't think it's going to solve my soft pedal problem and the front discs not doing much. I'm really drawing at straws here trying to determine the source of the problem. I've been through 3 whole 16oz bottles of dot3 fluid and I cannot get usable brakes. I'm about ready to hand it off to a shop, but I have a feeling they will not be able to solve the problem either. My first inkling is to make new driver and passenger brake lines, but I have a feeling that will not solve the issue. If anyone has any input, that would be great. Thanks!
-
Neat! It's great to see more comanche content on the youtubes!
-
Does this still exist? Is the rear baseboard (behind the seat), rear baseboard trim piece and headliner still exist? May make a trip out there if they are still there. I am in the NH-MA area Many thanks.
-
Project “Tomahawk”
Salvagedcircuit replied to ghetdjc320's topic in MJ Hardcore Tech: Epic Journeys to Greatness
I don't always check back on this build thread, but when I do, I'm simply amazed. Nice job man! -
Has anyone found a shade of gray spray paint close to the original turbine rim gray? Thanks.
-
Wait, did you order new axle shafts, or did they have an entire rear axle assembly on hand and just rebuilt it to spec? Thanks.
-
HVAC box refurb questions/advice
Salvagedcircuit replied to A-man930's topic in MJ Tech: Modification and Repairs
Excellent work! I'm hoping to get my new heater core installed before I see this years first flakes. Fingers crossed. -
HVAC Unit Vacuum Pigtail
Salvagedcircuit replied to Salvagedcircuit's topic in MJ Tech: Modification and Repairs
Haha, yeah i borrowed some photos for this post Thanks for the input guys! I think what I will do is heatshrink a new vacuum line to the last non-broken part of the vacuum line, use rubber hose with the right ID or just replace the entire vacuum line when I open up the HVAC box. What is strange is that the vacuum lines are missing from some comanche owner's hvac box. I've seen photos without then. Why is that? Do people just remove them if they removed the heater control valve? Do folks reroute them when they refurbish the hvac box? Thanks! -
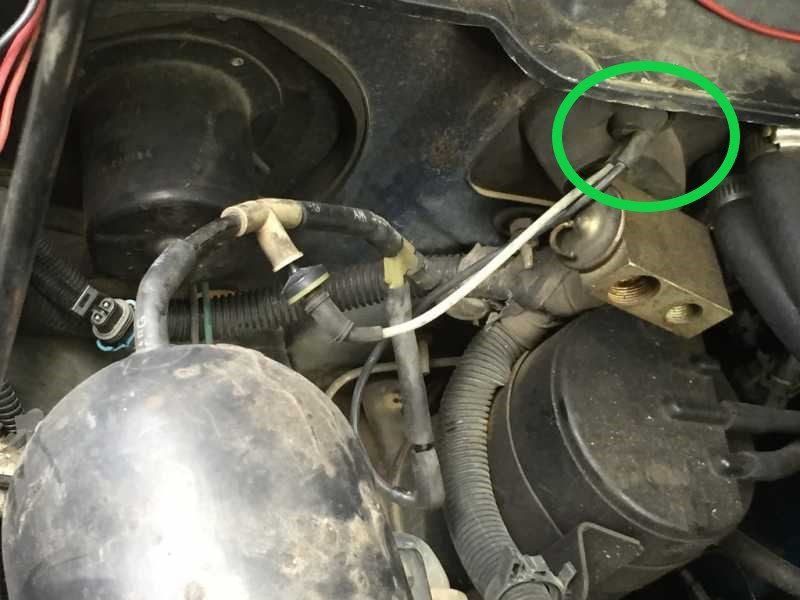
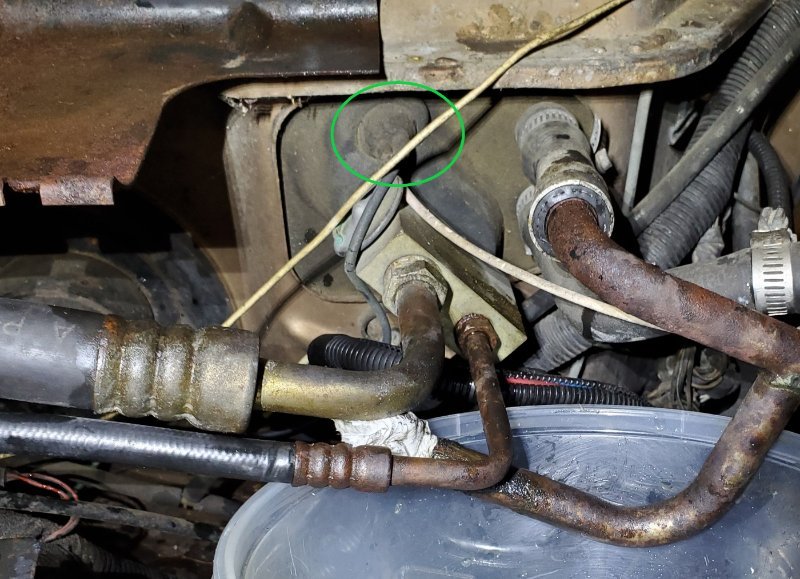
I'm in the middle of buying parts for my HVAC box restoration, and I can't seem to find the vacuum pigtail that is commonly found in the rear portion of the HVAC box by the evap and heater ports. It looks like the following circled images. Is this part available any more? Is the next best alternative to just shove new vacuum lines through the firewall with a new foam seal? Thanks!

-
HVAC box refurb questions/advice
Salvagedcircuit replied to A-man930's topic in MJ Tech: Modification and Repairs
Awesome work! Does anyone know if the fittings for this '96 ac evap unit are the same as on the '89 comanche? Didn't the evap core fitting sizes change through the years? According to rock auto, the 96 evap unit you used is the Four Seasons 54812 / TYC 97347 /UAC EV4178PFXC / GPD 4711548. Thanks. -
Replacement Cab Heat shield
Salvagedcircuit replied to Salvagedcircuit's topic in MJ Tech: Modification and Repairs
I saw your latest build. It is a marvel of a restoration. Seriously excellent work. Unfortunately, I noticed a teaspoon of some green fluid (engine coolant) that pooled up on my new passenger side floor after a heavy rain storm. I am hoping its just the hoses to the heater core failing from old age and not the heater core itself, but there's a good chance she's a goner. In the mean time, I will be skipping the heatshield installation until I get the coolant leak fixed. Looking over dynapad and the Luxury liner pro, both seem to just be closed cell foam with a thin layer of MLV glued on top. I have not ran any numbers yet, but I think I will be going with just a 0.5in or 0.75in thick closed cell foam pad underneath my ACC vinyl floor and not bother with MLV. The ACC vinyl floor should be close enough to MLV. The vinyl floor has a uniform mass and has a consistent thickness, so I think it will work just fine considering it will sit directly on top of the closed cell foam pad. The order of operations for the next round of repairs are: -find source of coolant leak -If heater core is the problem, replace with a 97+ one like ghetdjc320 did in his latest build -seam seal the cab and both sides of the engine bay-firewall -use 97+ molded coolant hoses -convert to open system with new coolant tank and bracket from 97+ cherokee (I grabbed this from JY last time I visited) -install inline Moroso Radiator Hose Filler in the gates coolant hose by the AC compressor bracket -remove water pump -install Dorman 56398 Engine Water Pump Inlet Tube. late 90s cherokees use this, makes installing coolant hoses easier. -reassemble everything for umpteenth time. -
Hey guys, I just finished repairing my floor and POR15'd everything. I cut back the original gray plastic coated foam heat shield that Jeep used from the factory. It was deteriorating in my hands and was damp, so I did not see the reason to keep it. I grabbed SEM seam sealer and hope to be seam sealing next week and conducting a waterproofing test with my garden hose. Following, I plan to install a replacement heatshield, underflooring and the new ACC vinyl floor. Heat shield options: -Dynaliner. 300F rated. $6.66/sqft -Eastwood X-mat. 350f rated. $5.98/sqft Under-floor options: -Dynapad. 0.5in thick. $9.17/sqft -Luxury liner pro. 0.375in thick. $8.88/sqft -DE undercarpet. 0.375in thick. $6.06/sqft -closed cell foam. 0.5in thick. $2.74/sqft -closed cell foam + MLV (mass layered vinyl) Sound deadening options: 3m Sound Deadening Pad 08840. 160f max. $3.72/sqft https://www.3m.com/3M/en_US/p/d/b40068137/ Frankly, none of these options are very affordable. I am not fond of buying import products just to have to redo the process again a year down the line. That said, the dyna company expects you to have a gold plated yacht in your yard. No automotive manufacturer is paying anywhere near these prices for sound deadening or shielding. When 3m is the cheapest option, you know there's a problem! It seems that thicker material yields a better thermal and sound deadening solution, so I don't mind selecting a 0.5in or 0.75in under floor / heatshield solution. Let me know if you guys have come up with any other alternate solutions. Thanks!
-
WJ Booster Incompatible with MJ
Salvagedcircuit replied to Salvagedcircuit's topic in MJ Tech: Modification and Repairs
Good news all, One of my theories was correct: The rod inside the booster was not lined up with the master. Because of this, the booster rod is now off center and the master is slightly damaged. This is why nothing was flowing from the master cylinder outputs when the brake was pumped. Also, I grabbed the '96 brake pedal assembly from the JY and it fits perfectly. The brake light switch housing is simpler and more robust, but I still have to modify it for the automatic transmission cable clip bracket which I will have to weld. In addition, I ordered a new old stock '96 dual diaphragm mopar booster+master from omix-ada / morris 4x4. It came completely dented and is not unusable. No packaging material was used. The WJ booster I ordered from napa was unpainted and remanufacturered which was not mentioned. It is a centric part, in case anyone was curious. After my testing with the new WJ brake setup, I discovered that my main brake line from the front-back is shot. I will update with photos later on. -
WJ Booster Incompatible with MJ
Salvagedcircuit replied to Salvagedcircuit's topic in MJ Tech: Modification and Repairs
I wonder if the 1999-2001 Grand Cherokee service manual mentions the acceptable push rod clearance values. I should try and find the WJ service manual. -
WJ Booster Incompatible with MJ
Salvagedcircuit replied to Salvagedcircuit's topic in MJ Tech: Modification and Repairs
Curious, was your booster shaft too short and you had reduced brakes and pedal drag? I was hoping that by purchasing a new 3rd party booster and master designed for the identical vehicle that the two parts would have the proper fitment. -
WJ Booster Incompatible with MJ
Salvagedcircuit replied to Salvagedcircuit's topic in MJ Tech: Modification and Repairs
Thanks a ton for the document Cruiser! I don't know if my booster is adjustable as shown in the document, but this at least gives me some insight master+booster fitment and booster troubleshooting procedure. Thanks. -
WJ Booster Incompatible with MJ
Salvagedcircuit replied to Salvagedcircuit's topic in MJ Tech: Modification and Repairs
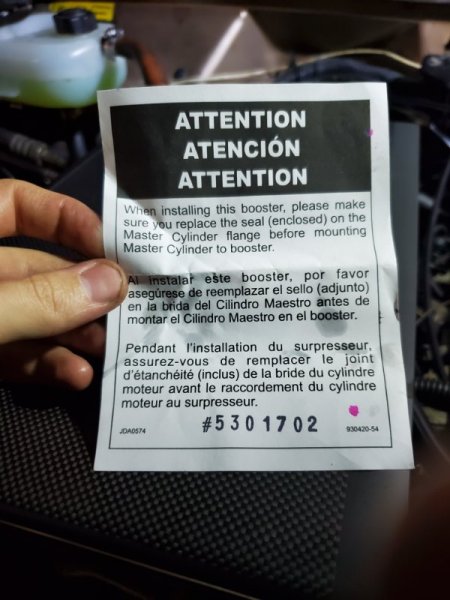
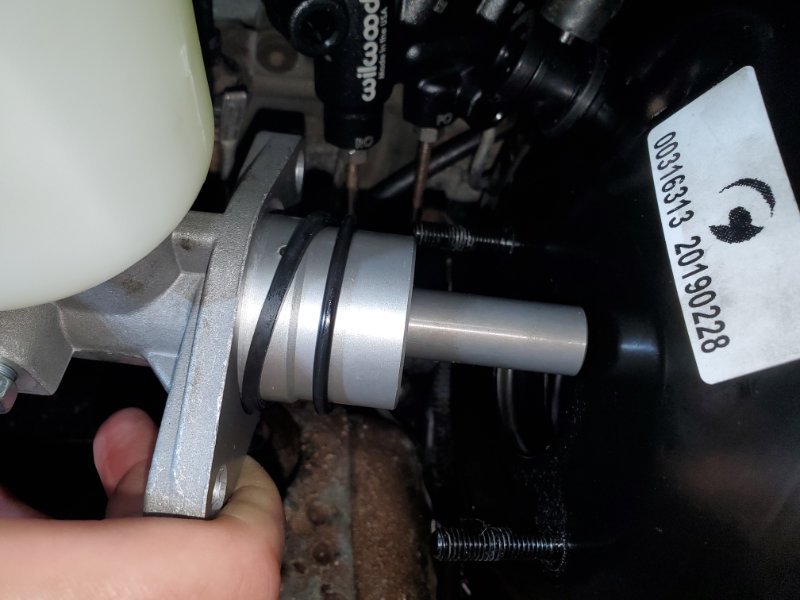
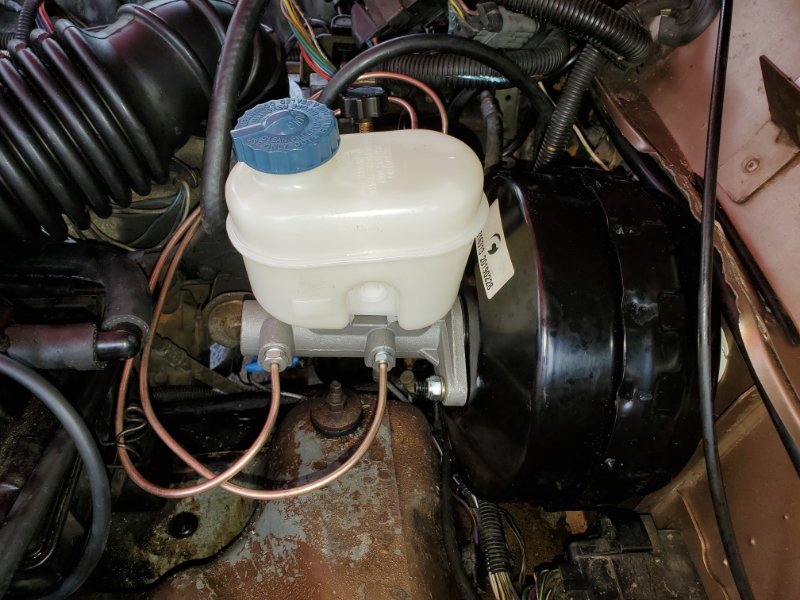
Here's an update. I'm on my second cardone booster + raybestos master and everything fit nicely. However, there were no brakes whatsoever. I bypassed the rear load sensing valve and removed the distribution block from the front and plumbed in a new wilwood prop valve. I bench bled the master cylinder in a vise and then installed the master to the booster. I connected everything up and started bleeding the brakes but no fluid would pump. Nothing bled from the passenger rear drum cylinder. I checked the temporary brass 5/16 union I used to mate the brake lines from the prop valve to the front brake lines. When I removed the master+booster combo, the lines were completely dry. I am baffled with why this is not working. There was some confusion with the installation. Raybestos does not make it clear why there is a second o-ring for the master cylinder. There is a rectangular profile o-ring that ships on the rear face of the master and there is an additional circular profile o-ring that they include in a separate little baggy with a warning note. The warning says "make sure to replace the seal on the master flange before mounting." I attached an image. I tried the master+booster with just the rectangular profile o-ring and then both the rectangular profile o-ring and the circular oring stacked. The same result kept happening. Nothing is being pumped. The master cylinder would push up and down about 10 degrees with every foot pump. I made sure to tighten the master to the booster, it was not loose. After doing some research, I believe I made (2) critical mistakes: We bled the master cylinder by pumping the cylindrical post in the vise and pressed too far (more than an inch) with a flat head screwdriver I did not realize that it was possible to have a master and booster misaligned. I believe I may have damaged the master by not checking alignment. I saw a video of another guy checking alignment with a usb endoscope camera via the vacuum pump port. This is what I plan to do next round. The master cylinder post apparently is not supposed to be pressed more than 1inch. I talked with a cardone ase technician about this. It seems better to bleed the master when mounted to the booster so there is more consistent travel within the allotted travel requirements. Some questions I still have: -Do I use both the Square and circular O-ring? I called raybestos and the fellow thinks you use both. He mentions that the rectangular profile o-ring is a "gasket" and the circular profile o-ring just stacks. He was not entirely sure. Lastly, here's how she sits now with factory rims acquired. Thanks for all the help so far guys.
-
WJ Booster Incompatible with MJ
Salvagedcircuit replied to Salvagedcircuit's topic in MJ Tech: Modification and Repairs
No hard feelings at all. @SoCalJeepComanche you have been a great help to me and an inspiration. I have a huge amount to respect to all of you on this forum, that's why I joined. It takes a true caretaker to keep one of these comanche's alive. I am truly learning that now. The more frustrating thing is learning to live with the hodgepodge assemblies. Torx, metric and standard at the same time! Thankfully there's no British standard thread. I'd really lose it :D I am going to take @MiNiBeast's advice: I plan on reinstalling the old booster, torquing it back to spec and taking some measurements. I plan on buying both a booster & master for both an XJ and WJ and making a few spacers. I will make (2) 1/8in spacers, (1) 1/4 spacer and a 5/16 spacer. I will then remove the booster and brake pedal and then try the install again. There should be a replacement prop valve in the mail from wilwood this week and I will have to set aside a weekend to do the booster+master+prop valve install. P.S. There's also a '91 longbed comanche in new jersey that is oh so tempting. No fusible links. Dedicated fuse box. no renix. Less vacuum tubing. Little rust. Hubba Hubba Hubba. Please send help -
WJ Booster Incompatible with MJ
Salvagedcircuit replied to Salvagedcircuit's topic in MJ Tech: Modification and Repairs
The starett caliper in the original post showed 2.177in. This was measured from the side of the diaphragm hole in the firewall to the intruding brake pedal bracket. I forgot to measure the actual diameter of the hole in the firewall for the booster. It is possible that my brake pedal bracket was poorly welded or loosely stamped at the factory, but it didn't matter at the time because the diameter of the single diaphragm was smaller than the diameter of the WJ booster. I tried to line up the WJ diaphragm as best as I could, but it would not fit because the brake pedal bracket always impeded the path of the booster arm. -
WJ Booster Incompatible with MJ
Salvagedcircuit replied to Salvagedcircuit's topic in MJ Tech: Modification and Repairs
That means a lot cruiser. Thanks. I'm thinking that if I remove the brake pedal assembly, mount the booster than mount the pedal assembly, I may have better luck with a successful install. The WJ Booster is mopar part# 5011261ab. Cardone and Crown make a clone of it, but of what quality, I don't know. The cheapest mopar WJ booster is $350 that I can find. My local Mopar parts dealer has one left and wants $536. The last time mopar produced a WJ booster was close to 20years ago. Who knows what shape the rubber diaphragm is in. A recently manufactured 3rd party booster may be a better option.