
NickyV
-
Posts
159 -
Joined
-
Last visited
Content Type
Profiles
Forums
Gallery
Everything posted by NickyV
-
SOLVED: Chime Module not chiming
NickyV replied to NickyV's topic in MJ Tech: Modification and Repairs
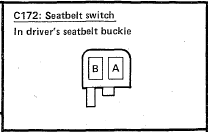
To clarify. The parking brake lamp only lights up when I engage the parking brake. It lights up independently of the seatbelt light. So the parking brake lamp seems to be working correctly. I only mentioned checking the parking brake lamp, because it is the first step of the troubleshooting procedure. I copy/pasted the troubleshooting procedure into my original post above. It seems that the purpose of this first step is to rule out a blown "Gauges" fuse. The seatbelt lamp lights up when start/run is engaged. In my truck, it lights up even though it is not properly connected. As I mentioned above, C172 and/or C199 is just dangling free. By the way, I'm not sure if C172 and C199 are two sides of the same connection. They look exactly the same in the troubleshooting manual. Thank you for your input here. I agree... I wondered if there was some kind of shared ground that could be causing the issue. But that didn't entirely make sense to me.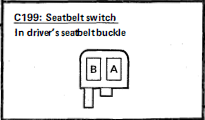
-
SOLVED: Chime Module not chiming
NickyV replied to NickyV's topic in MJ Tech: Modification and Repairs
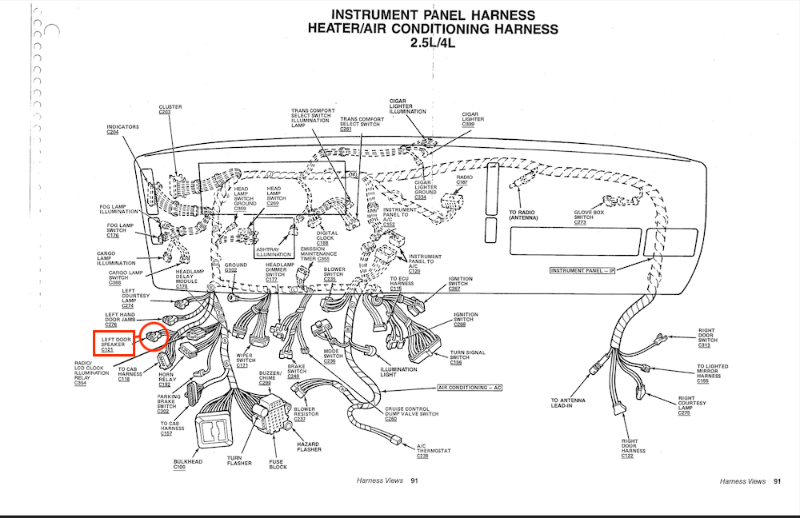
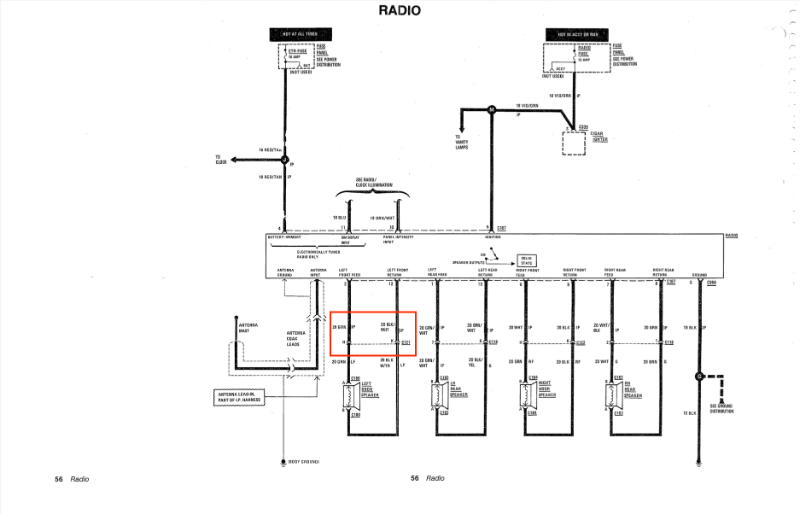
Thanks. I didn't think to tag @Ωhm — great user handle! Maybe @fiatslug87 has some ideas as well? To recap and hopefully add some clarity: I have both the black buzzer and the blue buzzer. Both of them buzz when I bench test them using the method described in this thread. Both of them cause my Parking Brake and Seatbelt Indicator lamps to light up properly. Below is the result I get for each step in the troubleshooting. TESTS PASSED: Remember T3 is the ground terminal. - T1: With COM prong of multimeter attached to T3 of C299 (ground), I get good voltage. OK - T3: With COM prong attached directly to negative terminal of battery via jumper, I get 0.068k Ohms (that seems like basically zero to me, considering this truck is nearly 40 years old. OK (?) - T2: With COM prong attached directly to negative terminal of battery or attached to T3, I get about 0.1k Ohms. This seems like "almost zero" to me. OK (?) - T7: With COM prong in T3, I get voltage pretty much as long as the key is in the ignition. Just inserted, at "off-lock" and in "ACC/RUN." OK (?) - T8: With COM prong in T3, keys out, headlights on, or running lights on, I get voltage. With keys in all positions and truck running, I get voltage. OK (?) PROBLEM AREAS: Multimeter reading of ".OL". - T4: With COM prong on negative terminal of battery or on T3 (ground), I get a reading of ".OL" on multimeter. NOT OK (?) - T6: With COM prong on negative terminal of battery or on T3 (ground), I get a readong of ".OL" on multimeter. NOT OK (?) KNOWN/POSSIBLE CAUSES: Things that I currently can think of that might be contributing to this. Seatbelt connection is not hooked up. I will try to hook that up eventually, but right now, the harness side connection is hidden under floor covering. Two of three wires snipped on C121 (see harness diagram below and picture). I believe that "J" and "K" are the ones that got cut. Something I didn't think about last night: My stereo is not hooked up using the factory wiring. I honestly can't recall exactly how I did it, but I know I ran several of the connections using new wire directly from the back of the radio directly to my speakers. It is possible that I used some of the factory connections on the passenger side to carry signal, but I think I used all new wiring on the driver's side. I am also using two separate amplifiers — one for mid/highs and one for the sub. And I have other customizations running here, like a bluetooth connection, door speakers and tweeters connected in parallel. Currently my theory is that it has something to do with either the seatbelt connection or the snipped C121 wires, but wiring is still new to me, and by simply looking at the diagrams, I can't see what the heck it would be. Picture of C121 Snipped: Location of C121 for reference: Diagram of Radio/Stereo circuit for reference: Diagram of C121 for reference. I believe that "J" and "K" have been cut. "H" remains connected. I am not using this connector in my stereo setup, so there is only the female connector present.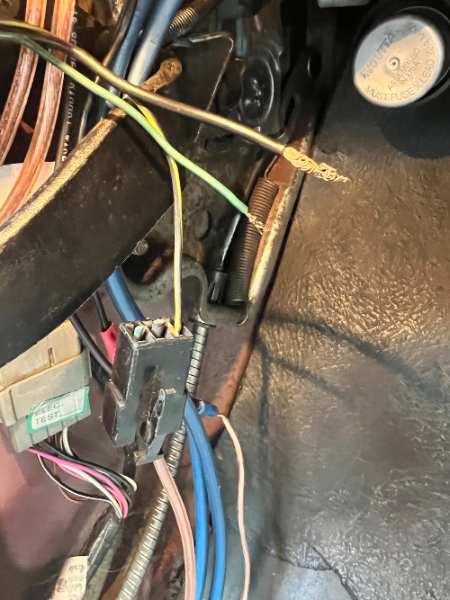
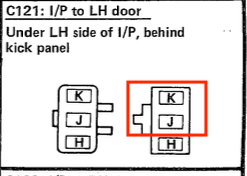
-
SOLVED: The main issue was that one of the two grounds connected to the driver's side door jamb switch had been disconnected. Secondary issue was that the seatbelt connectors under the seat weren't connected. Fixing the severed ground on the door jamb got most of the warnings working. Plugging in the connectors for the seatbelt solved the seatbelt warning. --- --- --- ORIGINAL POST: I recently picked up a blue chime module from the JY. Had a black one before that. It didn't make sound, and I figured was busted. But after plugging in the blue one, I had the exact same symptoms I was experiencing with the black one: [NOTE: This post has been edited since a new thread was started.] Parking Brake Light and Seat Belt Light both illuminate, but no sound. So, I found this older thread and did the bench test that @schardein outlined there (quoted below). Both the black one and the blue one seem to work properly during bench test. That is, they make noise as expected. Testing Procedure from "Electrical Troubleshooting" (1988 MJ Edition): So what gives? Well... I have some theories. I followed the troubleshooting guide and discovered that I'm getting proper voltage out of ports 1, 7 and 8. I am also getting proper ohms readings at Ports 2 and 3... at least I think they are OK. Feel free to let me know if I'm wrong. Here's what I am getting: - Port 2 gives me 0.103K ohms (black lead directly on battery, red lead coming out of port 2). - Port 3 gives me 0.068k ohms (black lead directly on battery, red lead coming out of port 2). - Ports 4 and 6 seem to be the problem: - Port 4 and Port 6 give me "OL," which I believe means there is a problem in both of these ports. I think it has to do with a ground. Here is what I know for sure: 1) The previous owner cut two of the wires on the driver's side door speaker connector. He did a really bad jury-rigged job on a speaker that wasn't even mounted. It was literally just tucked up under the dash. The black-with-red-trace wire is still in tact. The thicker, black (14 gauge?) wire was snipped, and the green (?) 16/18 guage wire was snipped. I think the thicker, black wire is a pass-through ground for the power windows (which I do not have). 2) I also know that the seatbelt connection is not connected. I'd have reconnected it tonight, but I didn't want to take the bench seat out. I can see the connector going directly to the belt, but I can't see the second part of the connection, which makes me think it's gotten wedged under the vinyl flooring. So... Does anyone here know if one of those two things sounds like the culprit here? If the seatbelt connection isn't hooked up does it cause all sound to stop working on the chime modules? Could it have something to do with the snipped wires on the speaker connector? Maybe a combo of both? Or something else entirely? @eaglescout526 — any ideas? P.S. Thanks for starting a new thread. Pics are below in follow-up post. I'm tired and I always forget to take pics, but I can upload some tomorrow if anyone wants to see what I'm ranting about.
-
I was just thinking about Cruiser today and wanted to check in to see if his stuff ever made it over here. I'm glad to see y'all got it on the site. Pete will be missed! Weather is getting nicer in NorCal and I'm feeling the itch to tackle a big project this spring/summer. So grateful for CC and folks like Pete.
-
Thanks to both @AnotherOldJeepGuy and @89 MJ for the advice and hope to get more. It all makes sense. I took a break from working on the truck for the past few months as it's been raining pretty frequently and I've been busy with other projects, but hope to get back into it soon. I'll try to do another post on the water pump and other fixes that I end up making. Keep on truckin!
-
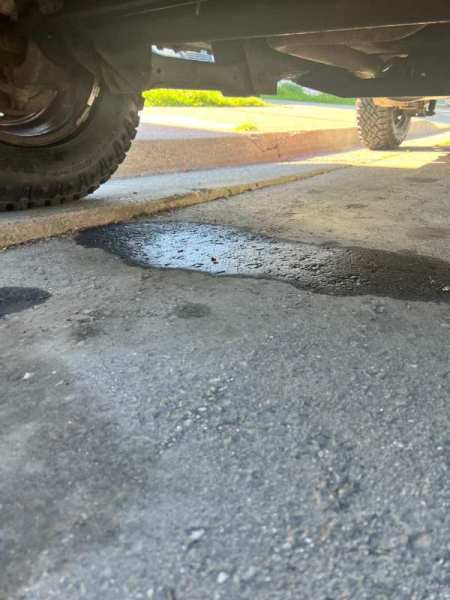
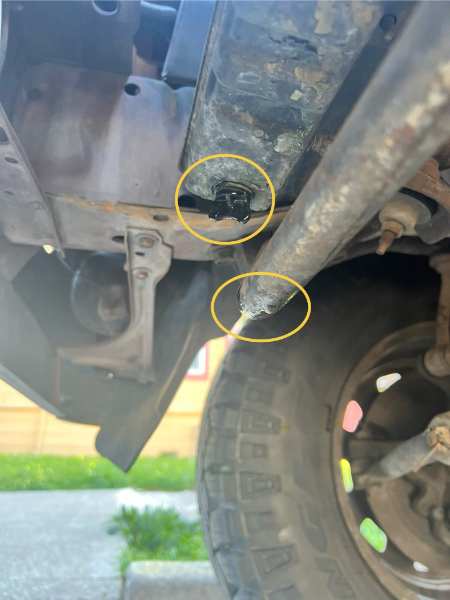
Update - Photos: I took some photos this morning in the daylight. I'm not sure if the liquid on the ground was from my MJ or something else. Hard to say. But it definitely looks to me like I'm getting some leakage around the base of the radiator. I've pasted them at the bottom of this post. I snapped these real quick on my way out to work. Will take a closer look after I get off. Some Background: If you have time, please read the whole post for all the details and then see my questions at the end. It took a while, but I finally got new tires on my MJ. I'd been driving on very old tires for way too long, and I was pretty sure they were causing the truck to shake at highway speeds. After getting the new tires installed (Good Year DuraTracs - 235/75/15), I was stoked to find that they significantly improved my drive on the freeway, and I drove about 30-40 miles at normal highway speeds for the first time in a long time. It felt great to be able to do that again, and I hope that I may finally be close to resolving my long battle with death wobble and not-so-deadly shimming. (If you've followed other posts of mine, you may remember that I had a lot of work done on the Jeep to fix the death wobble and that I'd made a lot of progress, but still needed to replace the tires). Anyway, that's not really what this post is about. The Overheating Issue: When I got off the freeway, I noticed that my heat gauge was redlining, so I pulled over. I popped the hood and saw that the coolant reservoir was boiling and that the cap on the reservoir is cracked. I let the truck cool off for a few hours and then drove back home (another 40 miles or so). It was probably around 80 degrees when I started driving earlier. By the time I drove home, it was night time and it was much cooler outside. I turned on the heat in the cab and made it all the way back home without any overheating issues or boiling (at least none that I could hear... I did not pop the hood when I got home, I just listened to see if I could hear any gurgling). My Theories So Far: The crack in the coolant reservoir cap concerns me, but I actually think that's been there for a long time. I have a 1987 2.5L, and my Haynes manual says that the overflow reservoir in these is not part of a pressurized system. But I'm no expert on this front. I have to do some more troubleshooting, but my first thought is that the water pump might be dying. The only other time I've encountered the boiling reservoir it was when my first water pump was shot. I replaced it probably 4 years ago now. Right before I noticed the overheating, I heard some engine noise that sounded similar to what it sounded like the last time the water pump went out. It was kinda like the sound of clanking metal being carried into the cab via tubes. It's not as pronounced as it was when I last changed the pump, but it definitely sounded similar. My Questions: Do you all think my water pump is going bad again? Do you think that's a good, low cost place to start? I drive the truck a fair amount, but it is not what I'd call a daily driver either. I have taken it on some pretty bumpy roads though since replacing the water pump and gone on some long road trips... so there's that. How vital is it to get a new reservoir cap for a 1987 2.5L? I definitely am planning to fix that ASAP, since it will be pretty cheap and I think relatively easy. Not trying to avoid it. Just wondering what my priorities should be. Is there any chance you think having the tires changed could have resulted in knocking something loose or shifting some fluid around or something? Like I said, this isn't exactly a daily driver, but I have made the trip I made today plenty of times over the past few years and sometimes on much hotter days. I wouldn't think the shop could have caused this, but I just am trying to understand why this happened today. I'm also wondering if driving it over 70 mph for the first time in a long time is why this cropped up today. Maybe the water pump has been going for a while and I just haven't pushed the truck hard enough in a while. Maybe the installation of power steering and new belts helped speed this problem along? When I got it worked on for Death Wobble, I also had power steering put in. And ever since then, there has been what I have assumed was belt noise. I tried a few simple things to resolve it, like tightening the belts, but I didn't ever get to the bottom of what was causing the noise. It wasn't a tell-tale screeching, but the noise would temporarily go away when I sprayed soapy water on the running belts, which made me think it was the belt. But maybe the soap was also lubing up the bearings in the water pump housing and thus stopping the noise temporarily? Finally, on a side note and in relation to the Death Wobble: How much jiggle is normal on a healthy MJ when driving on the freeway? I drove my truck for way too long with it's wobble issues before all the fixes (which I outlined in this comment). Now I'm a bit traumatized and I can't really remember what it was like before the wobble started presenting itself. I'm hoping that I start to get my trust back with time. Driving the truck today, after getting the new tires on, it felt soooo much better, but it still shakes when I hit a bump. I mean, obviously a 38 year old truck is going to shake when it hits a bump in the road, but I'm left wondering what is normal and what isn't... --- --- --- OK. I hope some of you will read this and respond to my questions. As always, any and all insights are appreciated, so thanks in advance!
-
Diagnosing Clutch Issues: Help/Advice Wanted
NickyV replied to NickyV's topic in MJ Tech: Modification and Repairs
Thank you all so much! This business about internal vs external slave cylinders is refreshing my memory. I did a bunch of research on this years ago. Hopefully I took good notes. I’ll have to check ye-olde Google Doc. @Eagle_SX4 and @pizzaman09: The possibility that it is sucking in air is intriguing to me. I feel like that might explain some of the weirder symptoms I’ve experienced over the time I’ve owned the truck. For example, sometimes the clutch will lose pressure completely and then get pressure back, all on its own. Does that sound like an “air in the lines” symptom? If this is part of the issue, what do you suggest besides resetting with a gravity bleed? Finding a gasket of the right size/shape to place on the master bath underside and of the master cylinder cap? Or is air more likely getting sucked in at the slave cylinder? Or is it a bit of a crapshoot as to where the air is getting in? -
Hey there! So, I've had my clutch worked on twice in the years I've owned my 1987 MJ. The first time, after about a year, the clutch's master cylinder was leaking. I do not recall if this was the issue the first time around, but it definitely was the second time. I know that is a common issue with these vehicles. I am eventually going to need to redo my fuse box... The second time, I took it to a mechanic I liked a lot better than the first. He and his team were very thorough. Explained everything to me. Pictures and videos provided. The whole nine... It was great! Except, I can feel my clutch going soft again. First time this happened, I took a peek in the master cylinder reservoir and it was dry. That's what used to happen... However, this time around I'm not seeing evidence of the DOT-3 fluid on my shoes or fuse box or anywhere. Just a few nights ago, I was noticing the clutch was feeling soft again, so I took a peek in the master reservoir and it was full. TL;DR: - Clutch is going soft. - Replacing DOT-3 fluid will bring it back to functionality (with plenty of pumping of clutch pedal) - But the fluid does not appear to be leaking from master cylinder - at least not into the cab. Thoughts: - Maybe it's leaking on the other side of the firewall? - Maybe we are dealing with something in the slave cylinder or somewhere along the line? Advice (?): - What should I do? - Where to start? - Diagnostic procedures? Background/Capabilities: - First time I had the clutch done, I also had the plates replaced, so hopefully that is still good. I don't think it's an issue with the plates. It seems like an issue with the pressure in the system. - I did bleed the clutch myself once. I'm not confident I did a perfect job, but I do know I can do it.
-
dimmer Dash Lights Work, but Dimmer Doesn't...
NickyV replied to NickyV's topic in MJ Tech: Modification and Repairs
Thanks for the explanation and advice, @gogmorgo. Good luck for when you get around to it, @AnotherOldJeepGuy! -
dimmer Dash Lights Work, but Dimmer Doesn't...
NickyV replied to NickyV's topic in MJ Tech: Modification and Repairs
@AnotherOldJeepGuy - To chime in on what @eaglescout526 and @gogmorgo have said: For me, it's been so far so good with the used switch I pulled out of an XJ. I actually pulled two out while I was at the yard. Once you get the hang of it, it's pretty easy, although you do have to get into a pretty awkward angle to yank it out. It's more difficult to get it in. That said, I haven't been monitoring the electrical flow out of the switch. I currently don't have a very sophisticated multimeter. (I need to get one... my old one broke). I just have a simple one that tells me if there is current and the voltage, so I'm not sure what's going on with resistance, etc. Anyway, the lights have been working now that I have the new switch. I also built myself a relay harness and created a really detailed post on that. So yeah, the switch is working well, and now that I have the new harness, I shouldn't be overloading it, which is great. But to the point about getting a brand new one, it seems like there are a lot of after-market solutions available through auto parts stores that would work just fine, and it would save you a trip to the junk yard. -
Thanks @89 MJ. I plan to stick around and do more write ups! I enjoy it!
-
Thanks for the additional input, @GonzoTheGreat. Sounds like I’m just gonna get a new seal. And go from there. Haha, @eaglescout526! I had to Google what NM stands for. So scientific! By the way… I just want to say that I love this forum! Every time I dip into one of the many XJ or YJ forums to research something, I see a bunch of one-sentence answers and rude responses to honest questions like “Let me Google that for you.” Y’all really care out here!
-
Thank you! I appreciate that!
-
Here's the fine print: "On models with plastic rocker arm covers, RTV or a gasket may be used. On models equipped with an aluminum rocker arm cover, RTV must be used. Later models use a pre-cured reusable gasket - install these without sealant." (Italics added by me). The page with the torque specs lists torque being 55-in-lbs for RTV and 44-in-lbs for the model with the built-in gasket.
-
Thank you again. I have the Haynes Manual and I think that it might use some different terminology than I've been using. It calls the valve cover the "rocker arm cover." I do not doubt your experience, I'm just trying to get on the same "page" as it were. It says "rocker arm cover-to-cylinder head bolts "55 in-lbs" with RTV. That's a lot more than you've recommended. Why do you think that is? Or am I looking at the wrong part? I don't see "valve cover" in the index of this manual.
-
Thanks, @eaglescout526. So, if I understand you correctly, you're recommending that I start by just replacing just the gasket on the VC I have? Honestly, I'm fine with keeping the plastic gasket. I just want it to work and to stop leaking oil!
-
Hello All, I've been researching valve cover replacements. I've still got a lot of research to do, but I'm wondering if anyone has had any good experiences with aftermarket VCs? I have a 1987 2.5L. Some of the posts about this topic are over 10 years old. In those, people tend to talk about finding a VC at the JY. But doing some searching on the old Googles, I'm seeing that Crown Automotive claims to offer an aluminum aftermarket solution. I really know nothing about this, but I'm a little worried it's too good to be true, especially because it costs less than $50 on Amazon: https://www.amazon.com/Crown-Automotive-33003857-Valve-Cover/dp/B008VPWLRG Any chance this might work? If not, what should I look for? Mine is currently leaking. Not badly, but I want to eventually fix it. Anything else I should be worried about? Like... if I've been driving it with a leaking VC for years and I suddenly seal that up tight, could it lead to other issues? I'd really hate to blow my head gasket. Then again, there's a high likelihood that my HG has never been replaced. Maybe it's only a matter of time.
-
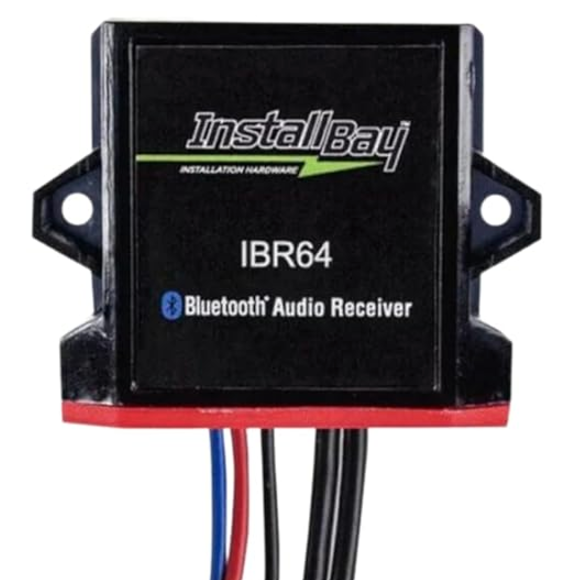
I'm deep in a phase of radio experimentation. A few weekends ago, I hooked up an AR-series radio (the radio-only kind with the sliding faders), and I hooked up an RCA channel selector out of sight, so I can switch easily between the radio and bluetooth. But I thought I could do better. Today, I found an RX-171 at the JY, and I follwed the video posted by @Pete M to perform one of @Minuit's "Science Projects." It is very easy to do. Per the video, I disconnected the AM band as well, and even repurposed an RCA cord I had lying around to hook up my bluetooth module to the radio. I'm going to drive around with it for a while, but I don't know if I will keep the set-up. The Pros: I really like the fact that I can control the volume of streaming media with the built-in radio knob, and adjust bass and treble and the signal from the bluetooth sounds great. The Cons: The reception on the radio is a bit fuzzy. I don't know if that is unique to the one I grabbed or not. Maybe it could be improved somehow by boosting the signal coming in from the antenna? Now that I have the confidence to repurpose RCA cables and tear apart radios, I am considering trying to do the same process with the the radio-only AR I have by tapping into the appropriate cables above the treble slider. The one thing I'm a bit wary about is that the two cables Minuit identified are from a slightly different model AR than I have. Has anyone tried the hack he described on page 3? Did it work? Also... it sounds like it will work a bit differently than the RX hack, in that it might not override the radio signal. Maybe a simple A/B switch mounted on the dash would do the trick. Or I could just use the RCA channel selector I already have hooked up. Hmm... If I succeed in this next science project, I may offer up the other radio with aux in the classified.
-
Parking brake pedal not staying engaged
NickyV replied to Warren99's topic in MJ Tech: Modification and Repairs
Thanks @Eagle_SX4 Interesting update. Last night I was fiddling with my brake a bunch. Just trying to get a better understanding of all the parts. It started locking a lot more consistently. I realized that for the past several years, the footwell kickpanel has been missing, which would have allowed for additional lateral movement. Right now, if I'm deliberate about it, I can get the parking brake to engage. Haven't tried it on a steep hill yet... I still think that I need to do some kind of fix, but I'm happy about this development for the short term. -
Can We Talk About Radios?… Again?
NickyV replied to neohic's topic in MJ Tech: Modification and Repairs
Interesting... -
Can We Talk About Radios?… Again?
NickyV replied to neohic's topic in MJ Tech: Modification and Repairs
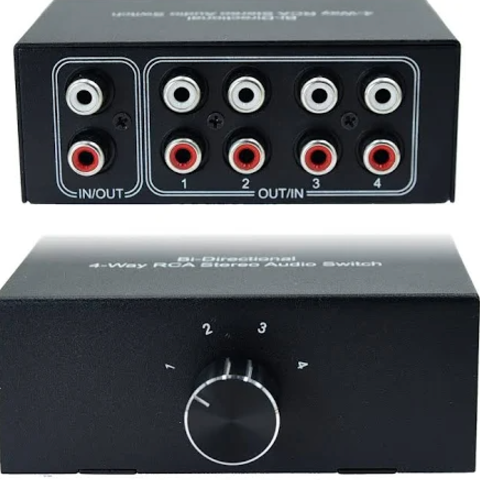
For the purposes of inspiration, here's V 1.0 (I didn't like this, but maybe someone who is much savvier with electronics could get a Jeep faceplate to control a more modern stereo? This "faceplate" was from one of the RX series with a tape deck: And here is how I rigged up V 2.0: I got this working radio. I believe it's one of the AR series. I hooked it up to a line converter which, come to think of it... I hope I grounded this... I must have. I don't think it would work if I hadn't. And I tucked this up under the dash. I still need to secure it. Then I got something like this. (Note, this is not the exact one.) The one I have has a the knob running perpendicular to the RCA ports. I have found push-button versions of this. Basically an A/B switch that I think I might be able to mount on the dash in one of the factor switch positions. I removed the big knob and the post that the knob sits on was long enough to fit through one of the holes for the cruise control. It was more complicated than that... I had to remove the metal housing and do a few more things, but hopefully this gives you a sufficient picture. I mean, this is a horrible picture that I grabbed as a screenshot from a video, but you can see the little post/knob. That is what I twist to switch between the radio and the bluetooth inputs.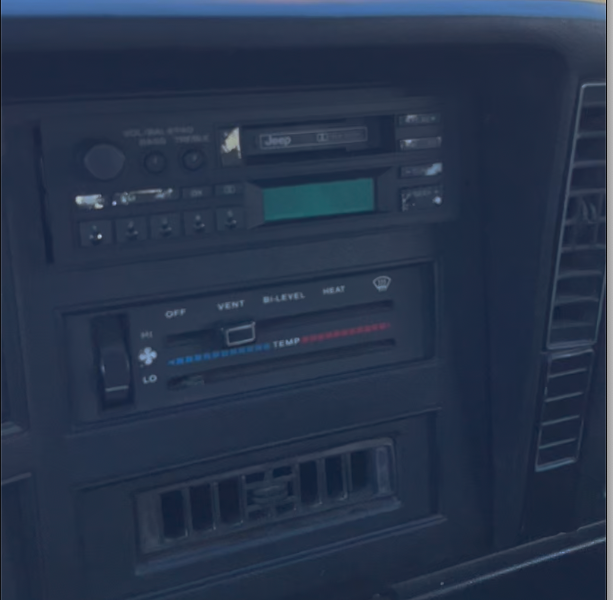
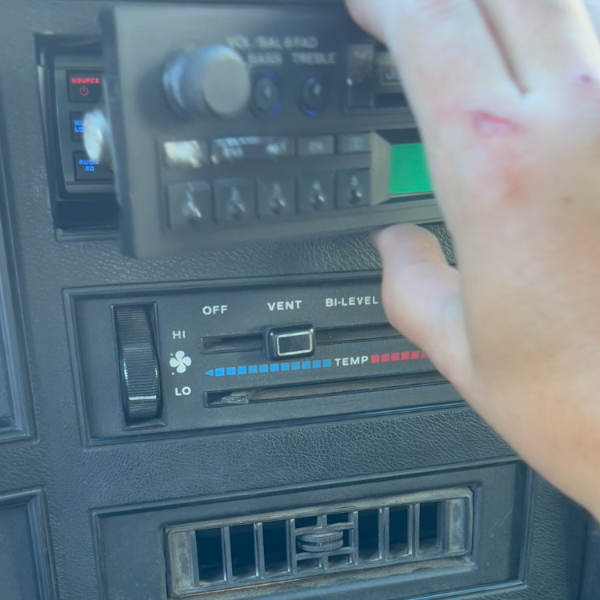
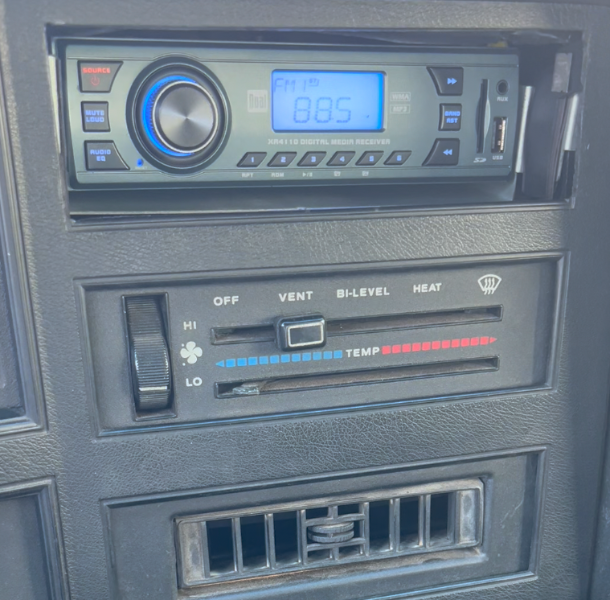
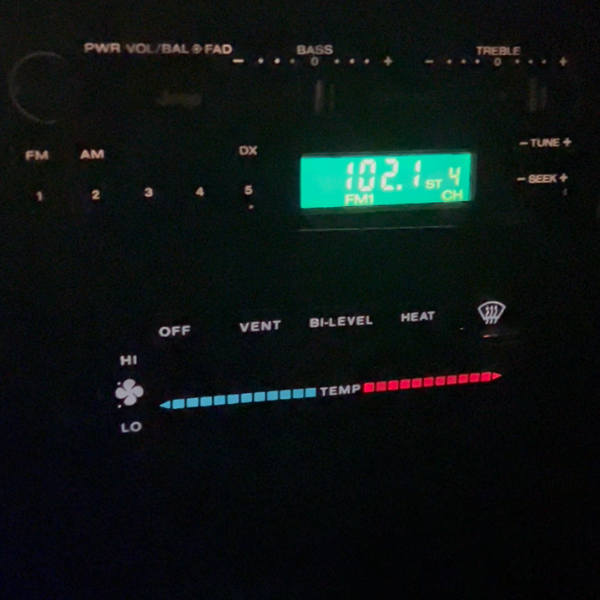
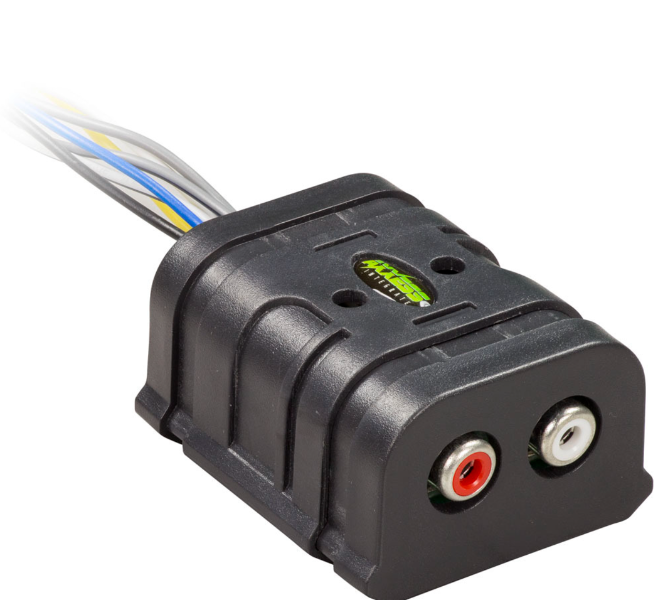
-
Can We Talk About Radios?… Again?
NickyV replied to neohic's topic in MJ Tech: Modification and Repairs
Looks like you're correct. There are holes down there for mounting the box, which is yellow with an AMC sticker on it. For my current solution, I took -
Can We Talk About Radios?… Again?
NickyV replied to neohic's topic in MJ Tech: Modification and Repairs
I've tried two different options in the past month. I had a factory radio with tape deck that sat in my basement for years. When I finally tried to hook it up, it didn't work. Super frustrating. I removed the faceplate and crammed a smaller Dual radio way back in the space where the radio goes. Then I used magnets to have a faux OEM faceplate. It looked pretty convincing, but it was not very functional. I've since moved onto my current setup, which is a working stock radio from a '91 XJ. I also have a bluetooth module tucked up under the dash. I switch between them with an RCA channel selector that I mounted under kick plate beneath the steering wheel. I took advantage of some holes that were already there for some option that I don't even think any MJ comes with... a yellow box that I've seen on XJs at the junk yard with an AMC sticker on it. This current setup all looks pretty slick and era appropriate. Only issue is I'm starting to think the radio I pulled from the XJ has a bad ground. I'm running all of this through a pair of amps behind the bench seat. One is for the single 12" sub and the other is for all the mids and highs. When I'm streaming from the phone it sounds damn good. When the radio is playing it also sounds pretty darn good. But when the volume is low, I'm getting the thing where I can hear a high pitch whine that increases with acceleration. I know it's gotta be a ground issue. But the thing is, when I had the Dual crammed behind the faux faceplate, I wouldn't get the whine with either the radio or the bluetooth, which has me thinking the bad ground is in the new/old, functional factory stereo. I could have screwed something up when I put the new radio in, I suppose. -
Parking brake pedal not staying engaged
NickyV replied to Warren99's topic in MJ Tech: Modification and Repairs
I think I have read just about every thread on here about the parking brake and fixes. The DIY E-Brake Fix, Parking Brake Pedal Refurb, and New Parking Brake Fix are all great. I want to start with the low hanging fruit and I've got a couple questions: Is the fix described in this thread (tightening down the main pin, the catch lever pin, and putting in a new spring) generally accepted as the first thing to try? Can I tighten the pin without removing the entire assembly? How do you tighten the pin? Do you apply a bunch of pressure to either end of the pin? I'm having trouble understanding how this works. Does the pin get compressed? Here are the symptoms on my e-brake. Keep in mind that I have not removed it to get a good look. Lateral movement of the e-brake pedal Some teeth seem to catch better than others (maybe some are rounded or broken?) Not sure if this is a "symptom" but the e-brake doesn't hold all that well unless I get it to catch with the pedal almost all the way against the floorboard. Should it be holding firm without pressing it all the way down, and if so, does this mean I need to shorten the cable a little bit? I am planning to just try to get a new spring on there first to see if that helps. I really like the idea of doing a complete refurb, but I don't have all the tools outlined in the two main threads easily available. I would eventually like to have a drill press and some kind of welding torch, but not sure I'm ready to buy those things for just one project. -
Build Your Own Harness: A Step-By-Step Guide
NickyV replied to NickyV's topic in MJ Tech: DIY Projects and Write-Ups
Thanks for the response and your thoughts on this project, @gogmorgo. This forum and YouTube make projects like these way more approachable than they would have been before, but one thing I find challenging is figuring out the right search terms. Just knowing the term "relay pigtail" would have been helpful for me to find the part that I wished I had — the one in your picture. I live in the Bay Area/Northern California and I don't have to worry about salt on the roads and ice. Hopefully my shovel connections will hold up for some time. But I will make a note of this and I may eventually upgrade. It would be nice to have everything sealed up real tight. I'm also glad you brought up the relays with the 87a terminal. I actually used one of those, because while I apparently have the patience to build a harness myself, I don't have the patience to order parts on the internet when I'm rearing to go on a project. As it happens, one of the relays I bought is a standard relay (30, 85, 86, 87) and the other is one with an 87a (because that's what they had at the auto store when I went to get my relays). I just left the 87a empty. But I think I used it for the high beams. At some point in the future, I may figure out how to make it so my fog lights go off when high beams are on. Then again, I've never actually used them while on the road. This is not a daily driver and I keep the covers on them most of the year... occasionally pulling them off just to make sure they are still working. I kinda feel like the only time I'd actually use them would be on a forest service road, far away from the prying eyes of the CHP.