
NickyV
-
Posts
149 -
Joined
-
Last visited
Content Type
Profiles
Forums
Gallery
Everything posted by NickyV
-
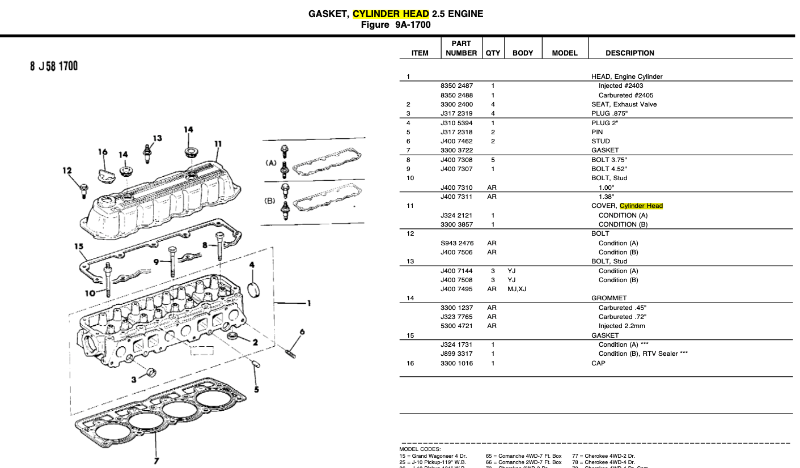
I appreciate all the advice. I’m just going to order new bolts. Maybe I’ll need them. Maybe I’ll just want to use freshies. Does anyone know much about the one 4.52” bolt that the parts manual calls for? That’s the only one I’m having trouble finding online.
-
Lol. I definitely didn't read the parts manual closely enough. It literally says I need five of the 3.75", one of the 4.52" and the rest are "as required," which would be four. And that is exactly what it looks like under my hood too.
-
Thanks. I gathered that things changed in the HO years. But I've also read that at some point around 1987, they started using torque-to-yeild bolts. Really want to make sure I do it right!
-
I'm looking at doing my head gasket. Trying to figure out which bolts I need. It's a 1987 2.5L. I'm not seeing any kits online specifically for the 2.5L, and based on the 1987 parts manual, it's not entirely clear to me how many I need with studs vs without studs. It just says "AR" or "use as required." But I'd like to replace them all. Pretty sure I need 10 total, but can anyone tell me with certainty how many I will need of #10, #9 and #8 to replace all of them?
-
More Clearance for Mechanical Fan?
NickyV replied to NickyV's topic in MJ Tech: Modification and Repairs
Thanks @eaglescout526 and @AZJeff. All this makes sense. -
More Clearance for Mechanical Fan?
NickyV replied to NickyV's topic in MJ Tech: Modification and Repairs
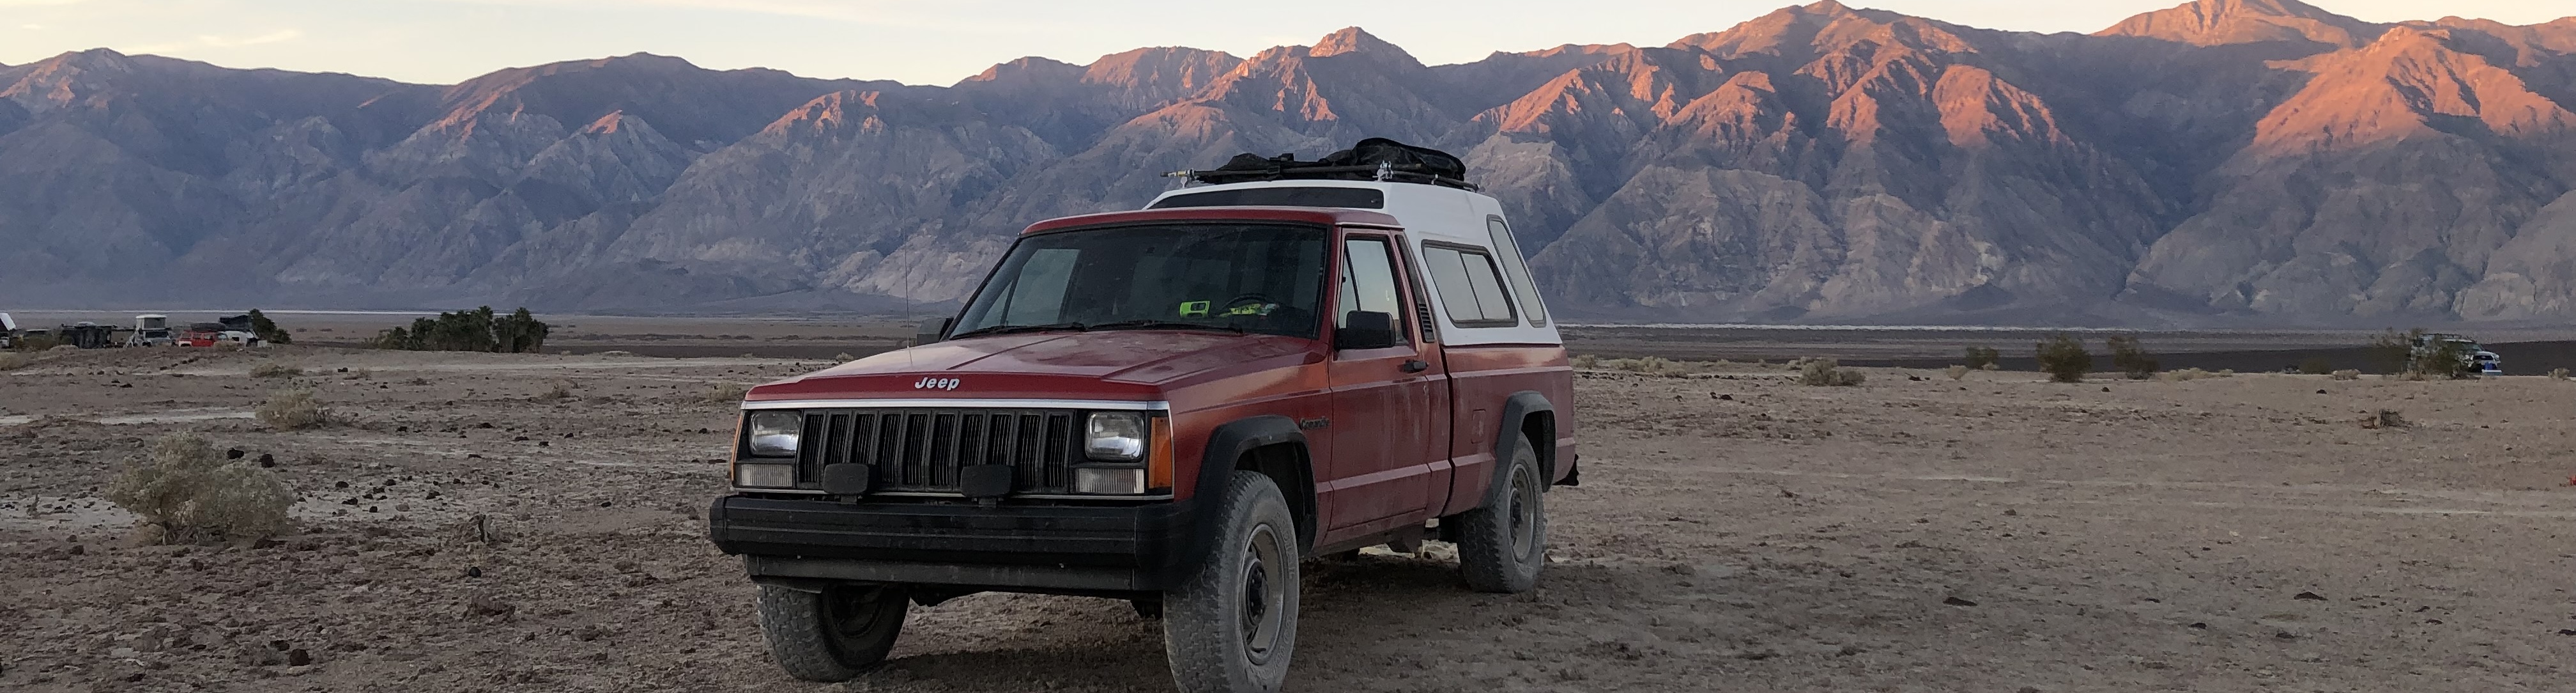
Interesting about the PT Cruiser fan. Thanks for the tip. I'm also just a bit stressed. Because the MJ has been overheating when it's climbing hills. I really want to be able to take it camping this summer (with A/C). It's frustrating (but expected with a project truck, I suppose). Every time I think I'm ready to do this big A/C job, something else more pressing comes up. I've been collecting parts and taking tons of notes over the course of several years. I finally took some time off from work and reserved some time at a DIY shop near by later this month. And now there's this overheating thing... Anyway, I know Cruiser advised against this, but I am quite literally getting ready to fire the parts cannon. New radiator, new rad hoses, new heater core, probably new water pump and fan clutch as well. I'm a still a bit worried it could be the head gasket. I've done several tests for emissions in the coolant -- both before and after a very thorough flush (haven't flushed the block though... I do plan to do that). I have not been able to detect fumes in the coolant. The engine seems to be running well aside from overheating as it goes up hills. I've found posts on here of people saying replacing their radiator helped. I have good reason to believe all the plumbing in the heating system is gunked up. The heater stopped working about a month or two ago, so I think the heater core is clogged. Like I said, I'm just worried about the head gasket. Not only because that will be a big job, but also because I don't want to unnecessarily muck up all my new parts. Sigh... -
More Clearance for Mechanical Fan?
NickyV replied to NickyV's topic in MJ Tech: Modification and Repairs
I’ve been talking to someone locally who replaced his mechanical with an all electric and he said it didn’t cool as well. Could be other things going on, but as of now, I definitely want to keep the mechanical for reliability. I might consider going full electric down the road to try to free up some HP. Gotta see how it all works first. -
More Clearance for Mechanical Fan?
NickyV replied to NickyV's topic in MJ Tech: Modification and Repairs
Thanks, @eaglescout526 I hear you loud and clear. But the thing is, I already went to the trouble to build my wiring harness so that it can activate an e-fan. There are e-fans out there that are quite small. I'm talking about 8-9 inch fans designed for transmission or oil coolers. I know they wouldn't provide nearly enough cooling on their own. But in addition to the mechanical fan, it seems like they could help, especially in stop and go traffic. Do you think that's just not worth the trouble, or do you foresee other issues with going this route? -
Is there a way to get more radiator clearance for the mechanical fan in a Renix 2.5L (1987)? I’m asking because I am working on putting A/C in and I want to add an electric fan while keeping the mechanical fan. I have also considered creating a custom bracket for my radiator to adjust the spacing. I will be running standard size radiator and condenser… matter of fact, the condenser might actually be a bit thinner than OEM. I was hoping to use a salvaged e-fan pulled out of a 4.0. But I picked it up from a local Pick-N-Pull on impulse, without measuring or calculating. So far, I have only eyeballed the space under the hood by holding up the various parts, and I can tell it will be tight. I think I can use the 4.0’s e-fan as either a push or pull (just need to flip the polarity, right?) But I am worried the fan might be too tall/wide to fit as a push, and that if I use it as a pull, it will be ridiculous close to the mechanical fan. One idea I had and am trying to research is if there is a water pump housing that has a slightly lower profile? That could potentially buy me a fraction of an inch? Based on pictures, it appears that the FlowKooler housings might have a slightly slimmer profile so that the mechanical fan wouldn’t stick out quite so much. And maybe I could combine that with a slightly lower profile fan clutch? [Correction: FlowKooler housings actually look a bit wider... but there are some manufacturers with slimmer profiles.] Anybody have any insight into this?
-
OK. Really appreciate all the input as always!
-
Thanks @89 MJ and @derf. I will put my calipers to work to see what kind of engagement I have. I’m glad you brought up the blue vs red lock tite. Seems to be a lot of debate around this point all over the internet. A lot of people say go with red. One post I saw put it this way: “The only permanent thread lock would be actually welding the nuts to the studs.” What they meant was that you will be able to get the nuts off. But I have only ever used the blue, so I don’t know how hard it will be. I definitely want to make the right decision here… are there downsides to red other than it being PITA to get the nuts loose?
-
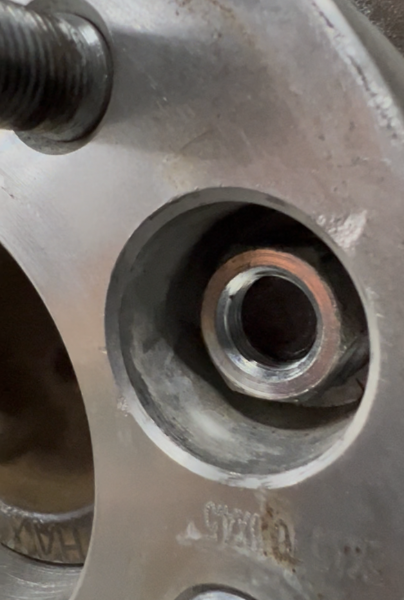
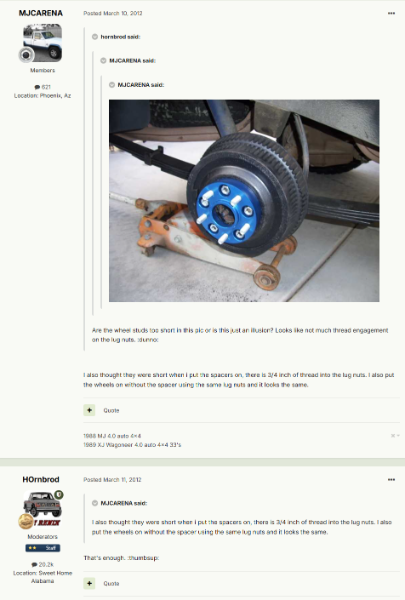
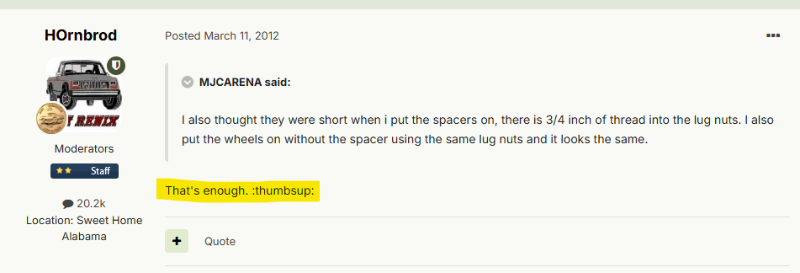
I finally picked up some wheel spacers. I've done a lot of research, but now that I'm getting close to actually putting them on and driving around, I'm triple checking my work. Here's my question. The lugs that came with the set of spacers picked up do not fully cover the factory studs. I'm attaching a picture I took yesterday and a screenshot from a CC thread from 2012 where @HOrnbrod seemed to suggest that this is OK (as long as most of the lug is over the stud). Photo of My Spacer Installed: Screen Shot From 2012 Thread, Titled Wheel Spacers: Closeup of HOrnbrod's Reply: What do folks think? As long as the majority of the lug is on the stud and I use Locktite, am I good? I don't do any wheeling... I just sometimes take the MJ camping down forest service roads. They are hub centric and the bore is approx. 71 mm. They seem to fit perfectly over the lip of the rear hub. So far, I've only put one on as a test to see how it looked. I took it back off because I wasn't sure about the question above. I picked these up on Marketplace. They look used because they are!
-
Thanks to all who replied. I have an update on using the 98 seals. It’s only been about a week, but it does seem like it is getting a bit easier to close. I definitely don’t have to slam the door, just have to close firmly. And there have been a few times where it feels like I’m closing it normally and it fully shuts. Seems like when it is warmer out, it’s easier to shut with minimal extra force. I’ll try to remember to come back to this thread in a few months to give a better update after more time has passed
-
I've already added your pictures to my notes! Liquid electrical tape is the only thing I can think of that I'd be able to paint on, and that would dry/cure in such a way that it wouldn't end up sticking to the surface of the window. Maybe there is some other product that I'm unaware of? I might also try something similar to what you did. Maybe I could glue a really thin strip of weather stripping to the inside edge of the gasket flaps to increase the contact between gasket and window. Whatever I do, I want to be smart about it. My current vent window gaskets are truly in pretty darn good shape. I don't want to mess them up by making perfect the enemy of good. But also... I can get kind of obsessive over details like this. So, I'm open to any and all ideas!
-
All very good intel, everybody! As long as no one thinks that a firmer close is going to damage my doors in any way, I think I'll install the second one (passenger side) and then give it some time. Hopefully they do start to give just a bit more than they currently do. Now I just gotta figure out if there's a way to improve my vent window seals. They are pretty good... they don't really let water in unless it is absolutely dumping outside. But they do whistle a little bit. I can get that to stop if I apply more inward pressure (the quarter trick). But I'm still chasing that "as little wind noise as possible" ride. I'll probably start a new thread about that soon. Thanks again everyone!
-
How firm is too firm? And how long should I wait to determine if they will “break in” properly? Hope it’s OK to post this here. I just started on this door seal upgrade process and the above questions are my two main questions at this point. Here’s the background: I pulled a pair of door seals from (I think) a 1998 XJ. It was definitely 97+ because It had the newer style trim. I figured 1998 was a good choice because it was about as old as you can get with the thicker seals (97 would be the oldest?). I wanted them to be as “pre-broken in” as possible. I have a 1987 with good original doors and vent windows. I just put in the new seal on the driver’s side yesterday after work. I did it kinda fast, so maybe I could have done a better job. Anyway, first for the good: I took it out on the freeway after, and my unscientific “gut” reaction was that wind noise was better on the driver side. If I pull on the vent window latch, I now have no discernible wind noise on the driver side. TBD on leaks. Now for the (maybe) bad: I do have to close the door very firmly. And when I open it, there is a bit of a pop. I was surprised by how firmly I had to close the door. But maybe that’s normal! I’ve never done this before! I wouldn’t call it “slamming” the door. I would call it a very firm close. So, that brings me back to my questions from above. @ghetdjc320, @Gjeep, @Salvagedcircuit — this post is now a year and a half old. Any updates? How long should I wait to see if these seals get “broken in”? How firm of a close is too firm? Based on the symptoms, I described above, what would you all do? I have never had much of an issue with my doors, and I don’t want to mess them up. I am doing this in an attempt to eliminate as much wind and road noise as possible.
-
How serendipitous that @MelissaNelms commented on this thread. I finally have a lead on an aluminum Valve Cover and I also have a Felpro gasket ready to go. Just gotta make sure this seller has the bolts. (Yes… it has taken me a long time to get around to this project.) As I understand it, there are a few things to worry about here. 1) The bolts need to be longer. If he doesn’t have the bolts, is it possible to buy them? Or at least some of them? If they are a standard thread and relatively standard length, it seems like I should be able to order them from somewhere, right? 2) There is a mix of bolts that screw in from the top down and a few studs that come up from underneath. Am I understanding that correctly? And are the studs long enough to get through the thicker lol of the aluminum VC? 3) This is a cover from a 93 YJ. Or so the seller says. Is there anything I’m going to need to grind down on the cover? I saw a post on here saying that some of these covers have “lugs” or something that should be ground down. At least that’s what @Jeep Driver said back in 2018: Grind the lugs down on the back of the cover as shown, use Felpro blue rubber. Nothing else works. http://i.imgur.com/XgKNGxO.jpg
-
What Minuit knows about stock Jeep radios
NickyV replied to Minuit's topic in MJ Tech: DIY Projects and Write-Ups
Makes sense to me! -
What Minuit knows about stock Jeep radios
NickyV replied to Minuit's topic in MJ Tech: DIY Projects and Write-Ups
Happy tinkering! Just go slow and Make sure to take pictures and notes as you go, so you don't lose track of how to reassemble. -
What Minuit knows about stock Jeep radios
NickyV replied to Minuit's topic in MJ Tech: DIY Projects and Write-Ups
I second everything GJeep said about adding an amplifier and a sub to your setup. @hgeranium Something I didn’t realize until I got into car audio is that even though many head units do have decent amplifiers built into them, these built-in amps are very small, and are not powerful enough to drive speakers at their full potential. Amps are not just for subwoofers. They are for all the speakers in your system. That means, you will struggle to get your speakers loud enough to be heard while you are driving on the highway. It also means that your signal will get more distorted. (Think of it this way: to get even close to highway volume, you will have to push a tiny amp all the way to its maximum. But if you have a more powerful amp, you will only need to push it maybe a quarter of the way to get to the level you need.) I also want to draw your attention to the end of Minuit’s original post — to the “Science Projects” section. Here is where you will find a write up on how to add an auxiliary input into your RX-series radio. By doing this procedure, you will be able to add an auxiliary input to your head unit. I have done this procedure myself and it is very simple. (It is more complicated on units with tape players, but only slightly. That’s because you have to pull the tape player module out of the way to access the input posts.) If you do this procedure, you will be able to use the head unit’s built-in volume, bass, and treble controls on your aux input. You can make your aux input either a 1/8” input or a Bluetooth module. Then you will have a radio, cassette AND Bluetooth player! And it will look completely stock :) One additional thing to note: If you do this, you will want to either perform the “AM Delete” procedure, or you will want to carry a blank cassette in the truck. I believe most of this is explained in the “Science Projects” section. It is also covered in this YouTube clip: If you have additional questions, feel free to DM me. -
Thanks, @Pete M. I agree that they shouldn't burn out simply by existing. And good on you for not installing ridiculously bright headlights. I hate it when I'm driving down the road at night and suddenly I feel like I'm about to be abducted by aliens. I just ordered some LED H3s and I'm going to redo the wiring. All the PO wiring was truly janky. One example is that someone had decided to use what I think were computer monitors for the tweeters. They had tucked these little speakers (about the size of a Rubik's cube) up under the dash and just twisted the ends of the wires together. I fixed that a while back when I redid my stereo. Haha.
-
My MJ has fog lights with orange glass and covers. They were installed aftermarket by a PO, and I don't think they did a great job. I've been working on cleaning up the work. Anyway, I rarely find the need to use them, but every once in a while I check on them, and almost always one or two are burnt out. I'm suspecting that I just need to redo the wiring right, which I will do. But what do you all recommend for replacement bulbs? The last time I replaced these, I went with Hella H3s. They are cheap, which is nice. I've seen some very expensive options out there. Wondering if the juice is worth the squeeze. Also wondering about best practices when it comes to wiring these up. They are already running through a relay. But is there a recommendation on gauge of wire? Recommendations on wire routing? What tips do you all have?
-
What Minuit knows about stock Jeep radios
NickyV replied to Minuit's topic in MJ Tech: DIY Projects and Write-Ups
I would absolutely be interested in learning about all the radios they offered! You should upload that puppy! -
Bringing a RX-135 Radio Back to Life
NickyV replied to MagicJames's topic in MJ Tech: Modification and Repairs
Hey @NC Tom - Did you ever get this figured out for yourself? I am also hoping @Minuit is doing well and may one day return to the forum with more sage wisdom. But if I'm understanding your question correctly, I can help guide you through everything you need to get an amplifier hooked up. Feel free to send me a DM if you want. -
Reproduction Comanche Emblems
NickyV replied to carolinajeepman's topic in Vendors- members making products for MJs
I'm way late to this party, but I would like to second the request for a "2.5 Litre Lo Output" badge. I'm going to DM you now, @carolinajeepman