


ghetdjc320
-
Posts
5212 -
Joined
-
Last visited
-
Days Won
1
Content Type
Profiles
Forums
Gallery
Everything posted by ghetdjc320
-

Project “Tomahawk”
ghetdjc320 replied to ghetdjc320's topic in MJ Hardcore Tech: Epic Journeys to Greatness
Found the bag it came in:
-
Project “Tomahawk”
ghetdjc320 replied to ghetdjc320's topic in MJ Hardcore Tech: Epic Journeys to Greatness
Those were an Amazon find. I think I have an extra down in the shop I can snap a picture of the package for you -
Project “Tomahawk”
ghetdjc320 replied to ghetdjc320's topic in MJ Hardcore Tech: Epic Journeys to Greatness
-
How to Improve Power Windows
ghetdjc320 replied to Warren99's topic in MJ Tech: Modification and Repairs
I will say, I tried running the motor directly from the battery with 12awg and it was no where near as quick as 18v. I would never run a motor that ran continuously (like the ac blower motor) on higher voltage but for window motors, nothing that I’ve tried comes close to the speed. In a perfect setup, I’d use both relays and the step up converter. -
How to Improve Power Windows
ghetdjc320 replied to Warren99's topic in MJ Tech: Modification and Repairs
You could be shortening the life of the motor by perhaps 25-35%. But since it only runs occasionally, it really shouldn’t be an issue. Just make sure you aren’t binding on anything. I powered mine with a 18v battery while testing them all after install. Worked perfectly and the speed is better than most new cars. -
Hub/brake questions
ghetdjc320 replied to Rhys Chalmers's topic in MJ Tech: Modification and Repairs
If you’re sticking with 31” or smaller tires, stick with stock brakes and maybe some black magic pads. Some good centric rotors as well. You have the later style knuckles on that axle (90+ style with the brake pad “wings” and floating calipers). I’d recommend going with say a 97 for all your parts. Get new skf or timken unit bearings (had better results with SKF for some reason lately) and Centric calipers for the same year. If you want to go with an off the shelf brake pad, I’d recommend centric posi-quiets and follow the break in procedure to the T. Can’t overstate how critical that is. On another note, you’ve got quite a bit of rust there . I’d get under there with a chip brush and some POR15 or similar. -
How to Improve Power Windows
ghetdjc320 replied to Warren99's topic in MJ Tech: Modification and Repairs
I’d start at the window track as well. There is no window relay system in the MJ so making sure you have good clean contacts is extra important. @Minuit had some insight into this as well iirc. -
Project “Tomahawk”
ghetdjc320 replied to ghetdjc320's topic in MJ Hardcore Tech: Epic Journeys to Greatness
Well, project is going on hold again. Will be several months before picking this back up again. Probably next year around this time or maybe a bit later. -
Project “Tomahawk”
ghetdjc320 replied to ghetdjc320's topic in MJ Hardcore Tech: Epic Journeys to Greatness
Yes they are. I didn’t see any standings on them though -
Project “Tomahawk”
ghetdjc320 replied to ghetdjc320's topic in MJ Hardcore Tech: Epic Journeys to Greatness
Just got finished up with this modified cross member as well. Had to do a lot of cutting and welding to get this to a nice clean custom piece that fits the new tcase like a glove.


-
Project “Tomahawk”
ghetdjc320 replied to ghetdjc320's topic in MJ Hardcore Tech: Epic Journeys to Greatness
Thought I’d post up some info on these custom tailight housing @Dzimm made for me. They incorporate the newer sealed o ring style 1156 and 1157 sockets which are a lot easier to work with and seal much better than the stock ones. Also running an ARB air coupler outlet to the front bumper to inflate tires as needed.


-
Project “Tomahawk”
ghetdjc320 replied to ghetdjc320's topic in MJ Hardcore Tech: Epic Journeys to Greatness
Driveshaft lengths are off by about 2-2.5”. Had to also notch the crossmember and re-weld it shut as the np242 has a larger case

-
Looking good!
-
Project “Tomahawk”
ghetdjc320 replied to ghetdjc320's topic in MJ Hardcore Tech: Epic Journeys to Greatness
Lots more fab and custom work. For reference, I’m running the Dakota digital 128k ppm vss that screws on to the original long shaft speed sender. I have the Dakota converter box as well but really didn’t like the idea of using it as it doesn’t have the native resolution of the original sensor. I’ll use the LS ecu output to provide the stock speedo and tach signals. Also running a custom PDC. I have a bussed 6 relay kit along with a 10 position power distribution block. Running a Wix LS filter/regulator with all AN fittings. On another note, looks like I may be close to stock driveshaft lengths in the end


-
I did as well in my current build. Wasn’t even planning to use the original seat belts in mine. It was tough to spec out a sub that fit the air space but I still think it would be a great idea.
-
You hit the nail on the head there. Been watching these for a bit and here is my $.02: I made brackets like these a couple of years ago but the b pillar panels really shrouds the speaker. A larger simple grill with about a 1/2” rise to it would accommodate a full depth speaker. Second issue is trying to dampen the rear of any installed speaker. The front of the speaker should ideally be isolated from the rear of the speaker. This would involve an even larger bracket that could provide a bit of a baffle. Getting the speaker out closer to the b pillar plastic though would be best along with a simple grill. Would be easy to fab like a 6x6 grill from 1/2” mdf and throw on some speaker cloth material. Remove the existing plastic grill and open up the opening a bit more. It won’t be factory but it would be a clean install and provide better sound.
-
On mine, the top corners had solder but the lowers did not. I used seam sealer on all the overlap joints. Also used some to form a bit of a slope in the corners to get the water to flow out better. I’ll see if I can find some pics of what I did.
-
Power door and window wiring questions
ghetdjc320 replied to ghetdjc320's topic in MJ Tech: Modification and Repairs
I guess I Can comment on the topic. After more research, it’s a very simple design. The cross cab harness does incorporate a few extra items that will not be used and I’ll be adding the wiring for the power mirrors but the windows and locks are straight forward. The tan single wire get fused 12v from the fuse box and is the power window + input. The ground is the black 14awg wire that is in the green connector. With those two wires plugged in all the windows work. The door locks are a “positive” switches setup. You’ll need to 5 pin micro relays along with the terminals and sockets. I’m using the factory electrical manual to recreate the relay configuration needed. Will post up the info on my build thread once I get to interior electrical. -
That’s also the reason why I cringe at someone saying they have a “rust free” truck. It’s hiding there somewhere, you just can’t see it yet. Factory workmanship was horrendous, though probably on-par for that time period. It will be great knowing that it’s done right
-
Project “Tomahawk”
ghetdjc320 replied to ghetdjc320's topic in MJ Hardcore Tech: Epic Journeys to Greatness
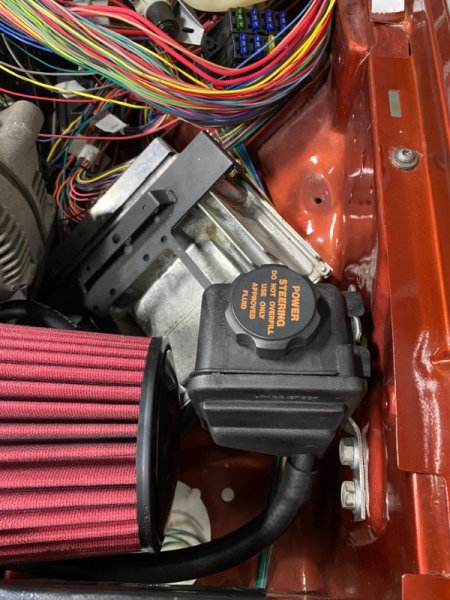
Lot of small things accomplished. Fabed up a bracket and relocated the power steering reservoir to clear the intake. The bottom of the reservoir is still higher than the top of the pump for a good gravity feed. Planning and engineering the layout under the hood is quite a task. Once the components are all where they need to be, wiring will commence which is actually the easier part at this point. Still have to install the accessories tray for the compressor and pdc area, install the condenser, compressor, radiator overflow and starter.

-
Project “Tomahawk”
ghetdjc320 replied to ghetdjc320's topic in MJ Hardcore Tech: Epic Journeys to Greatness
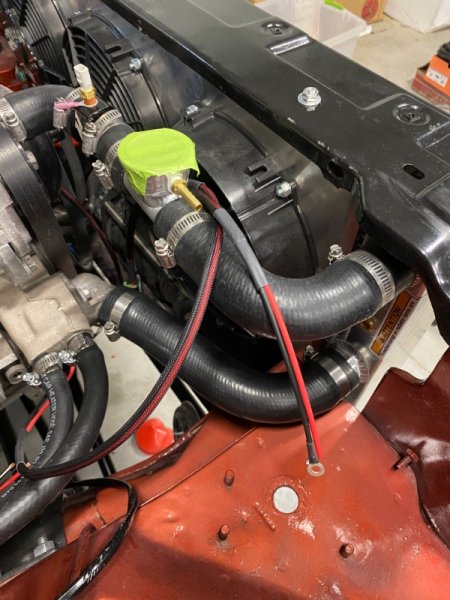
Lower radiator hose installed. Added an inline spot for temp probe but also had to add a ground to the sensor body since it can’t get engine ground where it’s at. Complete the intake as well. Building the shelf for the electronics and compressor now.

-
Forgot to mention, but make sure you have a small unobstructed and sealed “channel” in each lower corner of the windshield frame that will allow water to drain out down through the cowl to fender seam.
-
Yep that should work. Just give that aersosol 2 part epoxy some heat to cure if you can. Once it dries to the touch and is no longer soft, hit it with a heat gun, heat lamp or just leave it in the sun for several hours. I’ve noticed the aerosol 2k primers take longer to cure as hard as the ones you mix and shoot in a gun. If you can, I’d even give it a few days to cure.
-
I used one of those oscillating tools with a fine metal blade. It works excellent and save a lot of time removing all the old urethane. Also cleans up the rust very nicely. I would suggest some POR15 followed by some good medium bodied 2 part seam sealer in those corner seams. The medium bodied stuff should flow into the seams a bit. When it’s all done, mask off surrounding areas and shoot it with 2 part Roxy primer and let that cure before installing the windshield
-
Project “Tomahawk”
ghetdjc320 replied to ghetdjc320's topic in MJ Hardcore Tech: Epic Journeys to Greatness
The core is a solid 3.25” thick. It’s quite an epic radiator