

coolwind57
-
Posts
992 -
Joined
-
Last visited
-
Days Won
6
Content Type
Profiles
Forums
Gallery
Everything posted by coolwind57
-

Dome Light Fuse--keeps blowing
coolwind57 replied to coolwind57's topic in MJ Tech: Modification and Repairs
Why did Jeep get rid of the C101? One might assume because it was showing up as a cause of problems a few years later. Or maybe it just cost less to build the harness without it. -
Dome Light Fuse--keeps blowing
coolwind57 replied to coolwind57's topic in MJ Tech: Modification and Repairs
Excellent recommendation on trying out each wire individually. As far as deleting the connector, it appears to me that the only reason they have one there is for ease of initial assembly or manufacture. I'm can't really think of a really good reason that one would need one there later down the road after the build. I know that the C101 connector is notorious for causing trouble. Is there any particular reason you recommend not deleting this connector? If I'm correct, then the connector could be seen as a possible weakness--especially if perhaps the heat damage started as a circuit began to open as the connector loosened up and lost good connection over time. Or just got dirty and contaminated...it is occasionally near wet, muddy boots after all. Buy hey, just a thought. I acknowledge that I may be completely wrong here. -
Dome Light Fuse--keeps blowing
coolwind57 replied to coolwind57's topic in MJ Tech: Modification and Repairs
Well, I found my problem. There's a wiring bundle connector just behind the kick panel, driver's side. That sucker looks like it took a missile hit. Wiring is all melted together something awful. I'm hoping that there was just some bad connection within the connector that caused the overheating. Or may some rubbing that caused it. I've started my repair, which consists of deleting the connector and soldering in ten each, 6" wires. I don't have enough length after cutting out the connector. Melted wires were entirely on the rearward end of the connector, not the front end. Connector itself took only minor damage. It was the inch or so after the connector where all the wire melting took place. Without knowing the exact cause of the overheating, I suppose I'm going to finish my soldering and checking for heat once I reconnect the battery, toss a fuse back in and run the truck. Curious if anyone else had run into this connector going bad. I'd feel a lot better knowing the reason for the overheating. -
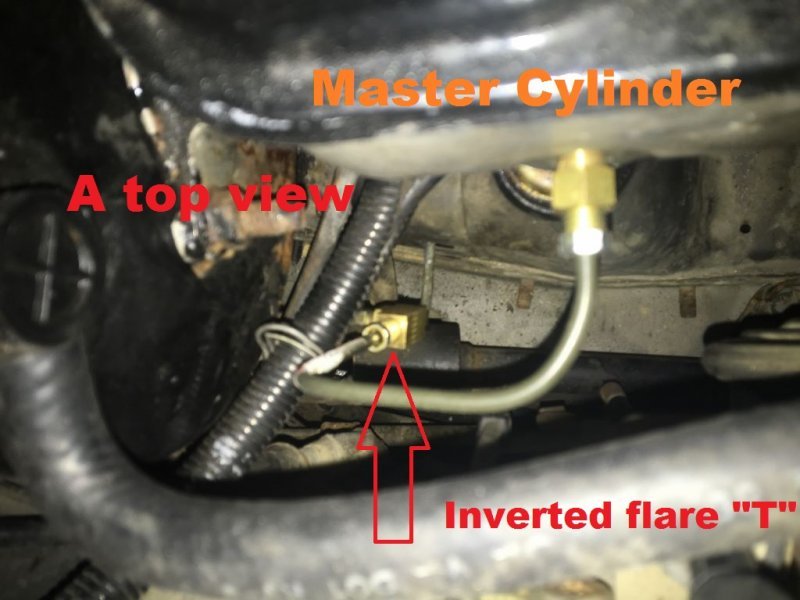
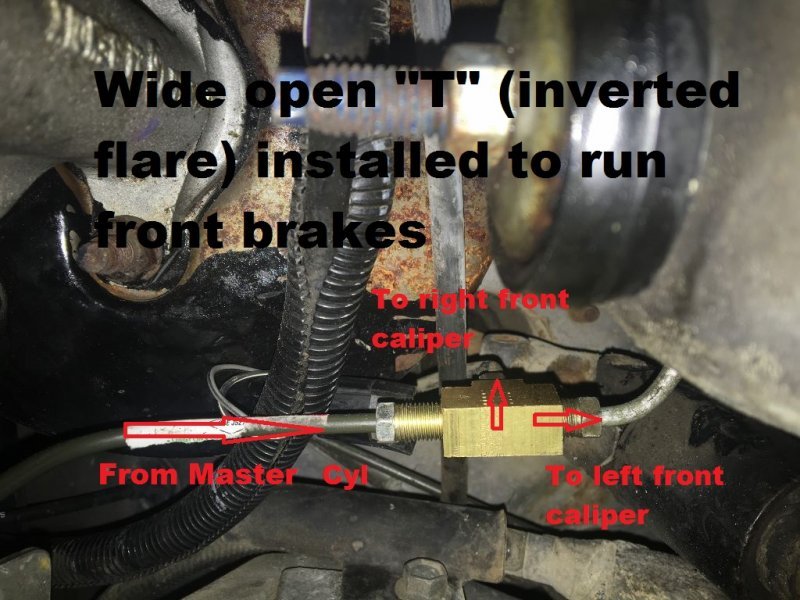
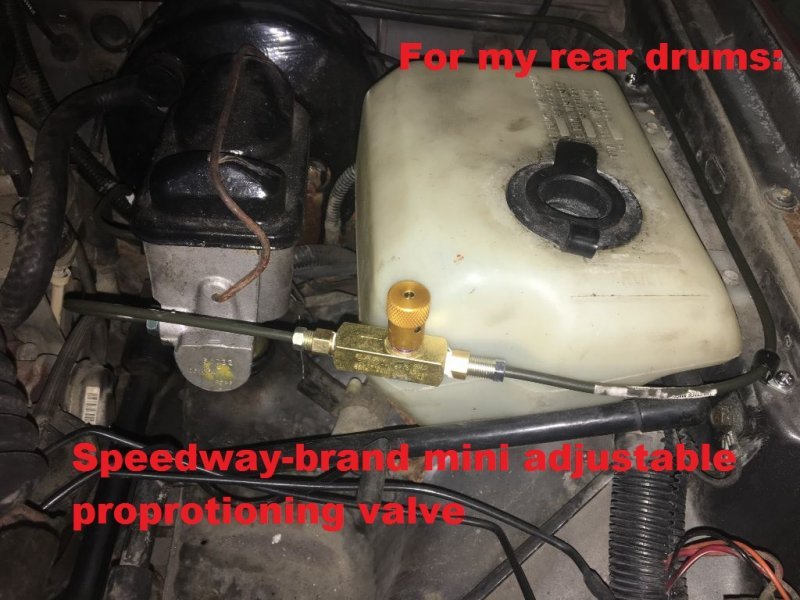
When I bought my truck a few years ago, it had the original front disc and rear drums. The Height Sensing Valve (HSV) half-assed deleted by PO. Still had 2 old crappy rusty brakes lines running to rear. Acceptable brakes as a whole, but I chose to renovate it for since I had my truck mostly apart with other projects anyway. I chose to start things off by trying Cruiser54's front Proportional Valve (PV) trash and replace procedure, aka DELETE. This seemed logical as a way of simplifying things and perhaps improving front brake performance.. Plus He's got real-world experience doing this and it has worked for him multiple times. I figured at least to me, that the MJ PV was designed to work a system that included the additional second brake line to the rear (to be used in cases of front brake failure) AND a system including a well-working Height Sensing Valve HSV. Since I had neither, the MJ PV is no longer being used exactly according to its design with those two aspects missing. The MJ PV meters the front brakes down considerably after the brake line run into it from the master cylinder. Just look up some of Cruiser54's pictures of those tiny little orifices in there. They certainly choke the inside diameters down. I removed the entire PV and then T'd-off the front calipers using an inverted flare brass T. I can't remember where I bought the inverted flare T, but with a little searching you should find one. You should get better braking because the small orifices of the prop valve to the front brakes are eliminated. You're now running near-full open inside diameter of the hard brake lines that are coming off direct from the master cylinder. Pics below are from a couple different angles but it was tricky getting a good shot of the installed brass T. and here's a view from side/bottomp: Because I am eliminating some front and rear "bottle-necking" I used to have at the now-removed PV, I agreed with many others here that an Adjustable Proportioning Valve (APV) may be a good idea FOR THE REAR BRAKES. This should eliminate any rear brake lockup that I may experience if I am running a heavy payload. I sourced my APV from Speedway Motors. I chose the Speedway APV because it is compact and appears to be simple and tough. Another cool feature is that it allows for full shut down of fluid to the rears, which can possibly come in handy when working on your brakes. Even though TJ1 had a cool location for the APV in his rig, I ultimately sided with HOrnbrod's (God rest his soul) opinion of not having brake lines running inside my cab. Mounting it outside of the truck near the rear of the bed would likely affect longevity and stable function due to full exposure to elements. I installed mine under the hood, near the washer fluid reservoir. Having had removed the two original rear brake lines, I ran a new single line back there the the axle from my APV, which I installed here: Speedway didn't have comprehensive flow specs on that mini APV that I show in the picture. it shows gpm and max psi and states that it can be completely shut down whatever line it is controlling if desired. I was curious of flow characteristics during "fully open" setting, knowing that nearly any valve in a hydraulic line would impart some level of restriction. So I emailed them about it and this was their response: Perry, I just spoke with one of my techs and he stated that it will not be fully open when the valve is fully open, there will still be some restriction there. Thinking around 20% restriction, so it'll flow 80% of the fluid that a straight line will. As far as I know, we do not offer a proportioning valve that will flow as if there is nothing there while fully open, however the purple proportioning valve might flow a little better as it is not a complete shutoff valve while fully closed, there will likely still be a bit of resistance there. https://www.speedwaymotors.com/Speedway-Purple-Adjustable-Brake-Proportioning-Valve,23498.html My brakes ROCK now! Got my MJ running last night and took her for a spin. My brakes were not so bad to begin with. But now they are excellent! Feels like I have 4-wheel disc brakes. By the way, I am running the stock master cylinder. Many thanks to Cruiser54 for the advice on ridding the front proportional block. I have killer good brakes, and I now have the ability to adjust the rears (or shut them down if I choose to)" Actung Baby : If you've read much on the topic of HSV deleting/PV deleting/running a single line to your rears, keep in mind that you'll lose that safety feature that allows full braking to the rears in cases of front brake failure. Here's some additional notes: 1. It took some active shopping around to find the correct sized fittings/adapters to use stock flare fittings and MC orifices with new....I didn't want to have to cut double flares on new and factory brake lines, so I had to use my brain a bit during shopping to avoid cutting/flaring. 2. By design, I certainty now have isolation of from and rear brakes, for sure! Front and rear have two different and very separate paths. They obviously already have two different reservoirs inside your master cylinder. My system continues from there to NOT cross paths with each other. If I lose my front brakes, I still have rear brakes. There are advantages and disadvantages to nearly anything you do. I'm pushing full volume to my front brake calipers now instead of dealing with a factory bottle neck. Overall, front-and-back, I can say that I've got superior braking ability compared to what I originally had. And at great cost and time savings. Disadvantage is that I may lose some "fail-safe" capabilities, if you will. I will no longer have a working brake warning light. I weighed perceived consequences, and then decided on my course of action. This method works for me and after nearly 3 years of use, I have no regrets. I can now shut down my rear brakes totally if I want to. If you like to show off and do burn-outs, then this is a nice feature! This isn't me, but I give it as an example. Shutting down rears is also nice if you're working on your rear brakes and want to shut off fluid completely. There's several options for those out there working on their brake system. As i had brought up above, my Proportional Valve was no longer capable of operating as designed by Jeep. In renovating my brake system, I chose to go a simpler route with fewer parts to go bad and which gives me far better braking capability. Do your research and weigh your options and consider risk factors. A complete proportional valve delete like I did may be a good option for you.
-
Pete, I can't recall when or where I posted this write-up originally. I can't seem to find it in its original form. I don't think it is currently in the write-up section. Would you like me to clean it up a bit and post it there?
-
I am thinking it was like $250. Guy included spring shackles. It is an LSD unit...or whatever Jeep called their system that's not coming to me at the moment.
-
Hey man, go to this conversation I started back when I did my axle upgrade: I think Pete M was going to put this thread up in the Write Up section, but I don't believe he ever did. It's got lots of pics and lessons learned from my experience. The MJ Dana 44 is gold, bro. Bulletproof, made specifically to go in the MJ and RARE. Bug the heck out of Jesse J until he gives up the 44 before someone else nabs it. Lucky you; You're even in the same area as him too--Dude, that's a sign from GOD. By the way, I have beloved friends that live in Syracuse, UT...right across from Antelope Island. Flew out to see them a couple of Months ago. Love the area.
-
I used Monstaliner WWII Olive Drab. It's not really a paint, it's a bedliner material. I rolled it on. Going on 3-years now I think and I'm tickled pink. No issues. No fading even with the truck staying outside 100% of the time. It had a crappy spraybalm paint job on it when I got it and I hated the thought of applying nice shiny paint because i get this truck out in the woods on occasion. I'm real happy with it. By the way, besides a quick hose down I have never washed it. Never seen soap and brush. Yea, that's what I'm talkin' about.
-
Dude. buy that from him NOW.
-
I had wanted to upgrade from my D35 soon after I bought my truck. I was in no hurry, so I was periodically checking around for an MJ Dana 44. The D44 from an MJ is the easiest swap--no mods, just plug and play. But they're kind of hard to find. By the way, my MJ had been running 31s since before I bought it. i also have a couple inches of lift. After a couple of years, I saw that my D35 was becoming noisy and I found the reason being, unbeknownst to me, that the axle seals had been secretly leaking. There was no way I was going to spend a dime on that D35, so I intensified my search for a D44. Luckily, within a couple of weeks, I found an MJ Dana 44 less than 2 hours from me. It was the ratio I was satisfied with as well. I nailed that bad boy and installed myself. It was a great learning, knowledge-building experience If you're rather low in cash reserves, have time on your side and your skill level is intermediate at best, then your best option might be to install your lift, slap on some 31s and roll with it until you can locate a D44 or slowly begin your 8.8 or 8.25 build back behind the scenes. You'll earn some wrenching knowledge and experience and you may find that you're happy enough with your D35 until the day it kills over on you. You'll also learn things like, "dang...my new shiny 31s rub my stock lower control arms (LCAs). I need to buy aftermarket LCAs or install ones designed for a WJ." ...Like I did. If you're just desiring to regear, then I'd go ahead with the axle upgrade. I wouldn't put a dime in reworking that D35. Common opinion is that they're just not robust enough to justify that. No sure exactly what you're getting at here. An axle is not part of that equation. It's a great project. Have fun with it.
-
A couple of years ago, I did a brake distribution valve delete and I just realized that I did not include it here in "My MJ project." MY SITUATION: Original front disc and rear drums. Height Sensing Valve (HSV) half-assed deleted by PO. Still had 2 old crappy rusty brakes lines running to rear. Acceptable brakes as a whole, but redoing it all because I already have the truck apart anyway and didn't like the rusty, brittle looks of things. Plan is to renovate brake system for added reliability and maybe even get some added performance as a bonus. I chose to start things off by trying Cruiser54's front Proportional Valve (PV) trash and replace procedure. This seemed logical as a way of simplifying things and perhaps improving front brake performance.. Plus He's got real-world experience doing this and it has worked for him multiple times. I figured at least to me, that the MJ PV was designed to work a system that included the additional second brake line to the rear (to be used in cases of front brake failure) AND a system including a well-working HSV. Since I now have neither, the MJ PV is no longer being used exactly according to its design with those two aspects missing. The MJ PV meters the front brakes down considerably after the brake line run into it from the master cylinder. Just look up some of Cruiser54's pictures of those tiny little orifices in there. Remove entire PV and then T-off to your front calipers, using an inverted flare brass T. You should get better braking because the small orifices of the prop valve to the front brakes are eliminated. You're now running near-full opening size of the hard brake lines that are coming off direct from the master cylinder. Makes sense to me so I did it: and here's a view from side/bottomp: Now technically I should experience slightly better front brake because I have larger interior diameters running from the master cylinder on through to the calipers. Because I am eliminating some front and rear "bottle-necking" I used to have at the now-removed PV, I agree with many others here that an Adjustable Proportioning Valve (APV) may be a good idea FOR THE REAR BRAKES. This should eliminate any rear brake lockup that I may experience if I am running a heavy payload. The original intent of this thread was to see where other guys were mounting their APVs. I ended up deciding on mounting mine under the hood after all. Even though TJ1 had a cool location on his rig, I ultimately sided with HOrnbrod's opinion of not having brake lines inside my cab. Mounting near the rear of the bed would likely affect longevity and stable function due to full exposure to elements. I completely eliminated my two old hard rear brake lines and ran a new single line back there the the axle. So here's where I ended up mounting my APV: I chose the Speedway APV because it is compact and appears to be simple and tough. Another cool feature is that it allows for full shut down of fluid to the rears, which can possibly come in handy when working on your brakes. REMINDER: If you've read much on the topic of HSV deleting/PV deleting/running a single line to your rears, keep in mind that you'll lose that safety feature that allows full braking to the rears in cases of front brake failure. Speedway didn't have comprehensive flow specs on that mini APV that I show in the picture. it shows gpm and max psi and states that it can be completely shut down whatever line it is controlling if desired. I was curious of flow characteristics during "fully open" setting. FYI for the benefit of anyone interested in this particular device, I sent them a message and here's their response: Perry, I just spoke with one of my techs and he stated that it will not be fully open when the valve is fully open, there will still be some restriction there. Thinking around 20% restriction, so it'll flow 80% of the fluid that a straight line will. As far as I know, we do not offer a proportioning valve that will flow as if there is nothing there while fully open, however the purple proportioning valve might flow a little better as it is not a complete shutoff valve while fully closed, there will likely still be a bit of resistance there. https://www.speedwaymotors.com/Speedway-Purple-Adjustable-Brake-Proportioning-Valve,23498.html My brakes ROCK now! Got my MJ running last night and took her for a spin. My brakes were not so bad to begin with. But now they are excellent! Feels like I have 4-wheel disc brakes. Many thanks to Cruiser54 for the advice on ridding the front proportional block. I have killer good brakes, and I now have the ability to adjust the rears (or shut them down if I choose to)"" Additional notes: 1. It took some active shopping around to find the correct sized fittings/adapters to use stock flare fittings and MC orifices with new....I didn't want to have to cut double flares on new and factory brake lines, so I had to use my brain a bit during shopping to avoid cutting/flaring. 2. By design, I certainty now have isolation of from and rear brakes, for sure! Front and rear have two different and very separate paths. They obviously already have two different reservoirs inside your master cylinder. My system continues from there to NOT cross paths with each other. As I had mentioned in my original comment on this thread above, there are advantages and disadvantages to nearly anything you do. I'm pushing full volume to my front brake calipers now instead of dealing with a factory bottle neck. Overall, front-and-back, I can say that I've got superior braking ability compared to what I originally had. And at great cost and time savings. Disadvantage is that I may lose some "fail-safe" capabilities, if you will. I will no longer have a working brake warning light. I weighed perceived consequences, and then decided on my course of action. This method works for me, no regrets. 3. If I lose my front brakes, I still have rear brakes, although the addition of the aftermarket adjustable prop valve doesn't give me full 100% use of the brake line ID. I do not know to what degree my rear brakes assist my stopping if I suddenly lose my front. In my 35+ years of driving, I don't recall ever running into the loss of brakes of either end, so I'm not too worried. I can shut down my rear brakes totally if I want to. If you like to show off and do burn-outs, then this is a nice feature! This isn't me, but I give it as an example. Shutting down rears is also nice if you're working on your rear brakes and want to shut off fluid completely.
-
Dome Light Fuse--keeps blowing
coolwind57 replied to coolwind57's topic in MJ Tech: Modification and Repairs
Well I just found an 88' Troubleshooting manual on here afterall, so disregard with wiring diagram request above. Interior lamps schematic is on page 63. Here's the manual if anyone else needs it: https://comancheclub.com/applications/core/interface/file/attachment.php?id=14915 -
Dome Light Fuse--keeps blowing
coolwind57 replied to coolwind57's topic in MJ Tech: Modification and Repairs
Anyone got a wiring diagram for this dome circuit? I can't seem to find one anywhere on the internet. -
Dome Light Fuse--keeps blowing
coolwind57 replied to coolwind57's topic in MJ Tech: Modification and Repairs
That's GENIUS! Hadn't thought of that! Haha. Maybe I'd better exhaust all other options first. But great tip, man! haha -
I have a write up of my Dakota seats I put in my MJ on page 4 of "My MJ Project". See my signature below. Might provide you with some input/ideas.
-
Dome Light Fuse--keeps blowing
coolwind57 replied to coolwind57's topic in MJ Tech: Modification and Repairs
That is pretty sweet. Didn't know they had such a thing. -
Dome Light Fuse--keeps blowing
coolwind57 replied to coolwind57's topic in MJ Tech: Modification and Repairs
I had unplugged the glove box light at the switch harness (inside the glove box). That might had been after I popped my last fuse. I'm going in to my work tonight and I'll pick up my multimeter. this sucks. -
Dome Light Fuse--keeps blowing
coolwind57 replied to coolwind57's topic in MJ Tech: Modification and Repairs
I did pull the door switches. Inspected and cleaned them. I don't think there are power wires in this system. It is my understanding that they provide only ground to the circuit when the doors are opened. It's kind of a spring loaded plunger that connects the body of the truck to the wire terminals--but only once the plunger is forced out by the opening of the doors. There is one spade terminal on the passenger side, and two spade terminals on the driver's side. Unless I'm way off, then this is the way it works. And it made sense when you look at the action of the switches. But I may be wrong. -
Dome Light Fuse--keeps blowing
coolwind57 replied to coolwind57's topic in MJ Tech: Modification and Repairs
No. No cargo light. I see the wiring provided by Jeep for it, though. Still neatly wrapped in the wiring harness for the dome lights. -
I have an on-going issue for a Month or two. I thought it was my clock shorting out or something, but now that I have a new one I've found that it wasn't the culprit. Here's the deal: I can't put a fuse in the DOME slot without instantaneous blowing of said fuse. From my understanding, that dome circuit stays HOT at all times, powering RADIO memory, CIGARETTE Lighter (I think), GLOVE BOX light, and DOME LIGHTS (when door is opened and the door switches close allow grounding to complete the circuit). I've checked connections and then even unplugged my Euramtec DOME lights, pulled fuse from RADIO, disconnected radio harness, disconnected cigarette lighter connections, and finally disconnected clock. Still, I blow any fuse as I begin to plug one in the fusebox. Unfortunately, I have no a diagram nor a multimeter here today and I've got about an hour or two before I have to give up for the day. Am I missing anything? Would the headlight pull switch have anything to do with this issue maybe? Unless you guys can point me to an area I hadn't thought of, my next step is to go pick up more fuses, buy a torx socket that fits the seatbelt shoulder harness bolt and take off the pillar covers to inspect the dome light wiring behind there for ground outs. Anything else come to mind, fellas?
-
anyone make a relay pack for the hvac/blower yet?
coolwind57 replied to Pete M's topic in MJ Tech: Modification and Repairs
Back when I frequented junk yards a few years ago, I always checked these harnesses from XJ/MJ to XJ/MJ to try to nabb a good one. Seemed 99% showed signs of heat damage, and most were shockingly significant. I finally ran across a good one and snipped that bad boy off and kept it. It's a back up, kept safely in a baggie with extra fuses. bulbs, etc in my glove box. Yea, we need to relay this circuit for sure. Keeping an eye out for updates on this, Pete. -
Here's my take on your questions of ownership: The 86 you're looking at is a Renix, so you'll need to understand that you're not getting an ODB-II system. This means that you'll need to become familiar with a multimeter if you're not already. Troubleshooting is a bit more of a challenge than with newer cars that have a system of almost doing it for you. You say you have a garage, tools, eagerness to learn and ambition--CRITICAL TRAITS to have, my Brother! Exactly what I was hoping that you'd include in your message. Man, I didn't know much at all when I bought mine. This site has a lot of very knowledgeable people and most have dealt with nearly everything. Most are eager to take on a challenging issue that you may present. Pete has organized the site well, so knowledge and experience here are relatively easy to find before you toss out a basic or very common inquiry. If you have the cahonas, like to take on challenges and feel rewarded when you pull them off and dang it, I must say it...if you have the budget to take on a Comanche, then you're already one of us. If you hadn't already seen these major 1st-to-do items, check out Cruiser's tips here: http://cruiser54.com/. Pete M immediately grabbed me by the shirt collar when I joined here and insisted I do the headlight relay retrofit with his famous slogan, Swap in a relay harness for your headlights before it's too late!! Go buy that thing and get us some pics on here asap. We're all dying to see what your floorboards look like under that carpet and whether or not you're grill is upside down. Welcome to the club, my friend.
-
97+ XJ taillight install
coolwind57 replied to Pete M's topic in MJ Tech: DIY Projects and Write-Ups
So, you maybe cut out your MJ lenses to fit and glue in the Wrangler lenses, is that what I'm seeing here? Maybe shot black paint on what still visible of the MJ lens housing? I'm diggin this. -
My wife speaks 5 languages. I was doing pretty good at learning Spanish before we married. More and more I began accidentally slipping Bisaya into my Spanish as that's my wife's native tongue. Bisaya slowly began taking over what little Spanish I had learned. Just recently I introduced my wife in Spanish, but used "Asawa" instead of "Esposa" for wife. Dude looked at me like, "what the F is an Asawa??" I've said "Oo" instead of "Si" a few times too. Feel like an idiot when I do that. Asked a random dude in a convenient store check-out line to "spit on me" once. Yea. Real cool. Hope you got the help you needed, Eagle. i would had likely caused an international incident if I had attempted to help you.
-
Looks like Eaglescout just sold me one, but I sure appreciate it.