

husky410ohio
-
Posts
113 -
Joined
-
Last visited
Content Type
Profiles
Forums
Gallery
Everything posted by husky410ohio
-
Company that can narrow a Dana 70
husky410ohio replied to husky410ohio's topic in MJ Tech: Modification and Repairs
Anyone know what the WMS to WMS measurement is for the comanche dana 35 rear? -
When I took my NP231 apart and replaced the chain and added the SYE someone in the forum posted the 86 factory manual section for the NP231 that was a big help for. I saved it as a pdf and could email it to you. It is 28 pages and 6.8MB file size. The stupid Haynes or chilton manual that came with truck when I got it said do not attempt to take it apart because it is too difficult to do.
-
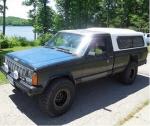
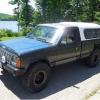
Hi my name is Richard and I am from Ohio and this is my 1988 Comanche It started 10 years ago with the truck that did not run I purchased from a friend for $100 and had towed to my house. My brother gave me the chevy 350 motor and SM465 from his old CJ-7. Advance adapter motor mounts DIY beadlocks I did a drawing in Solidworks for a new 304 stainless steel tailgate latch. Autometer gauges This is my fuel tank sending unit. I removed the fuel pump and made a pick-up tube with a fuel strainer I purchased. I used a 1/8" pipe tap and plugged the old return line. Fuel float works with a new auto meter fuel gauge. Holley spreadbore 650 CFM 4 barrel with mechanical secondaries that I rebuilt with new floats New holley floats part number 116-3 nitrophl on right Allstar Performance power steering pump with Detroit Speed Inc. pump mount Painless Performance fuse block, MSD 6AL ignition, mechanical fuel pump and Holley spreadbore 650 CFM 4 barrel with mechanical secondaries that I rebuilt with new floats, Mallory cartridge style fuel filter, 3/8 inch fuel line, new 22 gallon tank, Elelbrock aluminum intake manifold, AA headers made for the conversion, Flowmaster diamond plate off-road muffler, AA motor mounts, Novak radiator, Allstar Performance power steering pump. Lakewood bellhousing, SM465 truck transmission, AA t-case adapter, Mcleod throw out bearing, NP231 with slip yoke eliminator, Detroit Speed Inc. shifter knob, Autometer gauges. 33 x 12.5 x 15 BFG mudterrain on stock wheels modified with DIY beadlocks, Superlift 3" lift with longer lower control arms and shocks from Tyres International. Optima battery on DirtBound Offroad steel tray, DirtOld Man Emu steering stabilizer, OMC Offroad steering box brace, drop pitman arm, ZJ tie rod conversion, Canton Custom Clutch driveshafts. Single electric pusher fan mounted on front of radiator wired to a switch on the dash that I only use driving at 70 mph highway because I have a mechanical fan
-
Company that can narrow a Dana 70
husky410ohio replied to husky410ohio's topic in MJ Tech: Modification and Repairs
I plan to add a Detroit locker in the future and in the past I have twisted axles on the street. The first thing I want do is pick it up a take it apart and see what it looks like. -
Company that can narrow a Dana 70
husky410ohio replied to husky410ohio's topic in MJ Tech: Modification and Repairs
Thanks motocharge and Incommando. I am in Piqua, Ohio and it looks like Moser is about an hour away and I could drive it there and save shipping charge. I am going to call my friend and pick it up. Thanks -
I have a Jeep friend that will give me Dana 70 axle from a Ford truck. It has a tag number with the 4:10 gears I need. I want take it completely apart and check the axle spline size. I have an 81 CJ-5 with a Dana 60 I purchased in the 90s from Summer Brothers. I am going to call them but anybody know who can cut and narrow the fullfloater housing for 1 piece axle with flanges for Jeep backing plate and axle shats with 5 on 4-1/2" circle? Want to replace my original dana 35 before it breaks with chevy 350 motor and 12.5 x 33 x 15 tires..
-
Before and after
husky410ohio replied to kansashogan's topic in MJ Hardcore Tech: Epic Journeys to Greatness
Did you use the Novak motor mounts? That looks really good I like it. It is a lot of work but the 350 is fun to drive in a comanche. -
I marked my calender for May 29/30 Willys Jeep Rally at Heuston Woods State Park www.mw-willysjeep.com/
-
UPGRADED front end/steering components
husky410ohio replied to projectMANCHI's topic in MJ Tech: Modification and Repairs
I have the original steering box with a drop pitman arm and a new GM style pump from Allstar with Detroit Speed mount. The pressure hose I made at work on the hose crimp machine. The hydraulic hose is rated 9000 PSI. I purchase fitting adapter from Summit to go on steering box port to SAE thread. I like that the allstar pump pulley has holes so that the pump can be installed/removed without removing the pulley. -
UPGRADED front end/steering components
husky410ohio replied to projectMANCHI's topic in MJ Tech: Modification and Repairs
The Tie rod parts I installed from NAPA are: ES-2079-S Tie rod adjmnt/sleeve $15.57 269-2788 Inner-otrtie rod end $37.76 DS1312 Left inner tie rod end $32.50 -
UPGRADED front end/steering components
husky410ohio replied to projectMANCHI's topic in MJ Tech: Modification and Repairs
Below text and picture is what I found. I have the parts and painted the tie-rod today. Why is the solid ZJ tie-rod bent? ZJ Tie Rod Conversion So, there I was after the Round #2 build up. I had 35" MTRs on Lady. I was sitting on 6" of lift and the Tera 4:1 was going to get me over obstacles that I had not tried before. So.....yep....I was a bit nervous about the stock tie rod setup. I mean, have you really taken a close look at it? It is not exactly what one would call over built, if you know what I mean. With the possibility of a Rubicon trip looming in the future, I wanted something up front that was going to keep the front tires pointed in the right direction. I spoke with the guys at O-R Fab, who have done some steering conversions for TJs. Scott K., a local Phoenix Jeeper I run trails with, had O-R Fab do a heavy duty tie rod conversion on his '97 TJ. If memory serves me, they used 1 ton GM components. It involved drilling out the steering knuckle to accept the larger ball studs that were used. After considering this method, I decided to go a different route. One of my California Jeepin' buddies, Robert Yates, told me about using a ZJ tie rod from a V-8 on his TJ. He said it was a bolt on replacement for the stock tie rod and resulted in a much stronger setup. I exchanged some e-mail with Robert some time back and got some more info on it. This topic also comes up fairly often on JU and I copied some of the info from a thread the last time it was discussed. Since I was due for a front end alignment after having had some welding done on the D-30, I decided I might as well get the new tie rod before the alignment. If not, I would be back at the shop for a toe-in adjustment once the tie rod was installed. Here is a picture of the soon to be replaced tie-rod end and the threaded end of the new tie rod end. As you can see, it is a bit larger. I took some measurements while in the garage. The threaded section of the factory tie rod end measures .65" in diameter. The ZJ end measures 1". The other major difference is the construction of the tie rod itself. The factory TJ rod measures .88" O.D. and is hollow tubing. On the other hand, the ZJ tie rod is 1" O.D. The ZJ tie rod and tie rod end are joined by a regular adjusting sleeve, like the one located near the pitman arm end of the drag link. I purchased the replacement ZJ parts at a local Napa Auto Parts store (another reason I like this conversion because spare parts can be obtained from virtually any auto parts outlet....no custom ends to get from the aftermarket manufacturer). Here are the Napa part numbers in case you want to save some time with the counter person. You will need one each of the below listed parts. These are for a '98 Jeep Grand Cherokee w/ 5.2L V-8 engine. It is my understanding that the same parts are valid starting at the '95 model year, but I have not verified this. Note that the Moog tie rod was obtained at the NAPA store....it just doesn't have a NAPA part number. Item Part Number Tie Rod End 269-2788 (Napa #) ES3096L (Moog #) Adjusting Sleeve 269-1134 (Napa #) ES2079S (Moog #) Tie Rod NCP 269-6085 (Napa #) or DS1312 (Moog #) NOTE: Although I have not verified this personally, I got the NAPA # for the TJ drag link off of a forum. It is supposedly 269-6090. NAPA lists it as a R.H. Outer Tie Rod instead of a drag link. The price quoted in the forum posting was about $70. The poster stated it was dimensionally identical to the factory drag link. If you have bent your existing drag link (35" tires will slowly do that) or you are looking for a spare, this sounds like reasonably priced option. July 16, 2001 I stopped by my local alignment shop (Roosevelt Alignment) this morning to have my caster and toe adjusted. I had stopped by last week and set up an appointment with Joe. Since Joe and Vince where going to be right there where the old tie rod was, I figured they might as well install the new tie rod and do the alignment after that. Joe removed my old tie rod and end together, so I'll be able to use it as a trail spare. As it is now, it is "sitting close enough" so I can use it to drive home with and still have tires left when I get there. Here is the business end of the new ZJ rod after Joe and Vince got it into placed and all locked down. As I indicated above, it is substantially "beefier". Before Joe installed it, he handed me both tie rods. Needless to say the ZJ assembly was much heavier. It will go a long ways in keeping the MT/Rs pointed straight ahead. -
Willys Jeep Rally 2014, College Corner, Ohio, May 30/31
husky410ohio replied to husky410ohio's topic in The Pub
The 2015 Jeep rally will be May 29 and 30, 2015. I will attend. http://www.mw-willysjeep.com/home.aspx -
1st and 2nd is best for me too. Not sure if I could make any other weekends in August. Would like to tent camp with the group at the campground.
-
Bending Dana 30 back to correct position
husky410ohio replied to Jacob Ochs's topic in MJ Tech: Modification and Repairs
Here from 4 wheeler how to straighten it: http://www.fourwheeler.com/how-to/transmission-drivetrain/1410-straightening-a-bent-dana-44-axle/photo-01.html To add on to the long line of “oops” moments we’ve had, we recently realized that a junkyard axle we grabbed, for what seemed like a steal, was bent. The plan was to build this cool full-width Ford F-150 high-pinion Dana 44 for one of our Jeep projects. The high-pinion design makes for great front driveshaft angles, and due to the nature of how a front axle turns relative to the gear, the high-pinion design means this axle is stronger than a low-pinion axle. Also, the tubes have a stout 1⁄2-inch wall thickness, so this axle should be difficult to bend. Or should have been difficult to bend; more on that in a minute. As plans changed and time passed, the axle spent way too much time sitting on jackstands in our garage, doing nothing but taking up space. We collected parts for a rebuild, and as our axle rebuild story’s due date was rapidly approaching, we dusted it off and started once again messing with the axlehousing. We had taken the axle down and had it sand blasted it some time back, and that makes working with it nice. Now, as we started working on the axle and used a plasma cutter to cut off the old axle brackets, we noticed a near-fatal problem with the axle: It was bent. It was hard to see the bend unless you stared at the axle for a while or peered down the axletubes. Poo. What now? Is it junk? Is it now only worth its weight in scrap steel? All our plans and parts collecting were for nothing—or so it seemed. Luckily for us, we had contact with a place that should be able to help us out. That place is Arizona Differential in Phoenix, Arizona. With one call, the owner, Nate, told us to drag our “slightly bent” axle down to him the next day. When we got there, Nate directed us to Tim Adkins who helped us straighten our axle that, as it turns out, had way more problems than we thought. In the end, our junkyard axle has a little bit more money invested in it, but its way stronger and probably straighter than the day it drove out of the Ford factory. Luckily for you, we also grabbed our camera and snapped a few pics to check show how the axle was straightened and strengthened. Instead of being junk headed for the steel recycler, our junkyard axle is now better than ever. Here is the axle. Can you see the bend? It’s subtle, but it’s there. It looks like maybe the Ford truck the axle came from was jumped and the axle bent in a very slight smile. Looking down the inside of the axle is the best way to see even a slight bend. If you line up the center of the two axle openings and the center is not perfectly inline, then your axle is bent. Unfortunately, it’s next to impossible to take a picture of this view, but see how the opposite opening looks egg shaped. Here, Tim shows us one part of the key to straightening an axle. That is a 1.5-inch solid piece of stainless steel that is about 6 feet long (top). Another key to the straightening are two of these pucks (bottom) where the outside diameter fits snuggly under the axles bearing caps. The inside diameter is the same as the stainless steel rod. With the pucks installed in the axle, you can slide the rod through the axle and see how the axle needs to be bent the opposite way to straighten it. Here, Tim shows us one part of the key to straightening an axle. That is a 1.5-inch solid piece of stainless steel that is about 6 feet long (top). Another key to the straightening are two of these pucks (bottom) where the outside diameter fits snuggly under the axles bearing caps. The inside diameter is the same as the stainless steel rod. With the pucks installed in the axle, you can slide the rod through the axle and see how the axle needs to be bent the opposite way to straighten it. It turns out our axle was far from straight, despite its nice, thick axletubes. Tim couldn’t even slide the stainless rod all the way through our housing without straightening it first. So the next step is to lift the axle onto the straightening jig, which is basically a big piece of 1⁄2-inch thick I-beam steel with a cradle on one end, some huge chain, and a 20-ton jack. With the axle in the jig, you can begin to see how it works. A keen eye and experience determine how the axle is placed in the jig. The chain’s position is adjusted so that the jack can bend the axle opposite of the direction of the bend. This seems simple, but experience and knowledge of metallurgy is key here. Bend it too far, and you’ve made the problem worse or broken the housing. Once the axle is in the jig, it must be bent slightly past straight, so it returns to straight. One thing that Tim also did that helps the steel molecules find their happy place is to whack the axle with a big hammer a few times while it’s under tension. Once Tim had been working on the axle a little while, he noticed that the plug-welds to the cast centersection were tiny and some were cracked. This was allowing the axletube to move around in the housing, which was part of the problem with the axle. Tim also pointed out that if the axle’s inner knuckle is bent, they can’t straighten it, but chances are they can either replace the knuckle or help find a replacement housing. The fix for this is to straighten the axle in the jig, heat the housing with a torch, re-weld the plug welds, and weld the axletubes to the cast housing. Proper heating and slow cooling needs to occur for this to work properly. You can’t just weld the axletubes to the housing without heating the casting and then allowing it to cool slowly—in our case, while sitting in the Arizona sun on a 100-degree day. This makes our axle way stronger than it was with its tiny inadequate plug-welds. With a little work, our junkyard axle is better than we could have ever planned. Instead of being junk headed for the steel recycler, our junkyard axle is now better than ever. Arizona Differential charges a very reasonable $200 to $300 to straighten a front or rear axle, depending on how bad the axle is bent. Welding the axle like we did isn’t always necessary and brought our total repair to $350. Arizona Differential can also re-tube an axlehousing or build a custom axle from scratch. With their years and years of experience, wholesale prices, and huge inventory of used parts, your fix doesn’t have to cost a mint. Sources From: http://www.fourwheeler.com/how-to/transmission-drivetrain/1410-straightening-a-bent-dana-44-axle/#ixzz3Jk7eEXuA Follow us: @fwmag on Twitter | fourwheelermag on Facebook -
Improving headlights
husky410ohio replied to nitroxsteve's topic in MJ Tech: Modification and Repairs
I was thinking of going to Summit to get the Putco harness and Hella housings they have instock. http://www.summitracing.com/parts/put-230004hw/overview/make/jeep and http://www.summitracing.com/parts/hla-003427291/overview/year/1988/make/jeep/model/comanche the description for there putco harness is for 9004 bulbs? http://www.tripleswitch.com/vehiclelist.htm not sure if putco socket will fit the H4 Hella bulbs but I can have the parts pulled and check before purchasing. When I was replacing my gages with autometers I replaced both my headlight switch and hi/low beam switch. When I removed the old headlight switch and turned it green dust came out. And the headlights lost the vacuum seal and reflective material was gone in the old Wagner lights. -
For the steering box brace I got the OMC Offroad brace which is very heavy duty and precision made: http://www.omcoffroad.com/apps/webstore/products/show/3099940 I had to replace the mechanical fan with a smaller 6 blade 15.25 inch size on the 350 chevy motor. I had a 5 blade 16 inch fan from a 87 comanche clockwise rotation.
-
Need to Replace Ball Joints.
husky410ohio replied to dinghyboy's topic in MJ Tech: Modification and Repairs
I have not replaced mine and do not know how old they are. I grease the upper ball joints but the lower ball joints are not greasable. Do they make the lower ball joint with a fitting? -
Did the front hubs have dust caps from the factory? I could not find the correct dust cap at NAPA but I used RTV and sealed a Mr. Gasket cap on. It should keep the dirt and water out from the outside seal.
-
The Timken bearings I used are made in Korea?
-
Novak Radiator
-
This is my fuel tank sending unit. I removed the fuel pump and made a pick-up tube with a fuel strainer I purchased. I used a 1/8" pipe tap and plugged the old return line. Fuel float works with a new auto meter fuel gauge.
-
Some fotos. Mine was simple to wire with Painless Performance fuse block, MSD 6AL ignition, mechanical fuel pump and Holley spreadbore 650 CFM 4 barrel with mechanical secondaries that I rebuilt with new floats, Mallory cartridge style fuel filter, 3/8 inch fuel line, new 22 gallon tank, Elelbrock aluminum intake manifold, AA headers made for the conversion, Flowmaster diamond plate off-road muffler, AA motor mounts, Novak radiator, Allstar Performance power steering pump. Lakewood bellhousing, SM465 truck transmission, AA t-case adapter, Mcleod throw out bearing, NP231 with slip yoke eliminator, Detroit Speed Inc. shifter knob, Autometer gauges. 33 x 12.5 x 15 BFG mudterrain on stock wheels modified with DIY beadlocks and 2 inch lift, ome steering stabilizer, Canton Custom Clutch driveshafts. Single electric pusher fan mounted on front of radiator wired to a switch on the dash that I only use driving at 70 mph highway because I have a mechanical fan and guard from an 87 Comanche. Normal temperature in the city is never over 180 degrees.
-
My 350 chevy motor never is over 180 degrees in town driving. On the highway at 70 mph over time on a hot summer can get to 200 but I do have a small pusher fan in front that I can turn on with a switch but I do not run the pusher fan in the town. My transmission is truck 4 speed SM465 so I have no overdrive. I have the Novak radiator and fan and guard from an 87 comanche that was a 4 cylinder. The 87 had the older clockwise fan and old style belt/pullys. The fan clutch is new and for an 87 clockwise fan. The 88 fan I tried first was a counter clockwise fan and had serpentine belt. That did not work and got hot in the city driving. It is important to know fan direction for both mechanical and electrical and push or pull direction for electrical.
-
I have the 4wd drive unit bearing type and I purchased new Timken bearings from Summit racing in Akron, Ohio. It was not instock but they shipped direct to me in a week no extra charge for shipping. I also replaced my U-joint with a good one with grease fitting and rebuilt the brake caliper too. The old wheel bearing inside seal rusted out and fell off when I took it out.
-
I can meet in Columbus. I know next 2 weeks I can not make but maybe after that. Also I go to the Thursday cruise-ins at the Piqua DQ on the 14th. It is free. Richard