feerocknok Posted January 4, 2008 Posted January 4, 2008 What do you do when you have to work on the tranny with this set-up/Clayton's?
Regger Posted January 4, 2008 Posted January 4, 2008 What do you do when you have to work on the tranny with this set-up/Clayton's? Just unbolt the center section. Tranny comes out, and you don't have to worry about your control arm mounts Ryan
jtdesigns Posted January 4, 2008 Posted January 4, 2008 What do you do when you have to work on the tranny with this set-up/Clayton's? have about 4 floor jacks?? :dunno:
feerocknok Posted January 5, 2008 Posted January 5, 2008 Derr, I see the bolts now, didn't realize. :roll:
DrThunder Posted January 8, 2008 Author Posted January 8, 2008 pics. pretty much done with the front except paint stuff so it looks pretty. all worked out well and can't wait to do the rear soon. just waiting for brake parts for my 44
1999MJ Posted January 8, 2008 Posted January 8, 2008 what track bar is that and what's with the ground down bare metal spots on it? That's not but welded together is it?
DrThunder Posted January 8, 2008 Author Posted January 8, 2008 nope its a solid piece of metal heated up and bent, the bare spots are just from where the heat was and where i smoothed it out with a sander.
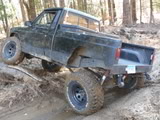
DrThunder Posted January 9, 2008 Author Posted January 9, 2008 tested out the new setup today finally, very happy with the results. here's some flex shots
jackel18 Posted January 9, 2008 Posted January 9, 2008 so, correct me if i'm wrong, you are running long arms with 4.5" lift and 31" tire?
DrThunder Posted January 9, 2008 Author Posted January 9, 2008 yea for now. :brows: i am looking for a set of 33s. The rear still sits at only 2" cause i am still waiting for parts for my dana44. Still have to set up the gears to 4.56
jackel18 Posted January 9, 2008 Posted January 9, 2008 ok thats what i thought, thanks the conformation :cheers:
DrThunder Posted January 12, 2008 Author Posted January 12, 2008 I think i finished the bumper today. here's some pics, not sure whether or not i should put the shackle mounts on it or not, undecided cause it's really clean looking right now. tell me what you think. it's made of 2 x 6 x 3/16 BEFORE AFTER Obligatory building shots
CWLONGSHOT Posted January 12, 2008 Posted January 12, 2008 HELLO neighbor!!! Nice buildup!! Where in CT are you located?? I am in Meriden. CW
JeepcoMJ Posted January 12, 2008 Posted January 12, 2008 ya should sell me your old trailer hitch :D seriously. how much?
DrThunder Posted January 12, 2008 Author Posted January 12, 2008 that hitch is off a 90's blazer that i made fit with some (actually alot) of welding and my buddy took it arleady. sorry :cry:
DrThunder Posted January 12, 2008 Author Posted January 12, 2008 i'm in canterbury, i'm close to the casino's if you don't recognize canterbury
DrThunder Posted January 16, 2008 Author Posted January 16, 2008 update: with 33's here's one before i trimmed
DrThunder Posted January 20, 2008 Author Posted January 20, 2008 Gears and SOA is done and it's everything i could have hoped. The only things left to do in the near future is to -switch out trak lok for detroit or hopefully ox. -Finish bumper hooks and paint it nice nice (tuesday) -One Ton Steering -Rims
DrThunder Posted April 26, 2008 Author Posted April 26, 2008 Not sure where I left off with this but since then I've locked the rear end, added hand throttle. That's it. More trimming. Now I installed OBA and must say it's one of the best mods yet. Things left to do, order a saftey valve for 150psi and thread it in the manifold in place of the plug. What I did/needed [*:2he6j06a]Sanden Compressor[*:2he6j06a]Used a tool lubricator to lubricate the compressor[*:2he6j06a]Air Filter[*:2he6j06a]Pressure switch ~ $22 turns on at 90, off 125[*:2he6j06a]Gauge[*:2he6j06a]Fittings[*:2he6j06a]Bumper I ran the line all the way to the back bumper and have a quick connect in and out of the bumper for ease. Works great and that bumper holds a lot of air! I can run the impact gun with ease with the bumper. Not really much else to say but I like it a lot. Feel free to ask questions. With everything I think it cost a little under $100 with some freebies.
cccj Posted April 29, 2008 Posted April 29, 2008 I predict a blow out in the near future of the blue hose between the compressor and tank. It gets very hot right out of the compressor and with those pressures you're much better off with a hard copper line or braided steel.
Oizarod115 Posted April 30, 2008 Posted April 30, 2008 I predict a blow out in the near future of the blue hose between the compressor and tank. It gets very hot right out of the compressor and with those pressures you're much better off with a hard copper line or braided steel. we've had many lines blow running a similar setup but with about 2 feet of copper hard pipe before the hose...blew the hose after a while, then repaired and blew out like 5 minutes later. i suggest running higher temp lines, whether they be braided or pipe until you get out from under the hood to let things cool down some. cool setup though, i like the quick disconnects there.
DrThunder Posted February 21, 2009 Author Posted February 21, 2009 Here is an old pic of the frame resto in primer and a picture of the before damages. Built bumper awhile ago and the frame was broken about a half a year ago.
DrThunder Posted February 21, 2009 Author Posted February 21, 2009 Built diff covers, locked the front too, blah blah blah, probably forgetting more stuff. But finally got started on the bed chop :brows: Basically the leafs are now flipped around leaving the short end of the leaf at the back which allows me to shorten the bed an extra 5". We also shortened the wheelbase 1" to take up the excess amount of yoke sticking out the t-case. Now it sits at 112". The front of the leaf was stuffed into the frame and the frame (which is scary to see just how thin of sheet metal they use) is plated with 1/8" plate on both sides. Now the fun begins to see just how short we can get it. Looks to be somewhere in the 18 = 20" range on total shortness Can't wait for tomorrow!!!!

Recommended Posts
Create an account or sign in to comment
You need to be a member in order to leave a comment
Create an account
Sign up for a new account in our community. It's easy!
Register a new accountSign in
Already have an account? Sign in here.
Sign In Now