joester1908 Posted November 24, 2014 Author Posted November 24, 2014 I got my sliders out, ground off the bolt I welded on, then my dad sanded and primed the entire thing while I helped my brother change his oil. I think I'm going to fully install one side before starting on the other. That way I can learn on one side, instead of make the same mistake twice. One slider is ready for installment, the other is cut to size but needs the caps welded on, then primed. So that's a project for next weekend. It's not like I can even drive the Jeep with the blown up Flex Joint anyways...
joester1908 Posted November 24, 2014 Author Posted November 24, 2014 I ran to home depot today and picked up all the stuff I needed to install my air compressor and my air horns. The ARB compressor has a little mini tank with 3 fittings on it. 2 of them have solenoids on them for the air lockers. Then there is one that is just open, which I have a female air hose fitting on that goes to a 10 gallon air tank, that has a valve, a male and a female fitting. So I open the valve and have 10 gallons of air in the system. But I have the compressor mounted to some plywood that I put in my bed when I go 4 wheeling, then uninstall. Every time.... My plan is to build a metal box that will go on the wall of the bed (under the roll bar) that will house the compressor. It will be secure and weather proof so I can leave it year round. But the bottom will have a vent or something so it can breathe. So from the 3rd fitting will be a T. One end hooks to the compressor, one to my horns, and one to my air tank, which has the male fitting on it for the air line so I can run air tools and air up tires. The air tank will also be on a regular air hose, so I can disconnect it if needed. That's why I bought that cheap air hose from home depot. I'm gonna use part of it to hook my compressor to the tank, and I'm giving the rest to my dad for his air compressor setup. Enough typing, I did start installing the air horn today. When I did my manual swap, the column I used didn't have cruise control, and I don't think it even worked. So I'm going to use the bracket for that for the horns. I re ran the harness over the MAP sensor, hiding some speaker wires, and I was able to neatly tuck away the harness just in case I decided I wanted cruise control again. I blocked off the vacuum line too. As you can see, I used an L shaped bracket included with the horns for the back side, for stiffness. I'm going to need to put a 90 on the top of the horns.
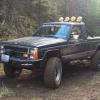
joester1908 Posted November 28, 2014 Author Posted November 28, 2014 Finally got some 2 door seats for my MJ! I wanted 2 door because they flip forward, and you can actually access behind the seat... The driver's is missing the adjustment handle.
86FUBAR Posted November 29, 2014 Posted November 29, 2014 Looking good ! You might want to stretch the front axle out a little bit to give you more tire clearance . Mines stretched about an 1.5" IIRC
joester1908 Posted November 29, 2014 Author Posted November 29, 2014 Looking good ! You might want to stretch the front axle out a little bit to give you more tire clearance . Mines stretched about an 1.5" IIRC That would be awesome! I have sooo much I want to do on this thing, but I want to keep it looking like a pickup too. lol
joester1908 Posted December 6, 2014 Author Posted December 6, 2014 Here's a photo of that lower "X Flex" that popped Rough Country sent me a replacement, so that's gonna be installed today, but the MJ is still dirty from Walker Valley, so yesterday it got a well needed bath Here's the new joint. I couldn't find the tool you use to tighten it, the 4x4 shop was kind enough to give me one :thumbsup:
Dillithium Posted December 6, 2014 Posted December 6, 2014 Sir, your Comanche is awesome! I'm also looking forward to seeing the sliders. I'm going to build my own as well, but I haven't decided on size yet.
joester1908 Posted December 7, 2014 Author Posted December 7, 2014 Sir, your Comanche is awesome! I'm also looking forward to seeing the sliders. I'm going to build my own as well, but I haven't decided on size yet. Thank you! My uncle is driving up from California next week and my dad and I are going to install a lift on his JK. So I need my Jeep on the road until then, because we are going wheeling sunday. After that, the rockers are getting cut!
joester1908 Posted December 7, 2014 Author Posted December 7, 2014 Worked on the Jeep a bit today. Updated the stickers on the rear window, then continued working on my broken joint... New "X-Flex" joint assembled. Hopefully this one doesn't pop too... Doesn't this look familiar? The threads weren't stripped in the joint, surprisingly. I didn't take a picture of the disk, but it looks just like the other one did. So I unscrewed the old one, measured how far out the nut was, screwed in the new one, put the track bar in and done! Or so I thought... 2 nails. 2 different tires. Luckily the little guy in the tire on the left wasn't leaking. Patched the other one at work, and then finished everything up... Still gotta add some more grease to it. Upon taking apart the old joint, it was bone dry inside. I greased it at least 10 times. I think it's just a poor design and the grease doesn't get around in there like it should. Luckily, I decided to pre-grease the new ones. Next up (which should be not next weekend, but the weekend after) Is gonna be cutting out my rockers and welding in the 2x6 :thumbsup: Stay tuned...
joester1908 Posted January 10, 2015 Author Posted January 10, 2015 I know, I know it's been a while. I've been busy with school and now that the holidays are over, it's time to get back to work on the Jeep. Besides, I'm tired of stepping over all the metal in my garage! lol So this morning I decided it's time to do my sliders. I have rocker panel damage like this on both sides. To start, i flattened the bottom of the door jam out to make it easier to tape. Then I taped the line where I was going to cut So the plan is to cut the fender and the bed below where the slider is going to be, then fold them on top for strength...I used an angle grinder, and realized how hard it is to make it straight... After taking off that bottom piece, I was going to fold the fender, but the actual rocker panel is directly behind the fender. So I'm gonna have to trim it more...more to come
joester1908 Posted January 10, 2015 Author Posted January 10, 2015 So I decided the best way to do it would be to take off the fender....a lot of work but I am such a perfectionist; it has to look good. My dad started cutting... He cut the entire top (below the door) and the front behind the tire, and I did the pinch weld and the back of the cab This channel is inside the rocker panel, and required a Sawzall to cut.
joester1908 Posted January 10, 2015 Author Posted January 10, 2015 My tire has been rubbing on that pinch weld type thing inside the fender. Here's my fix...
joester1908 Posted January 11, 2015 Author Posted January 11, 2015 Got all the pinch weld cut out I'm using the factory bracket So I have a little bit more clean up work to do tomorrow, then I have to cut and fold the bed. Stay tuned..
BlackBeast Posted January 11, 2015 Posted January 11, 2015 Yup the sliders are pretty cool.. it's definitely a solid upgrade..I'm staying tuned! Also I like the switches and the bumper rocks!
joester1908 Posted January 11, 2015 Author Posted January 11, 2015 Yup the sliders are pretty cool.. it's definitely a solid upgrade..I'm staying tuned! Also I like the switches and the bumper rocks! Thank you! Gonna work on the sliders more today...
joester1908 Posted January 12, 2015 Author Posted January 12, 2015 Testing fitting the metal... Pinch weld cut out Marking the bed. The plan is to cut the bottom off and fold the extra I also ground down this piece of metal, i believe it's for the seatbelt bolt. But it was going to be in the way. I also painted the underside of the rocker Bending the bed Ended up starting to rain, so change of scenery As soon as we started bending the bed, we realized we have to cut the inner fender out Then we ground the primer off the slider where we had to weld.
joester1908 Posted January 12, 2015 Author Posted January 12, 2015 We test fit the slider without the fender and it was looking good. So we re-installed the fender and figured out where to bend it I know it looks like the slider is too short, but I'm gonna trim the rear fender to match the other side My dad welded another bolt on for a ground Then I trimmed the rubber inner fender and reinstalled that while my dad did some welding It's pretty difficult to weld the thin sheet metal to the thick slider. Took some improvising but we eventually got it to work The cab is almost all done. But that's all we had time to do tonight. More than likely I won't be able to do much more until next weekend
joester1908 Posted January 22, 2015 Author Posted January 22, 2015 Ok, so I put a little but of filler in the welds. The thin sheet metal is hard to get a nice weld on against the thick steel. here's a photo from the bottom side. I also did the same cuts to the other fender. I also found the cause of the passenger side water leak Not the prettiest, but it will be hidden under the fender.
joester1908 Posted January 22, 2015 Author Posted January 22, 2015 I prepped the driver's side slider for welding, then started working on the passenger slider while my dad continued welding the slider on the drivers side. Another photo on the bottom. I used the factory brackets for the slider. Then I painted the drivers side slider and the entire underside of the truck. Here's the finished product I still want to make a brace on the rear of the slider that goes up to the frame for extra strength. And I haven't even started cutting the passenger side yet, because I need to drive the truck. Hopefully I can get some more work done on it. Once both are completely done, I am considering LINE-X for the sliders. Thoughts?
BlackBeast Posted January 22, 2015 Posted January 22, 2015 Line x sounds good to me... I would definitely want somthing to hide welds and seal up all of it from getting corrosion. ..I've heard positive things about line x ..but Never used it.
joester1908 Posted February 17, 2015 Author Posted February 17, 2015 Okay, so my heater only works on 1. 2, 3, and 4 all do the same as 1. So I pulled the resistor. Couldn't tell if it was bad or not, but I did notice corrosion on the coils. So I replaced it. After, my heater switch worked on 1 and 3. 2 and 4 were just like 1. After finding this out, I pulled the switch only to find this: After doing some research, I guess it's pretty common to melt that plug. Thinking back, I've owned a few Renix Cherokees, and multiple have had this issue. Well luckily I saved a good plug off an old wiring harness ' Then I had to drive to an auto part store about a half hour away to get a switch. I really just wanted to get it all done so I could drive it to work Monday. So I put it all together and the switch all worked as it should! Then I installed wiring for my air horn. I put everything back together, turned on my dash lights, and nothing. Got out, no marker lights. :fs1: Right away I knew it had to be a headlight switch. I was already frustrated. This didn't help. Decided to call it a night...
joester1908 Posted February 17, 2015 Author Posted February 17, 2015 Well tonight after work I went out to pull my headlight switch. I pushed the button, pulled the plunger out. The switch was very loose in the plastic. I tried to get the retainer off, and the headlight switch fell out of the dash... The plastic around it is all cracked. Great. Then I tried to pull off the plug. Totally corroded. At a loss. Ready to be done working on this thing.
joester1908 Posted February 21, 2015 Author Posted February 21, 2015 So I got everything working. The plug was completely melted. I got a new headlight switch from CarQuest ($18 after my discount) and I started looking on how to fix the plastic. Yes, this is redneck, but its about the best solution I could come up with. I grabbed a hole saw and cut out the recessed part Drilled a hole in a piece of aluminum, which i made much smaller than this, Painted it black and screwed it to the dash. Then I cut the old plug off, spliced on a new one, and installed the plug. It all worked, except for the dome light doesn't click on when you turn the switch all the way to the left. I had to drive it, so I reassembled and decided to deal with it the next morning.
joester1908 Posted February 21, 2015 Author Posted February 21, 2015 This morning, I went out and tore it all back apart. I had to fix a wire in my air horn switch, and i wanted to figure out why the dome didn't click on. Pulling the cluster gave the best access to my wiring. Ends up the ground on the back of the headlight switch wasn't snapped on. It's all working now

Recommended Posts
Create an account or sign in to comment
You need to be a member in order to leave a comment
Create an account
Sign up for a new account in our community. It's easy!
Register a new accountSign in
Already have an account? Sign in here.
Sign In Now