joester1908 Posted December 7, 2013 Posted December 7, 2013 Hey, I got my Comanche as my first vehicle over a year ago. I never have done a build thread on it so I thought I'd start here. More to come..
earl*t Posted December 7, 2013 Posted December 7, 2013 Hey Joester, you're in the right place. Bring it on.
joester1908 Posted October 7, 2014 Author Posted October 7, 2014 I bought my 1990 Comanche Pioneer the first of September, 2012. My neighbor bought it from a guy the next town over about a month prior to that. My dad had a Cherokee and his best friend had a YJ, and we went 4 wheeling all the time. I really wanted to get something I could take off road with them. I my dad had a 1980 Ford F250 4x4 with a 400 and a 4 speed manual that was supposed to be my first truck, but I was 15 at the time and didn't have my license. Back to the Comanche, it was a 4L, 4wd, AW4, short box. Had just over 237k on it. Lifted about 3 inches. My neighbor showed it to me when he first got it and I fell in love. It had a rod knock (which is why he got it so cheap), floor pans rusted through on passenger side, dents behind the tail lights from when it was rear ended, the passenger rocker panel was smashed from it being abused off road. He has a friend who works at a local 4x4 junk yard, so he got a good deal on a Renix with (supposedly) 150k miles. My neighbor drove it for a month and decided he wanted something full size. So my dad traded the F250 for the Comanche. Pictures coming...
joester1908 Posted October 7, 2014 Author Posted October 7, 2014 Here's the rocker And there was some sketchy front suspension I took these the night I got it
joester1908 Posted October 7, 2014 Author Posted October 7, 2014 The Jeep had sat in a field for a few years, the front windshield leaked water really bad, and all of the window seals were bad. Perfect formula for rust.
joester1908 Posted October 7, 2014 Author Posted October 7, 2014 The next day, my dad drove it in to work and got 4 31x10.5R15 Duratracs put on the stock wheels. We figured I'd need some offset, but thought we would give it a try.
joester1908 Posted October 7, 2014 Author Posted October 7, 2014 After a flex test, it was obvious I needed more offset wheels. Not bad for an add-a-leaf and longer coils with stock control arms :thumbsup: Notice the rear doesnt stuff much, it was rubbing on the frame rail.
joester1908 Posted October 7, 2014 Author Posted October 7, 2014 At this point, I was paying my dad monthly for the tires and the truck. We had $1500 in to our F250, so we said the buying price for the MJ was also $1500. Being only 15, I didn't have a real job, so cash was pretty tight. But I worked on a few different farms outside of town and saved up little by little to work on the Comanche. The first thing I decided to tackle was the rust issue. I was afraid a rock would bounce up through the floor pans or something, so that was something I decided to work on first. I could do a whole thread just on the floor pans (which I plan to do...so I'll keep it brief). I started by ripping out the seats, center console, and what was left of the carpet. Here's what the floor pans looked like.. Next, i got out the grinder and tried to figure out what was surface and what was rusted through.. I determined that the driver's side was savable, but I would have to cut out the passenger side and get whole new floor pans. A trip to Napa auto parts got me a spot weld drill bit I started drilling away. The floor brace was a pain....a few days of drilling after school and I got the floor brace out.... I found a set of floor pans off the internet. My plan was to completely do the passenger side, and just patch the drivers. Once all the rust was cut out, I painted the inside of the frame rails with POR15 so I hopefully wouldn't ever have to do this ever again..... Luckily, inside of the frame rail had no rust at all, it was just the floor pans. They didn't fit perfectly, so i ended up cutting them vertically and then messaging them in to place... I searched and searched online for a replacement floor brace (with no luck, obviously) so my dad and i welded up this brace which we welded/bolted in to place. And we also rewelded the seat bolts in. Then, I painted over the floor pans with more POR15, and used calking over the seams so it would be water tight. I did a similar thing on the driver's side. I painted over the old floor pans, then we cut the new pans to fit, welded/epoxied them in, and painted it again with POR15. I bought bucket seats from a Cherokee to replace the bench. My brackets were rusted through, so I decided to use some spacers for the seat. I welded in the brace and welded a new seat bolt in. Once it was all dry, I cleaned and threw the carpet in (it was also from a Cherokee, I trimmed it) Here it is all put together
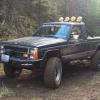
joester1908 Posted October 7, 2014 Author Posted October 7, 2014 The day after it was finished, my dad and I drove it to Discount Tire again, and we got the wheels I picked out. I ended up finding a few little trim pieces but other than that I didn't do much to the MJ between then and the time I got my license. However, bout 2 weeks after getting my license I drove my truck off road for the first time. Stopped to get Discovery Passes. (The Cherokee was my dads) It was pretty obvious that the offset wheels made a mess of the side of the Jeep My dad lost a mirror to a tree I really was impressed with this little MJ! It took a lot of abuse and did very well for its pretty much stock form A few weeks later I drove down south about an hour because I found a really good deal on a roll bar with 4 100w halogens. It came out of a Comanche. Another flex test revealed the offset fixed the rubbing issue. I ended up getting an aftermarket deck and a CB. Install went pretty well. Notice the blank spot where the floor shifter goes? My plan was a manual swap at some point, so i just left it blank..
joester1908 Posted October 10, 2014 Author Posted October 10, 2014 So i decided to paint my rear bumper while I was painting my roll bar. I stripped all the wires out of the roll bar, pulled the lights off and painted the roll bar
joester1908 Posted October 10, 2014 Author Posted October 10, 2014 I found some red lights at Radio Shack for cheap. I put them in the center console. Pretty happy with it.
joester1908 Posted October 10, 2014 Author Posted October 10, 2014 Then I found an XJ Dana 44 for a good deal. dilema was that I was going to have to grind off the perches and re weld them on to use it in my MJ. But the MJ is spring under. So do i convert to spring over? Everyone told me it would give me 5-6 inches of lift with a stock spring, and I had an add a leaf. I knew I wanted to do a long arm too....decisions, decisions
joester1908 Posted October 10, 2014 Author Posted October 10, 2014 As for the wiring for the lights....I decided to wire 2 lights on one switch, the other 2 on another switch. Each set on their own relay. The black wire is a grounding switch installed by the PO for the cooling fans. That got ripped out... My dad found this distribution block on eBay. Ended up working perfect So to mount the rocker switches we got, I took a factory switch panel and cut it, then screwed some metal on it and drilled holes. I also hit the trails at Walker Valley again. There is a "rock gate" meant to keep the cars out. It showed me i definitely needed to upgrade the suspension. My friend Alicia was there and took some great photos. Past the gate, it was smooth sailing. We had to cut some trees out of the way of the trail One of the rare pictures I have of me with my truck haha I was able to stuff the tires in this small ditch
joester1908 Posted October 10, 2014 Author Posted October 10, 2014 Picked up this sticker off eBay :thumbsup:
joester1908 Posted October 10, 2014 Author Posted October 10, 2014 So I popped the fuse for the cooling fans. Found some scary wiring for the fans. I ripped it all out and re did it. So my dad swapped to a D44 on his Cherokee, and he gave me his non vacuum disconnect HP30. At this point I realized the steering was pretty warn out. Its no wonder why the old owner put a new steering stabilizer on it. I road tripped my Jeep over I-90 to Liberty, Washington where we hit some more trails. RPMs were higher than I liked, and it definitely needs steering upgrade...however the bed works great for all the camping stuff And i used it as a tent! It was a great trip
joester1908 Posted October 10, 2014 Author Posted October 10, 2014 I bought an 89 XJ Wagoneer. Not running. You can guess what I did next...
joester1908 Posted October 10, 2014 Author Posted October 10, 2014 I ended up swapping my header panel on the XJ, got it running and sold it. But my dad bought a 98 TJ. It had 33s on it, but my dad swapped his wheels and tires. He told me if I mounted my 31s on the TJ's wheels and give him the 31s, I can have the 33s :thumbsup: Also, for my birthday, I wanted to go wheeling with friends and family. We ended up having a nice sized group The Jeep did take some damage, however. The sketchy sway bar drop mount broke Hit the exhaust pipe 33s rub on the fender, which dented it Also smashed my pristine rocker panels. Oops! Overall it was an awesome day and everyone had a great time A few months went by. I ditched the sway bar drop brackets. My brother in law was in town and we decided to take him 4 wheeling. I even let him drive the MJ a little bit... We did a trail that I can't figure out the name of. it is pretty gnarly and I got some damage There was a lot of spinning tires We decided to have lunch in the upper rock quarry after doing Humps and Bumps. There was even a little snow Here's the damage We all ate lunch off my tailgate. Aren't pickups great?? After we ate and headed back down the mountain, we aired up with my dad's compressor on his Wrangler.
joester1908 Posted October 10, 2014 Author Posted October 10, 2014 Ok, remember how I told you my dad bought a TJ? He ended up deciding to put the XJ back to stock. Hes going to sell me the Dana 44 (XJ Dana 44 rear, TJ Dana 44 front) ARBs, chromoly axle shafts, 4.56 gears, and the 5.5 inch Rubicon Express lift. He has the stock 8.25, so hes putting that in the rear and a Dana 30. Also, Ive decided to go with the Rough Country long arm upgrade, and I'm doing a manual swap. I bought an 88 Cherokee that someone swapped an external slave AX15 in to. I'm gonna use that transmission and transfer case. Here goes! I started by rebuilding the transfer case. New bearings, seals, and chain. thepreparing the axles. The local 4x4 shop put the carrier in my D44, and reshimmed the front D44. A friend and I put them together. Here's the Jeep before Then I took out my front axle. I picked up oil, a filter, disks, calipers, rotors, shoes, wheel cylinders, and a few other misc things. The first part of the swap I did was drill the holes for the master. There are dimples where to drill. Pretty easy actually. Especially since I pulled the motor out. I had to get a hole saw bit from Home Depot for the middle hole. Wasn't near as bad as i expected. You also have to unbolt the brake booster to get the hydraulic line behind it. I decided to install the clutch and smaller brake pedal while I was under there. My dad decided we should mount the transmission to the engine while it was out. Glad we did. Install was super quick. I used my dad's steering box because he had a drop pitman arm. We all know those are a pain to get off :doh: Before I put the drive train in, I wanted to get the plate for the manual transmission bolted in. Then I went crazy with the interior. Completely stripped it down for the cluster without the PRNDL piece. Then the motor went in I used a TJ shift boot because I couldn't find an XJ one in the junk yard that wasnt ripped! Now that the motor was bolted in, it was time to work on the axle and long arms. Problem solved... The front was done enough to sit on the wheels... time to work on the rear.
joester1908 Posted October 10, 2014 Author Posted October 10, 2014 Here's the old D35 I set the D44 under the leafs with the add a leaf. Hard to tell, but it was too tall. I knew it would be. pulled the tires off, gonna put stock leafs in Already looked like it was gonna be better... Not perfectly level, but good enough for me. Then we welded the perches after setting the pinion angle, and welded the shock mounts. Here's the rear axle all in place
joester1908 Posted October 10, 2014 Author Posted October 10, 2014 next, time to work on the interior. I got the idea from my dad, but I put winch controls in where the transmission switches used to be, and then cut out the vent for the fans, ARBs, and compressor. I also swapped the steering column over. The manuals have the key lock switch, and the column shifter would be useless. Here's everything installed. I ended up cleaning up the wiring, putting back together the dash, and putting the shift boots on. Here's the finished product.
joester1908 Posted October 10, 2014 Author Posted October 10, 2014 TIme to swap to the console e brake Not the prettiest, and its not hooked up under the Jeep, but that will come...
joester1908 Posted October 10, 2014 Author Posted October 10, 2014 Got tired of the old style steering wheel pretty quick, so I swapped my old one on the new column. The horn buttons worked a little different, but swapped over easily.
ftpiercecracker1 Posted October 10, 2014 Posted October 10, 2014 Dude . .. just stop. I'm turning into a zucchini i am so green with envy. :D Really digging how you've got all the switches setup, very professional/clean looking. It was quite ingenious of you to re-purpose that central vent as a switch board. I bet that thing is unstoppable off-road.
joester1908 Posted October 10, 2014 Author Posted October 10, 2014 Thanks, I'm really happy with how it turned out! It does pretty well off road, in fact I just got back from Liberty, WA with it. Really impressed. Once I'm caught up with my build thread I'll post a couple photos.

Recommended Posts
Create an account or sign in to comment
You need to be a member in order to leave a comment
Create an account
Sign up for a new account in our community. It's easy!
Register a new accountSign in
Already have an account? Sign in here.
Sign In Now