reson46 Posted December 29, 2014 Author Posted December 29, 2014 It was time to finally get rid of the D35 and install the Ford 8.8 that had been taking up space for years. When I removed the cover I was happy to find 4.10 gears which fit perfectly into my plans. The plasma cutter easily took care of the stock brackets. Deb helped clean up what was left. I welded the tubes to the housing. Willy
reson46 Posted December 29, 2014 Author Posted December 29, 2014 At this point we moved over to Ron's for a little more space to turn this MJ into a real Jeep by adding a transfer case. The collection of parts that will eventually make their way on to the MJ. Ron and I removing the 2WD AW4 and D35. Goodbye D35! :banana: Goodbye 2WD! :banana: This would be AW4 #1. Unfortunately this one only lasted about 10 miles. :( 4.3 Atlas II Willy
reson46 Posted December 29, 2014 Author Posted December 29, 2014 Mocking up the 8.8. Spring perches added and fresh paint. Shiny - mostly new - rear driveshaft. Rear axle in place. Atlas shifters. Willy
reson46 Posted December 29, 2014 Author Posted December 29, 2014 At this point I was still in need of a D30 with 4.10 gears to match the 8.8. I spent weeks searching CraigList and local junk yards. I found several that would work, but they were more than what I wanted to pay, especially if I would have to replace most of the parts on it anyway. Plus I'm cheap and was not in a hurry. Last week I came across a 2.5L MJ with 4.10 gears on CraigsList in SW Washington. What better way to get a front axle then buy an entire parts Jeep? It even comes with a "vintage" TrailMaster lift with control arm drop brackets. Ron wanted a lot of the body parts so he ended up splitting the cost with me. We've already got a friend who wants to buy the bed. By the time we're done we should both have a bunch of spare parts and will probably end up making money on it. Willy
neohic Posted December 29, 2014 Posted December 29, 2014 ... What better way to get a front axle then buy an entire parts Jeep? Ron wanted a lot of the body parts so he ended up splitting the cost with me. We've already got a friend who wants to buy the bed.... I love watching your projects, but I'll be the first to say it this time that this one looks too good to part out. :( Still... can't make an omelette without cracking a few eggs either, eh?
reson46 Posted December 29, 2014 Author Posted December 29, 2014 After transmission #1 didn't work out I spent the past weekend installing AW4 #2. So far I have 15 or 20 miles on the second transmission. It has already made it further than the first. Willy
reson46 Posted December 29, 2014 Author Posted December 29, 2014 ... What better way to get a front axle then buy an entire parts Jeep? Ron wanted a lot of the body parts so he ended up splitting the cost with me. We've already got a friend who wants to buy the bed.... I love watching your projects, but I'll be the first to say it this time that this one looks too good to part out. :( Still... can't make an omelette without cracking a few eggs either, eh? This one is perfect for parting out. It has issues and is undesirable enough that very few would be willing to put the needed time into it, but it still has enough usable parts to be of value. It is a four cylinder that came cheap because it is said to have a coolant leak. It is pretty obvious that somebody has attempted to remedy a cooling issue by removing the stock fan and rigging a junk yard electric fan in place. My first guess is that the head gasket may be blown or the head warped. But it ran enough to load on the trailer under its own power so that is what I was most concerned about. :D It's also been sitting for 8 years. The window was left open so the interior is disgusting. It's also been used as a beater truck without much concern for dents, etc. It is lucky that we found it and that most of its usable parts will move on to other MJs. Willy
neohic Posted December 29, 2014 Posted December 29, 2014 Good to know that most everything will be used that can be. Tip of the cap to you and both of your MJs, Willy. :thumbsup:
reson46 Posted January 16, 2015 Author Posted January 16, 2015 Got a delivery last week. I didn't realize how difficult it would be to find some decent looking black, 15", US made, aluminum wheels without fake bolts, faux beadlocks, spikes, or some other superfluous crap that looked like they were designed by a five year old on crack. Willy
reson46 Posted January 16, 2015 Author Posted January 16, 2015 Spent most of last week inspecting and cleaning up the donor D30. I replaced the axle seals since I had it apart, but got pretty lucky with most of the rest of the wear items. It looks like somebody must have replaced the rotors, calipers, and pads just before parking it. Besides surface rust they barely look used. Added a block off plate for the vacuum disconnect housing. As well as control arm skid plates. Added a weld washer to the track bar mount to help distribute the load and correct the offset hole that was added by a previous owner instead of getting an adjustable track bar. I then went crazy with the wire wheel until my wrists were numb in preparation for paint. Willy
reson46 Posted January 16, 2015 Author Posted January 16, 2015 Last weekend the 2WD axle came out and in went the D30. Good bye 2WD. Almost 4WD. It already had RE adjustable upper controls arms and an RE adjustable track bar when I bought it. I added RE adjustable lower control arms and the RE track bar bracket. I was hoping to have the 4WD in place and working for Snow Jam tomorrow, but unfortunately the front driveshaft I have needs to be shortened. Luckily, like most years, Snow Jam should be snow free this year so I shouldn't have any issue running forest service roads with 2WD. Willy
reson46 Posted January 20, 2015 Author Posted January 20, 2015 Took it to Snow Jam on Saturday. Willy
MuddFoot Posted January 20, 2015 Posted January 20, 2015 put your beam axle on craigslist ive sold them to guys building hot rods and sport trucks.
reson46 Posted January 20, 2015 Author Posted January 20, 2015 put your beam axle on craigslist ive sold them to guys building hot rods and sport trucks. Thanks, I've already got a taker. Willy
reson46 Posted January 20, 2015 Author Posted January 20, 2015 Picked up the shortened driveshaft. Also bought some tires. Willy
88whitemanche Posted January 21, 2015 Posted January 21, 2015 Build is looking great willy... So....I know many of us are wondering...are you going to build this one similar to your wife's mj or a mild wheeler/ daily driver?
reson46 Posted January 21, 2015 Author Posted January 21, 2015 This one is only getting 31s. The goal is to maintain good street manners and use it to explore forest service roads, play in the snow a little, etc. Willy
reson46 Posted January 26, 2015 Author Posted January 26, 2015 I was going wheeling Sunday so late Saturday night I cut and folded the rear fenders. I've got another set of rear TJ flares to adapt to the rear when I get a chance. Willy
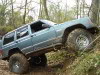
reson46 Posted January 26, 2015 Author Posted January 26, 2015 Sunday was our monthly club run. This month we went to Lonesome Lake to attempt to find some snow. Wasn't sure how much we would find considering it was a very unusual 60 degree day. This was also the first trip with a front driveshaft and 4WD. Stopping to air down. Mt. Rainier from Haller Pass. Lonesome Lake This is FS road 74. It's been closed right off highway 410 since 2006 when a flood damaged the bridge over the West Fork of the White River. There will be a lot of repairs needed if they ever do fix the bridge. The asphalt is completely fragmented and some surprisingly large trees have grown in the cracks in the last 9 years. Another side road that's been washed out by the river. Airing up before heading home. More pics here. Willy
reson46 Posted February 2, 2015 Author Posted February 2, 2015 As you can tell in the pics from last weekend the front flares did a pretty good job of keeping most of the road spray off the side of the truck. With no flares on the rear, they were throwing crap everywhere. I was eager to get the rear flares on, plus stay somewhat legal. Sophisticated method of test fitting. After cutting up the rear flares until I was happy with the fit, I pulled both the front and rear flares off for paint. I used Krylon Fusion for plastic. I wasn't sure what to expect, but they turned out really good. I used rivnuts to attach the rear flares since the inside of the rear fenders are not very accessible. Willy
reson46 Posted February 2, 2015 Author Posted February 2, 2015 The previous owner installed an XJ gauge cluster, which covered the shift indicator. I picked this up off eBay. It was the closest I could find to the AW4s shift pattern since it has the odd single position for first and second. Picked up a couple of Euramtec LED interior lights. I didn't use the trim bezel that came with the lights since they fit nicely into the MJ opening. Willy
BlackBeast Posted February 2, 2015 Posted February 2, 2015 Sweet how much did u pay fir lights if u don't mind me asking?

Recommended Posts
Create an account or sign in to comment
You need to be a member in order to leave a comment
Create an account
Sign up for a new account in our community. It's easy!
Register a new accountSign in
Already have an account? Sign in here.
Sign In Now