BBCchris Posted April 14, 2009 Author Posted April 14, 2009 5.5.09 I did not end up using these parts.... I just made my own and went with a different style. And your going to need to remove the header panel mount pieces off the Alex 2500 fenders to use on the OE US fenders. I'm going to remake them because they are of the same top notch quality as the fenders. Note the rust under the grey paint/primer. And if there was any more doubt about the quality of these fenders check out the lower mount stud. Nice phillips screw. :shake: enough said. Looking forward to getting this done because it's holding me up from getting the bodywork and paint.... -Chris
BBCchris Posted April 14, 2009 Author Posted April 14, 2009 I can't seem to come up with a color to paint it yet..... any sugestions? I was going to paint it the brighter red of the newer XJ's (PR4) IIRC, but now I'm leaning more toward a bright silver of some sort.
freakjeep93 Posted April 14, 2009 Posted April 14, 2009 id go with a nice red ... comanches have always looked good red
BBCchris Posted April 15, 2009 Author Posted April 15, 2009 I was thinking about Rescue Green like my JK, but someone on here has one.... Then I was thinking bright red, but Sir Sam is doing his that same color and is also using the 2500 clip. So bright metallic silver keeps popping up as a good choice. I remember seeing a copper or burnt amber color on a TJ that was pretty sharp.... but don't know how it would look on an MJ.
Pete M Posted April 15, 2009 Posted April 15, 2009 I'm a big fan of silver. Which is a bit ironic since I don't own a single silver truck. :hmm: But I've only painted one so far. :brows:
Sir Sam Posted April 16, 2009 Posted April 16, 2009 I was thinking about Rescue Green like my JK, but someone on here has one.... Then I was thinking bright red, but Sir Sam is doing his that same color and is also using the 2500 clip. So bright metallic silver keeps popping up as a good choice. I remember seeing a copper or burnt amber color on a TJ that was pretty sharp.... but don't know how it would look on an MJ. Ya I'm doing mine PR4(flame red). how about a sunset orange?
BBCchris Posted April 16, 2009 Author Posted April 16, 2009 Funny I was thinking about it. I do like the look of the Amber Fire TJ's or even Sunset Orange Metallic...... get outta my head Sam :yes:
reeser Posted April 16, 2009 Posted April 16, 2009 i really wanna see how those patriot wheels look on an mj
Sir Sam Posted April 17, 2009 Posted April 17, 2009 Funny I was thinking about it. I do like the look of the Amber Fire TJ's or even Sunset Orange Metallic...... get outta my head Sam :yes: No. We like it in here.
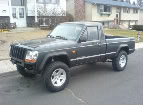
BBCchris Posted April 20, 2009 Author Posted April 20, 2009 And here is the truck with the 2500 nose on some hybrid fenders. Still needs some fit and finish work but it is looking better than the first attempt with the China fenders. It's weird how much the header hangs over where the stock bumper goes. ;) -Chris
Sir Sam Posted April 20, 2009 Posted April 20, 2009 looking good, let us know when you get something figured out for mounting the headlights to the header, I'm still not sure where I am going with that one.
BBCchris Posted April 20, 2009 Author Posted April 20, 2009 I have no idea yet...... expando foam? :shake: I'll figure something out..... I guess.
reson46 Posted April 21, 2009 Posted April 21, 2009 I just noticed you are in Spokane. Hopefully we'll cross paths and I'll get to see this thing on the trail. :thumbsup: Willy
BBCchris Posted April 21, 2009 Author Posted April 21, 2009 I'm starting to think that Alex Parts has never seen a real 2500 and just copied the stuff from photo's. The headlamps fit like crap. From what I can tell the 2 studs on the back locate it in the header and there are 2 screw clip on the top of the lamp to secure it to the header. *If you use the studs to locate it..... they are cantered and the gap is not consistant. So I removed the studs to try and get a better fit but it's not much better. *The 2 screws on top of the lamp assy. are 3/4" away from the header panel and if you were to tighten them down it would either break the lamp or crack the header. So I don't know really how much more I want to do..... It's no fun getting kicked in the bag everynight, it's like one step forward five back. This stuff is holding me up. And I hate to say it but if I don't see some more progress in the next week I'm going to put the 97+ stuff that was on it back on and get on to the paint. And the 2500 stuff can wait until another day when I have more mock-up time. -Chris
Sir Sam Posted April 21, 2009 Posted April 21, 2009 Thats sounds different than the fitment on mine. I feel like those studs are supposed to sit in something and then those two upper screws are meant for leveling the headlights.
BBCchris Posted April 21, 2009 Author Posted April 21, 2009 The white box on the back of the light (with gears in it) and the brass screw below and to the left are the adjustment knobs. The white box part does not have the adjustment knob included with the light.... I don't know what to think about the studs :???: ... But I'll keep working at it, whatever that means. Starting to think it would be easier to just put a Grand Cherokee clip on.
Sir Sam Posted April 21, 2009 Posted April 21, 2009 The white box on the back of the light (with gears in it) and the brass screw below and to the left are the adjustment knobs. The white box part does not have the adjustment knob included with the light.... I don't know what to think about the studs :???: ... But I'll keep working at it, whatever that means. Starting to think it would be easier to just put a Grand Cherokee clip on. Well if you decided to ditch the 2500 stuff you should sell me those fenders. :brows: :brows: :brows: Also, those studs do screw out, I was thinking about removing them and putting something else in their place.
BBCchris Posted April 21, 2009 Author Posted April 21, 2009 I was thinking a bolt/washer combo to replace them. I might be calling you next week on the fenders if I ending up bagging it. :(
Sir Sam Posted April 22, 2009 Posted April 22, 2009 I was thinking a bolt/washer combo to replace them. I might be calling you next week on the fenders if I ending up bagging it. :( Sounds good to me, we still need to settle up anyways.
BBCchris Posted April 22, 2009 Author Posted April 22, 2009 Well after putting in some more hours last night with it I think I got it to fit, still need to fit the hood... thought I would stop while I was winning the battle. :yes: Just me know when you want the other stuff sent out. -Chris
freakjeep93 Posted April 24, 2009 Posted April 24, 2009 man ive been following this and i really like it really unique.... personaly i like the normal clip but i like seeing the unique front end and i really want to see how this looks when its done so far ur doing a good job
BBCchris Posted April 24, 2009 Author Posted April 24, 2009 Thanks. It's a pain in the a$$ getting it to fit right, but it's nice to freshen it up after all the years of use.

Recommended Posts
Create an account or sign in to comment
You need to be a member in order to leave a comment
Create an account
Sign up for a new account in our community. It's easy!
Register a new accountSign in
Already have an account? Sign in here.
Sign In Now