kentsu66
-
Posts
24 -
Joined
-
Last visited
Content Type
Profiles
Forums
Gallery
Everything posted by kentsu66
-
Next Phase - Road Trip Home
kentsu66 replied to jamespwsullivan's topic in Member Projects: Your Comanches
You're darn tootin'. My third time having those delicious rings of heaven. It was Pat's first. We both settled on maple. -
2-door Cherokee with an unusual hood prop
kentsu66 replied to kentsu66's topic in Member Projects: Other Cool Stuff
I prefer physical books too unless there is something I know the name of but not where it is in the book. In that case, having a PDF with OCR can be very helpful. -
2-door Cherokee with an unusual hood prop
kentsu66 replied to kentsu66's topic in Member Projects: Other Cool Stuff
When I compare the layout, typography, drawings, etc. between the scans on xjjeeps.com and the snippets that @fiatslug87 posted, they are very, very different. Having been a tech writer at some points of my career, the differences I see between the two are much more than (for example) simply a branding change. The MoPAR books have a totally-new layout, page design, typography, etc. The data (information) could have been brought over -- but c.1990 -- easy transfer of info between publishing systems was largely still a dream for the future. I'm just surprised that Chrysler went to that much effort. What I would have assumed (not knowing what I know now) would have been minimal, along the lines of just a simple branding change. -
2-door Cherokee with an unusual hood prop
kentsu66 replied to kentsu66's topic in Member Projects: Other Cool Stuff
Thanks. Those binders contain the books like the ones you show above in the thread, correct? The ones with the portrait orientation of the drawings? -
2-door Cherokee with an unusual hood prop
kentsu66 replied to kentsu66's topic in Member Projects: Other Cool Stuff
Thanks. Very cool to see some version of a parts book showing the prop as we encountered it, with all of the pieces. Soooo--are there two completely different editions / printings of Jeep parts books? The ones on xjjeeps.com don't include the covers but the interior pages look completely different, formatting-wise -- and they're also landscape orientation instead of what you have, which is obviously portrait. Given the amount of work to create something like a parts book, it blows my mind that Jeep / AMC / MoPar would have done it TWICE! -
2-door Cherokee with an unusual hood prop
kentsu66 replied to kentsu66's topic in Member Projects: Other Cool Stuff
Yes--and it shows the transverse rod attaching on the passenger side. The Cherokee from which we liberated these pieces was attached on the driver's side. The parts book scan from xjjeeps.com also appears to show it attaching on the driver's side but does not show the bracket. Maybe the book that @fiatslug87 has is aftermarket? I don't recognize the layout or fonts as being Jeep/AMC... -
2-door Cherokee with an unusual hood prop
kentsu66 replied to kentsu66's topic in Member Projects: Other Cool Stuff
Thanks to you both. Appreciate the safety tip--the vehicle has electric fans now with a close-fitting shroud. I looked again in the 1984-1986 parts book (scan available on xjjeeps.com) and found it, on drawing 23A-3900 (PDF page 1280). Interestingly, neither the bracket and bolts that hold it down nor the catch/clip appear to be shown in the drawing. -
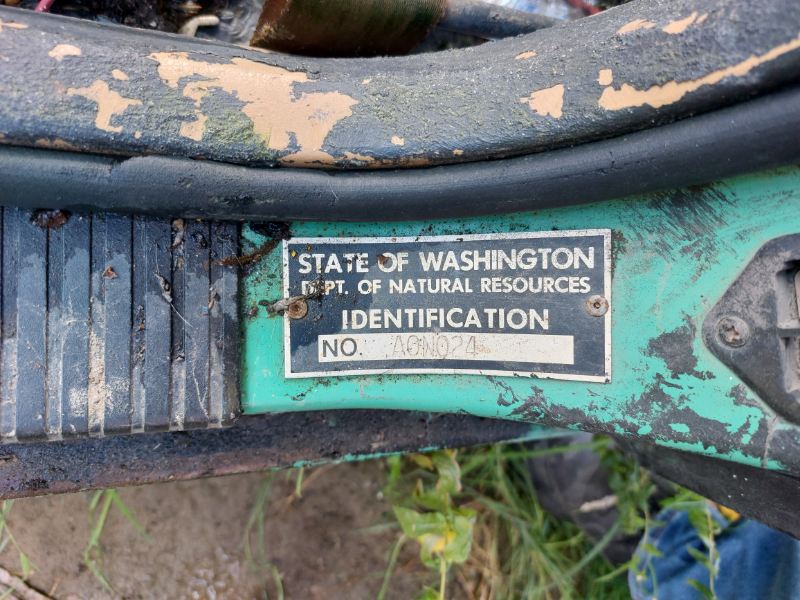
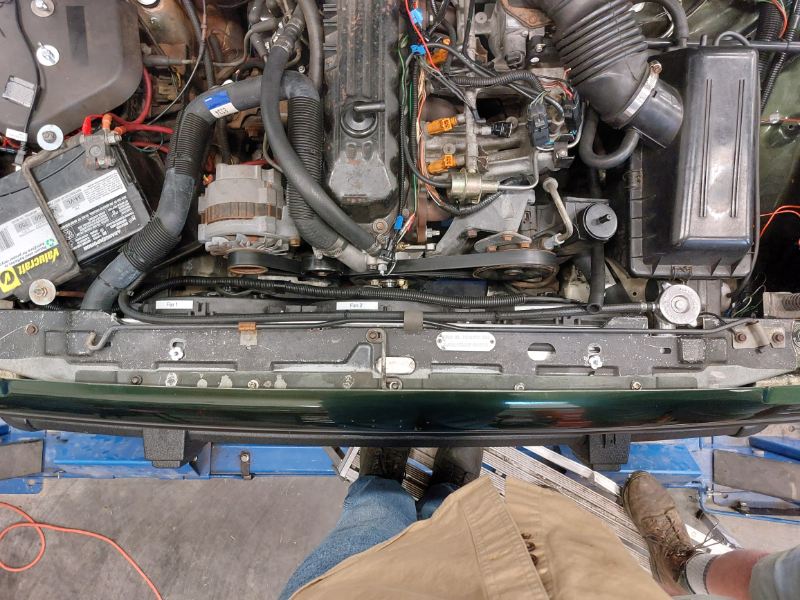
Hi all. My brother @jamespwsullivan and I were at a junkyard near me recently and we came across an interesting 2-door Cherokee. I couldn't find a VIN tag and the label on the driver's door was faded. The yard IDs it as an '87. Anyway, we found a riveted tag on the driver's door sill which indicates it was a Washington (state) Dept. of Natural Resources rig. (See first photo.) Also, it had a hood prop that goes across the front, along the top of the radiator support. Because my brother recently mounted a ground busbar in his '87 Comanche that interferes with the stock hood prop catch, we grabbed this assembly and installed it in the same manner that it was on the Cherokee. (See second photo. Neither of us thought to take pictures of the Cherokee before removing it.) Have any of y'all seen a prop like this on an XJ or MJ? It looks kinda like a YJ hood prop but the mount for those is on the passenger side, IIRC. It all looks to be factory rather than homemade. Thanks for any insights.
-
New Windshield Washer Tank Installed
kentsu66 replied to HOrnbrod's topic in MJ Tech: DIY Projects and Write-Ups
This mod is most excellent! Just finished doing it on my brother @jamespwsullivan's '87 Comanche. Some notes about the install are here: Also, I found that the first photo from @HOrnbrod's original post long ago was rotated, which confused me at first. Attached is the photo in the proper orientation--looking forward while on the garage floor from inside the driver's wheel well.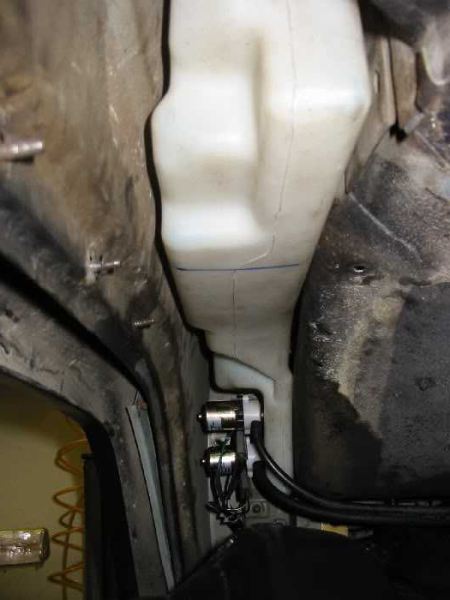
-
Experimental options for washer tank
kentsu66 replied to Gojira94's topic in MJ Tech: DIY Projects and Write-Ups
@Gojira94, my brother @jamespwsullivanand I just finished making this mod to his '87 Comanche. Regarding the pumps, we put the pump in the lower mounting location since that will allow the most fluid to be drawn before going dry. We are lucky to have some experienced staff at a nearby NAPA, one of whom found a differential plug that fit the unused pump hole nicely -- P/N 704-1949 ($7). If you're using original pumps, you'll see that Jeep used different connectors on the upper and lower units--probably to keep the wiring harness connectors from accidentally being swapped? The Comanche single-pump harness uses the connector shaped like a "T", which is part of the Delco-Packard (which became Delphi, which became Aptiv) Series 56 connector family. The other one is a Weather Pack connector. Replacement pumps for quite some time have only been made with Series 56 lugs but have shipped with a pigtail to convert to Weather Pack. In any case, we cut off the shell and terminals, extended the wires, then crimped on new Series 56 18-20 ga. female terminals ( NAPA does not carry / GM 2962508), and popped them back into the shell. (NAPA does carry the 14-16 ga. Series 56 female terminal, P/N 725147 / GM 2962447. If you're careful, you can cut down the inner wings to about 2/3 the height and get a proper crimp on 18-20 ga. wire.) Also, I found that the connector type for the low fluid level sensor was Metri-Pack 150. NAPA has a complete pigtail (EC11) -- it is used all over the place on GM vehicles (and on Jeeps too, esp. for assemblies sourced from GM). Since I like a bit of a challenge, I instead re-used the same connector shell and put new 18-20 ga. pins in it (NAPA 725187), on the ends of the wires after we extended them. (Minor note: the fluid level sensor wire is 20 ga. and the pump wires are 18 ga., no doubt due to the lower current draw.) All of these sorts of terminals are known as "open barrel" terminals, because the area where the crimp happens is not a full circle, but is instead open, with two sets of wings--one for the wire strands and the other for the insulation. Crimping these connectors is easy if you have the right tool. I bought mine decades ago but this one looks decent: https://www.amazon.com/Haisstronica-Crimping-Non-Insulated-Terminals-Receptacles/dp/B0978S514B By the way, Pat and I were rather shocked (in a good way) that the sheet metal geometry stayed the same all the way through 2001--no re-shaping required to get the bottle to fit. Also, we discovered that the inner fender liners appear to be identical as well throughout that year range. -
wiper switch replacement
kentsu66 replied to INjake89mj's topic in MJ Tech: Modification and Repairs
@jamespwsullivanand I love Matt's videos. I'd be interested in what you think of the steering column video I linked to above. I thought the guy did a really nice job with lighting and with speeding up segments so that the viewer's time was well-spent. -
Very helpful, thanks! My brother's truck has had an interior color change. The current lower dash panel is apparently out of an '89 (89 5501 0076) and has the molded in "crotch cooler" (LOL!). I looked at some more photos after reading your post. It appears that the separate piece was used on '84 - '86 XJs for sure. it's not 100% clear from the photos what the story was for '87, but I assume at least some XJs and/or MJs had it, else it wouldn't have appeared in the '87 - '90 parts book. In the '91 - '93 parts book, the louver and receiver are shown but not the surround, which would make sense for when it was molded into the longer trim piece.
-
wiper switch replacement
kentsu66 replied to INjake89mj's topic in MJ Tech: Modification and Repairs
Thanks for this. We were working on a non-tilt column. Help on those was a bit harder to find. You might want to give the video I posted a try. The lighting is super-good so everything is easy to see, and a lot of the steps are sped up, so you don't have to spend hours watching. -
Thanks for mentioning this. My brother @jamespwsullivan and I just finished a total rehab of the non-A/C heater enclosure in his '87--stripped out all of the old foam and replaced it, new heater core, etc. His truck also has been converted from 5-speed to auto w/ floor shift. He has two XJ full consoles and some of the original interior pieces that he intends to use as part of the rehab. He needed the XJ version of the full console specifically because he converted his MJ to have a center-mount parking brake, using parts from a junkyard XJ (including the difficult-to remove reinforcement plate that was spot-welded in **6** places). We're puzzled by the center heat duct at the front of the console. His 5-spd. setup used the larger of the two ducts, P/N 56000610. For the current auto floor-shift setup, we installed the smaller version, P/N 56000584. We **assumed** that this setup needed the separate outlet bezel, P/N 5AD44JY6. We tracked down a used one but we can't see any way that it could fit. (See items 27, 28, & 40 in diagram 24-3700 from the 1987-1990 parts book, attached.) So then we assumed that the MJ full console must be different, because otherwise the large rectangular opening in the duct would pour heat into the underside of the change tray. (@NHMJXJ mentioned installing the XJ rear heat duct, P/N 55001303, to provide some defrost to the rear window, which is a possibility!) In any case, diagram 8A-2000 (also attached) isn't clear about what the differences are in the change tray / shifter surround (item 17 in the diagram) between XJ and MJ. In addition to not having an e-brake slot, does the MJ version of this part have a vent in place of the change tray? We looked at a bunch of photos online of MJs with full consoles and they all seemed to have the change tray, which was a surprise... I'm also attaching diagram 8A-1000 since it shows the lower dash panel, which does not appear to differ depending on the type of console. Any insights would be very appreciated! 24-3700 1987-1990.pdf 08A-2000 1987-1990.pdf 08A-1000 1987-1990.pdf
-
JFYI, if anyone else landed on this topic (great photos and step-by-step!) but needs to disassemble a non-tilt column further (e.g., to replace the wiper switch), my brother @jamespwsullivan found this video to be very helpful: CHEVROLET STEERING COLUMN REPAIR | Ignition, Dimmer and Wiper Switch Replacement! --Kent
-
@Airborne Janitor, thanks a TON for the step-by-step! My brother @jamespwsullivan just installed a '99 motor. We added a ground wire and re-bushed the linkage. We found that Weather Pack makes a nice round 5-pin M/F shell pair so we installed those to keep the connections dry. Via bench testing, we found that the '87 reman motor (almost 0 miles since install) and the '99 motor operated at about the same speed on Low but the '99 was definitely faster (more wipes per minute) on High.
-
Intermittent wiper conversion w/o tilt
kentsu66 replied to a bum with money's topic in MJ Tech: Modification and Repairs
JFYI--as of early 2024, the non-tilt intermittent wiper switch is made of 99.5% unobtainium. Occasionally a new one will show up on eBay but they are expen$ive. -
Intermittent wiper conversion w/o tilt
kentsu66 replied to a bum with money's topic in MJ Tech: Modification and Repairs
56000032 became 56007298 in 1994. Also known in the aftermarket as DS570. -
wiper switch replacement
kentsu66 replied to INjake89mj's topic in MJ Tech: Modification and Repairs
I understand that HOrnbrod is no longer with us (RIP) but I thought it was worth noting here that my brother @jamespwsullivan and I have found this video to be very useful--a bit more so than the El Camino Central step-by-step he referenced above: CHEVROLET STEERING COLUMN REPAIR | Ignition, Dimmer and Wiper Switch Replacement! The video shows the column out of the vehicle, which helped quite a bit because the lighting was a lot better. :-) We also found that the K-M J-23653-A lock plate compressor tool referred to in the factory workshop manual and shown in the video is *definitely* worth the small amount of money to buy it. It's readily available. (NAPA has it in the Balkamp line, P/N 7769063, $14.50.) Also, as the video makes clear, the wiper switch is pretty much the first thing installed at the upper end of the column, so you basically have to take the entire upper end apart to get to it. Yay. -
Thanks much!
-
@schardein Thanks for your comments. Does the "no delay" sticker on one of your units mean it's not working properly? Just wondering what my brother and I should watch out for when we go yardin'... Thanks.
-
Ah! I suppose this is the "governor" that the parts book refers to? And the harness has a connector for it, I presume?
-
According to factory parts books, the front wiper motor for the 1984-86 XJ and the '86 MJ is P/N 56000899. For the 1987-1990 MJ/XJ, the P/N changes to 56001402 but it looks like the same drawing was used. For the 1991-92 MJ and 1991-93 XJ, the P/N changes to 4723460 but it again looks the same. There is a "w/ crank" unit listed as well, P/N 55154611. For the 1994-1996 XJ, the P/N changes to the previous "w/ crank" item (55154611) and it again looks the same. From 1997-1999, it's P/N 55155297 and the drawing looks different from previous years. From 2000-2001, the P/N is basically the same, 55155297AB, and it looks the same. Side note: There are different motors for RHD models and CJ/YJ/ZJ. So--my assumption is that the 1997-2001 motor will work--one does not have to specifically find an '01. The turn signal switch and lever in my brother's '87 Comanche is non-intermittent. Is it true that the necessary wiring is in the engine and cab harnesses, so that if we swap in the intermittent switch (56000032, aka NAPA ECH WS1019) and the intermittent lever (56000433), the intermittent function will work? Thanks!
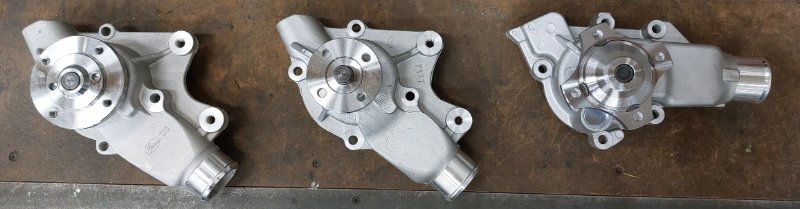
-
Greetings. I am working with my brother @jamespwsullivan on his '87 Comanche 4.0L. I am trying to do something I thought would be simple -- verify whether the water pump mounting bolts he current has are the correct original style. I'm finding it's not so simple in reality... I first consulted the '87 - '90 parts book and, much to my surprise, found that Diagram 7-2300 (page 172 of PDF) isn't correct! It shows a pulley flange from what I associate with a much later engine (e. g., TJ era) and says there are 5 mounting bolts, which is wrong--there are 4 mounting bolts. (There are 2 additional bolts for mounting the power steering pump, so 6 through holes in the water pump housing total; 4 not threaded and 2 threaded.) I then checked the '91 - '93 parts book and it shows the same incorrect pulley flange! The part numbers for the pumps themselves are correct though. I happen to have access to the 3 relevant types of water pumps so I took a picture of them (attached). The '87 - '90 is on the far left. The pumps are rotated so that the mounting holes are in equivalent positions. (The intake for the 3rd pump is at 3 o'clock, which is quite different from the earlier designs.) By the way, the 3rd pump *does* use 5 mounting bolts--and no additional through holes. In any case, the '87 - '90 water pump mounts with 4 bolts - 3 of one length and 1 of another (longer). The bolts on my brother's truck are standard hex bolts with a captive flat washer. Is this what was originally used for '87 - '90? The parts book pages (which I don't trust) seem to show hex head flange bolts with split lock washers. I have also looked in the 4.0L sections in the '87 FSM supplement, the '88 rebuild supplement, a Chilton manual, and a Haynes manual. I didn't find anything helpful about bolt style there (and at least one of the AMC books has the same wrong pump diagram!). I am also attaching the two parts book pages I mentioned. Thanks for any info and insights. Diagram 7-2300 from 1987-90 Parts Catalog.pdf Diagram 7-2100 from 1991-93 Parts Catalog.pdf