


coolwind57
-
Posts
992 -
Joined
-
Last visited
-
Days Won
6
Content Type
Profiles
Forums
Gallery
Everything posted by coolwind57
-
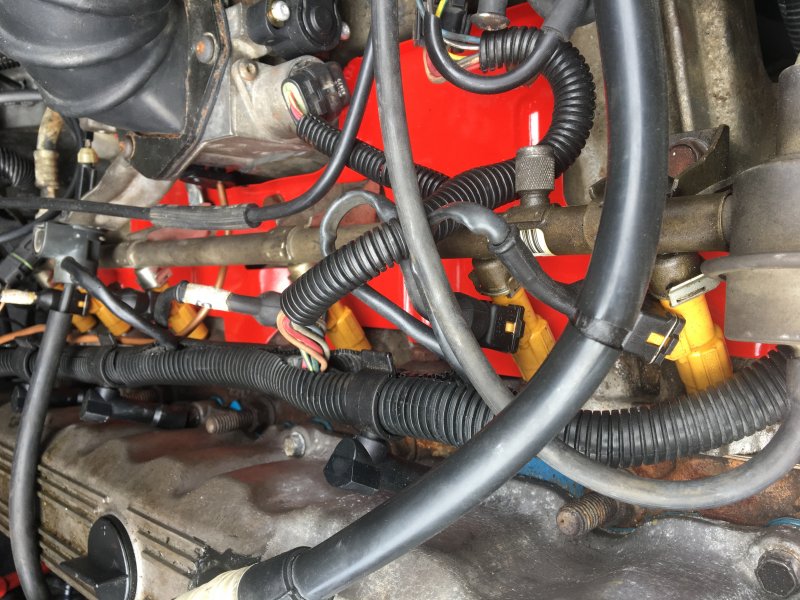
Speaking of red, I shot my injector heat shield red while I had it off. My taste in color selection may be questioned by some, but it sure helps distinguish components in this area. Makes it much easier to find a dropped fastener, for sure. Notice those 746 injectors I got from Yitamotor. That was a worthy purchase. Takes your single spray injectors to four spray per injector, all for $55.99 for the whole 6-each set. I felt like I scored a buy one, get 6 deal.
-
While I had both manifolds off over the past few weeks replacing freeze plugs, I decided to do an EGR delete. I figured it was more expensive to do repairs than it is worth (and a pain to work on when the time came). PO removed my catalytic converter anyhow, so SMOG provisions were already altered and I figured it was one less thing to cause me problems. Anyhow, this is what I did: Cut the tube connecting header and EGR. Welded header at pipe opening. I then cut off all of the stuff attached to the cast iron EGR housing. Using a piece of scrap flat metal, I cut it in the same profile as the EGR housing. I then smeared some RTV on one side of my sheet metal and used the EGR housing to sandwich it to the intake manifold. Prior to, I painted it red just for fun. It is so much easier to see and to reach around in this area now. And no worries about a 30+ year old EGR eventually interfering with drivability. My pretty red EGR delete block would look much better if I had wiped the smeared RTV off prior to this picture.

-
I picked up a stock XJ tranny cooler earlier this Summer and just got around to installing it. My 89 didn't come with one and coolers are definitely recommended by most everyone. I had plumbed it AFTER the radiator on the return. I've seen both ways, but it kind of made since to me that the radiator heat would slightly warm the fluid while idling first thing on cold mornings. Once moving, I figured that the fluid should probably need max cooling before going back into the transmission. I also replaced both tranny cooler lines (the metal to rubber lines running from and to the transmission. My 1989 rubber ends were looked pretty dry rotted. Figured they'd go any time, so best to replace now.
-
https://jacksonville.craigslist.org/pts/d/truck-topped-off-of-87-jeep/6480950527.html I've been shopping for a LWB topper that is somewhat near me, but so far nothing within 5 hours drive. I ran across this one for anyone looking.
-

Hesitation, then dies upon acceleration
coolwind57 replied to coolwind57's topic in MJ Tech: Modification and Repairs
The thanks I get.... I'm so sorry i wasted your time, Sir. Surely someone, some day, will actually read this thread all the way through and PERHAPS get something out of it. -
Hesitation, then dies upon acceleration
coolwind57 replied to coolwind57's topic in MJ Tech: Modification and Repairs
So today I can finally say that my hesitation/idle issues are resolved. In case you're having similar issues and are now reading this, here's the solution that corrected my issues. It was one or doing all of the below things: 1. Welded mildly cracked header and closed the very bad leak at the collector pipe. I also welded a small gusset between the last two exhaust pipes of the header for added strength, by the way. 2. Replaced my O2 sensor. 3. Replaced my water temperature sensor (the one down towards the bottom of the block, driver's side). 4. Eliminated my EGR. Did this while I had my header off. Removed tube connecting header to intake/EGR. Sealed with weld. Cut off EGR diaphram and other parts from it's cast iron housing. Replaced iron housing with sheetmetal sandwiched between it and the intake manifold. My guess on which had the most likely impact would probably be the O2 sensor replacement but I'm only guessing. I had to do all of this together at once, so I didn't have the opportunity to try each individually to test each one. Maybe a combination of them all, who knows. Hope you find your solution and I hope my case can help you. -
Good work on both the project and making the video. I thoroughly enjoyed it. like others said, it held my interest throughout. Good job, man.
-
YITAMOTOR 746 injectors?
coolwind57 replied to coolwind57's topic in MJ Tech: Modification and Repairs
Just wanted to report that my idle has been fixed with a lot of parts replaced and work done to my engine. These injectors from 746 VitaMotor are working great. I saved a BUNCH of money on them and so far, I recommend them. My gosh, they only cost $55.99 for the whole dang set. I can't figure out how they sell them for so cheap. -
Good news today! No transmission got hurt in the making of this thread! I had simply placed the bell housing inspection cover on backwards. My flex plate bolts were making contact, causing all that rukus. Still feel like a ding-dong, but I'm relieved that I didn't jack up my transmission after all. Now I just got to figure out what to do with all of the money I just saved from not having to rebuild my transmission....
-
More bad news, it seems. I did pull the transmission again. As I had it laying horizontal, I decided not to pull the TC off, but rather I rotated slightly to see what happens and it pushed in deeply. That was a good sign. It moved even more significantly deeper that I had imagined it would. I did not hear any click, but that sucker moved in wonderfully. I rotated more and pushed, but could not get it to go any deeper. It felt like to me that although I didn't feel it go deeper a second time, but it was probably seated all the way. As i recalled, I was thinking that this WAS the final step deep into the transmission. In hind site, I should had pulled the TC and at least inspected the seal. I would had also had a more definite count of how many "step-downs" I had as the TC pressed into the transmission. Unfortunately, I did start the engine as I thought all was good. I immediately began hearing a moderate metal ticking sound emitted from the bell housing. My first reaction was that a loose bolt was inside there or something....or I left a flex plate bolt sticking out untightened. Now, I'm fearing the worst. What gets me is that another indication that made me feel that I had the TC seated correctly is the fact that the transmission mated the engine like two magnets this time. Went together like a dream, no resistance. I thought I nailed it. Looks like I'm pulling the transmission again this weekend to assess the damage. Hoping its something simple when I look through the bell housing inspection cover, but this is probably wishful thinking. I may have just chewed up my transmission.
-
Question: Transmission disconnect lines
coolwind57 replied to coolwind57's topic in MJ Tech: Modification and Repairs
As an update for anyone finding this thread: Yes, you remove the old plastic clips and discard. When you push your male end into these new dorman flex house connects, you'll hear a click from the four metal tabs engaging the inner perimeter of the connector. -
Tips on initial starting after fuel system work
coolwind57 replied to coolwind57's topic in MJ Tech: Modification and Repairs
I did and she fired up within 5-6 seconds this time. Success! The last two times however, this cycling of the key didn't help much. I'm also happy that I have no fuel leaks, i had carefully prelubed the fuel rail disconnect O-rings using a Q-tip and petroleum jelly. I also used all new O-rings for my 746 injectors. Engine came to life, but my I've got hard ticking noise coming from bell housing. I chose not to run the engine but only a 30-40 seconds because of this. I'm thinking that I still didn't get that dang torque converted seated correctly...or I had damaged something already. Another weekend of pulling an transmission, it seems. Praying now that I didn't destroy it. -
Tips on initial starting after fuel system work
coolwind57 replied to coolwind57's topic in MJ Tech: Modification and Repairs
Check valve seems like a good idea. I'll play with that idea when the time comes. I'm not sure I have the problem yet. I've put all new o-rings on my injectors, so we'll see what's going on with pressure once I get this thing running. I also love your shrader valve-mounted pressure gauge. That's on my to-do list too. I'll try the other tricks as well. Thank you guys for your input. -
The last two times I did significant work on my fuel delivery system, I had problems getting my truck to fire back up promptly. The first time was when I removed my bed and replaced my fuel tank and filter. The second time was when I upgraded to 746 injectors. I am now getting my truck back together after stripping engine down to do freeze plug replacement. With that, I've once again had to disconnect my fuel delivery system. Those last two times took me nearly an hour of cranking and trying to feather my pedal to get the engine to fire up. Both times it would sound like it really wanted to fire at times but would peter out until it finally reluctantly started and ran. I had to put a battery charger on throughout the hour-long process to keep it up to charge. I had just recently learned of pulling the fuel pump relay prior to commending work. Unfortunately, I forgot to do it this last time if that makes any difference. So are there any guidelines on performing an initial startup after fuel delivery system work? Does everyone experience this near hour-long process?
-
Back home again, Indiana. Praise God you guys made it back safely. Sounded like a very cool adventure that I'd love to do one day.
-
Intake bolts...Any secret?
coolwind57 replied to coolwind57's topic in MJ Tech: Modification and Repairs
Out of removing and reinstalling the oil filter adapter, motor mounts, starter, transmission, exhaust system, power steering pump, airbox/vacuum lines, drive shafts, coolant sending unit, fuel lines, tranny cooler lines and the two manifolds, that bloody intake back was the hardest part for me. Beyond frustrating and unacceptably time consuming. Rear freeze plugs were a close second place as far as a pain. Transmission was third. I ended up taking the manifold back off, removing the three exhaust studs and placing them in the hard-to-reach middle lower row. I was then able to sit the intake on and that was the magic recipe. I removed the throttle linage assembly off of the intake and that helped a little--should've taken it off to begin with I suppose. I seemed to have had to use a different combination of extensions/u-joints for each of those lower bolts. It sucked but I eventually got it. I'm coming to Prescott, AZ next time this intake has to come off, screw it. I'll gladly pay you well, my friend. Haha Someone must had modified it, as I confirmed last night that I had three. -
Intake bolts...Any secret?
coolwind57 replied to coolwind57's topic in MJ Tech: Modification and Repairs
oohh, this is good! Thanks. -
Intake bolts...Any secret?
coolwind57 replied to coolwind57's topic in MJ Tech: Modification and Repairs
that whole side of the engine has been stripped. I did my freeze plugs and removed it all. Yes, i have used the electrical tape trick when I did my CPS last Month. And I tried it a bit last night, but gaining access and getting a bolt started is the trick here. Another trick is wrapping your universal joint in electrical tape, which make it a bit more rigid and not so loose. Yes, you're probably right. I think that top center one is a regular bolt and not a stud now that I think about it. I swear I was thinking about trying a 1/4" drive tonight. This sounds like a good idea. Best idea that I hadn't tried yet. -
Getting in the cab would be an interesting experience. Especially if you're old and/or fat.
-
Intake bolts...Any secret?
coolwind57 replied to coolwind57's topic in MJ Tech: Modification and Repairs
I did a delete and thought that would really help create some room. Nope. I am still struggling in getting those lower middle/rear ones started. There are three I think, with nut/stud. They were used for the exhaust header. Well guys, you let me down. I thought there was a top-secret, magical tool or technique that existed. Looks like I'll be cursing and kicking just like you guys did. -
Here's a shot of my old versus new motor mounts. Not as much rubber degradation as I expected, but check out the height difference. Replacing wasn't bad. I jacked up engine as I removed bolts. I loosely installed all bolts before I let the jack down and that seemed to help. Pic above does not include the metal jacket that covers over this rubber.
.jpg.591d331b71b3e7ae01642532997fefe3.jpg)
-
Dude I feel like I am spinning in my tracks here. I've given up for the night, but I've got all my intake/exhaust bolts started except for two bottom ones (center/rear). There has got to be some secret to getting them started and secured. I've tried many sizes of extensions, short as well as deep-well sockets, universal joints and I'm so far I'm failing with all. I can't even fathom how the heck anyone can get an accurate torque on them, as the angles and lack of space around them are crazy. I've gotten my tools under the manifold, I've gotten myself under the truck and I'm still fighting to find a solution--and petrified that I'll get a cross-thread. Anyone performed this lately on a Renix? Any secrets or tips you can share?
-
Question: Transmission disconnect lines
coolwind57 replied to coolwind57's topic in MJ Tech: Modification and Repairs
Yea, no doubt. Looks like the new ones would be just as problematic as the old. Probably drives people crazy trying to disconnect them without some sort of special tool. I'll remove the plastic clip then. Thank you. -
Question: Transmission disconnect lines
coolwind57 replied to coolwind57's topic in MJ Tech: Modification and Repairs
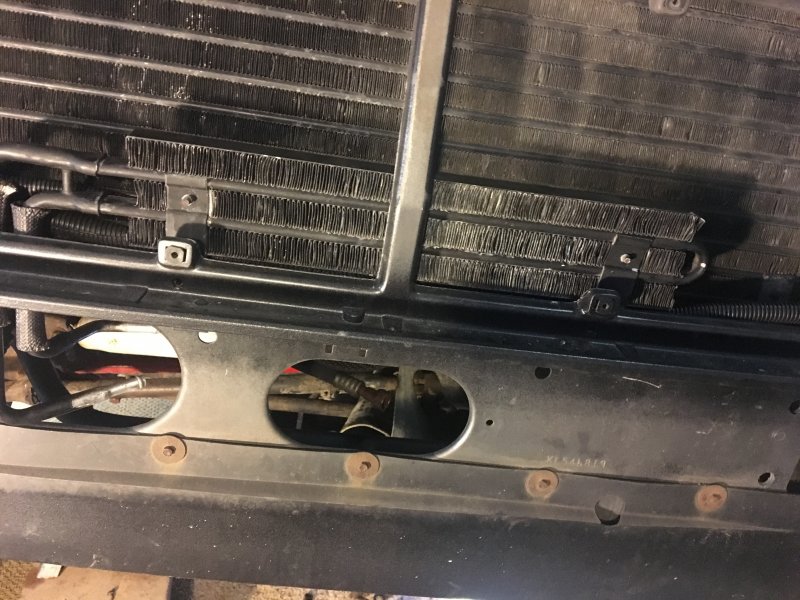
Check out this pic: My new Dorman transmission cooling lines have four metal tabs just inside the opening. Stock do not. This is a joint in the line connecting to the top of the radiator, btw. I still use that plastic clip on the hard line, right? I don't remove it?.jpg.de7e6f5a78668aa277ab277fe89661dd.jpg)
-
Question: Transmission disconnect lines
coolwind57 replied to coolwind57's topic in MJ Tech: Modification and Repairs
I may have just answered my own question. It looks like I didn't fully read the description for Option 2, "Transmission Oil Cooler Line Connector To Oil Cooler" I think this one is for the hard-line disconnect nearest the radiator. It's not one in the same. Sorry guys.