Dzimm
-
Posts
3580 -
Joined
-
Last visited
-
Days Won
11
Content Type
Profiles
Forums
Gallery
Everything posted by Dzimm
-
Post up what you end up using, I'm in need of some as well for my red truck. What's the green wire running along there? Just curious.
-
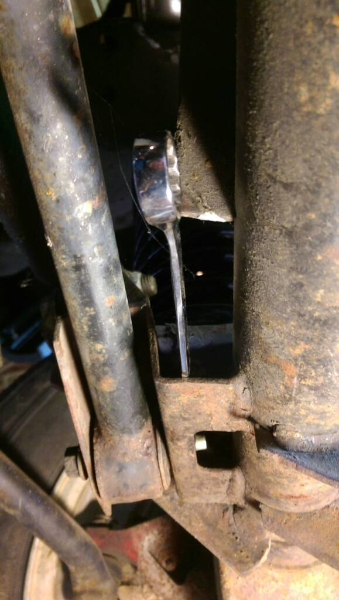
This^^^ I was also able to get a wrench on mine, there is just enough of a gap to get it in there.
-
Final tweaks have been made and I am ready to send you one to make sure it works with the real REM. PM me your address. I left the tolerances a tad large due to potential variation in consoles and REMs since they are 3D printed, they may vary a bit. I'm curious if it'll make any noise on the road with the two piece design. My XJ is still tore apart otherwise I'd go test it out. I will make these available to everyone once JMO413 gets his and makes sure it works and doesn't need any further tweaks. They are roughly 15 hours to print as is so I could get them out 1 a day. Not sure what kind of interest anyone else has in these. Post any other ideas you guys would like to see available for our trucks or XJs. I'm open to custom work outside of Jeeps as well if someone needs/wants something.
-
ComancheKid45 posted this driveshaft length list back in 2010 and figured I'd bring it here for reference. I put your trucks info in bold below. Your stock driveshaft should measure 50" u-joint to u-joint. Go out and double check to make sure that's correct. For the C8.25 you want to lose 1"-1.25" on the driveshaft. There are plenty of 49" steel shafts for sale online for around $150 that come with new u-joints so I'd keep that as your price point for sure. lwb,_2.8,____tf 3speed,____np207,_amc20= 53"_____d35= 54" lwb,_2.8,____ax5-ax4,______np207,_amc20= 53.75"__d35= 54.75" lwb,_2.8,____ax5-ax4,______2wd,___amc20= 63.75"__d35= 64.75" lwb,_4.0,____aw4,__________np231,___d44= 47.5"___d35= 48.25" lwb,_4.0,____aw4,__________2wd,_____d44= ________d35= # lwb,_4.0,____ax15-ba10/5,__np231,___d44= 49"_____d35= 50" lwb,_4.0,____ax15-ba10/5,__2wd,_____d44= ________d35= # swb,_4.0,____aw4,__________np231,___d44= 41.25"__d35= 42.35" swb,_4.0,____aw4,__________2wd,_____d44= 52.125"_d35= 53.125" * swb,_4.o,____ax15-ba10/5,__np231,___d44= 42.25"__d35= 43.25" swb,_4.0,____ax15-ba10/5,__2wd,_____d44= 52.125"_d35= 53.125" * lwb,_2.5,____ax5-ax4,______2wd,_____d44= 63.75"__d35= 64.75" swb,_2.5,____ax5-ax4,______2wd,_____d44= 57.5"___d35= 58.5" lwb,_2.5,____ax5-ax4,______np231,___d44= ________d35= # swb,_2.5,____ax5-ax4,______np231,___d44= ________d35= # lwb,_2.5,____tf 3speed,____np207,_amc20= 53"_____d35= 54"
-
I'd keep looking for better prices on the axles. That definitely is high. Check carpart.com for yards all over. $150-$200/axle is the going rate around central Iowa. Don't be afraid to drive a little to get a good price. For leaves, hopefully someone will chime in who has lifted and kept the 1ton pack. I believe there is somewhere that sells lifted 1ton packs but I don't believe those go to 4.5". If you aren't too concerned about weight capacity, you can get the full lift pack and have no issue selling the 1ton packs.
-
Yes thanks for clearing this up, forgot the first year of the Libby was drums still.
-
Pete hit it on the nose (snout ). It's right around an inch of difference for the C8.25. Typically you would want to measure after install but you can go with an inch and be plenty good.
-
The Libby axle install itself is the same as the XJ. The difference is the brakes. With the XJ drums you just hook your E-brake and brake lines up and go. No changes needed. I don't think it's been mentioned yet but you will need a new driveshaft or to have yours cut down a bit with the new axle as the diffs are slightly longer. I lucked out and found a premade shaft online that was the correct length for my 92 and at a good price. With a Libby axle, you need to find a brake distribution block from a ZJ that had rear disk brakes. You cannot reuse the stock MJ dist block because it was designed for drum brakes and won't work properly with the Libby's disks. You'd also absolutely want to do the dual diaphragm brake booster as well. You also need to buy a conversion u-joint to fit your stock driveshaft yoke to the diff yoke as the Libby uses bigger u-joints. If you have a new driveshaft made you can have the rear of it made with the bigger yoke. Then you have to figure out how to adapt your E-brake cable to work with the disk setup, which I haven't done yet so can't really answer to. I'd recommend to go with the XJ axle if you want an easy swap. If you want the extra braking power, then go Libby. For reference later, for an XJ axle look for a 97-01 XJ, for the Libby look for an early first gen 02-03 era and make sure it has the yoke and not the flange on the input.
-
I'm guessing they probably rub on the lower control arms. If that's the case, you can swap the bent lower control arms from IIRC a WJ to get the clearance. If you want ease and cheaper then just go with the 97+ XJ C8.25. to swap you'll just cut off the perches and shock mounts, weld on new perches in the MJ locations, then attach your brake lines and you are done. The only part you've got to be really careful about is getting the pinion angle correct. Plenty of threads here for this swap for more details. You'll also have the old axle to get measurements off of for the mounting location. If you don't have a welder that can weld the thicker tube, find someone who does. You'd be surprised how easy it is to trade a case of beer for a quick weld job. Id just recommend again that the axle be towards the top of the list, if not the top. Reason I say that is if you do break out in the woods you'll need decent recovery points to get your truck out. You can spend the money on bumpers, winch, and recovery points, or you can spend it on the axles to drastically reduce the chances of breaking in the first place. You can get the axle from most any yard for $200 or less (I payed $100 for my XJ C8.25). Add another $30-$50 for perches and factor in new brakes. You may be able to get a bundle price if you buy the front and rear axle together. For less than $400-$500 tops you should be able to get matching ratio front and rear XJ axles, new perches, and new brakes. Better yet, find a 97+ XJ someone is selling for cheap and part it out to get your axles and make money from the other parts to fund your truck parts.
-
Yeah definitely need a lot of production to get any RTI
-
It's up to you but I'd recommend not changing the tires. The D35 is a light duty truck axle. They are just fine at street driving and mild off-road with stock tires but as soon as you change tires, especially bigger tires off-road, it'll be likely to break. I've also heard stories of guys with stock tires on a street only truck have that axle break. Just not worth the risk IMO. Some guys have also had success running bigger tires on it so it may just come down to luck. If you are going to lift the truck, I'd recommend doing tires last anyway. You may not like the look of the 31s/32s once lifted and want 33s. You also may run into rubbing issues with it at stock height and bigger tires, I can't remember the biggest tire you can go without rubbing. I personally still run stock tires on my lifted MJ because I ran out of money and it was still DD duty up until recently.
-
Hood sure, doors nah too much. Remember stickers can always be removed later. It's your rig don't let us make the decision for you!
-
For hunting you'll hate lifting a deer into the lifted truck. It's not fun to do alone but still doable. I've got the Rusty's 4.5" kit on mine, rides better than the worm out stock suspension for sure. Find out for sure what rear axle you have, you can tell by the diff cover. Most likely it will be a Dana 35 but they did rarely come with a Dana 44. If you have the D35 you'll want to upgrade no matter what since you'll be off-road. Easiest swap would be a C8.25 from a 97+ XJ. If you want disk brakes you can do Ford 8.8 or liberty C8.25. I've done the XJ and Libby C8.25 myself and it's quite easy, cut off all brackets, weld on new perches and bolt it back up.
-
You can get smaller used 55Ton presses for less than $1000. Problem is a 55Ton can only produce a part as big as an inch or two. For taillights we would be in the neighborhood of 400Ton presses and they are huge and not cheap. Add to that you need accessory equipment and a transport company capable of moving it. Youre in the neighborhood of $50k-$100k to get running with used equipment if you can find any. New equipment you'd be well into the $150k-$250k range and that doesn't always include the screw and barrel. Want to add more convenience and automation? Cost just keeps going up. Don't forget maintenance either. Then you need a mold. A simple halfway decent one that can produce a set of taillight lenses would probably be in the $10k-$15k range. You definitely get what you pay for with molds though and they can be much more than that for a really good one. From my experience with molding clear parts, it's a royal PIA. We would run multiple different materials through our presses and when we would change over to a clear part, you had to be really freakin good about cleaning because one freakin resin pellet gets in with your clear and it's all over. We threw out dryers full of clear material due to contamination all the time.
-
I do have MJ 3D models in the works and plenty of ideas with them. It's very difficult to get even lighting on something as big as a truck.... Really need a warehouse and lightning equipment of a fairly bright but cloudy day so there aren't any shadows. I have successfully been able to get a good enough to work from scan of about 65% of the truck. Still working on the rest. I'm not sure what you mean by the shifter boot ring. An antenna delete plug Id have to do some deeper research on due to being exposed to the elements. Definitely not going to last if it were made in PLA. I have ABS on the way to start testing with as it has a little better heat tolerance.
-
And it now fits! I've got a few tweaks I want to make to clean up the print a bit but should be ready to ship soon!
-
I used Fusion 360 for this and a shelf bracket that I made. I may keep looking though because it's not quite as intuitive as I'd like. I use AutoCAD and Revit for work and am trying to think of a way I could make one of those work but not sure it would be any better than Fusion since they aren't really setup for this kind of design. I have extensive experience in Solidworks and it is definitely my favorite but no longer have access to it through work or school and certainly can't afford to buy access to it. I may give OnShape a try for my next design. I've heard some good things about it and is supposedly was created by some former employees that built the Solidworks program. Do you know of any good software that's free or relatively cheap/not a yearly subscription?
-
The redesign was finished over lunch and the main lower piece is printing right now. It should be done late tonight. The upper cover piece I just finished up the modifications to and will print that in the morning. Test fit results for V2 will be posted tomorrow!
-
I am quite jealous of the scenery where you're at. Would much prefer beers around the campfire than the TV.
-
I've noticed that a couple times as well. Staying active!
-
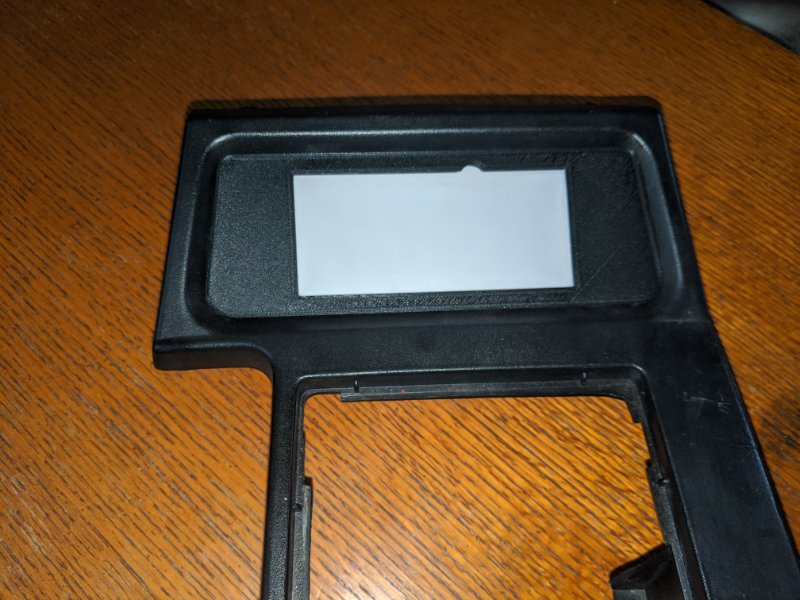
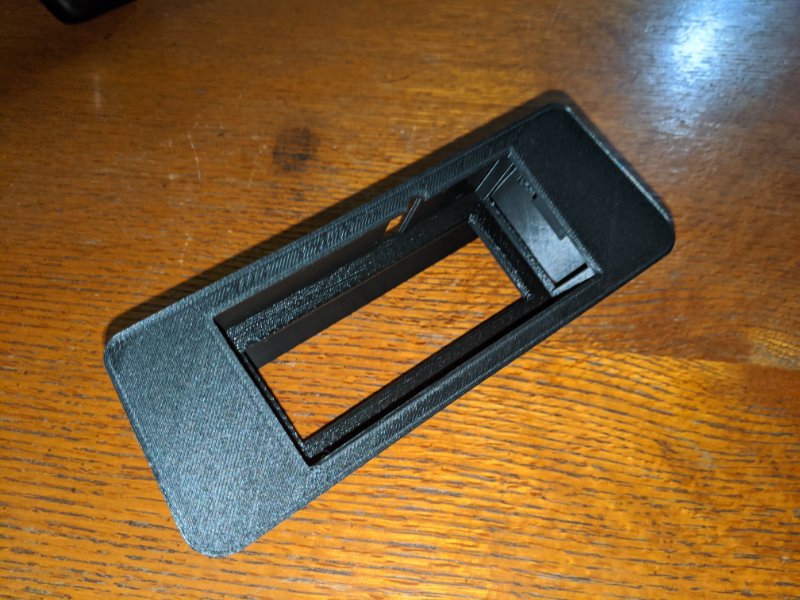
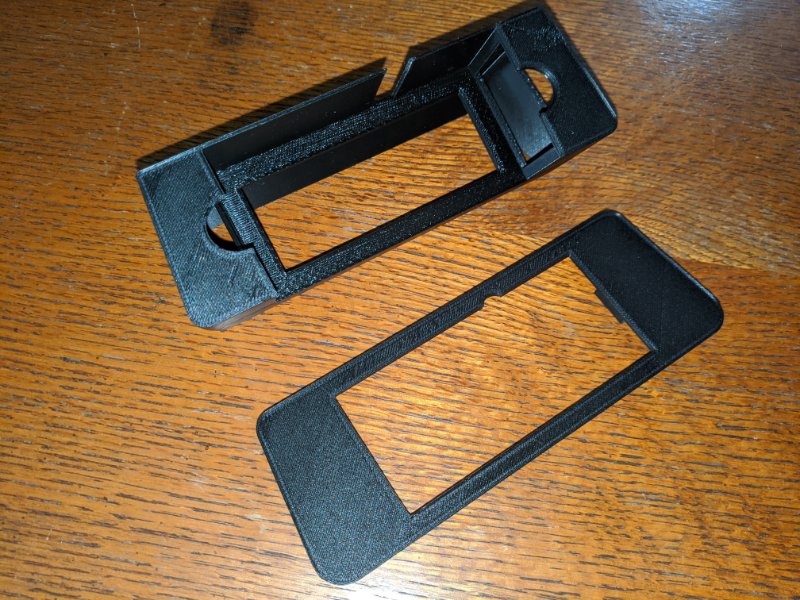
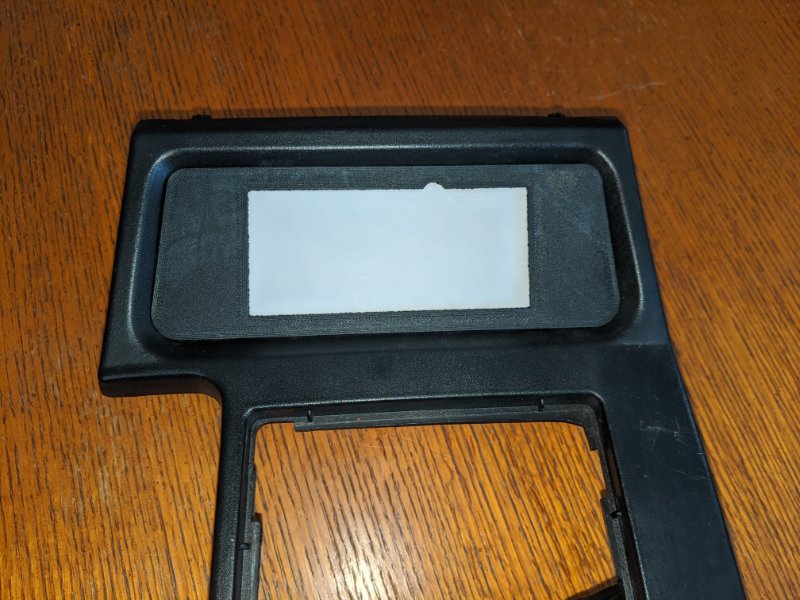
Ha don't worry about it. The prototype is a success! After some test fitting, I cut it into pieces so I could fit individual areas together and learn what all needs changed. I built everything to exact sizes with no tolerance to make sure it was correct and see what tolerances I needed. I will have to rebuild the model from scratch though because of a few angles that need to be adjusted as well as a few design changes I want to make. Ive had a hell of a week with work and today was no different so tonight I'm going to relax and have a few drinks. Tomorrow night I'll get the model rebuilt.
-
Oh man.. the new mobile site is going to take some getting used to. Is the logo meant to be off-center to the left? Also is anyone having an issue with the return button creating a new line then immediately causing the text pallet to close? The "mark forum as read" button is no longer showing on mobile. Will this come back? It's quite convenient to keep track of classifieds posts.
-
The REM blank came out great, the height was off by 1 mm after the print, which I can account for, but it's good enough for a blank. The first version of the console insert is modeled and the first prototype will be printed tomorrow. I've got to make a few printer adjustments in the morning and It's roughly a 10hr print so as long as there is no print failure, the first test fit will be tomorrow night!
-
REM blank V0 is currently printing, once done I will compare it to the measurements to make sure it's correct. Assuming it is, design on the mount will start tomorrow.
-
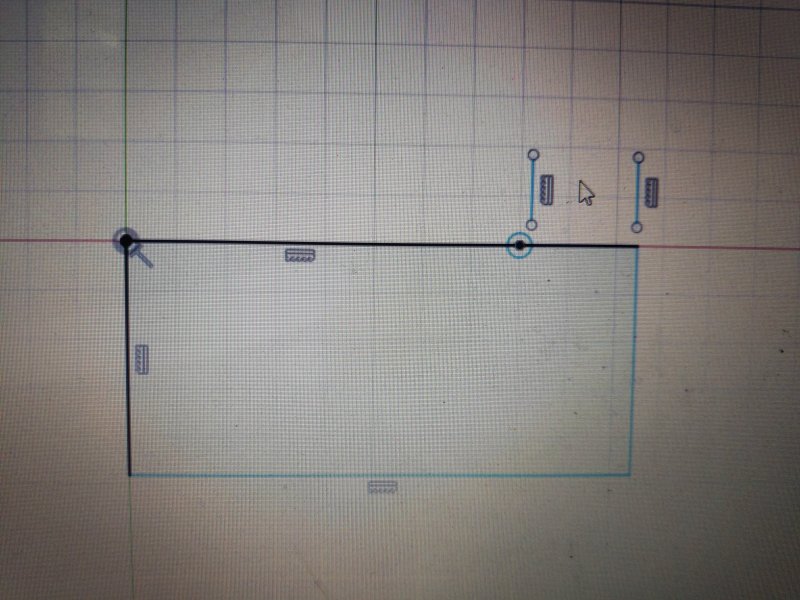
Can you send me the distance to the check engine light from the right edge of the REM? (Where my cursor is at)