

earl*t
-
Posts
419 -
Joined
-
Last visited
Content Type
Profiles
Forums
Gallery
Everything posted by earl*t
-
The Start Of Something... 86' Comanche Custom
earl*t replied to TheDirtyJeep401's topic in Member Projects: Your Comanches
Nice progress young jeeper. It sounds as though you have your plate full. Did the alternator replacement get you back on the road? -
Thanks again for the compliments guys. I should clarify that the auto glass repair company's tech swapped the windshield in my driveway. I assume that's a common practice everywhere? At any rate, the replacement late model Cherokee windshield already had the rearview mirror bracket attached. If I had realized the old and new brackets were different sizes, I'm sure the tech would have switched them. The appropriate rubber trim was also supplied by the installer. I prefer the cleaner appearance of the rubber seal over the original metal trim. Much of the disassembly of my truck was preformed by the paint/body man who was obviously familiar with the process. That's why the doors were so challenging for me. It appears as though the trim needs to roll onto the pinch seam. I've tried numerous times and do not want to damage the trim. I've applied enough pressure to scratch the paint without managing to engage the clips. I think the trim needs firmly tapped with a soft tipped hammer into place but don't want to destroy the trim. " When the rain quits, in about four days, I'll try to post some new pics of the roll pan for my mate "down under". :thumbsup:
-
I've wrapped up a few more minor details this week. The tailpipe was installed, passenger door completed, and the turn signal issue resolved. The trim pieces over the doors have proven impossible to install. I temporarily borrowed my Cherokee's rearview mirror because the OEM retainer bracket is narrower on the Comanche, just an FYI for anyone doing the late model windshield swap. I can't express what a pleasure it's been driving the Eliminator again. I'm discovering annoying little rattles and squeaks that need addressed, but nothing of consequence. I need to spend some time under the hood next. That's pretty much uncharted territory for me, so I'll be scouring the pages here for direction. The plan is just tune up items, problem for me is zero electrical experience. I've read a lot on here that's just "Greek" to me. So, please be patient with my upcoming questions.
-
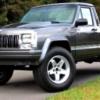
The door on the left is from a Comanche, the right is from a Cherokee. It would require ingenuity to pull off swapping the window mechanisms. The stamped panels are recessed at the mounting points and would necessitate the use of spacers. The Cherokee doors have a reinforcing rib inside the door affixed to the outer skin making them superior is structural integrity. IMHO it is far simpler to swap the entire door.
-
Thanks for your insight Mr. Knever. If I can improve handling and gain the needed clearance it's a win win situation. Mr. Rockwell, I certainly respect your opinion. As a matter of fact, my initial inclination was to do exactly as you have suggested in regard to the stock Eliminator wheels. I even invested quite a bit time searching for a vendor and availability of chrome plated OEM 10 hole Eliminator wheels in keeping with a stock appearance. However, after careful consideration I felt that the retro wheels would clash with the overall theme I've tried to capture. I believe the 17's provide a much more contemporary look. It may be interesting to post a poll and see what the general consensus is. The interior lights are the same many on this sight are using, Euramtec. I used SEM paint to color match the panels. They're reasonably priced and simple to install requiring minor trimming. Thanks for the compliments on my 89 Eliminator. Emblem is finally in it's place but still needs a facelift.
-
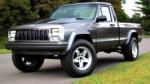
Thanks guys. The Line-X is flawless. I had looked at several other do-it-yourself products but opted for Line-X because of its, in my opinion, superior appearance. I don't know if it's a standard marketing tool but the shop had a 12 oz. beverage can they had Line-Xed. The sides of the can could not be deflected with moderate pressure, the strength of the product is an added bonus. The tech periodically measured the depth of the product as it was being applied, resulting in very uniform coverage. I'm approaching completion with a few unfinished details which include: 1) install rain rail trim over doors, tomorrow 2) replace tailpipe, Thursday 3) finish passenger side door lock and handle, waiting for plastic rod clips in mail, Thursday 4) solve non functioning turn signal issue, hopefully Saturday 5) attempt restoration/polishing of Jeep emblem on front header. If anyone has a line on a "new" or in excellent condition emblem, I'd appreciate the necessary information for acquisition. I'm sure there will be other items that need addressed like paint touch up and buffing that will require assistance. There are other upgrades I'd like to do, but I have another project waiting in the wings that will soon take priority. Thanks for all the views and extending me the courtesy of sharing my project. In the above picture, the front axle appears slightly rear of center that I assume can be attributed to the lift. The resultant tire interference with the flares needs corrected. I'm considering adjustable control arms to rectify the rubbing. Any recommendations on a simpler and less costly solution? I only need about 1/2" to 1" clearance. The preferred solution would center the axle in the wheel well.
-
:rotf: I wish I had hair like that. I'm follicly challenged...ok, I'm bald. I sport a reverse Mohawk. The gentleman in the photo works at the shop responsible for the superb liner job.
-
Other than scuffing, there was no prep. The previous owner still had the original factory bed liner in the truck when I purchased it. Unfortunately, someone cut the liner to access the tie downs. The resultant holes were oversized and un-uniform allowing water and debris to migrate under the liner. On a positive note, the bed didn't have so much as a dimple. I had gone over the entire bed with a red scuff pad. The shop completely went over it again to meet their prep standard. I chose the under rail, premium finish options. I was surprised to see the liner carried over the front of the bed, apparently that's the company's standard. My preference would have been a finished edge under the front lip exactly like the tailgate. It still looks good. Here are a few more pictures with the truck in natural lighting.
-
I concur. The caliber of members here is fantastic. I recently had opportunity to meet and visit with a fellow member in the great state of Texas. Our common bond was surpassed by a cordial, interesting, and genuinely decent young man I now consider a good friend. This description could likely be applied to the vast majority of the members in the CC family.
-
It's been a good day. The plans for today went off without issue. The Line-X turned out perfect. My wife also took the Eliminator for the frontend alignment after the liner job. I'm hoping for a productive day tomorrow.
-
Progress pending, scheduled for Line-X and a frontend alignment on Friday. :)
-
Continue to post the boring stuff. The mundane tasks often have the biggest impact on the project. Your work looks impressive. :thumbsup:
-
Isn't that a pleasure. I have a new found respect for the guys that do that work everyday. They have way more patience than I.
-
Yesterday evening I took the Eliminator out for it's maiden voyage since reconstruction. The ride was just a short ten mile round trip for a fresh tank of fuel. It was for the most part uneventful with only a self inflicted overheating issue. I neglected to tighten the cap on the reservoir, added a little coolant and water and all seems fine. There are still a few minor issues to address. I'm shooting for next week on the Line-X.
-
Hey I'm A New Member, Just Got My Comanche, Please Hit Me Up
earl*t replied to jeepmarine312's topic in The Pub
You win the prize for "most unique color". Welcome to the club. -
:dunno:
-
87 Red Comanche So Far.
earl*t replied to 87shortbed comanche's topic in Member Projects: Your Comanches
Thank you kind sir. -
Precisely! The lock cylinder installation is quite the same as handle installation. At least the clips aren't plastic. The door glass and associated hardware is even more fun. It goes something like this: The first step is to install the wing window. Use extreme care to prevent scratching the new paint on your truck and newly painted wing window trim. After inserting the wing window into place, secure it using the two screws on top edge of the door and the bolt at the bottom. The next step is to slide the door glass into place. This step requires removing the wing window because the door glass will not fit with the wing window in place. After the wing window has been removed, slide the door glass into the door. Next, reinstall the wing window following the aforementioned process tightening the two top screws and the bottom bolt. Now, remove the wing window...the glass will not fit into the door channels from the bottom much like it would not fit from the top. Reinstall the wing window tilting it into place while simultaneously protecting the brand new paint while employing the "one arm crammed into the door from the inside" method to insert the door glass into the wing window channel. Secure the wing window into place being sure to tighten the two screws on top and the bolt on the bottom. The subsequent step of course is to remove the bolt on the bottom of the wing window to reposition the two rods trapped under the bolt. Slide the rods up past the bolt and then reinstall the bottom bolt on the wing window. You are now ready to bolt the door glass to the mechanism that raises and lowers the window. This is accomplished by simply temporarily attaching the crank handle and rotate it until the assemble can be accessed inside the door. Line up bolt, attach spring washer, and screw on the shoulder bolt. Crank the window up to admire your handy work. Now you're ready to install the belt seals and the rubber seals. Crank down the window permitting access to the channels. Insert the "ell" shaped seal into the rearward channel and slide it down. It will not go all the way down, so crank the window glass up enough to employ the "one arm crammed into the door from the inside" method. Grasp and pull down from the bottom while pushing down from the top until the seal is in place. Next, crank the window down. Install the guide into the wing window channel in the same fashion, then the inner and outer seals next to the glass. The final step is to attach the metal trim strips around the glass on the outside. There are two methods. The first is to force the trim into the groove. This technique requires a soft tipped hammer to force the trim into the groove. It also requires assorted other tools to repair the resultant damage of the hammer. Forget about scratching the new paint. The other technique, and my preference, is to initially install the trim. In order to do this...first remove the wing window.
-
Just finished with the passenger side door glass and trim. I still need to reinstall the door panel, armrest, and connect rods on lock and latch assembly. :)
-
Well, your ploy at least half worked on my part. I'd also be willing to bet that several members remember Ben's showcase even if they don't chime in. Until recently, I've been awol on the site, so I suppose I missed said showcase. I'm a firm believer in giving credit where it's due. Along with Ben, there is an incredible amount of talent, knowledge, and creative experience represented in the Comanche Club. Keep up the good work. :thumbsup:
-
87 Red Comanche So Far.
earl*t replied to 87shortbed comanche's topic in Member Projects: Your Comanches
Quarter inch is very substantial. In your posts it appears you do a little tail draggin on approach angle. I'd guess the plate is reinforced to the frame? If it works for you, I'd like to borrow your design. -
The wheels kinda give it a gangster look. :thumbsup:
-
87 Red Comanche So Far.
earl*t replied to 87shortbed comanche's topic in Member Projects: Your Comanches
The landscape is incredible. Could you give us a closer look at your rock rail and rear bumper. The bumper appears to be exactly how I intend to build mine with additional side protection. -
What Did Your Wife Do To Your Comanche Today?
earl*t replied to earl*t's topic in Member Projects: Your Comanches
I took the Overland Eliminator out this morning for a short combination trail ride/spring shake down snow run just a few miles from home on an ORV trail. \ It got a little dicey just prior to the ridge. It required pawing, back tracking, and packing to reach the apex.