Gjeep
-
Posts
1221 -
Joined
-
Last visited
-
Days Won
3
Content Type
Profiles
Forums
Gallery
Everything posted by Gjeep
-
The 1992 Jeep Comanche Of My Dreams (Well, Almost)
Gjeep replied to cavalier's topic in Member Projects: Your Comanches
Nice find. I've installed AC in 2 trucks now -- one a few months back, 1991 MJ same era as yours. Not sure what regulations/ your preferences are for refrigerant, but I upgraded both of my HO era MJ's with the later 1995 XJ factory R134 system. If you decided to go this route ping me as I can provide you the necessary part#'s. In general, you'll need a new heater/evap box under the dash as it is different than the non-AC box. You'll also need an AC truck (XJ/MJ) vacuum harness that runs just above the box assembly. You'll need an AC dash control bezel and I'd suggest a heater core based on your miles (get a quality copper brand, factory is no longer available); and an evaporator (again quality) for inside the box. All the lines under the hood, drier, condenser for in front of the radiator, relief valve, cut-off switch, engine bracket for the compressor, a compressor, expansion valve (sits between the evaporator and engine hoses, and I'd suggest a new blower motor as my first gen XJ's typically started to fail around 250K. If you're scavenging from a wreck of the same year (R12 system) you'll probably have most of what you need. But but new items as I mentioned above. It's a job. Time consuming, but worth it. And I suggest removing the dash entirely to access the HVAC box. A lot of guy just pull the passenger side out, but my thinking is it's bound to bend and break things.. Just take your time as ask questions as you need. -
Project: Slippery Slope – a ’91 MJ runner
Gjeep replied to Gjeep's topic in Member Projects: Your Comanches
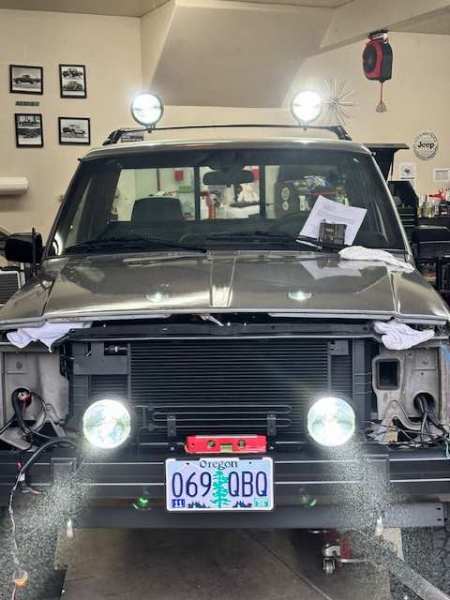
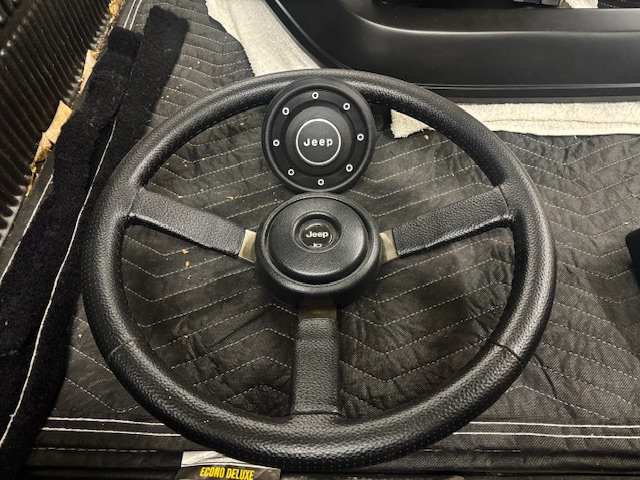
Moving forward after a week away… Black leather Omix-ADA steering wheel is in with XJ Renix era horn hub in place. Just looks better than the HO era smooth hub. Has character. With the airdam in place, it was time to install the tow hook assembly. It’s rare when installing factory tow hooks that a drill is not needed on the front crossmember holes to get them to line up to the reinforcement bracket. This Jeep was no exception. The passenger side was for the most part lined up but driver side top was off. Since this Jeep will be my daily driver, I opted to refinish a straight factory front bumper versus running a new one. Keeping with that theme, I chose Crown end caps instead of NOS Mopar. I was impressed with how easily it installed and to proper shape the passenger side end cap was (pic below). As I moved to the driver side I was thinking – wow, the aftermarket parts have come a long way in fit/ finish. Then the top hole of the driver side was a whole 1/4” off, while all else lined up. Easy enough to carve back the top-side hole but would take much to get it right in production. Lights on! Factory TJ fogs have 5700K LED bulbs installed to match the (arriving this week) Holley RetroBright 5700K headlights. I’m currently running these RetroBright’s on my ’97 XJ and am amazed at how bright they are. My wife and I went from an overly lit city of San Jose, CA to a town that has no street lights on rural roads and highways for the most part. And we’re on the outskirts. I know there are plenty brighter LED fog light options out there, but I just don’t like the look – trying to keep it as close to Jeep factory as possible. Time to finish up the front suspension and align it.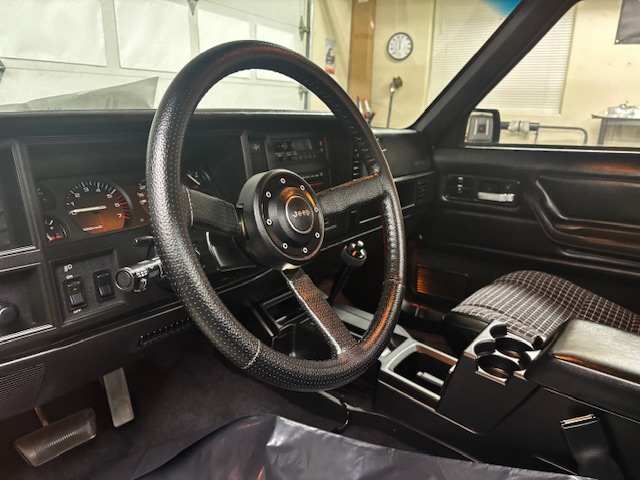

-
Project: Slippery Slope – a ’91 MJ runner
Gjeep replied to Gjeep's topic in Member Projects: Your Comanches
From 2 to 1… Drilled out, cleaned and refinished. Always takes a little bit of doing. Fun fact: the very very early assemblies were screwed together and much easier to disassemble (but difficult to find).


-
Project: Slippery Slope – a ’91 MJ runner
Gjeep replied to Gjeep's topic in Member Projects: Your Comanches
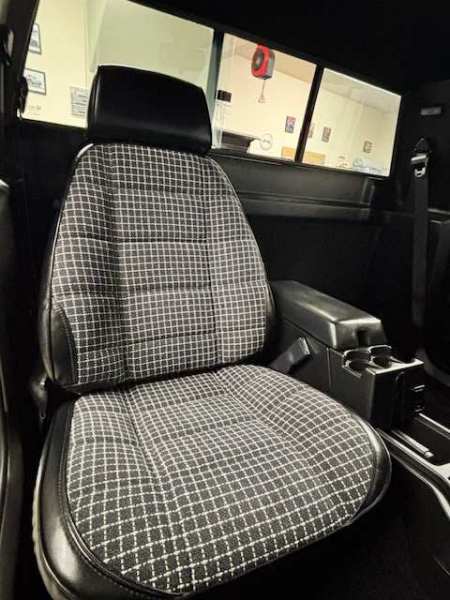
Black Mesa fabric seats are going in. These are XJ variants of the buckets, as they don’t have the upper strip of carpet as factory MJ seats do. I prefer this style with the full vinyl surround. As for the flooring, I went with Husky slush mats as they come molded in black and fit well. Some pics of Pioneer compact sub under the passenger seat. Fit is perfect and sounds great – not competition thump but rounds things out very well. The front of it has about 1/8” before touching the seat bracket mount backside.


-
Project: Slippery Slope – a ’91 MJ runner
Gjeep replied to Gjeep's topic in Member Projects: Your Comanches
Getting there... Jeep should have kept the black interior throughout the Renix years at least. Cordovan, Navy, Charcoal, and Tan interior colors were all good and unique colors that worked well on MJ/ XJ.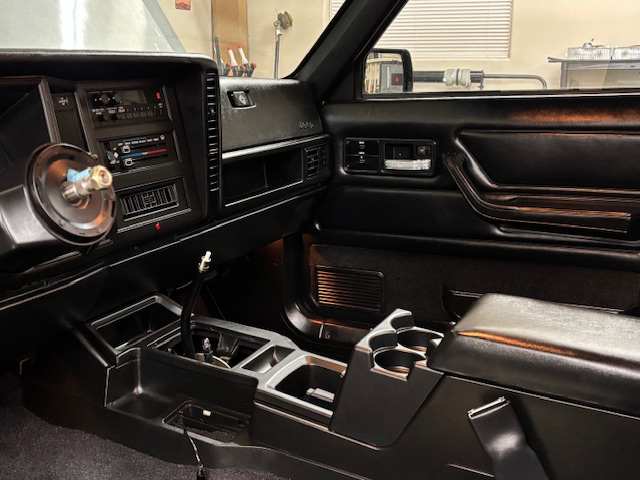
-
Project: Slippery Slope – a ’91 MJ runner
Gjeep replied to Gjeep's topic in Member Projects: Your Comanches
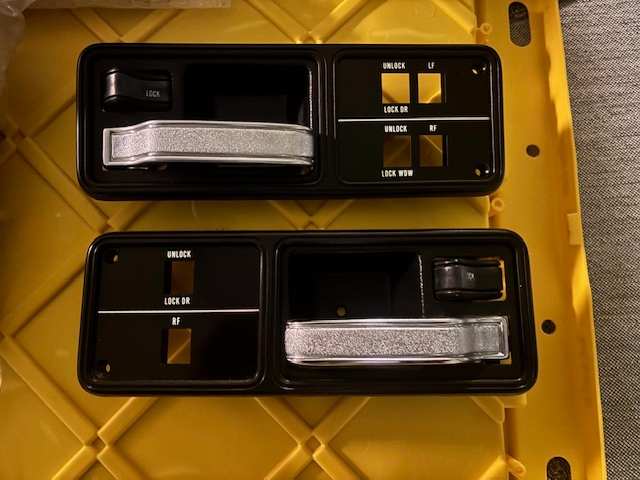
I was deciding between chrome and black door handle/ switch bezels… Going with black to keep things sinister. While going through parts, I unearthed these assemblies I put together back in 2001. Forgot all about them. Originally planned for these to go on my red MJ. Crazy how long ago that was.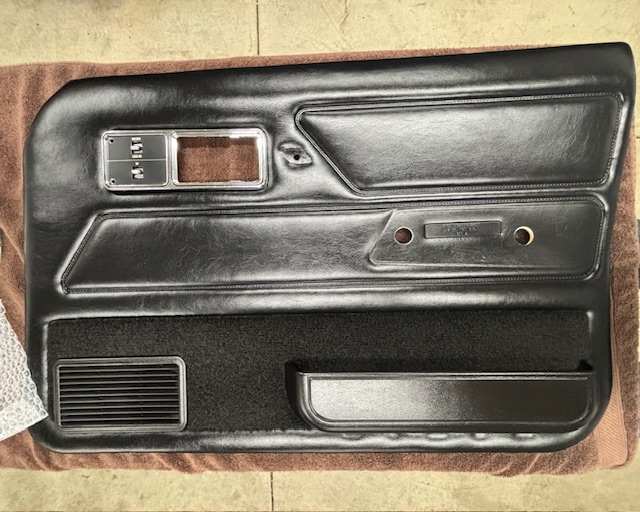
-
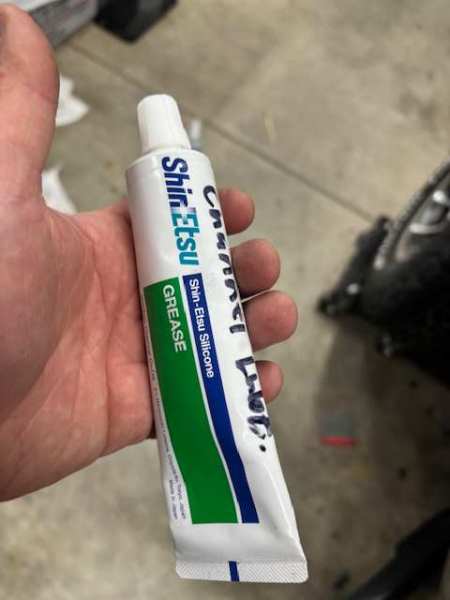
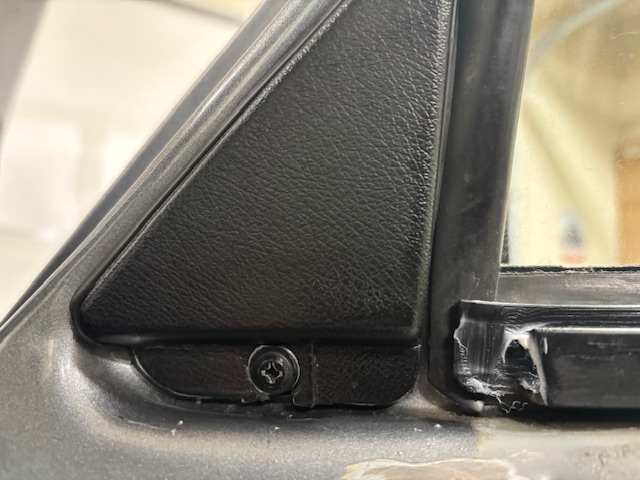
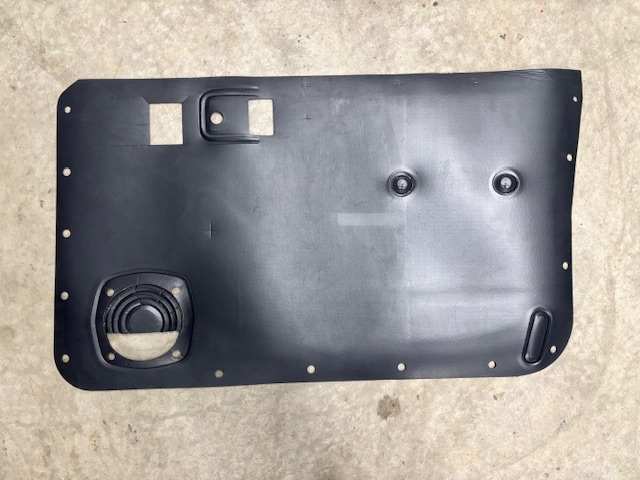
Project: Slippery Slope – a ’91 MJ runner
Gjeep replied to Gjeep's topic in Member Projects: Your Comanches
Door panels are reassembled and vinyl conditioned prior to install. This is passenger side. I use channel lube to put under the inside mirror cap and inside the rubber channel the door panel hangs on in the hopes of if I ever need to remove it doesn’t get stuck (risk of vinyl tearing). This brand lube is hands-down best as it’s not oily/ runny. Toyota and Honda use it during their factory assembly and I’ve had good luck with it.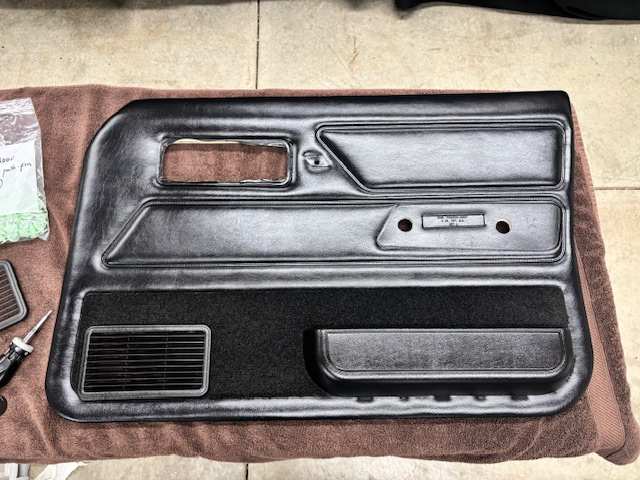

-
Project: Slippery Slope – a ’91 MJ runner
Gjeep replied to Gjeep's topic in Member Projects: Your Comanches
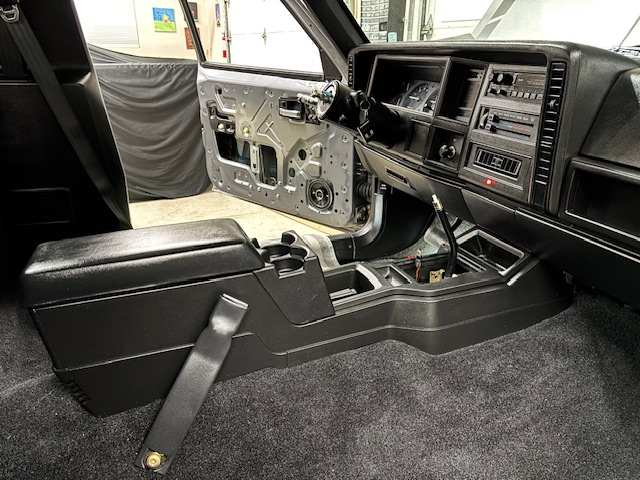
Center console is in, complete with under the lid BT hardwired aux connectivity/ phone charger combo. Lower dash panel also in place. Chemical Guys Satin Shine Protectant on everything. No doubt there’s many better functioning cupholder setups for the first gen console these days thanks to the 3D printing world, but this one looks right. And I’ve never had issues with canned drinks. One thing I’ve always done since my ’86 XJ back in high school is put door edge guard around the middle area the hand brake comes up as I don’t want to gash up the new ebrake assembly should I use it. Finally, upcoming project is disassembling and refreshing the console gear select bezel. I have 3 of them to cobble together one good one. After that, door panel installation.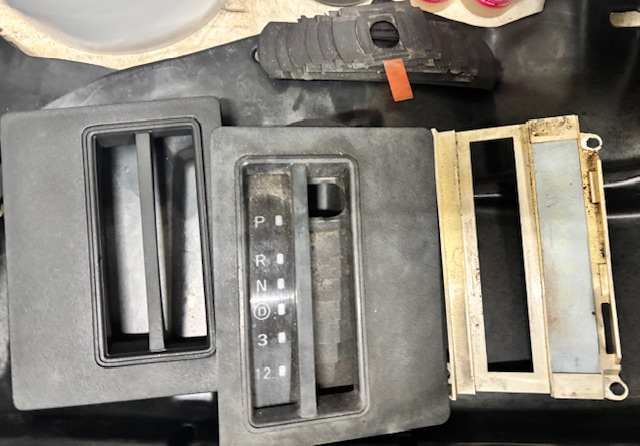

-
Project: Slippery Slope – a ’91 MJ runner
Gjeep replied to Gjeep's topic in Member Projects: Your Comanches
Getting the interior back together…
-
Project: Slippery Slope – a ’91 MJ runner
Gjeep replied to Gjeep's topic in Member Projects: Your Comanches
Went with the 97+ XJ windows on this MJ also. I prefer the cleaner look/ less complexity. The lower window trim is the first gen with long long ago purchased Beijing XJ window wipes as I could never find in the States a supplier of this style wipe that you could buy in bulk length or anything close that would fit. Believe me, I looked. The first gen 2-dr wipe is unfortunately too short...and I don't like the 97+ style wipe/ trim piece. This MJ gets power exterior mirrors also.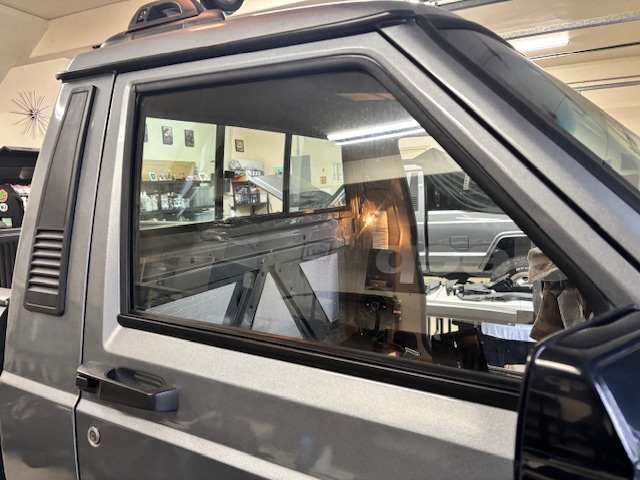
-
Better than new -- and not a dent in that bed.
-
What year is your MJ? I modified those B-pillar lights for my HO era MJ's to come on with rest of the interior lights with doors/ headlight rotate left switch on. The B-pillar light itself is always at on-center and cannot be switched on independently like factory units (as I did not want it to).
-
Project: Slippery Slope – a ’91 MJ runner
Gjeep replied to Gjeep's topic in Member Projects: Your Comanches
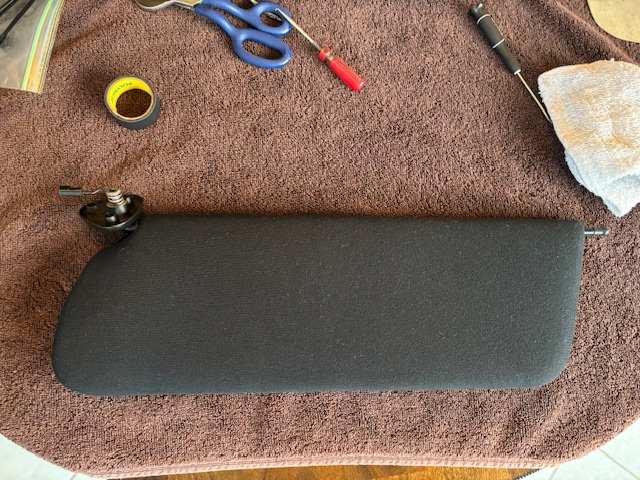
Sun visors ready for install. Installed.
-
Project: Slippery Slope – a ’91 MJ runner
Gjeep replied to Gjeep's topic in Member Projects: Your Comanches
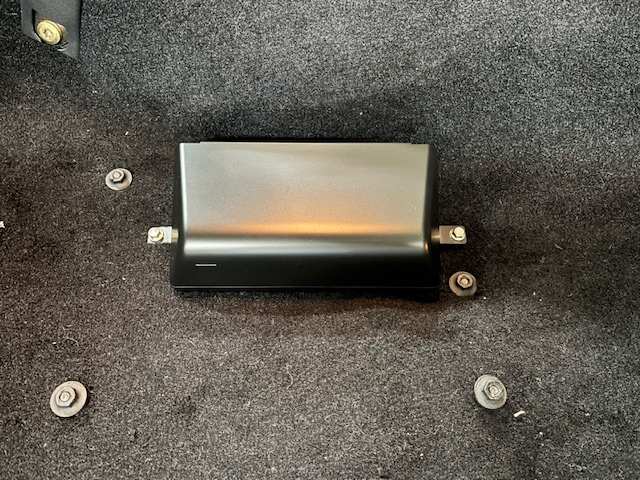
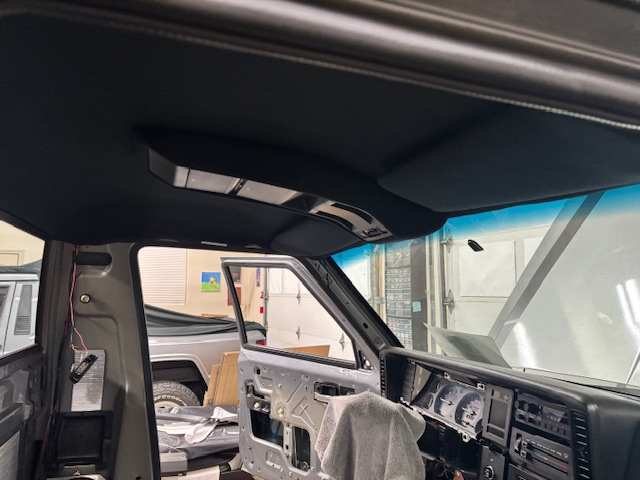
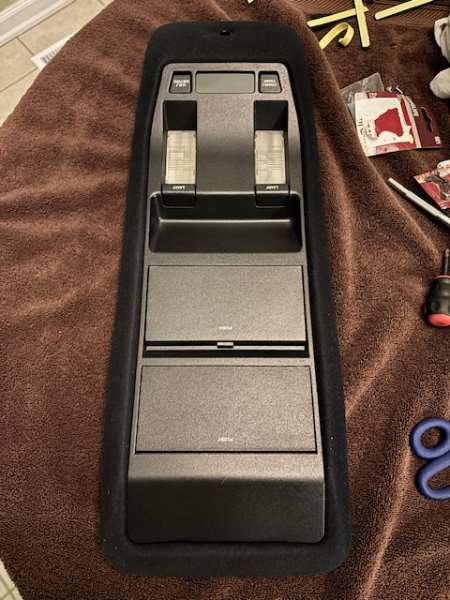
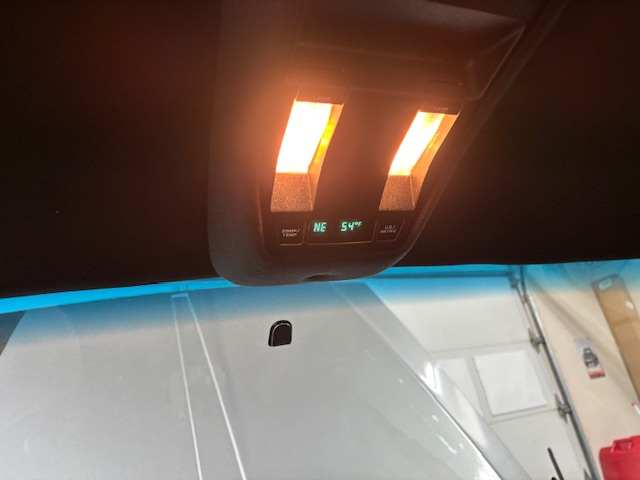
Overhead console has been assembled, installed and working. The front of it is hung similar to the XJ, though the XJ bracket has been bent to follow the higher Comanche’s roof line. The rear is kept in place using a cut-down SJ bracket adhered to the roof and attached via the same screw/ mounting hole the Wagoneer uses in the sunglass bin. Time to cover the sun visors…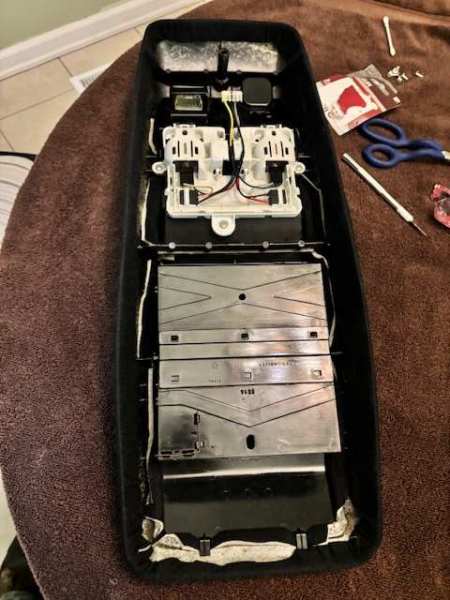

-
Project: Slippery Slope – a ’91 MJ runner
Gjeep replied to Gjeep's topic in Member Projects: Your Comanches
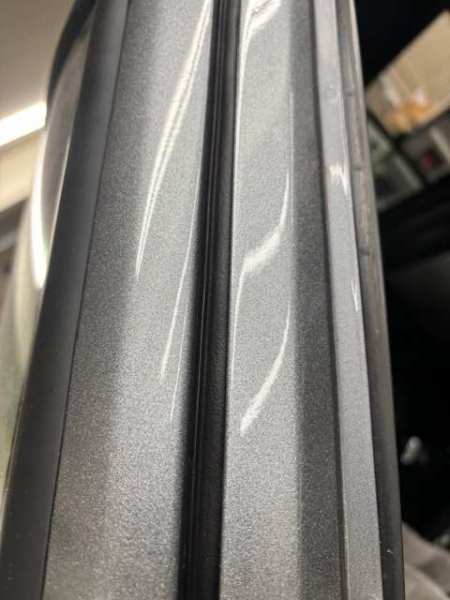
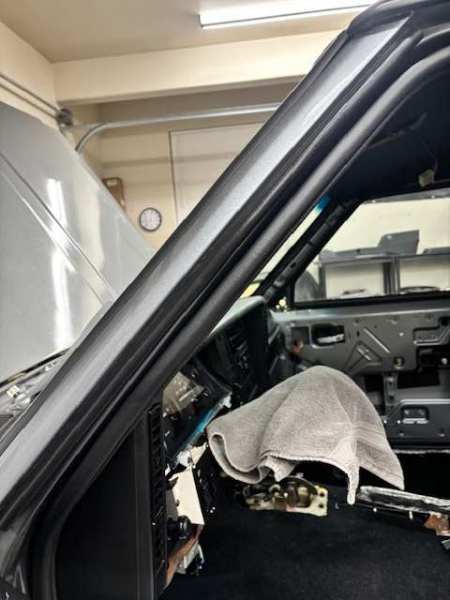
Finally done trimming the carpet/ getting whatever electrical that needs to be through into place and test-fit a scrap center console for any gaps. Always a pain-staking process with the carpet, as typically the mold is off somewhere. It seems ACC must start the stamping process on the passenger side because the driver side is 99% of the time where the contouring with a heat gun needs to be done…this goes for both MJ’s and XJ’s. BUT, I’m thankful they’re still producing these for our builds. New 97+ XJ door seals were used on this build as with the other as the larger, oblong seals just seal better both noise and the hose. I re-hung/ shimmed the driver door as the gap was off, driving me nuts. For the a-pillar exterior, I split the difference between the new and the old-style seals, using a 3M weather stripping near identical to the ‘97+ XJ cowl to hood seal. It fits well and looks OEM.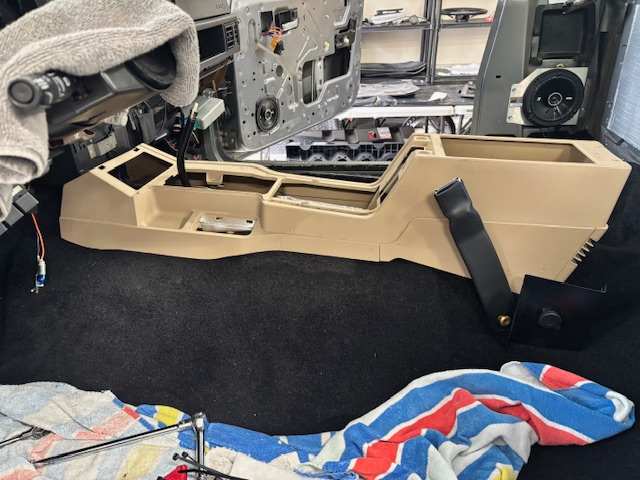
-
Project: Slippery Slope – a ’91 MJ runner
Gjeep replied to Gjeep's topic in Member Projects: Your Comanches
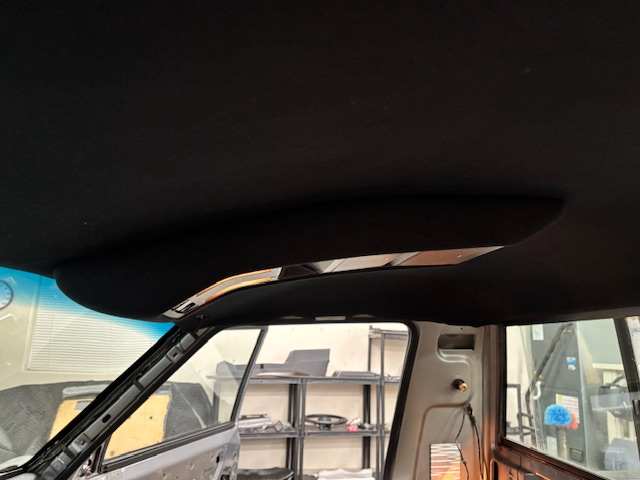
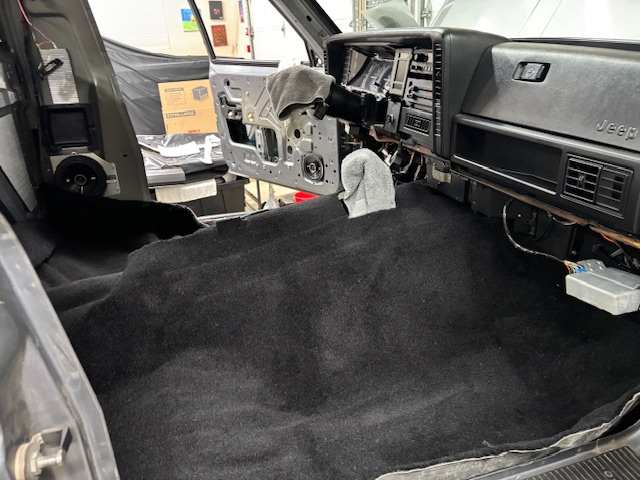
Headliner is up and carpet dropped in. Final trimming is work in progress to get fit 100%..
-
Spectra tank is great, but those new straps no matter how you try and bend them won't be right. Use the factory straps -- if yours are rusted, find some factory straps on ebay/ FB marketplace. You'll also want to identify the straps when you remove the tank 'front' and 'rear' as they will be shaped to fit accordingly.
-
Project: Slippery Slope – a ’91 MJ runner
Gjeep replied to Gjeep's topic in Member Projects: Your Comanches
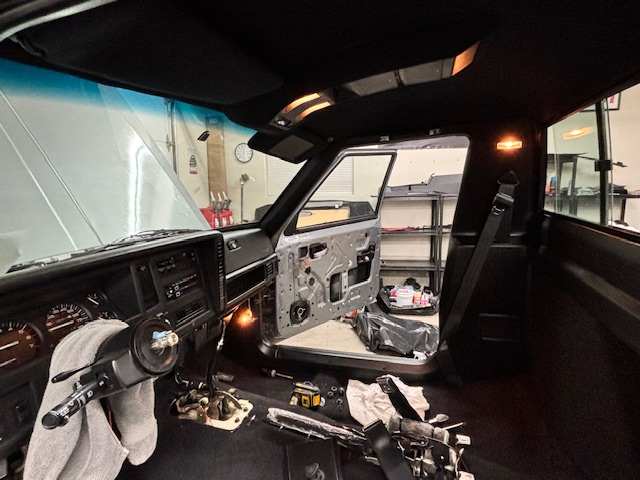
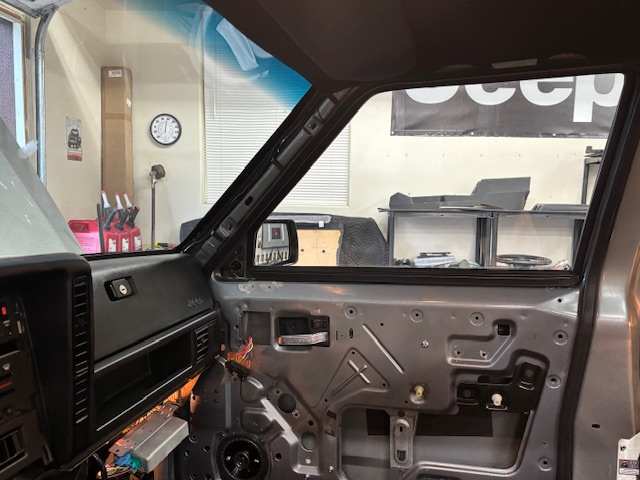
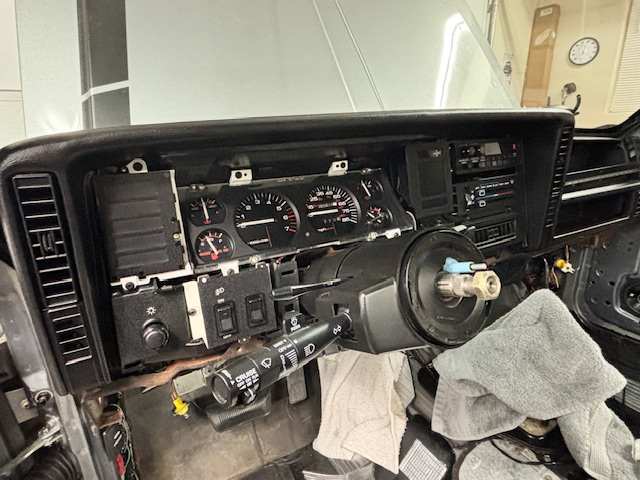
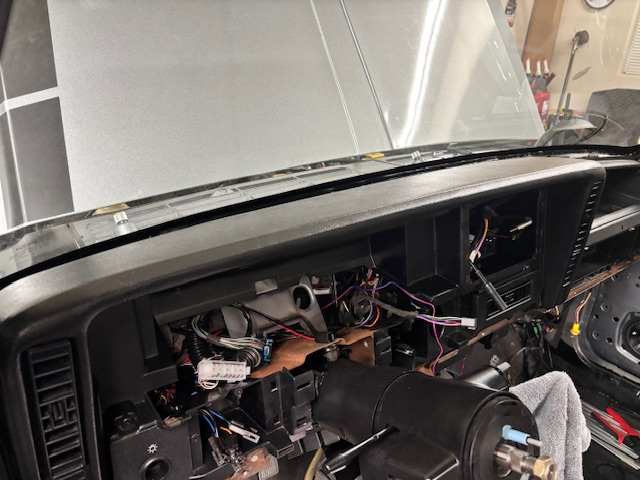
Continued assembly of the dash… Factory radio in place with BT connectivity a la RediRad unit which fits perfectly in the ‘Y’ opening of the defroster duct up against the firewall. The AC bezel, gauge cluster, first gen clock, cigarette lighter, and rocker switches (fog lights and efan override) in place and working as they should. Was stumped at first as to why headlight switch wasn’t turning on the interior lights when I clicked left– then I remembered the ground. Important. For the efan override rocker, I always use the face of the XJ rear wash/wipe (which is identical to the fog light switch except it does not have the notification ‘on’ light) because for the HO era XJs/MJs the efan is triggered off the PCM by a ground. So, no light would be illuminated when switched on.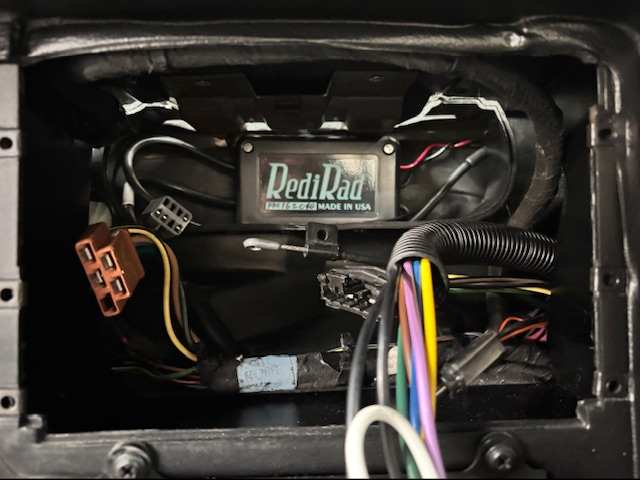
-
Project: Slippery Slope – a ’91 MJ runner
Gjeep replied to Gjeep's topic in Member Projects: Your Comanches
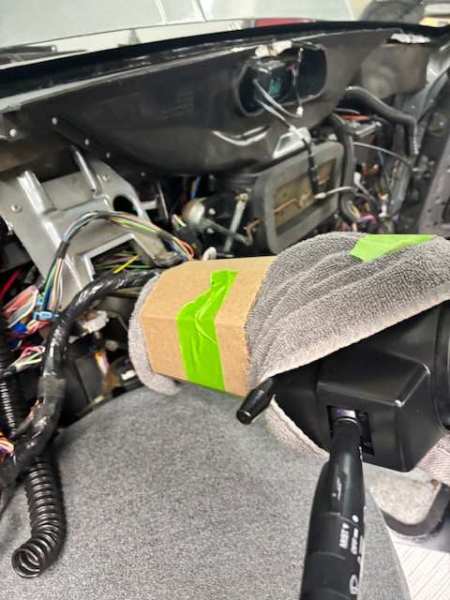
I was determined to get the dashboard in – and 5hrs later it’s done! Ready for 2026 now. No doubt I could have gotten it in faster, but I took my sweet time as I didn’t want any damage. Also, I wanted the wiring to line up properly, and ziptie it to the behind the factory mounting points. Forgot how much fun this is... head up under the dash and hands looking like they were attacked by a feral house cat. I’ll call it 98% installed… I still need to shift the dash 1/8” to the right to center steering column dead-on. This dash (and entirety of the black interior) came from a parts MJ I bought back in 2019 off Craig’sList in North Carolina. Its interior was minty so I shipped it to the west coast to strip it down. It was a farm truck, a black ’86 XLS 2.8L, 5-speed 4x4 with 75K on the clock. It ran well but turned out to be a gross polluter, so I decided at that point she wasn’t a keeper. But before selling it, I taught all 3 of my daughters how to drive stick on it. The interior was gutted, nothing but a steering column and seats. My wife was horrified, but they learned. That truck was nicknamed ‘The Beast’. Goodbye tan, column shift, bench seat interior. Next up, getting the headliner and overhead console in, as well as recovering the visors and installing those.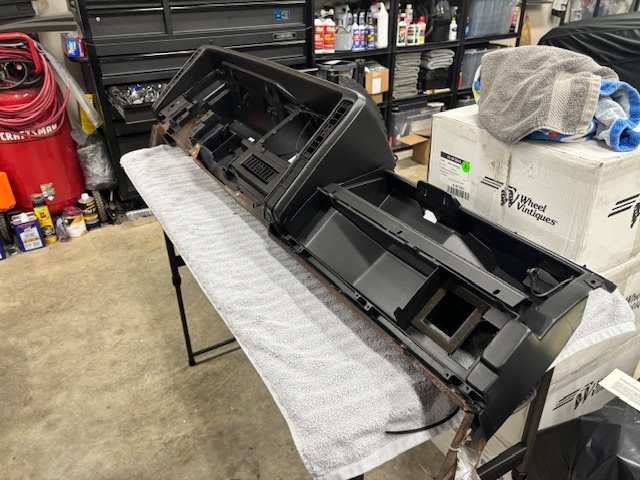

-
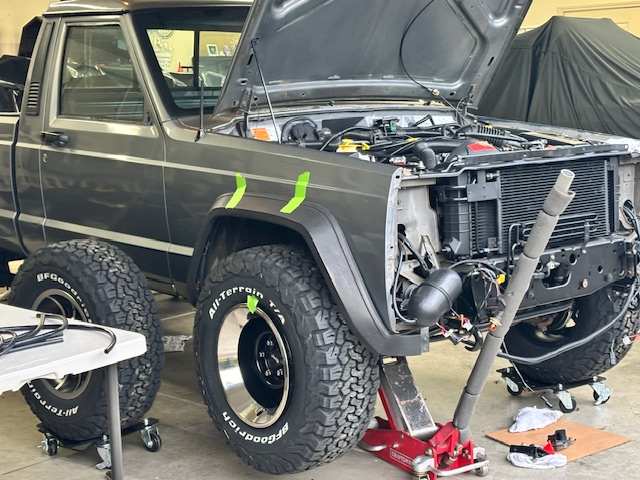
Decided that the XJ/MJ factory steelies widened as they are and even possibly painted matte black (versus the current argent color) wouldn’t work with the graphics of the truck. Tooooo many slots and too much visually going on in those factory rims that detract from the direction I’m taking this project. Will save those for another build. Bought and returned a number of wheel possibilities, but the only one that felt right from the get-go were these 15x8 Mopar steelies (4.5” BS) I just took delivery of. Love ‘em. Once I decided on the wheels, I then went through a plethora of center caps, settling on something clean and simple. Had a silver color matched Jeep logo insert made to finish things out. Chrome lug nuts and the same NOS 15x8 Corvette Stingray era trim rings will be used for pop on these rims. The trim ring in the current pics are cheapie Amazon sourced 15x7’s just for visual. This Stroker MJ will still be running 31” BFG’s and the stance this wheel/ tire combo provides gets two thumbs up. The pics show it mounted on my ’91 MJ guinea pig as it’s the one with the work in progress graphics in place also. The Stroker MJ has another 1.5” of lift on the nose end of it and at least 2+” more in the rear.


-
Project: Slippery Slope – a ’91 MJ runner
Gjeep replied to Gjeep's topic in Member Projects: Your Comanches
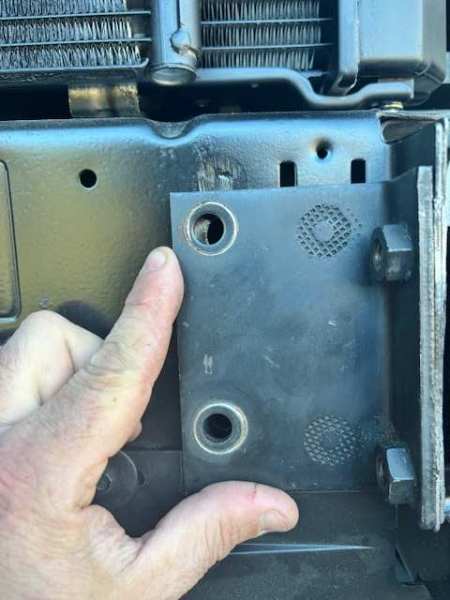
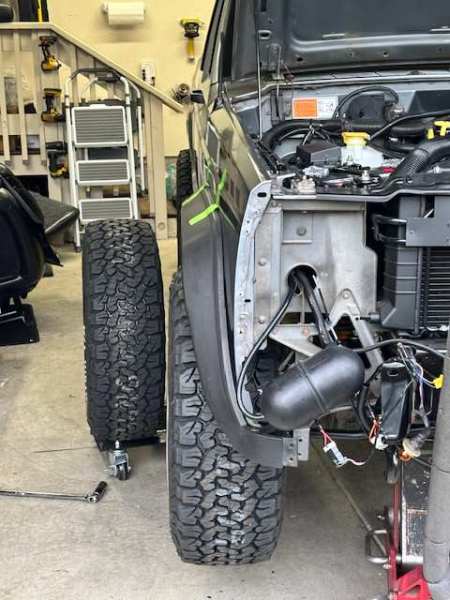
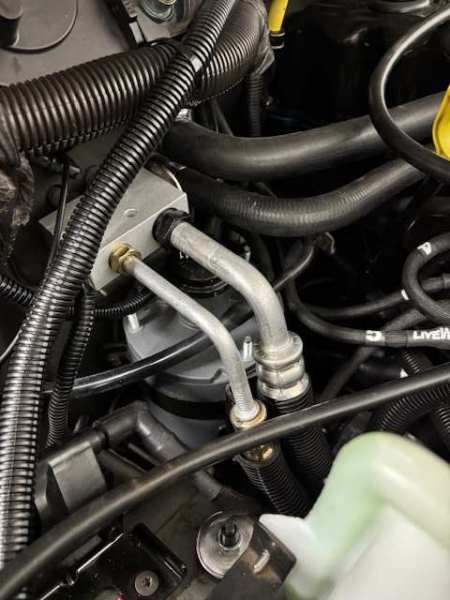
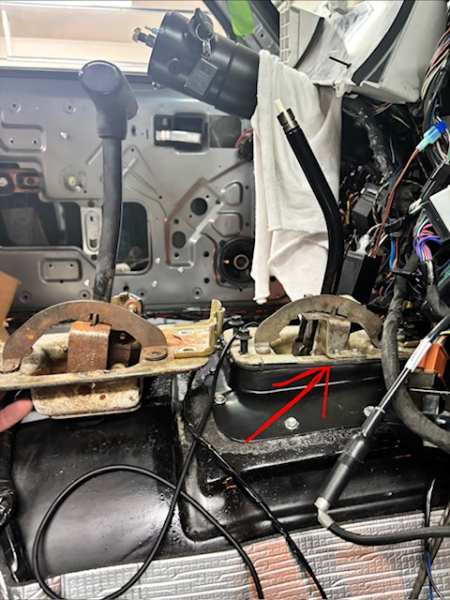
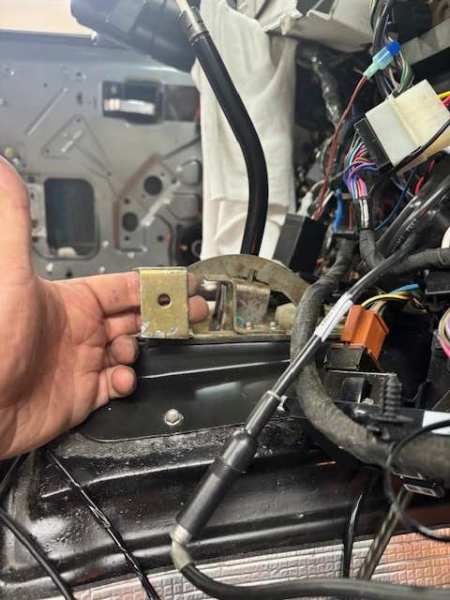
I took some time to ponder on the engine vac lines and how they’ve been run. Originally, I followed the web on how best to install with the U-shaped manifold on the OBD1 MJ’s and XJ’s…meaning cap/ do not use the large side center vacuum port of the manifold. Having some vacuum line issues/ cracks discovered on this build I decided it best to run a 99+ XJ firewall vacuum hard line (with check valve added in) that connects to that large side/center port and serves as the dedicated engine HVAC and cruise control main supply. Plenty of vacuum. And as a bonus, the newer line is a slightly larger diameter than original MJ one and extends forward from the firewall at the heater core a good 5” so it’s not laying on top of or near the heater core hoses. The MAP sensor has a dedicated intake top side port and the charcoal canister small line and rear of valve cover PCV share a smaller port on the side of the intake on this truck. Engine purrs. Will be revising my Stroker MJ vacuum lines similarly. I’ve always preferred the angle of the AW4 shifter on the 97+ XJ’s. When I first got my ’01 XJ long ago I couldn’t immediately figure out what it was about the seating position that was different from my ’95 XJ when shifting between gears. Took me a minute to figure it out and then realized the newer XJ’s had a bend to their shift lever. Many, many moons ago I grabbed a couple of the newer style shift levers in the wrecking yard just in case I got an AW4 MJ…and then 20+ years later I got one. Here are the two shifters front/ back showing the difference. I needed to drill out the console bracket to put on the newer shifter (and cut a bracket off the newer setup that is for the second gen console). Done.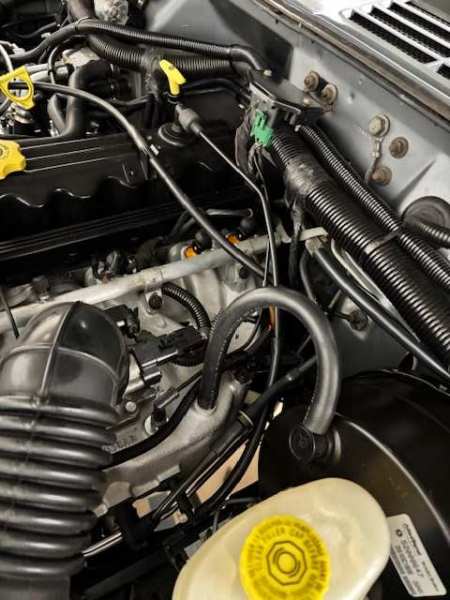
-
Project: Slippery Slope – a ’91 MJ runner
Gjeep replied to Gjeep's topic in Member Projects: Your Comanches
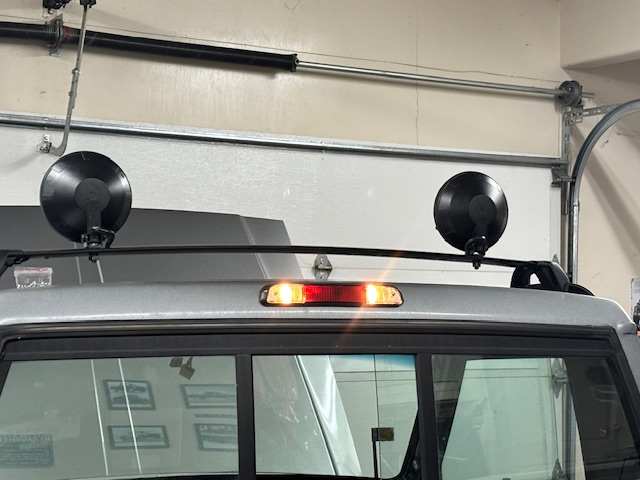
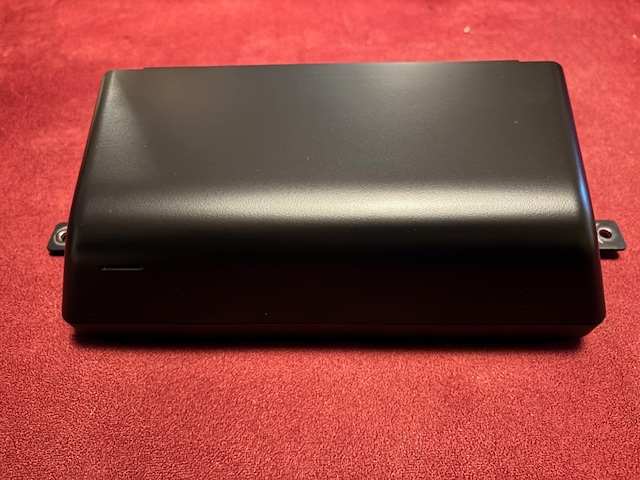
Adventure of day was getting the light bar secured. Two seam-sealed nutserts per side were put into place with all the light bar components freshly painted (yesterday). The nutserts are not visible from inside the cab as there is inner support from a-pillar to b-pillar so they won’t be poking into the headliner once installed. Wiring connects at the driver side b-pillar light and has been rattle-free wrapped and tucked away inside the b-pillar. Also got the third brake/ cargo light installed. I have the cargo light tied into the interior lighting of the truck. Never was a huge fan of how Jeep had that as a separately switched item. Additionally, I want to keep the right-side switch pod empty/ available should I decide to add a winch in the future. Left of steering column switch pod has the bumper fog lights and efan manual override switches. I’ll move the truck outside in a couple days as rain is expected for the next couple weeks to see if there are any leaks. Then onward to installing the headliner and rest of the interior. Last but not least, I disassembled the Pioneer subwoofer and painted it black. That blue/gray color with Pioneer logo wasn’t going to work. Beautiful.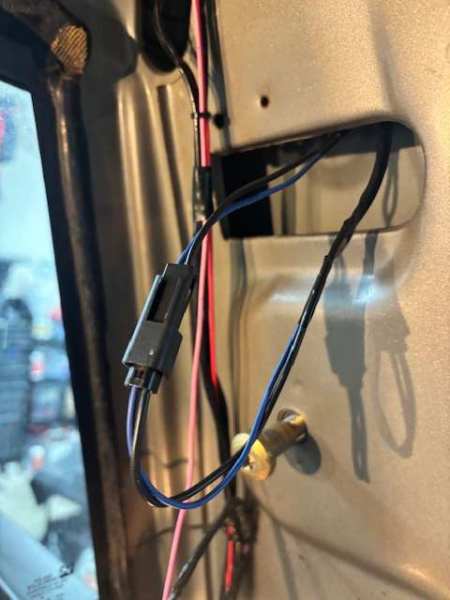

-
Project: Slippery Slope – a ’91 MJ runner
Gjeep replied to Gjeep's topic in Member Projects: Your Comanches
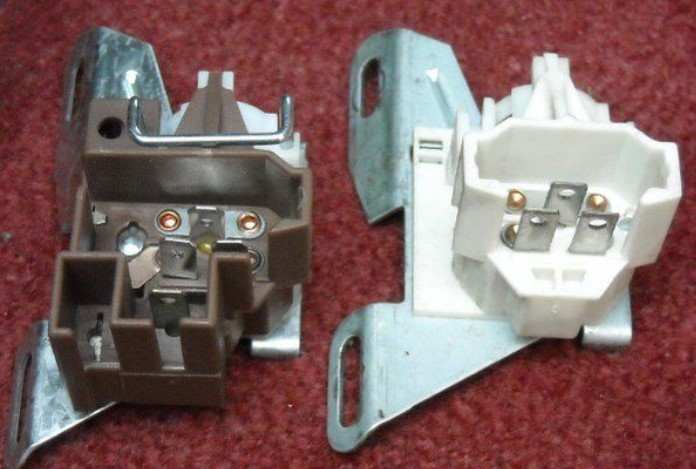
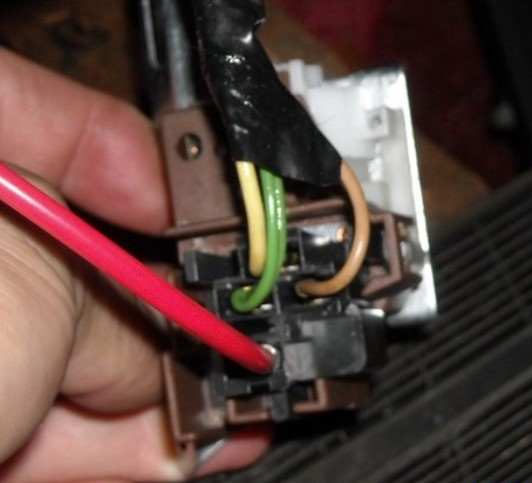
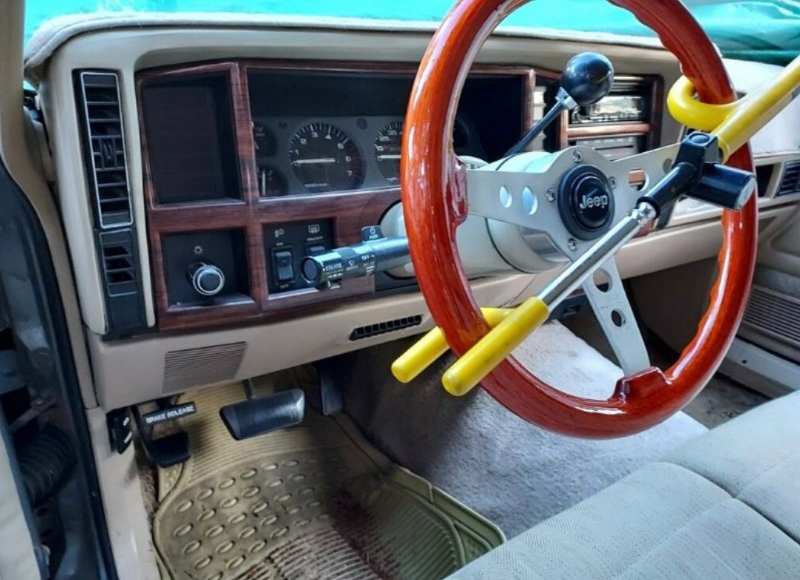
My '89 had it, my '92 has it, but my '91 does not... and I just figured out why. This NOS steering column is 1987 vintage, so it makes sense. I just looked at the original steering column and it indeed has flash to pass. This will be more or less plug and play. -
Project: Slippery Slope – a ’91 MJ runner
Gjeep replied to Gjeep's topic in Member Projects: Your Comanches
Interesting -- I'll check out the connector on my '91. Odd they didn't just pop in the flash to pass switch then. -
Project: Slippery Slope – a ’91 MJ runner
Gjeep replied to Gjeep's topic in Member Projects: Your Comanches
While I was rewiring my IPF headlight harness to work with Holley RetroBright’s, I was reminded while testing that our GM column'd trucks don’t have the modern ‘flash to pass’ feature. I did some research and found a site where it's added to an ’88 C/K using an early ‘90’s Cadillac DeVille/ Fleetwood dimmer switch that is identical – you only need to add a 12V wire into the connector. Easy enough. I’m using Standard Motors part# DS-203. (Note: you need to pull the thin retaining clip at final installation.)