SW86 Posted November 17, 2010 Posted November 17, 2010 okay its time. my rear quarters have bumped, dinged and smashed everytime i go hardcore with it. they are about on thier last leg so its time to cut em. i read a few threads on yall cutting them and it seems everyone did it a little different. my question is, whats the best way to do it and where do i stop cutting? some of you cut below the body line and folded, other didnt. i know there would be some strength added back to it with the cut and fold method but ill have a slider there so I'm not too worried. as far as mudding goes, did you put something up in there to stop stuff from flying in there or just left it open? as you can see I'm full of questions but i just want to do it right the first time you know what i mean lol. thanks in advance guys
Carl'sMJ Posted November 17, 2010 Posted November 17, 2010 I would use the "cut and fold" method you referenced. Just before you get the metal folded all the way up I would run a decent bead of silicone along it and then "crush" the silicone in there when you finish the fold. After the silicone dries hit the seam with some undercoating for additional corrosion protection. Or instead of the silicone you could finish the fold and then use some seam sealer to seal the joint. Regardless, I would seal it up good or it will be a debris catcher like you stated. The added strength of the folded metal will help support the body panel during everyday use. It still probably wouldn't do much if it gets hit by a rock or other obstacle on the trail, but it sounds like you already have plans to use a rock rail or extended rear bumper to protect it anyway.
xjrev10 Posted November 19, 2010 Posted November 19, 2010 Someone that has done this should take some pics and show where the cuts where made. I have been wanting to do this to my xj and I will have my long bed mj that will need this done also
Darren Posted November 19, 2010 Posted November 19, 2010 Look in my build thread. I took quite a few pictures when I did it.
Carl'sMJ Posted November 19, 2010 Posted November 19, 2010 I like this method too. I was referring previously to folding the metal all the way up, but I think this method would work just as well to keep some rigidity in the bed and might be a bit less work. Oh, by the way here's the direct link viewtopic.php?f=7&t=9854&start=150... Page 11. :thumbsup:
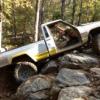
SW86 Posted March 5, 2012 Author Posted March 5, 2012 a long @$$ time later and i finally cut em. a tree got me again and busted my tail light and crunched in the tail light area. cutting them is just making it easier to fix it. i just did the "cut it" method instead of the "cut and fold". its still pretty firm, not flimsy at all.
Pete M Posted March 5, 2012 Posted March 5, 2012 might be time for some wraparound protection. :thumbsup:
SW86 Posted March 5, 2012 Author Posted March 5, 2012 oh yeah. ive needed a rear bumper for a long time and this step alone will help a ton later. ive got hook ups on steel already i just need to get off my @$$ and start
meljr Posted March 6, 2012 Posted March 6, 2012 Just took it off with a sawzall, sealed and painted. -meljr
SW86 Posted March 6, 2012 Author Posted March 6, 2012 nice. i didnt want to use a sawzall because its too violent for me. if you can get a good cut going sure but forget that. a cutoff wheel makes a pretty cut and where you want it. either way you got it done though :thumbsup: whats up with that drivers leaf spring? or is the picture playing tricks?

Recommended Posts
Create an account or sign in to comment
You need to be a member in order to leave a comment
Create an account
Sign up for a new account in our community. It's easy!
Register a new accountSign in
Already have an account? Sign in here.
Sign In Now