

drcomanche
-
Posts
445 -
Joined
-
Last visited
Content Type
Profiles
Forums
Gallery
Everything posted by drcomanche
-
Coolant temp sensor and coolant problems
drcomanche replied to drcomanche's topic in MJ Tech: Modification and Repairs
Lower hose was cold Not sure. Something is moving or else it wouldn't overflow the rad Nope Yes, its an open system I did pull it all apart since I was taking off the balancer and as soon as I removed that thermostat housing it let loose a bunch of coolant. Pump seemed fine, housing was fine, t stat was fine(but I'm replacing it anyway). Another thing I noticed after playing with the sensor, when unplugged, the gauge drops back to normal. When plugged in but the the key in acc position, it starts climbing, even though the engine isn't started. I think, initially, my t stat was seized or blocking air in. I'm going to fill the coolant a different way this time that shouldn't leave any room. -
If you still have trouble finding them and don't mind a non metallic plug, Caplugs has a variety of diameters in a couple different styles. Thats what I used on my interior.
-
So recently, I just got the truck back to running condition. I started it and just did some general checks(this coming after taking apart pretty much everything but the block and head and replacing most) to make sure it was all functioning. I replaced pretty much everything in the cooling system with the exception of the pump, t stat, and housing because they had only seen 500 miles of use. So here's the symptoms as they occurred. Checked the coolant level from cap after cooldown and it erupted out of the radiator fill when the cap came off. I was just checking to see if it needed more. Coolant was cold. Checked again the next day while fully cold with cap off to check level. It slowly filled over the course of 2 minutes until it started to pour out of the fill. Coolant was, again, cold. Capped the radiator and started it again, expecting that maybe it was caused by air in the system. Ran for 3 minutes, noticed that oil was seeping from the valve cover, went to shut it down and saw that my temp gauge was beyond even numbers, well beyond the red. Radiator was cold to touch. No fans came on with the sensor. Panicked about potentially warping the head. Decided to leave it till tomorrow. Decided to check the gauge reading at complete cold, no engine start. It was reading at 190 in acc on position. Started the truck and observed the temp gauge, it started rising immediately. And thats as far as I've made it. 4.0 I6 engine. Not sure if these correlate but it does have me concerned. I did change out my wiring harness over winter, but its still an ho harness. The jeep has an all electric fan setup run to a single out sensor on the t stat housing, meaning no connection to the harness anymore. I also changed the temp sensor on the head, which had a different plug style, but was still one wire. Did the sensors change their output over the years and maybe it's a different resistance reading from start?
-
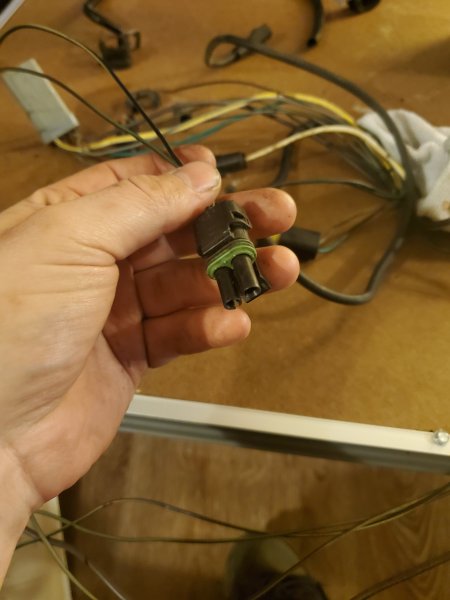
Just wanted to update this here for anyone who may have this problem later. I ended up just tracing the wires, disconnecting the firewall block(which I really didn't want to do), and checking connectivity to see where the break could be. Ended up finding these plugs that the wires ran through. I have no idea why they didn't just run the wires all the way there or what purpose this connector has, but its an inconvenience. Turned out the plugs inside were corroded a bit. Cleaned them up and greased them and now I have full power.
-
Mine isn't a renix era harness, so no fusible links.
-
Steering linkage.
drcomanche replied to Wounded_Fighter's topic in MJ Tech: Modification and Repairs
I use the jcr one ton kit and it's pretty solid. The only downside is that you can tell it's a lower quality as the rubber boots are molded into the ends, so they aren't removable. For my money, next time I'm just buying the moog parts. Roughly the same cost but you can replace the boots if they ever split and they seem to be more solid. There are a few othe companies out there that offer a kit, but they look to be about the same as jcr. Make sure they are the right fit for tie rod and usage though. Why go heavier if you don't need to? -
Offhand, I can say I have checked all the fuses(and replaced them, just to be sure). Ground points at the underside of the dash, firewall, left, and right fenders are all good. There isn't really any connection points I know of besides the fuse block itself at the firewall and the pdc, both of which have no corrosion. Tracing the harness is my last resort, but I was hoping someone knew what the pinout wire was for the dome fuse so I could start there. As it stands, I have no clue which wire runs to it unless I split the block at the firewall, which I would also like to avoid.
-
I know its been discussed but i havent found my exact problem here.. So, in trying to get the interior squared away, I was playing around with the radio and couldn't get it to work. Did a quick test on power, the constant is there, but the full power(red) wire had nothing. I looked at the fuse block and saw no popped fuses for any of them. The only thing I could pinpoint was that the dome lamp fuse, with integrates with the radio harness, was receiving no power at all in any keyed position(despite the manual saying it should be hot all times). My question is, where does the power feed from in the pdc? Is it directly from the fuse block 40 amp maxi? And if not, whats the next step for figuring out where my power is? Worth noting is that this wiring harness is not affected in any way by leaking fluid. It's a fresh install after a restoration of a 91 92 harness.
-
Speedo gear not meshing properly
drcomanche replied to drcomanche's topic in MJ Tech: Modification and Repairs
I put in the new bearing and the c clip, then mocked it up with the gear in. It all works fine. Its amazing how that little tolerance changed everything. The tightness of the c clip wasn't because it was up against the bearing, it's just a really hardy c clip thats own tension holds it in place. I am unable to move it when it is in. I'll take more of a look at it and see if there's something I'm not seeing. I am concerned that it would move through vibration or friction. -
Speedo gear not meshing properly
drcomanche replied to drcomanche's topic in MJ Tech: Modification and Repairs
It is VERY tight in there. It was a chore to remove and while it was in, I couldn't get it to budge at all. -
Speedo gear not meshing properly
drcomanche replied to drcomanche's topic in MJ Tech: Modification and Repairs
Thats exactly where it was aligned. I wasn't matching it with the retaining bolt. At that exact alignment, it contacts the snap ring, which when I replace the bearing, will be oriented with the gap facing the gear. It's a slip yoke eliminator kit from teraflex, I believe. It's one of the older versions so it may not be their up to date best design. When I took out the snap ring, it moved fine. -
Speedo gear not meshing properly
drcomanche replied to drcomanche's topic in MJ Tech: Modification and Repairs
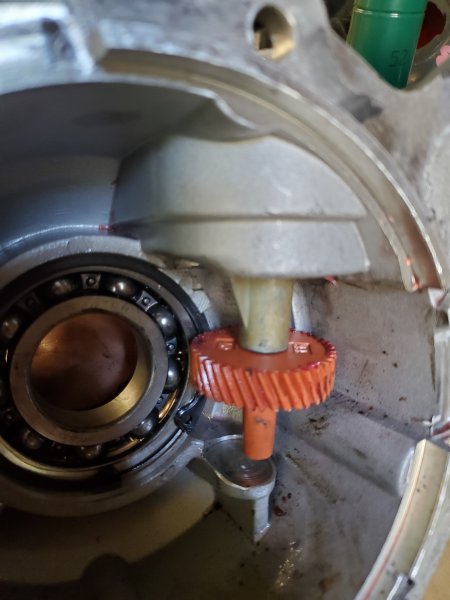
Popped the tail cone off yesterday to have a look. The gear on the shaft is nice and secure with minimal wear. I was playing with the gear and the tailcone seeing how it fit up and I think i found my problem. The snap ring holding the output shaft bearing was in the gears, hold them from moving. I'm guessing that the gap in the snap ring needs to be right where the gear sits for it to clear properly.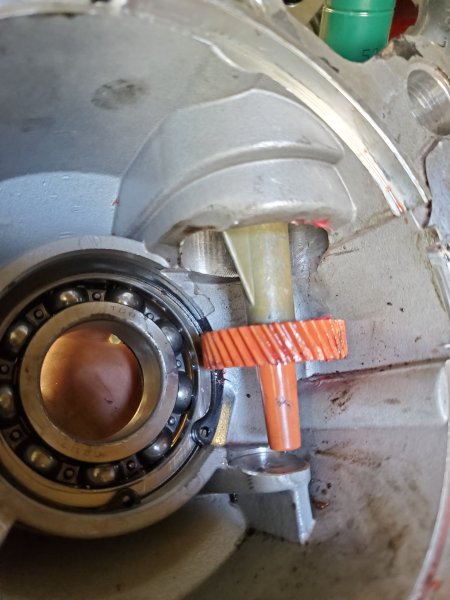
-
Speedo gear not meshing properly
drcomanche replied to drcomanche's topic in MJ Tech: Modification and Repairs
I'm not lining the indicator up with the bolt, although there is no ridge or dimple to mark it with, I was relying on looking up pics and that there's only 4 orientations it could be. I had another look at the shaft gear, still looks perfect. Hard to see, but there it is. I was also thinking, is this supposed to be a short shaft assembly and maybe its reaching too far? You can see a groove at the bottom of the plate in the pic from it.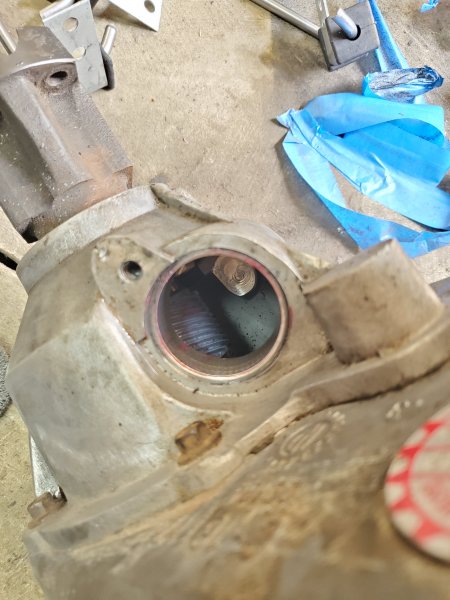
-
As the title states, the gear isn't aligning properly. Its an np231, the gear is a 40 tooth gear. The top "holder" is aligned for 39 to 45 teeth. I installed it and just moved the input shaft back and forth a bit to test and when reversing, it pops as though its not turning properly. When going forwards it kind of lines up, popping every 5 or 6 rotations. The inner shaft gear isn't damaged in any way, but when i pulled the speed gear out, you could see that it had bent portions of it. Probably worth noting that my previous 39 tooth gear, while it did function, was worn severely at an angle, to where it was almost flat on one side. Again, it still worked when driving, but that doesn't seem to be how its intended to function. I've seen people pull them out with no wear at all. Is there something I'm missing with alignment? Or is it normal to chunk the gears up a bit?
-
Measurements tell me its a early model ax15. I havent removed the bushing to measure bore, but the casting number tells me the engine is 94. Guess I'll contact novak and get a replacement if it's necessary
-
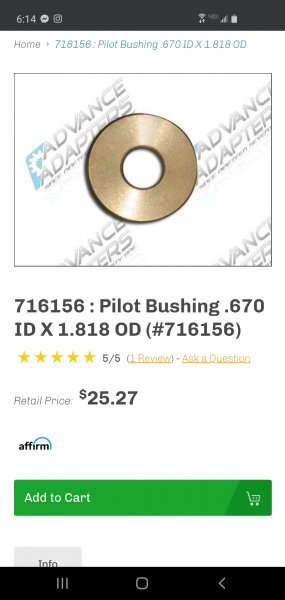
I found what looks to be the correct part, but it says its for mating an amc engine to a Ford transmission. I'm not sure how this correlates to my AX15, though. Is my input shaft different? Custom? It's never easy with this thing. I'll measure the input and the bushing when I get home today to see how they match up. I sent an email to Novak themselves to see if I could get more info.
-
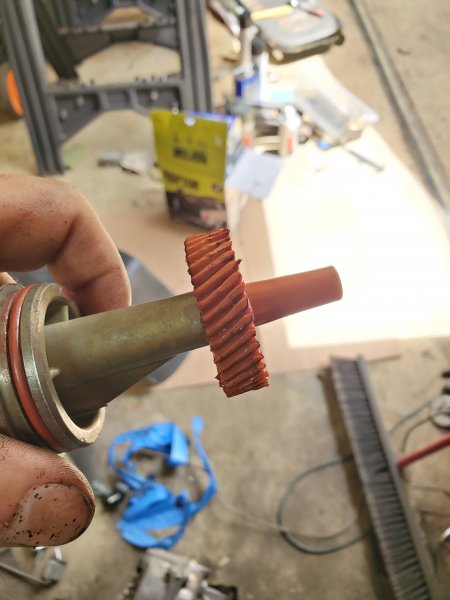
When I purchased the truck, I was told the engine, trans, and t case came from the same cherokee, so i would assume they are all 94. The clutch kit I purchased was for 93 to 99, i believe. Maybe that is it. It looks well machined, so i figured it was some kind of part that belonged. I also noticed the shaft from the trans was a good bit smaller than the new bearing that came with the kit. I'll have to size it up and see.
-
I looked that up as well and didn't see anything like whats there. The closest I got was a generic pic from Novak of a bunch, but no pics of ax15 specific bushings, at least on mobile.
-
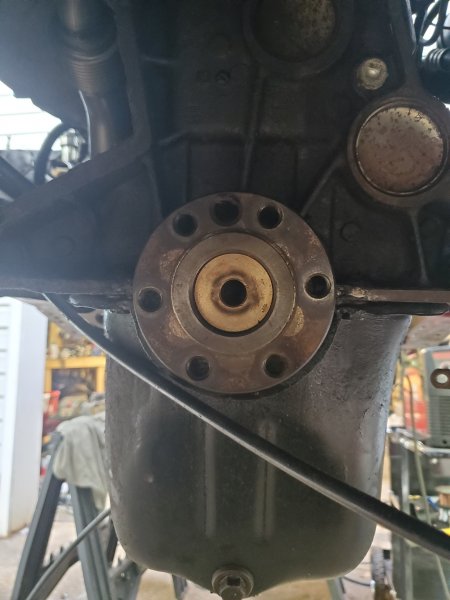
I'm replacing the clutch and all that in my truck and I see that there is no pilot bearing in the crank. It's just a large brass washer(?). Was scrolling through pages trying to find out what I've got here and couldn't find anything on it. The pilot bushing that came with the kit is much larger than the end of the trans shaft. Is this some kind of weird upgrade I've never heard of?
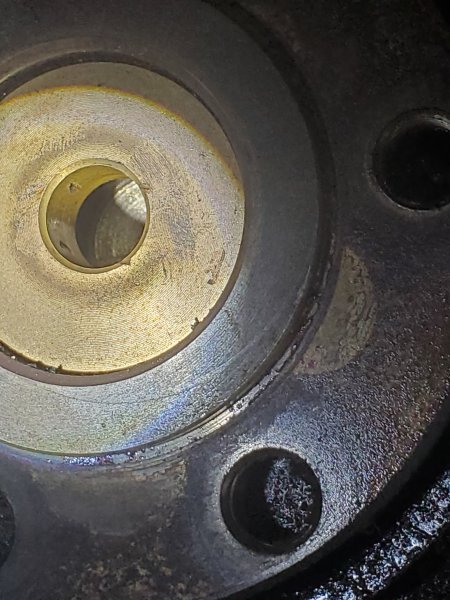
-
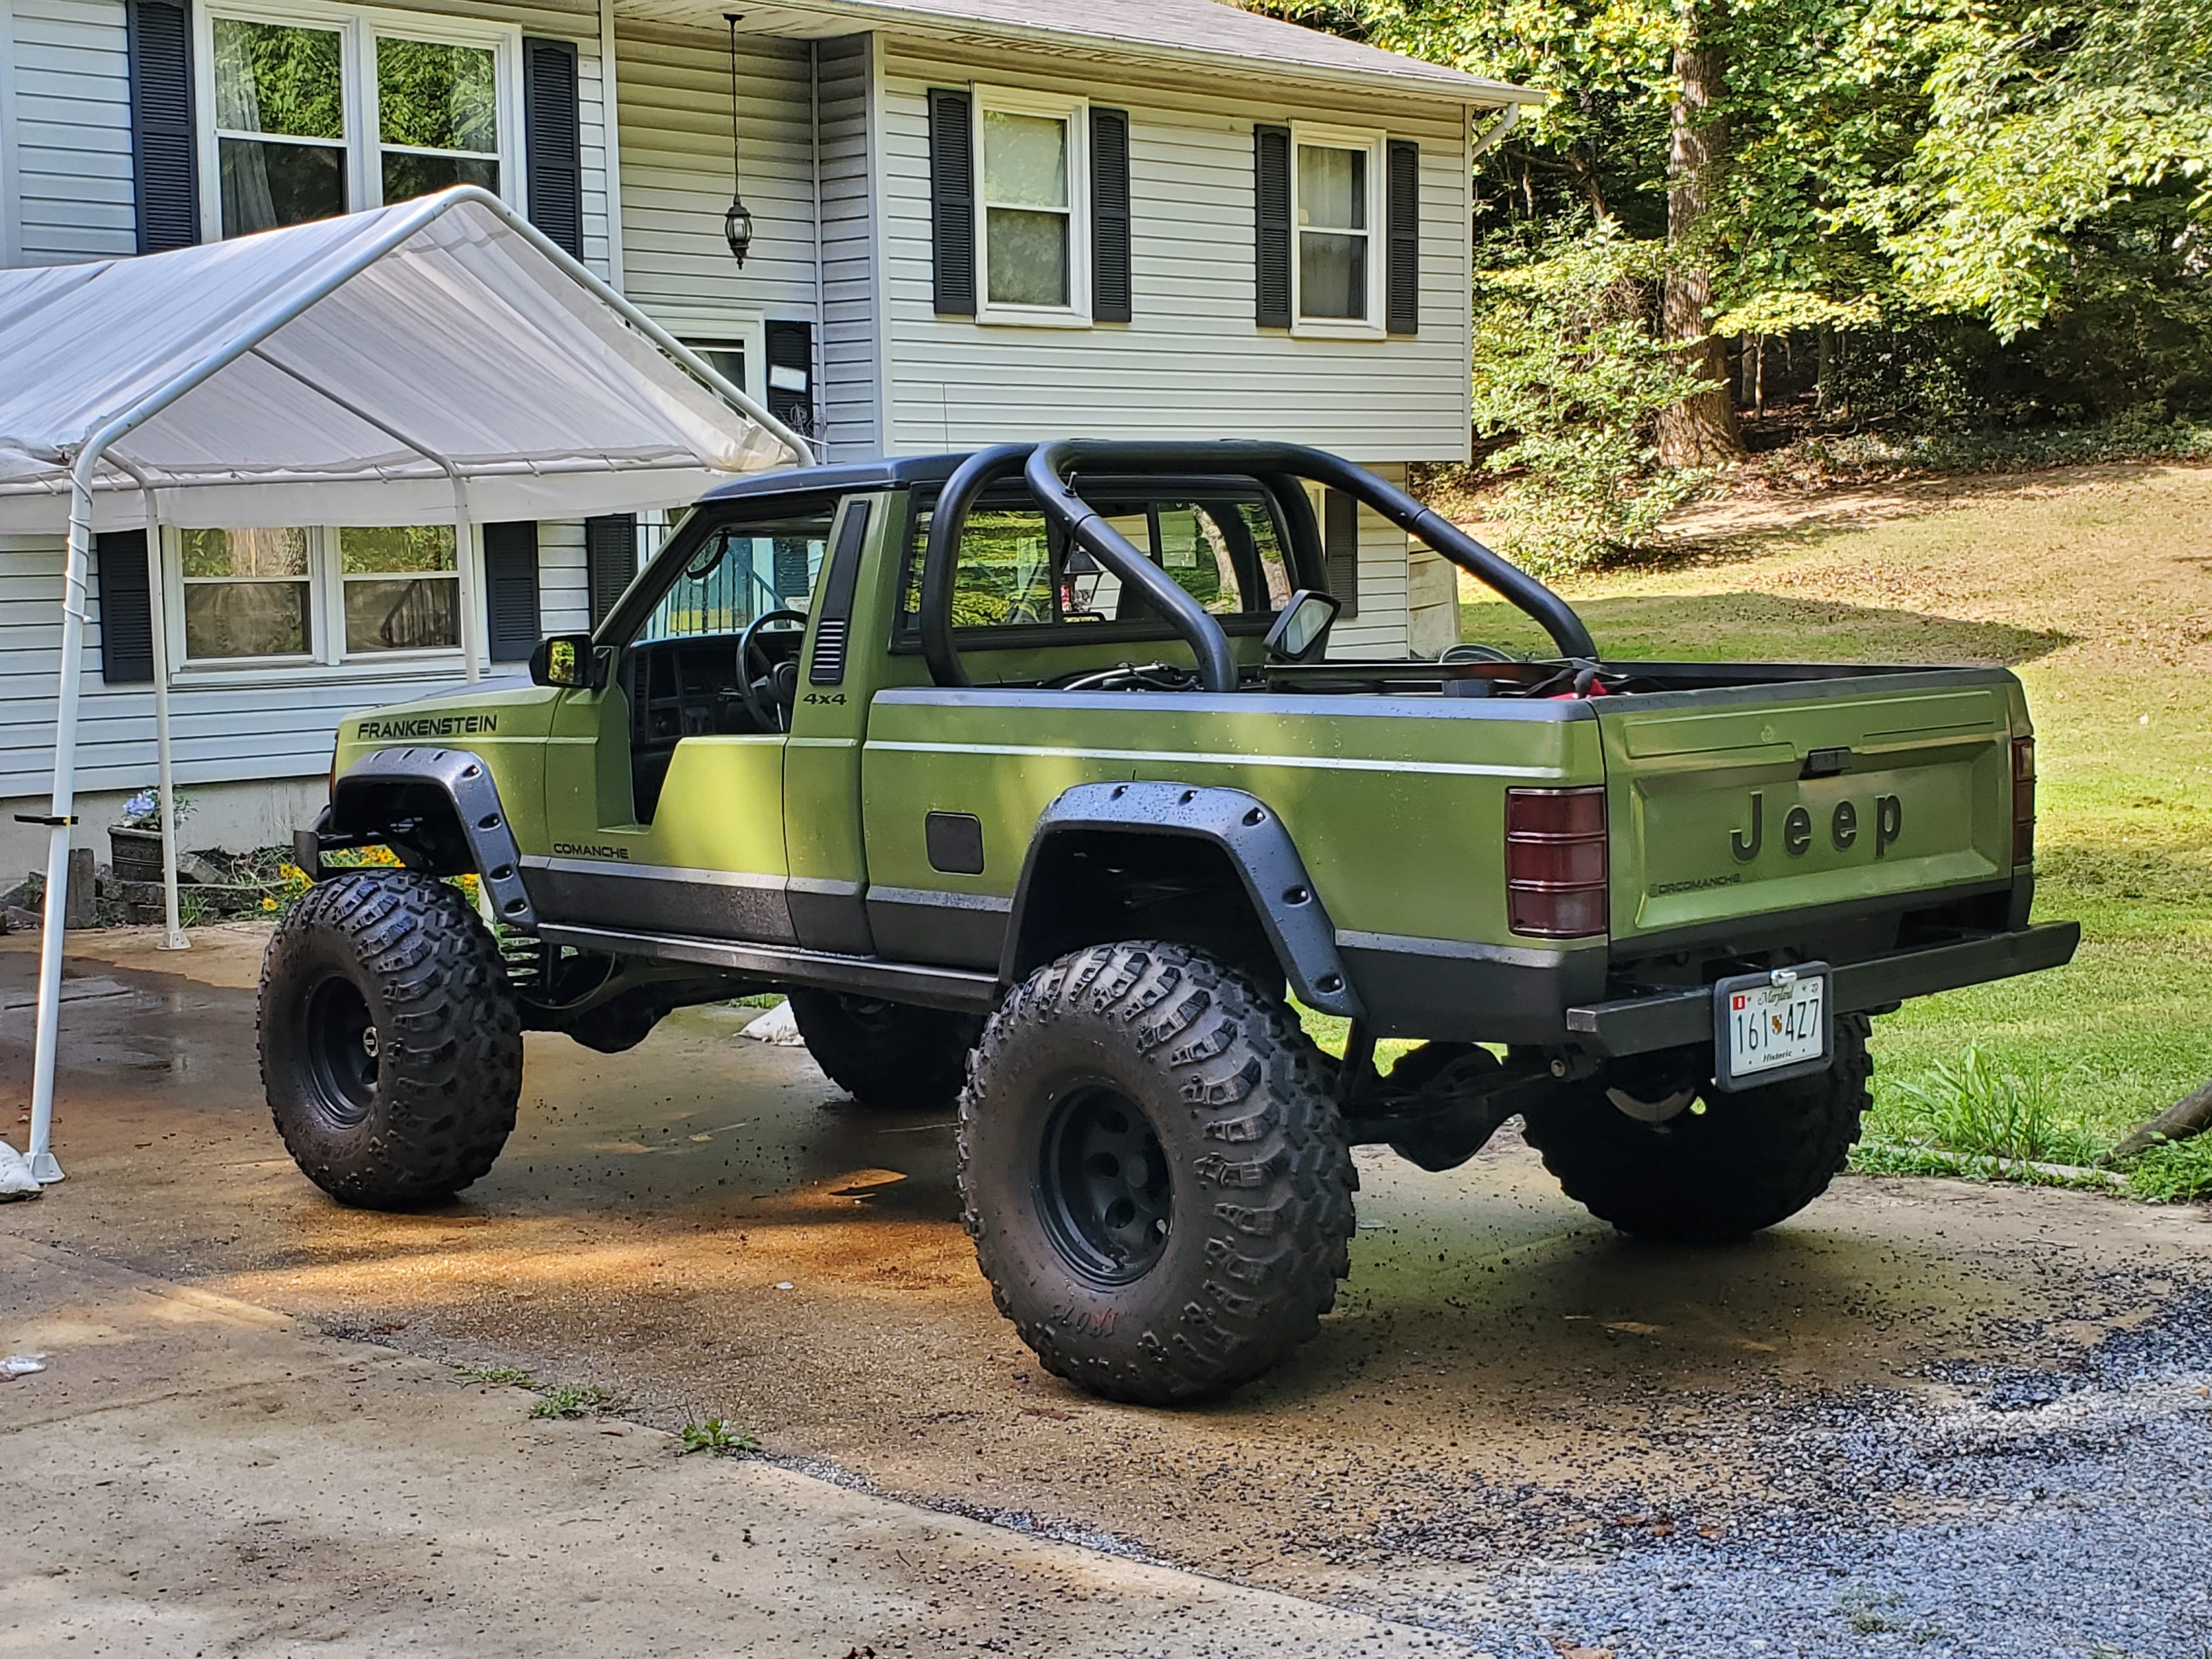
DrComanches Project "Frankenstein"
drcomanche replied to drcomanche's topic in MJ Hardcore Tech: Epic Journeys to Greatness
Been a while, as usual, since I've posted any updates for the truck, so what better time than now?(Otherwise, I'll be writing an essay by the time I finish, and nobody wants to read all that). So, as is usual fashion, I took the truck off the road this past winter to undergo some more upgrades/repairs. When I finished up last year, it felt like a good stopping point, and I was fairly satisfied, although some things were rushed for the show and go season. The real kicker was the trip to Ocean City Jeep Week. The trip there wasn't much to talk about. I noticed on the way that it did get warm, but the temp gauge never really made it beyond 220. The drive out was in nice, not too sunny, not rainy, not humid, not too hot kind of weather, which made it easier. A few issues occurred, however, that would be addressed in this garage session. For one, the engine did eventually vapor lock, which put a damper on repeat events and driving too much. Not too bad of an issue, but something to fix so it doesn't turn into a problem down the road. The more pressing issue was the transmission. Either the trans fluid or the clutch hydro fluid was on it's way out or overheated too much and I started losing gears(until, eventually, after my trip back, I lost the ability to shift at all. I was right around the corner from my house though, fortunately). In all my years having this truck, and back when it was my daily, I never had issues like this, but they became progressively worse over that Ocean City trip. This was the main reason I didn't do any offroading events with it. I was afraid, after waiting in line or in the sun for hours, that it would lose the ability to shift and I'd be stuck on the obstacles. The third problem; the engine had a steadily more pervasive miss that by the end of the trip was almost stalling it out. I was having to apply gas at stops to keep it alive, that could've been something in my plumbing for the fuel cell, since I later found my charcoal canister overflowing with gas. Maybe incorrect pressures or pull causing the vacuum to fight with the pump for fuel pressure. It's hard to say. When I got back from that trip, after letting it sit for a couple weeks, I drove it to a buddies house and we checked the compression numbers on all the cylinders. I was expecting it to be very poor and maybe some blow by, but the numbers were exactly 150 on every single cylinder, so somethings working right in there. We also tossed around the idea of some electrical issues being present since the harness was a cherokee adapted hack job. And the fourth major issue was my brakes. The truck was still very capable of stopping, but it was wavy when I had to apply at speeds. It tended to pitch back and forth and, generally, be a bit more difficult to control. The harder I applied the brakes, the more right and left motion I got, so it made me fearful of stop lights on the highway. I didn't want to blow through a just changed red light, but I also didn't want to pitch into another lane. Add to that the fact that about 5 miles from my house, one side locked down completely, giving me a burning smell and braking that pulled hard to one side. With all of these things in mind, I made some decisions as far as what was getting done this season. I wanted to address the engine components in particular, the drivetrain components, and I wanted to address the safe driveability of the truck. I don't have a tow vehicle nor a trailer, so I'd prefer to have an all arounder truck that can make the trip to trails and drive back. To these ends, my starter list was: Replace my rotting radiator with an all aluminum 2 core and old fans with a full electric unit Replace, if I can, my engine and cab wiring harness with one from an HO era Comanche Upgrade my brake booster to dual diaphram Replumb my fuel cell system and eliminate the charcoal cannister Replace my clutch and whatever other components need it at the trans Improve airflow and heat shield my injectors Add an Antirock sway bar for driveability Get proper lug pattern wheels and lose the spacers as well as tires(if I could find any that weren't insanely expensive) Finish my front frame braces(Didn't get to them last year because of the effort involved and all the parts I needed to remove) As with all upgrades and repairs, I kind of added a bunch more to this list as I broke down components and sized up what else could be done. I began by stripping out the engine harness, removing the dash and that harness, brake booster, and then, because I had access to much more, I stripped the engine down and removed the heater box. Since I had it all removed, the gears started turning on further upgrades and customization. I took the opportunity to paint my engine bay so it matched the rest of the truck. I went with a black bedliner spray that I've used before, and the results were fine. I don't need perfection since this is supposed to go out and do stuff. After removing all of these components I added a few more things to my list of upgrades. I had always seen the late model intake upgrade and thought that would add some additional airflow to help the engine run more smoothly, so I bought one of those. The fit up took some custom work with grinding and tapping and I ended up welding together a bracket to go from that to the top of the power steering pump. I'm currently putting together the vacuum system, which just needed a few extra elbows and sections to work. I decided to add hydro assist in addition to a steering fluid cooler, and the grand cherokee steering pump upgrade, so I purchase the necessary components and ended up cleaning, resealing, and porting my steering box. I wanted to keep the brackets that made the power steering pump a belt tensioner, so I ended up drilling and tapping sections of the new pump to make it work. All told, after just planning it out, it wasn't too tough to come up with a plan and get it held together. The ram I bought had to have the bolt bracket on the end switch up 90 degrees so it wouldn't bind when I mounted it, and I have the other parts on standby until I finish welding the frame stiffeners. I had to build a custom bracket for it once I found a place for it to go, and I incorporated some custom sway link brackets into the design out of quarter inch. I also got the boostwerks steering box brace for added support with the large tires I run. Since I already had the heater box out and I had a bud with a scrap 96 cherokee, I got the full AC system and decided to put that in. I had to but a few new parts, but the install itself was fairly easy. The electrical was pain to deal with, and I'm only guessing that it will work now. I had to dive into the wiring guides and took apart 2 other harnesses to try and figure out the circuits. I ended up taking the entire HVAC wiring components out of the other harness, removing the pinouts from the firewall block(that only controlled the heat before) and installing the complete HVAC harness section in it's place. I purchased a THOR cowl intake and spent some time cutting and drilling to get that to fit up correctly. With a bit of trimming, I got the new radiator in with the fan shroud as well as the AC condenser but ran into a problem with the reservoir, which was covered with black mold, and, to my surprise, a couple inches of hardened mud at the bottom of it. No amount of cleaning could remove the mold, so I spent the ten or so dollars for a new one. I managed to get lucky at one point on Facebook and found a guy selling a 92 Manual engine harness and got that from him. This led to one of the more difficult portions of my endeavors since I wanted the wiring for the new fans and all that to be nice and neat. I decided to tie them into open relay and fuse segments of my PDC. I had 2 open maxi fuses and 2 open relays that I used. I ran 2 of the 3 fans to one of those relays to automatically come on when the thermostat reaches the desired temperature. This meant I had to find circuits to tie into and I had to make a jumper and new fuse section for it. I also added my offroad lights to the other open relay in the box with a wire running inside the harness into the cab. The last fan I wired into my old e fan relay, but disconnected it from the ECU and instead ran a wire to the cab, that way I can turn it on and off at will. Running these all into the harness made it look a lot more professional in the long run and gave me an extra 2 or 3 feet of harness that goes around the battery tray. I even wired in actual waterproof connectors in lieu of the worse looking butt connector or blade links. Now I won't have to cut wires to pull things out again, it all just disconnects from the main engine harness. After all that, I had to adapt a few newer style connectors for some things and then re taped the whole engine harness with new friction tape. While I was in there, I bought a battery tray from Ballistic Fab to replace the hacked up old plastic one, and to give me a proper solid battery hold down. I had weld up a custom bracket for it but I have a bunch of leftover metal for exactly this reason. I painted a bunch of the metal parts I removed(as long as they weren't in an area that got too hot for it) with the army green I use on the outside. Hopefully, the engine bay will look much more presentable now. I rebuilt the master cylinder of the brake booster since it sat for so long, and good thing I did, as there had definitely been some water that made it's way in there. It took some custom work on the pedal and the plunger to get it to fit correctly and I had to make a custom metal bushing to hold it in place. Having the pedals all out allowed me to straighten out the clutch pedal so it didn't compress at an angle(used some wrenches and a hammer after applying some heat from the torch)plus weld up a bolt sleeve to take up the slack between it and the retaining bolt. With them out, I decided to replace the pedals with some quality billet units(when my feet were wet, they would slip off the pedals, plus the gas pedal cover kept falling off while I was driving). Otherwise, with the engine and wiring harnesses apart, I cleaned up anything I could take apart or get to, including the throttle body and the intake and exhaust ports. I also replaced the broken pcv valves in the valve cover, which was a pain as they had turned to concrete over the long years spent in there. The next step for me is to roll the truck back outside under the awning to do the final weld work and the transmission work. I decided, since it will already be out, to upgrade to the external slave cylinder setup, and have the parts for that waiting. While I'm under there, I'll be removing the third member from the rear axle to change the fluid and check the condition of it. The front axle will come back off so I can do the stiffeners but I figure while it's out, I'll paint it back up, too, with some other parts. I'll be finishing my exhaust while it's all out, and porting it out the side of the bed. The last portion will be to do the raptor liner on the front frame, roof, roll bar, wheel wells, tail gate, re finish the front bumper, and do a coat on a custom rear bumper someone is setting up for me(no tube bender makes that a bit too much for me). There are a few odds and ends I will get to as well later on, but for now, this is a pretty solid update. On a side note, the truck ended up in JP magazine. It's only a small pic, but pretty cool nonetheless Barely fit in the garage Some goodies Coming apart Some of the custom fit up of the new intake manifold Dirty before, painted after. It got another coat to get the extra red bits Relatively clean Painted up Gave the block a good cleaning too. So much oil and dirt on there. Why I replaced the radiator and the old engine harness Before and after cleaning and rebuilding the brake master Some lettering on the block. No clue what it means. Empty cab. I added more sound/heat deadener under the firewall mat, too. Rebuilding, ported, and painted Power steering cooler mounting Then plated the front Battery box, pinion guard, and home brew bracket, all finished up. Working on wiring Pedals and new reservoir Dash back in Harness in the making and harness all done. Getting closer, but still some way to go. I guess it's a good thing I can't go anywhere else but work right now. I have a lot more stuff to come, but I'll probably just do another big post after I get it back out and finish it up. -
March 2020 MJotM-Awinski's 1988
drcomanche replied to 89 MJ's topic in Comanche of the Month (MJOTM)
I know I'm late to the party here, but this one was bound to end up here one day. Nothing like a completely custom build from a crazy idea. Great build, great concept, can't wait to see where it goes. -
Alternator harness help
drcomanche replied to drcomanche's topic in MJ Tech: Modification and Repairs
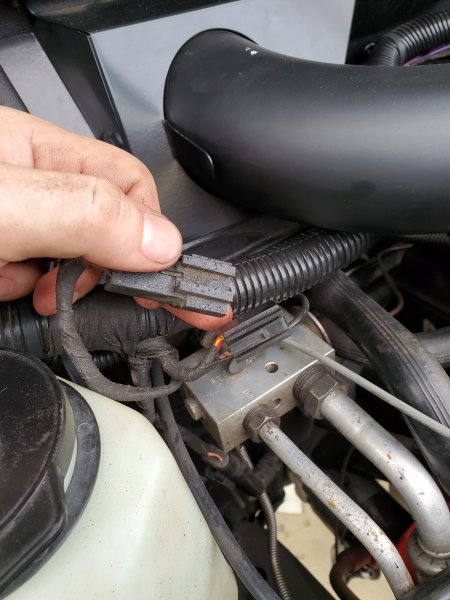
New and old, both harnesses so you can see the difference. That extra long 2 wire is what I'm wondering about.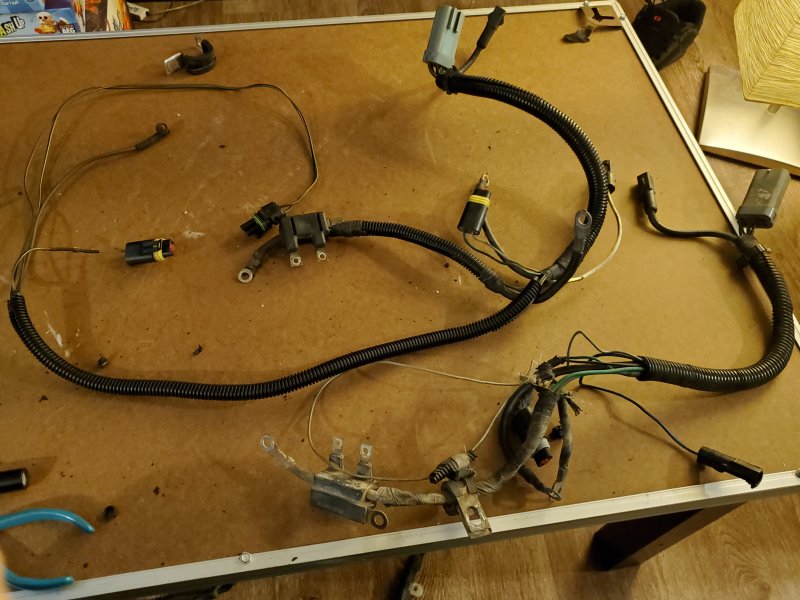
-
Alternator harness help
drcomanche replied to drcomanche's topic in MJ Tech: Modification and Repairs
I'll grab one after work today. Found a basic pic online of it, don't know if it helps, but it's the same style.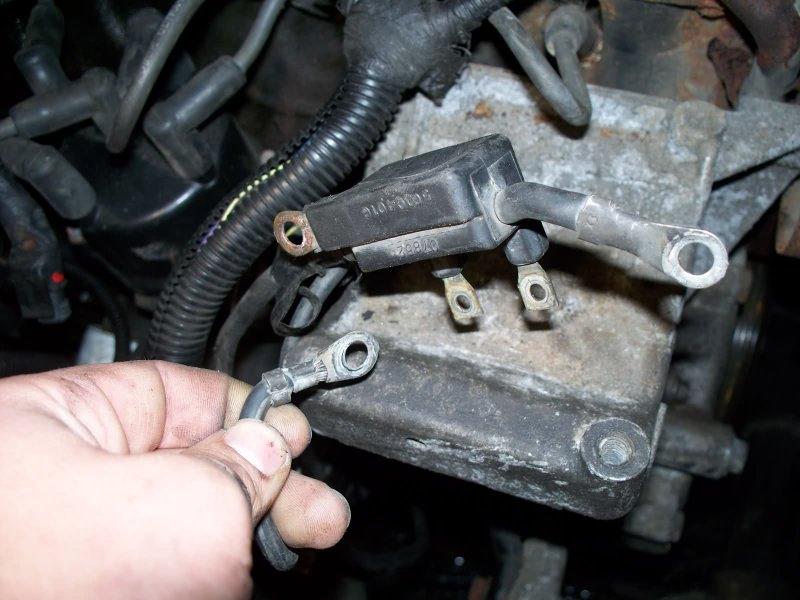
-
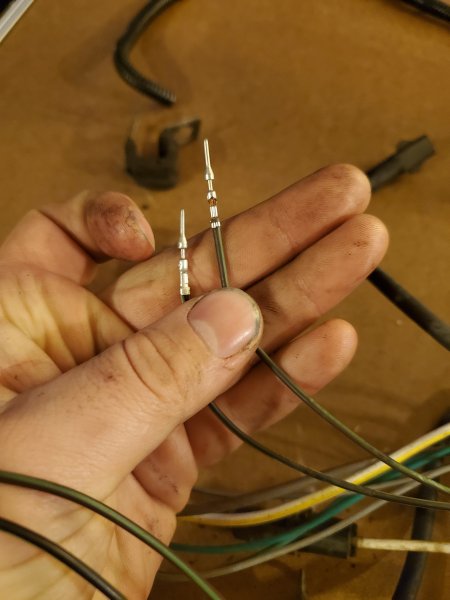
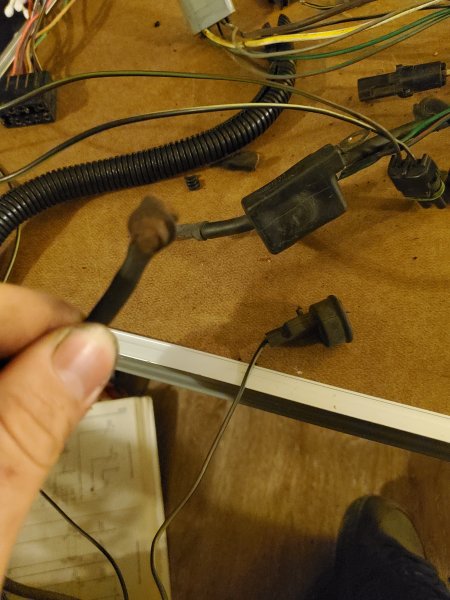
I'm wondering if anyone can shed some light on the wires I have in a new to me harness. My current engine is a mid 90s cherokee transplant. First, it has a very long lead of 2 wires(brown or purple with a green tracer and black with a green or grey tracer, I'm partly colorblind so I they may be slightly different) extending to a connector. The wires weren't attached to the c connector, instead having the pins seemingly pulled out and tucked in the split loom. What do these go to and what positions on the c connector do they attach to? Second, there's a heavy brown wire that has a rusty nut on the end. My old harness didn't have anything like this, but it connects to the c connector, so it seems important. And clue where that connects?
-
Adding A/C Technical Thread
drcomanche replied to drcomanche's topic in MJ Tech: Modification and Repairs
Which diagrams do you have? I'd like to include all possible info for everyone, so if its different then it would still be handy for people with pre 91 harnesses. I'm looking at the Haynes manual, and it is equally as confusing, but seems to have the relative same circuits for the relay.