

Warthog
-
Posts
96 -
Joined
-
Last visited
Content Type
Profiles
Forums
Gallery
Everything posted by Warthog
-
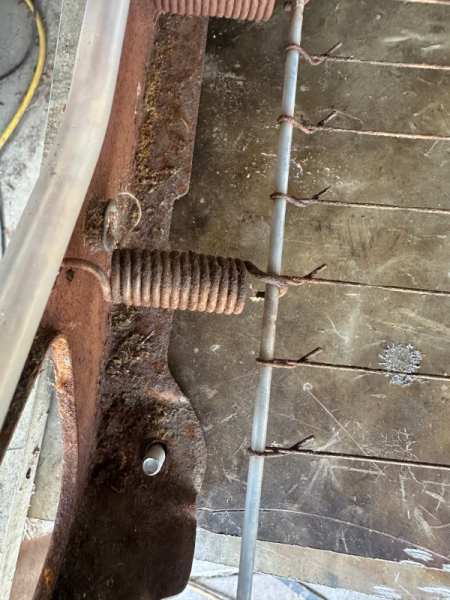
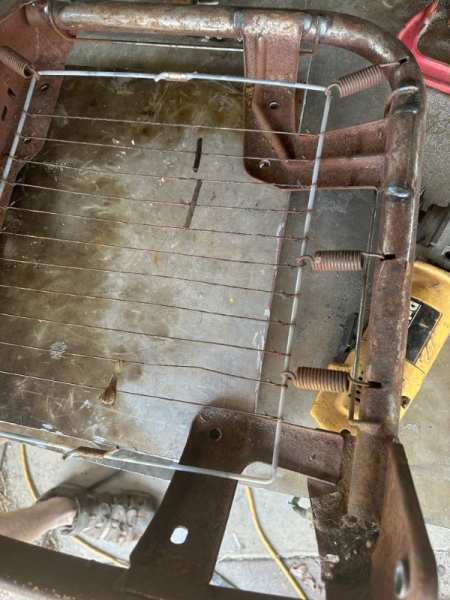
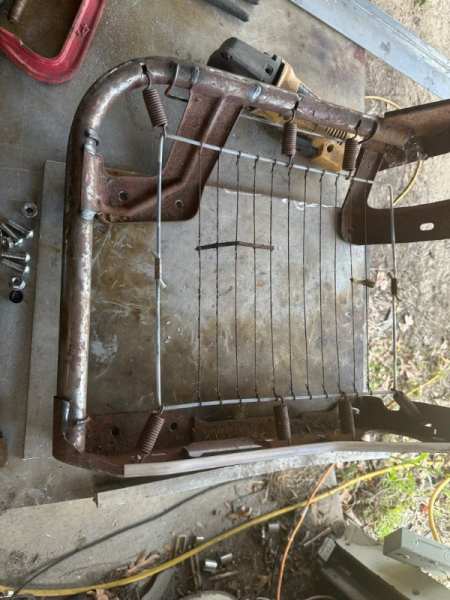
Not sure but they are the later ones like after 97? The flat lookin ones everyone seems to use when they do that front clip interior swap? Cloth in the center and vinyl or leather whatever around the edges? I can shoot a pic if needed. I was thinking instead of the grid wire I’d just use hog or chicken wire wired to the square rope frame thing. Call it a day. I think the bounce comes from the actual frame to grid springs. Those wires on the grid look like a 9ga guitar string. Just lookin at em you would think your @$$ would fall thru or get slice like cheese! If you want some pics I’ll shoot em in a few. Thanks for the reply brother!
-
Ok so I have some later model buckets that I turned into fold forward with some mechanisms out of some too far gone two door buckets. My question is the spring grid. Can we chunk it and just cut some hog wire the same size and use that? Way way cheaper than buyin the grids and even cheaper than using zig zag springs which nobody seems to have done, or they are not saying how to do it. From what I gather by looking at it is all the bounce? Comes from the attached springs and not the grid itself. Be happy to try it and post just curious if anyone else has thought or tried or can shoot holes in this idea. Many thanx in advance
-
86 / Old Style Wiper Arm Removal
Warthog replied to aris_garage_builds's topic in MJ Tech: Modification and Repairs
Appreciate the knowledge drop! New to jeeps, old to muscle cars and old trucks. Peace -
86 / Old Style Wiper Arm Removal
Warthog replied to aris_garage_builds's topic in MJ Tech: Modification and Repairs
Good to know! I’ll look into them. Motor the same? -
86 / Old Style Wiper Arm Removal
Warthog replied to aris_garage_builds's topic in MJ Tech: Modification and Repairs
Why? Sorry but what’s the difference in em? Got an 87 xj and an 86 mj I'm building so any upgrades I can do while I’m there, I'm down. Thanks in advance. -
Get some paneling and cut you a template, cover in carpet or vinyl etc, I use tread bright aluminum on everything and paint to match. You can glue or Velcro or mate a metal strip to the inner frame via counter sunk screws and screw the new back to that. A little door trim around the edges to clean up the looks. You can get that stuff in rolls on Amazon cheap. If you can’t find the right color get as light as possible and get some duplicolor vinyl spray and paint to match. Awesome idea by tye way!! Bench in a cherokee? I would in a second! But I can’t even find a decent bench for my Comanche let alone another for m cherokee! If I still had the ebrake you could have it. Went buckets for lack of choice. I’ll look around, don’t remember chunkin it but don’t remember keepin it either.
-
What size steering wheel you guys using? The factory is a 15”. I’m curious if anyone has gone to the 14” and if it felt different? Not so much in response etc but the basic feel? I’ve felt a 13” and absolutely not for me. Is there really that much of a difference in the feel between the two? I’ve read the one has better response one has better leverage etc, but I’m talkin about holding it driving. Do you notice a smaller feel? Thanks, just rebuilt my steering column on one build and ready to put on a wheel. Not a lot of selection in the 15” wheel department but gobs in the 14” range. Peace
-
Second the pb blaster and soaking! That crayon wax thing actually works on some things. Heat it up and let the crayon melt into it. As it cools it sucks the crayon wax into the threads. Old timers used to use that trick all the time. I’ve always had good luck with pb blaster tho.
-
Custom Gaskets for HVAC
Warthog replied to H3ADBANG4L1F3's topic in MJ Tech: Modification and Repairs
Need a set!!! -
Yes!!! This you? Please say it is!
-
Posted this on the Cherokee site as well. There was a guy on one of these sites selling hvac box replacement foam kits. Sent me one to test fit and love it but need another for my other build. Got both an xj and a mj. Any help would absolutely rock! Thanx!
-
The 1992 Jeep Comanche Of My Dreams (Well, Almost)
Warthog replied to cavalier's topic in Member Projects: Your Comanches
Can you give me part numbers? Got an 87xj with original box and a 90 box going in an 86 mj. Updating the heater core and evaporator. Says there’s a difference in the 87-91, then 92-95? Gonna install sbc in both so I’m aware of needing custom hoses. I just want to get the better of the two set ups and not sure which or if I can even go with a later model evaporator.first jeep builds and definitely first ac replacement. Gonna cap em til I’m ready to hook up. Hope that makes sense and you can give me some guidance. Many many thanx in advance! -
here are some pics of what I did. Cut me a plate to mount to the seat frame. The old rocker slide were taken off the adjuster slide and I used that mechanism. Getting those rockers off is a pia cause one bolt is under the adjuster lever. I removed the front and rear bolt holding the rocker track on and spun the rocker slide basically unscrewing it. Then a finder and cut the bolt stem to get it out. The old rocker slide and the inside seat bolt line up almost perfect giving me the clearance side to side. That’s an old newer style frame I had laying about I’m using for test fitting etc. I also had to fold or bend the front lip up on the old style seat mount so it would meet the new seat since it’s flat and not concaved? Also ditch the 1/2” tubing for clearance as I didn’t need it. Probably gonna have to use something in the back to take out some seat incline. Not sure yet. I pretty much lay out when I drive so it may work great. Rain comin so done for now. If any of this is confusing I’ll be happy to clarify. But the basics are take the rocker mechanism off your old seat mount. Cut you a plate for the seat bottom. Match it to the holes in your seat frame and mate your old style sliders to the front inside bolt and buckle everything in. That center bolt on the lever side rocker is a serious b*@ch til I figures out just spin the rocker off and cut the bolt shaft to get it out. If this helps one person then I’m happy. Peace!
-

-
I know this has been beat to death but I wanted to give my version. Rocker buckets set too high, newer buckets the sliders too wide. After reading and reading and reading, looking at these seats and looking and thinking here is my solution. I had an aluminum loading dock sheet my brother gave me. You can use whatever you can find that will hold the seat. Cut me a plate to mate to the newer seat cause it has forward flip. Removed the whole bracket and mated it to the seat frame. Then I’m gonna run some 1/2” square tubing to get the slide lever clearance which will run front to back. Bolt the old style rails to the tubing to the seat plate. Then mount to some krustyballer seat brackets. Once you have everything lined up you can play with the height by adding washers or bigger tubing etc. you can also set up your preference of tilt doin the same method. More in the front less in the back. I will post pics tomorrow once I have this done but will try to get some as I go. My issue was it seemed everyone including myself was making this harder than it actually is. Your basically bolting the newer seats to the older slides. If anyone has done this and had issues feel free to drop advice. Peace and stay safe
-
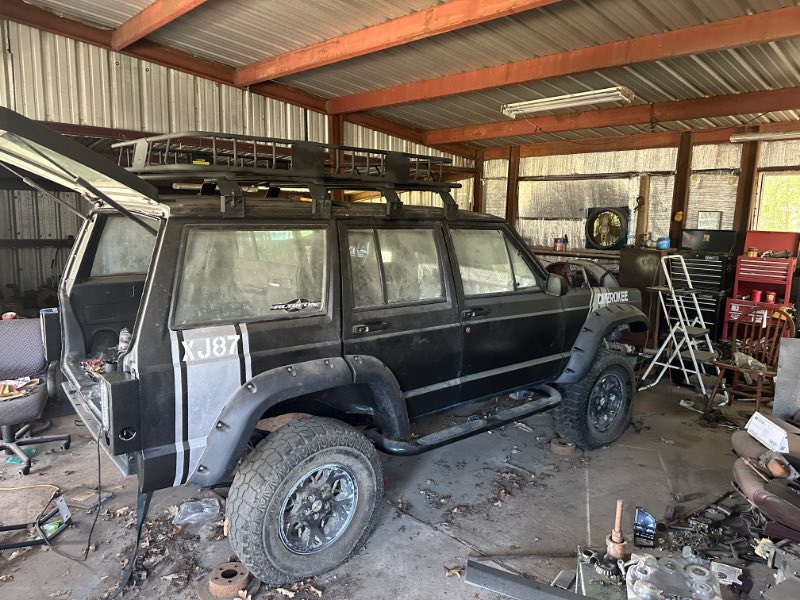
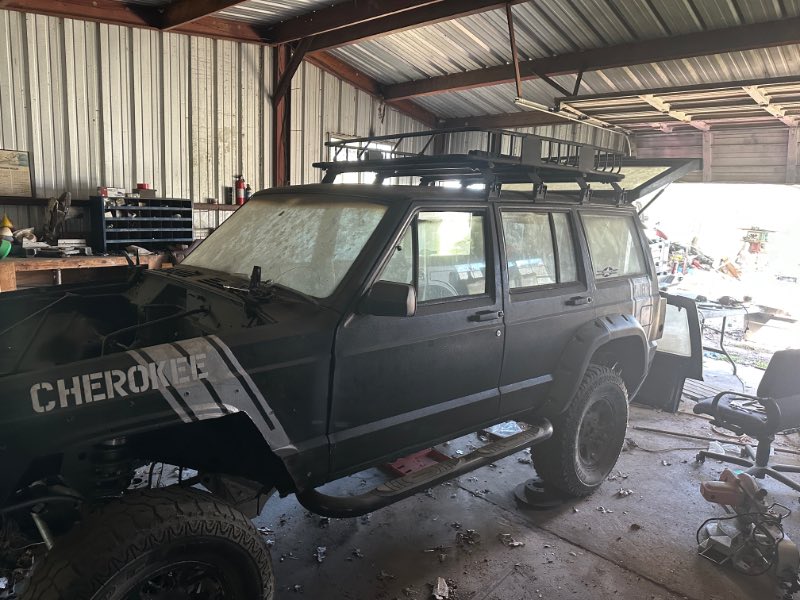
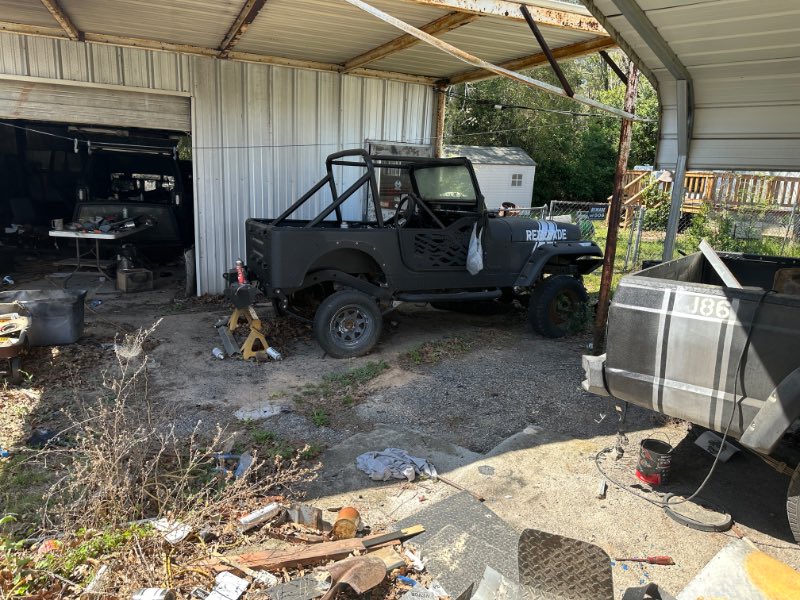
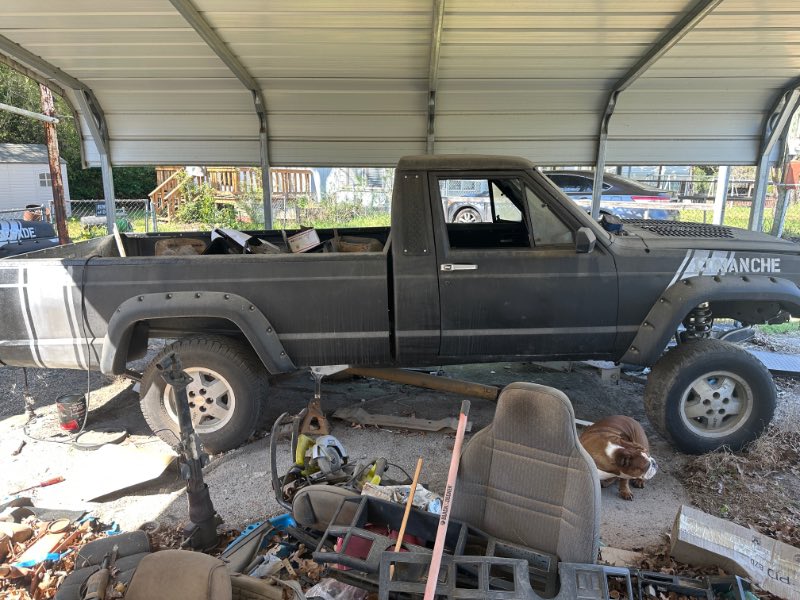
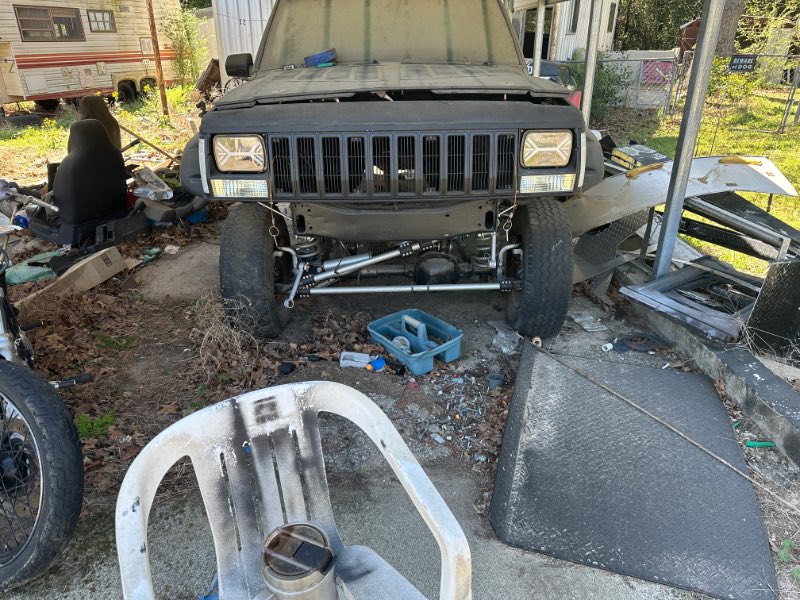
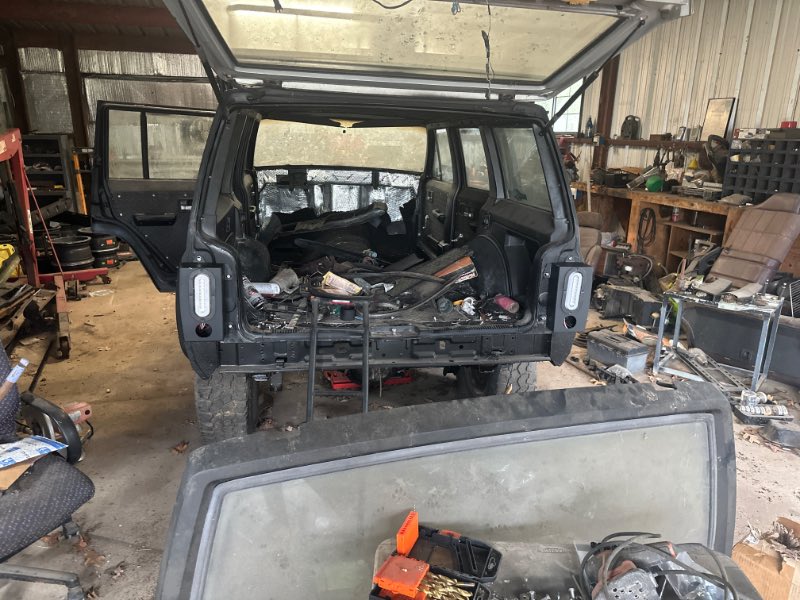
Well thought I’d post on my builds. Been rebuilding restoring and renovating an mj, xj, and a yj. Took last year off for various reasons but back to the cut. Got pistons in for the 283 that’s goin in the yj, got pistons in for the small journal 327 goin in the xj. Hoping i can get by with a standard bore on the large journal 327 goin in the mj. Waiting to ensure the small journal pans then will be attacking the big journal 327. The small journal was already punched .030 over. Punching the 283 .030 for valve clearance. Doin roller so that with bigger valves larger can better to be safe than sorry. Plus not sure what I’ll find when I crack the heads. All engines have aluminum heads 2.02 1.60 valves, whatever the common edelbrock intake the performer I think, quadrajet block hugger headers and a came for the job I want each vehical to do. Compression round 10:1. Hei for fire and I guess that’s about it. Should tag some good numbers. Jury is still out on the tranny. Was gonna go with an ax15 and had several, but figured why do bunch of adapters and why not full gm drivetrain. I know old school Chevy pretty well so stick with what you know. Regeared and spartanized my fronts! My own made up turn. Don’t have enough faith in myself for the rears so got someone doin that for me. Super 35 regeared and yukonized! Carpet sound deadner done. Door panels and sunvisors done. Headliner is eh… gonna try some trimming but it’s there. Made it all out of tool boxes I got free. Gonna start to upload some pics and before during and afters if anyone cares to see or know how I did what. Any advice as always is welcomed. Stay safe people!
-
HVAC box refurb questions/advice
Warthog replied to A-man930's topic in MJ Tech: Modification and Repairs
There is a guy on Cherokee forum that was selling whole foam kits for refurbishing. Awesome products! Gotta order another one! Got a mj and xj build going. -
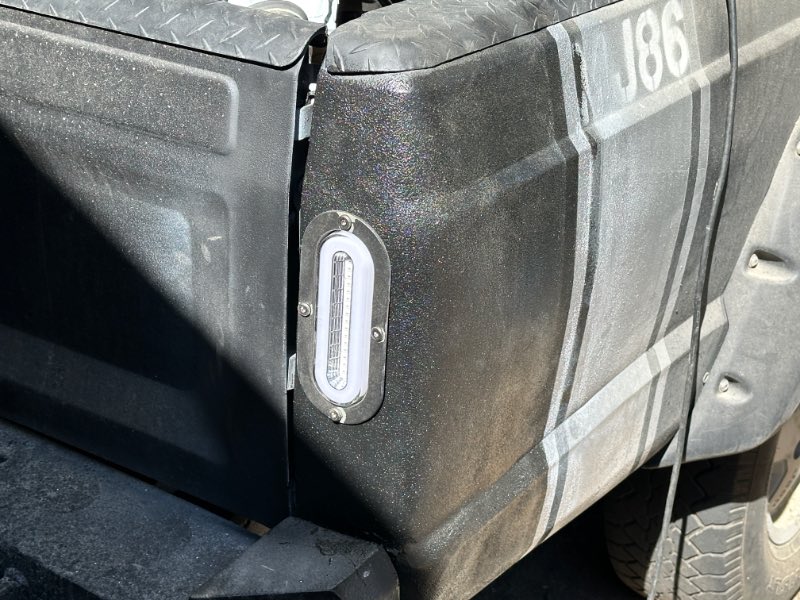
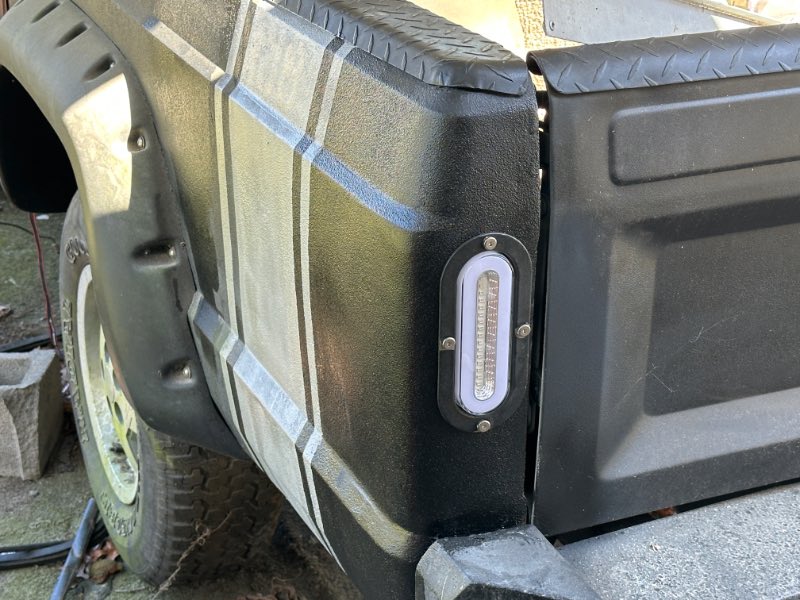
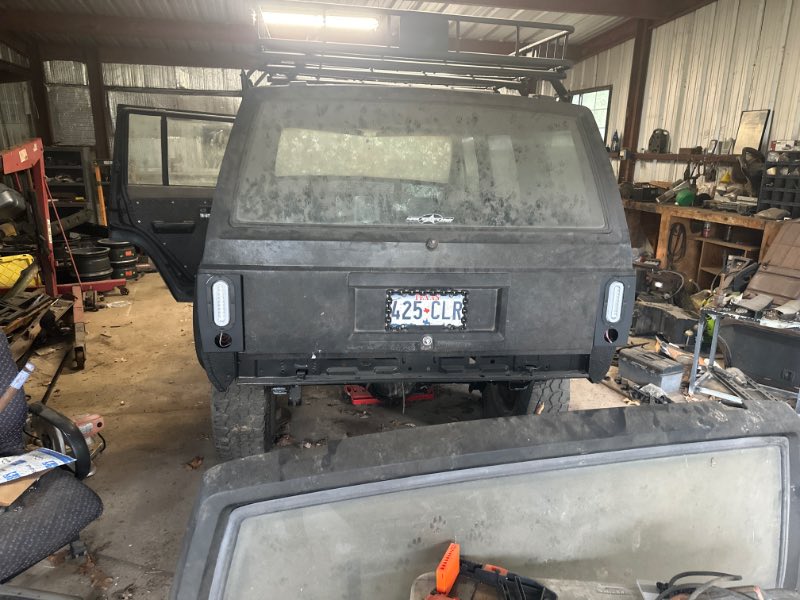
Comanche tail lights are too damn high!
Warthog replied to Warthog's topic in MJ Tech: Modification and Repairs
lol it’s the bed liner! Don’t have the patience for actual body work and paint. Would have taken me a couple weeks! I get to particular when it comes to real detail.! But thanks! -
Comanche tail lights are too damn high!
Warthog replied to Warthog's topic in MJ Tech: Modification and Repairs
What’s cool is I can change the look for bout $20! If I decide to go with a different light design. -
Comanche tail lights are too damn high!
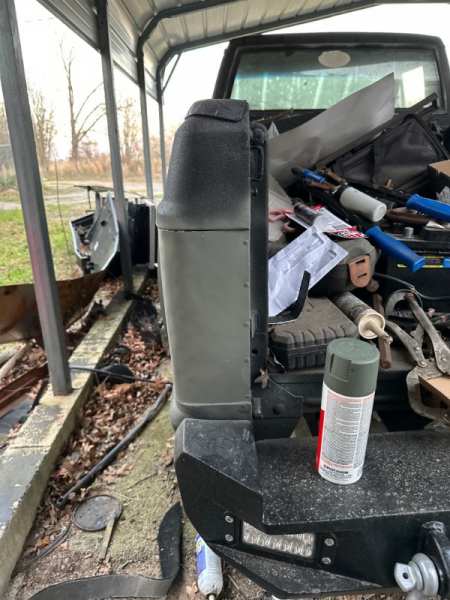
Warthog replied to Warthog's topic in MJ Tech: Modification and Repairs
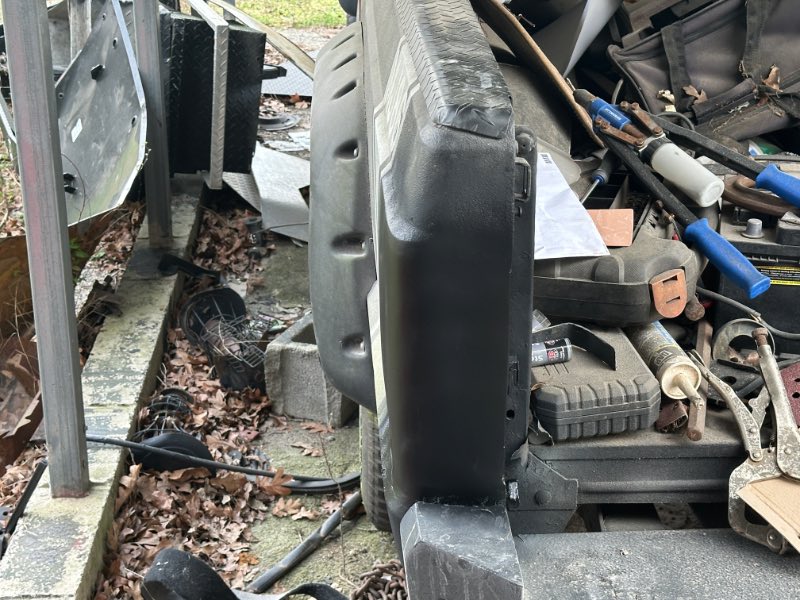
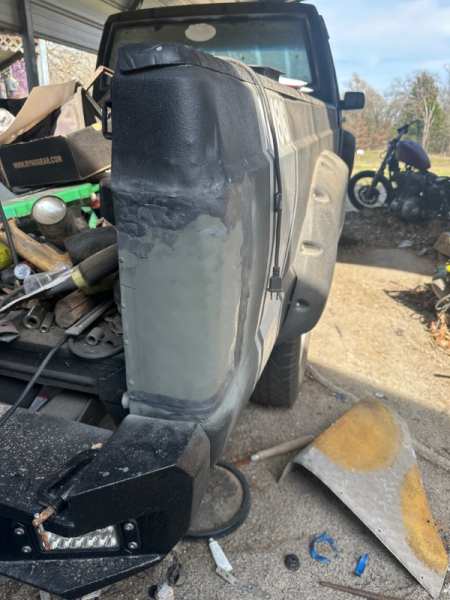
Well got em in but not secured yet. Gonna smooth out the inner part so I don’t gash myself wiring them. But other than some stainless bolts that it. Still kickin around what clearance lights I want. Back up lights are in my bumper. Like these cause the little glo ring park lights. Also sorta does with my head lights. Will post more later on the clearance light decision. Wish I didn’t have to. Dig the sleek side look.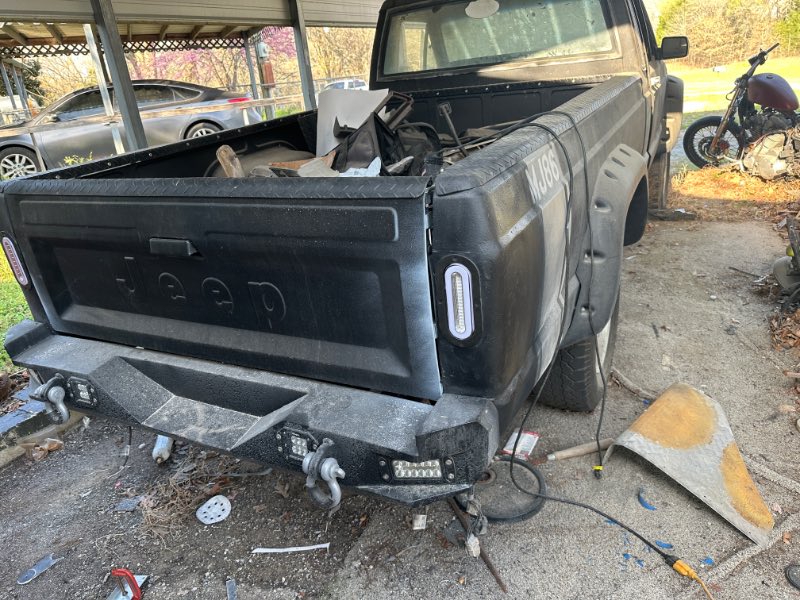
-
Comanche tail lights are too damn high!
Warthog replied to Warthog's topic in MJ Tech: Modification and Repairs
Well I wasn’t but I’ve been informed it’s mandatory! So a small round one will be added. -
Comanche tail lights are too damn high!
Warthog replied to Warthog's topic in MJ Tech: Modification and Repairs
I don’t think so. If I do it will be those 2.5” round jobs with the clear lens red led. I’m now at the cut in stage. Got a bit more liner to apply but for the most part it’s cut wire install. If I was painting I’d still have moser body work? Bondo skimming. But bedliner is sooooo much more forgiving. Soon as I find my step up bits for the ends I’m gonna cut. To get the round part plumb and draw a line from bottom to top of those holes for the cut off wheel to finish the cutout. -
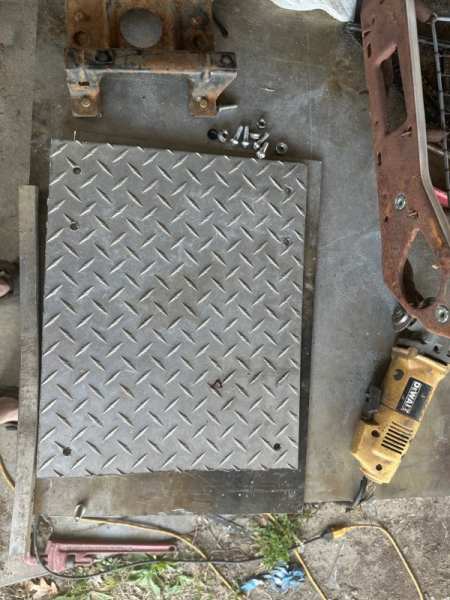
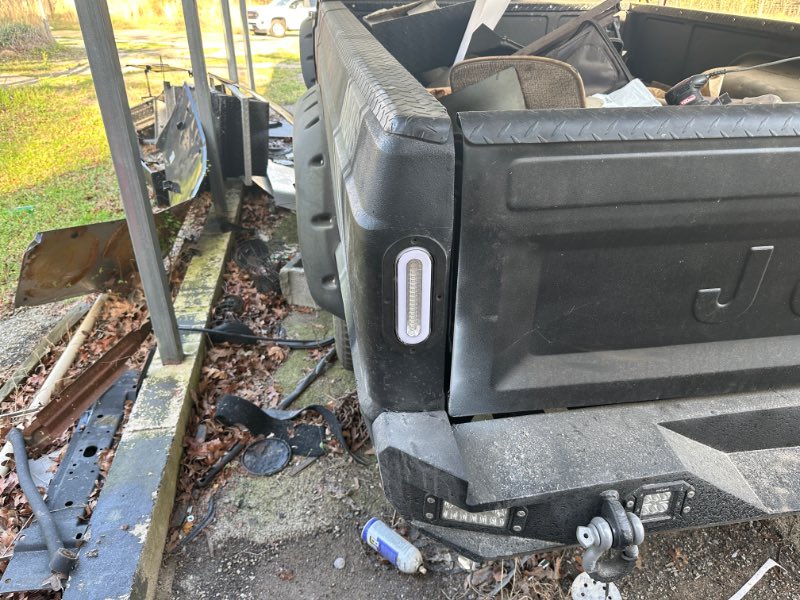
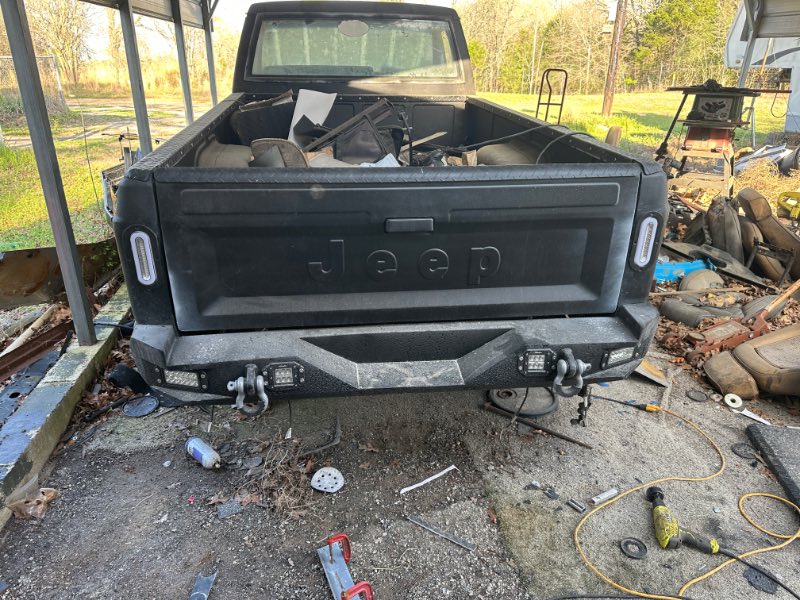
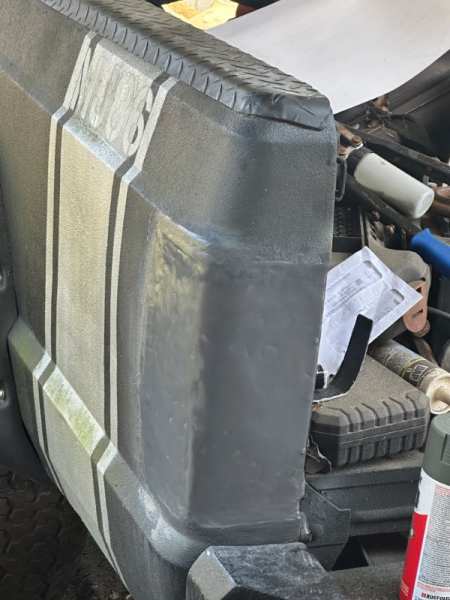
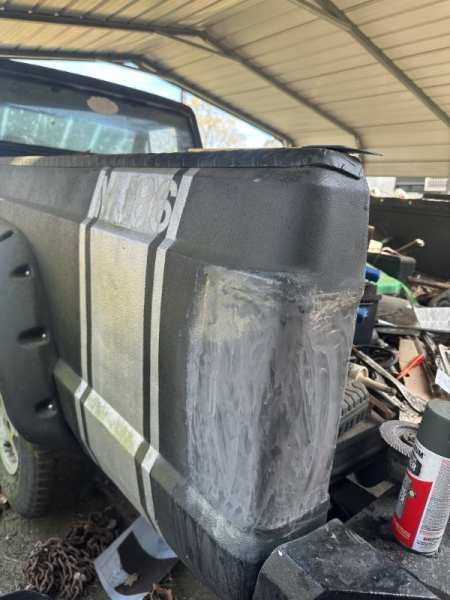
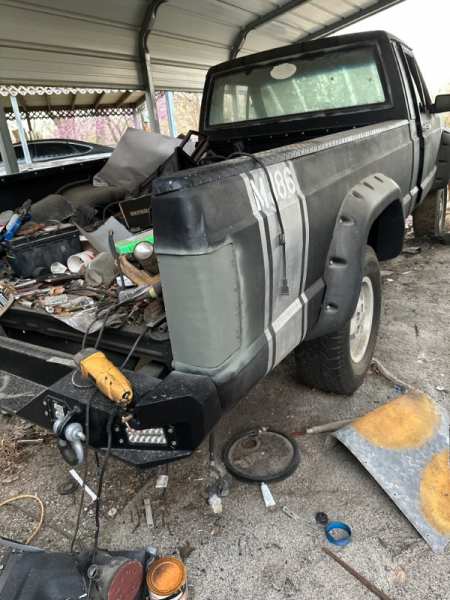
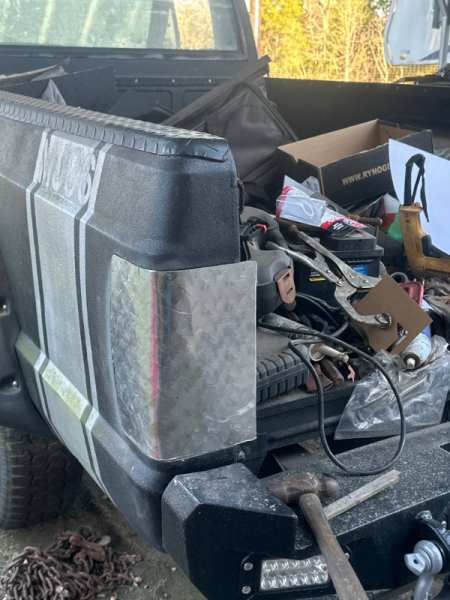
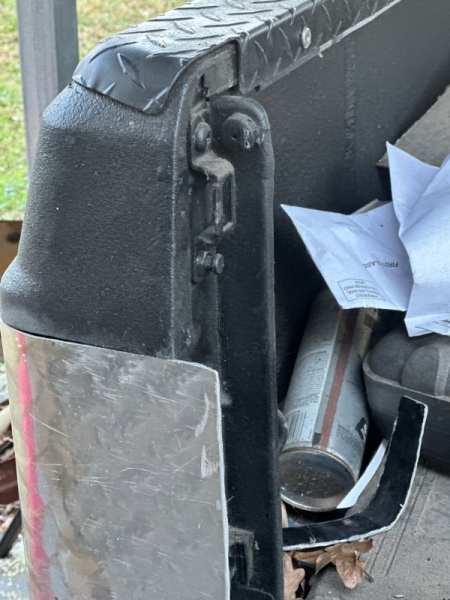
I thought I’d share my tail light dilemma with you guys cause I know someone out there feels the same way I do! Chevy ford and dodge did a huge disservice to people when the decided to do wrap around tail lights. They get bumped they break and add to the fact these trucks haven’t been around in decades makes for a price sunami! Never have been a fan of wrap around period. Takes away from the body lines and just look ugly to me. Just my opinion and I’m old so there. Looked for boxes but nobody makes em for the mj. Xj yes but those won’t work. Dakotas from certain years will with some cutting filing and massage. No thanks cause you’re still in the same boat. I’ve seen originals for $500 and repos for $300! No thanks. You’re still in the same boat. So thought I’d weld some sheet over the hole like some guys I’ve seen! Bought a welder and everything! My whole family welds! I however do not. I can not. Took all of 20 mins to realize you need a basic certain skill which I don’t possess. So gave it to my brother and was gonna get him to do it. Problem is he is always up to his @$$ in alligators so I might as well wait on the lord himself to come down and do it. Talked to lots of I’ll do it for you! And that’s as far as it got. Offered to hire someone but didn’t pan either. Folks are busy and don’t wanna work on there day off. It’s a complete rebuild so a shop is out of the question. After many many moons and thinking sessions it came to me. I took a tool box someone gave me some poster board and made a template. Ground down the diamond treads so the aluminum would bend easy but left it on the non bend areas for strength. I put smooth side out. Took some pliers and tye tab where the originals screwed in I bent it out flat for a lip. To the inside by the tail gate the is a little bend lip I assume to meet tye taillight? I beat it into a flat lip. Took a tiger paw on a grinder and made small slow increment changes to the aluminum til it fit. Made the bend using the upper side of the bed just pushin til it got close then hands and eyeballed it. I kept the tailgat portion a bit long. I’ll explain in a minute. Once I had it like I liked I put it in place and made my rivet marks and drilled. 3/16 on the side and 1/8 or smaller by the tailgate. Once I had it lined and rivets would go in I removed and layed jb well onto the tab lips. Use it pretty thick so it makes a nice squish and pop rivet it in place. Wipe the excess jb weld off but try to use it to make it sorta flush in the gaps? Took a cutoff disc on a grinder and trimmed the excess by the tailgate flush and jb weld after sanding to fill in the seam.Next day took some steel stick jb weld and pushed into gaps and seams to make it as flush as possible. Not a fan of bondo I took jb weld again and used it to make the body lines shape in best I could. Once everything was close I used bondo to skim to make the finish. Sand repeat etc. til you get it how you want it. The goal is to have no seam lines where it looks like all one piece. Once it’s where you like it prime and start sanding and eyeballing til it’s to your satisfaction. I used Rust-Oleum. Once you it’s done mark and cut out for your tail lights. Paint, plug em up and install. I am almost to the cut stage. Wanted tye 4”rounds but couldn’t get em to fit right so went with some nice ovals. I also used a metal ss light bezel so it looks cleaner. I got pics for you to get a reference. I bedlined my whole truck, even my Cherokee and yj so the prep work doesn’t need to be as spot on as if you use paint etc. it’s a jeep a truck and it will be used as such. Total cost? A large size jb weld pk, one steel stick, can of primer and paint. You can get tool boxes free if you look around. Hope this helps someone.
-
There’s a guy on the Cherokee forums that’s makin em or was. Great stuff!
-
86-92 Jeep MJ Reproduction Tail Light Housings
Warthog replied to Dzimm's topic in Vendors- members making products for MJs
Hey brother just found this do you still make these? If so how much and if not would you do a set?