
eaglescout526
-
Posts
12138 -
Joined
-
Last visited
-
Days Won
13
Content Type
Profiles
Forums
Gallery
Everything posted by eaglescout526
-
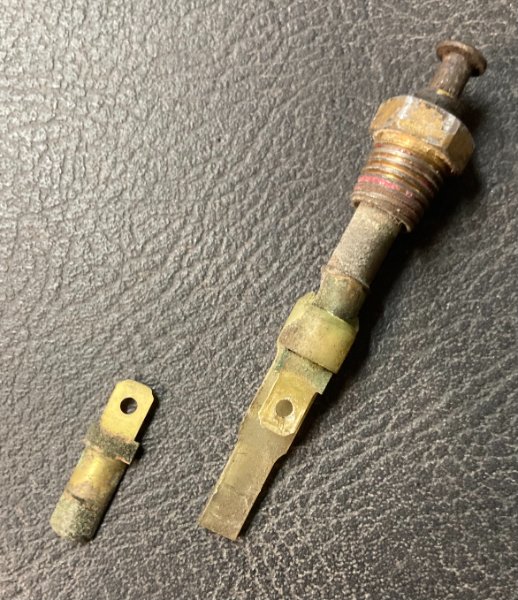
More than likely. I was actually surprised as I have never removed my switches from the door jambs. But it looks like the nylon clip that holds the terminal to the switch has just failed to hold the terminal to the switch. I’d give it a look. Maybe soak it in some vinegar to remove any corrosion if it still is in good shape.
-
Damn. Its been a bit huh. Well she still lives. Duh, runs like a champ. But im here today to show this gem: My key in chime failed. Ok thats fine. Ill order a new switch for the column cause that usually brakes from the stress. Plot twist. The switch isnt broke. Ok thats weird. Did some power tracing. Found I had no power, weird. Found a popped fuse. I think I did that when the switch contacted the column. Replaced it, still nothin. Ok. Busted out the MJ electrical manual. Found the chime circuit, went to the dome lamp as well. Decided to take the switch out and found the 40 year old switch is broke. Alright, thanks for your service switch. Dug out my NOS one, put it in and We are back in business with a new switch too. That is all. I need to add some stickers to her from boxyjeep still. Been lazy.
-
 I think I see a factory tail gate end cap.
 -
Odd headlight issue
eaglescout526 replied to Aidenmoreno3's topic in MJ Tech: Modification and Repairs
All -
Odd headlight issue
eaglescout526 replied to Aidenmoreno3's topic in MJ Tech: Modification and Repairs
Have you cleaned your grounds? -
Odd headlight issue
eaglescout526 replied to Aidenmoreno3's topic in MJ Tech: Modification and Repairs
This would be a great time to add the relay harness upgrade. Have you checked your fuses? -
$1200 91 in TX (project)
eaglescout526 replied to H3ADBANG4L1F3's topic in Craigslist/Marketplace/eBay... i.e. Not Your Stuff
Those are ford?! Jeez. Someone copied someone. -
$1200 91 in TX (project)
eaglescout526 replied to H3ADBANG4L1F3's topic in Craigslist/Marketplace/eBay... i.e. Not Your Stuff
Lol. It really is. I see Toyota axles, custom rear frame, rear control arms. It’s for someone looking for a crawler half done. It’s niche. -
$1200 91 in TX (project)
eaglescout526 replied to H3ADBANG4L1F3's topic in Craigslist/Marketplace/eBay... i.e. Not Your Stuff
That’s gonna be a tough sell. -
Will this gauge cluster work
eaglescout526 replied to Smokeyyank's topic in MJ Tech: Modification and Repairs
For that cluster, I can see $200 being reasonable. It’s speedo is up to 115mph vs the 85 that was standard. Plus column shift and gauges. -
Will this gauge cluster work
eaglescout526 replied to Smokeyyank's topic in MJ Tech: Modification and Repairs
Mechanical speedo went away in 91. 91-96 would be digital. -
2.5 Fixer Upper (new to Comanches)
eaglescout526 replied to I_s2k's topic in MJ Tech: Modification and Repairs
No problem! This should almost always be a must for any new 2.5L owner. -
2.5 Fixer Upper (new to Comanches)
eaglescout526 replied to I_s2k's topic in MJ Tech: Modification and Repairs
Idle Speed Actuator. Its at the front of the throttle body close to the valve cover when looking at the intake from the front of the MJ. -
2.5 Fixer Upper (new to Comanches)
eaglescout526 replied to I_s2k's topic in MJ Tech: Modification and Repairs
I have a DIY on TBI ISA adjustment. Should help with your start up being a hit or miss. The ISA after the engine is off is supposed to extend and be ready for the next start up. If it isnt doing that or the PO messed with the adjustment screw on that ISA, the start ups will be a hit or miss. -
Renix 4.0L wiring help
eaglescout526 replied to eaglescout526's topic in MJ Tech: Modification and Repairs
Ok good I can delete this wire. Thank you so much! I must’ve glossed over that when searching. -
First, Ωhm ive dug through the electrical manual and for the life of me I cannot find this one wire on C104 at cavity F, blue wire. Have no idea where it leads I suspect C103 or C105 Anyone with an 86 4.0L, can I get some help on seeing where this one wire goes? I have my doubts I need it but I dont want to remove it if I find out I will need it later on. C104 is a ten wire connector that looks different from the rest at the passenger side by the shock tower or relay center. I will follow up if I need to figure out where any others go.
-
2.5 Fixer Upper (new to Comanches)
eaglescout526 replied to I_s2k's topic in MJ Tech: Modification and Repairs
With V-belt?! I think we need to look at the date code on that block. -
2.5 Fixer Upper (new to Comanches)
eaglescout526 replied to I_s2k's topic in MJ Tech: Modification and Repairs
I know they existed but I’ve never seen an 84-86 2.5L with no PS pump or brackets. That’s probably factory. PS was an option still. -
2.5 Fixer Upper (new to Comanches)
eaglescout526 replied to I_s2k's topic in MJ Tech: Modification and Repairs
Wow. Power steering delete all together. Is it a V-belt set up? -
2.5 Fixer Upper (new to Comanches)
eaglescout526 replied to I_s2k's topic in MJ Tech: Modification and Repairs
Hes gonna need an 86 electrical manual, which I do have. I really need to get all my books into a pdf. Or transcribe them. -
3B Seabring Red
-
2.5 Fixer Upper (new to Comanches)
eaglescout526 replied to I_s2k's topic in MJ Tech: Modification and Repairs
What a basket case. Can we get some pics of the engine bay? I have a DIY on adjusting the ISA. It is highly recommended to go over cruiser54's tips and get those taken care of as well. If I can get some pics, I can help out. But theres a few things that would make it fall flat on its face. Vac leaks, manifolds not being snug to the block, MAP, TPS and or a bad head gasket. -
Chunk, A 1984 XJ
eaglescout526 replied to eaglescout526's topic in Member Projects: Other Cool Stuff
Plot twist! I found the harness I need. I have had it all along lol. PSA everyone, go through your Jeep crap! Never know what you have. Now to dissect this harness so I can have the wiring I need and get it all routed and together and I can move forward with installing the manifolds. This is really interesting to do. I have been studying the hell out of the 84, 85, 86 and 88 electrical manuals to make sure I get everything to line up properly. Which it all should now. -
Cracked block - what to do?
eaglescout526 replied to CO MJ's topic in MJ Tech: Modification and Repairs
Haha, sorry I couldn’t help but laugh a little. I presume you mean oil in your coolant. Because those two are the same thing in the automotive world. -
Chunk, A 1984 XJ
eaglescout526 replied to eaglescout526's topic in Member Projects: Other Cool Stuff
Ok funny thing about this. I was a dingus and had the wrong ground connected. I now figured out that if I jumped the two grounds or even jumped the ground at the starter relay this way, it will run. Everything else isn’t entirely necessary. i found there are two AC related wires, coolant sensor(cluster), tach signal(cluster), up shift lamp, reverse lamps and 4wd light are at this plug including ground. So I have that figured now. Just waiting on the other half of the harness now haha. Which brings me to here Getting closer. This is the early 86 Renix relay bracket. So you see the starter relay, fog lamp lamp relay, O2 relay, fuel pump relay and the diag connectors. I used the old diag connector bracket holder, drilled two holes into the relay bracket to hold these connectors. I say it looks pretty well actually. Added two missing wires from when I yanked out the engine wiring. Added the alt wire and ignition wire. I might be missing one or two more but won’t know yet. I also know I need to tie in power to the ECU from an old yellow splice on the main harness. Next will be labeling the system sentry wires and where they go and what all plugs I will need to replace.