

holeski
-
Posts
154 -
Joined
-
Last visited
Content Type
Profiles
Forums
Gallery
Everything posted by holeski
-
Very nice. I have a 3ed MJ I am planing on doing a truggy. Keep the photos coming. :popcorn:
-
I'll look into it. Sliders are on my list here soon. I want to try and keep this trucks body beter then my first MJ.
-
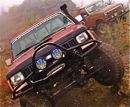
We are building a 1989 Jeep Comanche "MJ" for our Holeproof Industries shop truck to showcase some of the products our shop offers. It is being built with products from some of the leaders in the off-road business. Besides being seen on the road daily as a parts & errand truck it will be featured at all 4x4 and off-road events in Northern Alaska and some of the bigger ones in Southern Alaska. Decals and Logos provided to us will be clearly displayed on the vehicle. We will also be doing install and product write-ups on our website and local off-road forums for the products we receive. If this is a marketing project your company is interested in participating, please contact us. Shop truck info: 1989 Jeep Comanche, short bed, 4.0L, Dana 44 rear axle with L/S Supplied parts to date: Complete 4.5 Rough Country lift kit 3/8" Synthetic Winchline.com & Hook Holeproof Industries Aluminum Fairlead CRAWL Magazine UDS Ultimate Trail Products AGR steering Rock Ram Kit K&N Air and Oil Filters Staun beadlocks Watch what we can do to this MJ with the help of some of the leaders in the off-road business. This is our 3ed MJ and I hope will be our best. above: The truck as we picked it up. We purchased two Comanche's for just over $1000.00. With some spare parts that we had here at the shop we had this. 4.5" Rough Country lift photos will be up soon.
-
Nice job. Maybe I missed it but what is the best way to get payment to you?
-
I like to do a lot of exploration so he goes with me when I do that kind of stuff. When I hit real trails he stays behind. He has a lot more room in the MJ compared to my YJ. We have gone across the US 2 times and worked Urban Disaster Search and Rescue in Washington State for FEMA so he is real good with everyone and thing, although he doesn’t understand why he can’t go play with the Moose. Where did you find the doggy harness? As rockers go I know I did this to my wife’s XJ and I am no longer allowed to wheel it buy myself. So I built these, She was still pissed at me though.
-
-
I went out and wheeled my Comanche for the fist time is weekend. Wow what a wheelbase will do for you. 4.10 open front and rear right now stock 4 cyl.
-
Good luck! :USAflag:
-
I made this quick fab plate mount out of scrap in like 10 minutes. http://www.arcticoffroad.com/gallery2/m ... alNumber=1
-
Sure go ahead Nothing in there I would try and copyright or trade make. Sorry I could offer a better price for you, good luck.
-
I don’t want to know where to get them just who has them, a photo or two and what you think about the change over from the short arms. I will be building my own and what to see what has worked well for the most of you. Not looking to make the flexiest thing out there since it will still be a daily driver for a few more years. I just did a TJ rear long arm set up with an axle swap so I know I can work it out.
-
I would but the shipping would kill you. Shipping in & out of the Alaska is ruff. Something that size is UPS ground or a shipping forward on a barge to Seattle or Tacoma WA then truck sipped to you. For UPS it has to be unpainted due to new laws. I would do it but it’s now economical for you. Drive on up here and I’ll build you one and we can hit some trails. :cheers: This is a reply I made to some one here on a local forum.
-
The mounting brackets where pain. When I decided I just couldn’t stand to look at the old box steel bumper anymore, I thought it would be a quick pull off, cut and cap. Well it turned out to be much more work then that. The way it was made (I did make the old bumper, it came on the truck) I had to drop the rear springs. What a pain. I cut and the bracket at angles so I could slid it in and out with out messing with the springs, but did not mess with any of the mounting holes. I was a bit afraid I might have taken too much of it away but I don’t think so now. It is held on by 8 stock bolts, 4 on each side. Wife has it to day; She loves driving that thing. So I’ll snap a photo of the rear and post it later. I plan on adding more gussets to it later, but want to see how it holds up as is, before I start adding more weight. As for making you some frame mounting brackets, If after I post a photo a few of you want them I can pull the bumper back off and make a template and fab up a few sets. Just the bracket I can mail USPS for cheap.
-
The steel used was, The bumper that was on the truck was 1/4x4x2” steel. Not welded well at all, but why waste the steel at today’s prices. This truck is a budget build for me. So I cut the lower corner off and added a 66” piece of 4x1/4” flat bar and welded it up. Some of the nicest weld beads I have done and I had to grind them smooth. I then cut the ends at an angle and capped with more steel plate. Re-welded all the old welds. The tow points where made from 1x3” bar stock, cut and ground smooth and drilled with a 1” hole. They are spot welded from the rear and fully welded in front so it pulls on the whole bumper and not just the face. The receiver is 2x2x1/4’’ square stock and looks cool how it sets in the angle of the bumper.
-
I finished up the rear bumper for the Comanche today. I ran out of black paint with this other CJ-7 project I have been working on so I had some black “Wrinkle” paint a friend left me when he moved so I used that. Weird stuff and takes forever to dry. I power coated two D-ring shackles silver to match the truck and offset the bumper. With the bumper on and now nowhere to put the plate I fabed up a receiver hitch plate mount witch is kind of trick. Here and some finished photos.
-
In the background is a CJ-7 that I just did an axle swap and shackle reversal on. I was thinking about trimming some of that sheet metal off but might wait till I tag it first. I painted the bumper last night and powder coated some D-ring shackles silver and should be mounting it up today so I’ll get a few more finished photos to share. Now if I could just find the time to do the XJ & MJ front bumpers I would be in there.
-
Here is a updated test fit before paint prep. http://www.arcticoffroad.com/gallery2/m ... alNumber=2 Thanks for the good words. :banana:
-
So I started a new project. I couldn’t stand the box look of the bumper that came with the truck so I cut it up and this is what I have so far. I would hit the bumper on the RTI ever time I went up in reverse so I angled it a bit, Added a 2" receiver and 1x3" tow points. I still have the ends to angle but not sure how I’m going to do it yet. www.arcticoffroad.com/gallery2/main.php ... alNumber=2
-
I sent the MJ up the RTI today now that the 4wd is fixed and here is how it did after a slight roll back. I will see if I can put the Rusty’s LCA and 6" skyjacker coils then SOA the rear. If it looks like it’s going to be to high for now I’ll just swap a set of 6 cyl stock XJ coils in with 2" polly spacers and some new shocks. It's a poor 4cyl with no power and I won't have the 4.56 gears out of the XJ until I do the 44-axle swap. So I'm going for flexy and not big rubber. It's a budget build and that’s what I have. After the gears maybe 33" MTR's that I have here. I'll be getting 39" Irok on the YJ and the XJ is going to 35" so I'll have 9 33" MTR's that are new. I will also have 8 30" mud rovers. So they might go on the sand buggy. But I'll stay with the 30" ones for a bit and I'll have two spares with me on the trail. Wait to see the bed cage build up later. Here is a photo of a stock MJ on the RTI. www.arcticoffroad.com/gallery2/main.php ... alNumber=2 I put the 6" coils I took out of the XJ into the MJ and it's too much for right now. The longer shocks I had are too short and I need a new track bar. So I was going to do the SOA in the rear Sunday but I think I will swap out the 6" coils for the stock coils and 2 inch spacers until I get more parts saved up to do the 6" lift. I swapped the 6" coils out for the stock MJ coils and 2" polly spacers and it sets nice and level with 30" tires on it. I have some longer shocks for the rear I'm going to go put on and then see how the flex has changed. I picked up a track arm relocate bracket form a friends TJ lift never used. Not sure if I need it yet or not now that the 6” coils are back out. The longer rear shocks helped out some. The longer shock let the rear sag just a hair since they don’t push back out like the short ones did, but they offer much more rear drop. Before: http://www.arcticoffroad.com/gallery2/m ... alNumber=2 After: http://www.arcticoffroad.com/gallery2/m ... alNumber=2 As you can see I gained a good bit of flex and it all cost me $0.00! All left over parts. I also removed the under bed spare tire mount to help ground clearance and save weight. Add greaseable bolts to the leaf springs. The rear bumper came off. Not sure if I’m going to mod it or build my own. Next on the list of things are longer brake lines. The rear brake line is really short and hangs up the rear drop. A set of rear XJ lift shackles, as the MJ’s stock shackles are longer then XJ’s so I will get about .05 inch out of them.
-
New TJ D30 shafts in an old D30
holeski replied to holeski's topic in MJ Tech: Modification and Repairs
I capped one of the vacuum lines and looped the other two together and the part time light works like a charm. Now if I only could do that with my 94 YJ that now has a front 44. -
New TJ D30 shafts in an old D30
holeski replied to holeski's topic in MJ Tech: Modification and Repairs
No machining was needed to fit the new seals in the diff. The second seal that fit into the disconnect seems to be a safety or redundant seal, a just in case kind of thing. The third seal I think must be for a different year maybe. Throw them all in there so they only have to make one kit for every year that the seals might have changed. Thanks for the how to on the 4wd light. I was thinking I could do that but haven’t tried it yet. -
The MJ has 4wd once more. I swapped out the old 3 piece vacuum disconnect with the newer TJ 2 piece shafts. Benefits of this are faster 4wd engagement, Less parts to break and stronger u-joints. I pulled the front Dana 30 diff cover and drained the oil. I then pulled the vacuum disconnects and drained this. After pulling the tires, brakes rotors, axles and throwing the dust cover in the trash. It was time to start the real work. The block off kit comes with 3 new oil seals the aluminum block of plate and gasket. The 3 seals are not the same as either the old Dana 30 or the new TJ Dana 30. This is why I went with the kit from Randy’s R&P instead of make it myself. If you order one let them know Holeproof Industries sent you. I first took the seals to NAPA to try and cross-reference them. Only one crossed, but this is the most important one. The one that goes in the pass side of the diff. See there is no seal here in the old 3 piece axle set up since oil need to flow down to where the disconnect is. I pulled the ring gear and carrier and pulled or knocked out all the old seals. There is also a roller bearing in the disconnect housing that should be pulled. The new shaft is thinner in this area so it won’t touch it, so you don’t have to pull it but it makes putting the new seals in easier. One seal (NAPA 11566) went where the outer pass side shaft goes into the disconnect housing and one (NAPA 11343) in the pass side of the diff. Now the 3ed went no where to be found. I put the seals in and bolted everything back together. Filled with gear lube and went wheeling. The only thing I don’t have now the 4wd light witch I think I can hook up some of the old vacuum lines to make it work. This however won’t work on say my newer YJ since the light switch is electric and not vacuum actuated. Seal info. Pass side diff Kit National 471763 NAPA oil seal 11343 Outer disconnect housing seal NAPA oil seal 11566 Looks to be right one from the NAPA seal book.
-
anyone run 31s with SOA lift?
holeski replied to Oizarod115's topic in MJ Tech: Modification and Repairs
All the more room for some killer flex. I plane on doing it as my tired 4 cyl. won’t turn 33” well enough for daily driving. -
changin water pump on a 4.0L?
holeski replied to Stumpy's topic in MJ Tech: Modification and Repairs
You can do it with out removing the radiator but you will have wished you did half way though the job, Not hard to do at all just a pain in the @$$. -
Nice, looks good and I'm glad you’re not afraid to wheel it.