

holeski
-
Posts
154 -
Joined
-
Last visited
holeski's Achievements
")
Comanche Aficionado (4/11)
-
Notch Customs M-Max fender flair review
holeski replied to holeski's topic in MJ Tech: Modification and Repairs
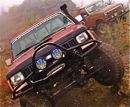
Notch Customs MJ flairs unboxed. Front Notch Vs. Bushwacker, Top Front Notch Vs. Bushwacker, Side Rear Notch Customs flairs arrived with broken mounting hardware. The bolts that were not broken were all pointing in different directions. Also the fiberglass had some twisting in the mold and are not flexible. (Drivers Front) (Passanger Front) Front Notch mock-up on the Comanche, would have looked nice if they could have been mounted. -
I agree 100%. We have been talking with a few places about doing this. i know nothing about how well they fit, but they look pretty decent and the price is damn good as well. http://www.t-mfab.com/store-3/mj-unibody-stiffiners/ We have a set of the Ruffstuff frame stiffeners here now we will do a review of and let you know how they work. This may be where we start. We have a CNC Plasma table coming in very soon and are looking for items to focus on making that would benefit all our fellow MJ brothern. We have also done a few MJ bed cages. We could put together a DIY kit, but shipping would still be ruff.
-
Like it!
-
Deciding what products and parts to use on the Holeproof Comanche Shop Truck has been hard. There are a lot of great manufactures so we try to give them the chance to prove there product is better then the rest and send some items to test out in one of the harshest climates in the world, Alaska! This wasn't the case with the Notch Customs fender flairs. We bought a set of the M-Max flairs for MJs & 2-door XJs and had them shipped. First shipping was a pain as they told us $300+ on top of the $550 price tag. We understand they are in Utal and not use to shipping very far. After some time we were able to get them to arrange USPS for under $200. Notch Customs have some pretty convincing torture testing videos posted, so we hoped these would prove well in Alaska. But we should have know something was a foot when they said they didn't want to send a set to test up here. Still we pulled the trigger since something had to be done for the Holeproof Arctic MJ Project. Excited to see how they would look, month after month nothing in our deliveries. A email out to Connor at Notch and we find out they haven't even been made. A few weeks later we get a message that they are done then another month long wait before they show up. Although the box was packed very well with no evidence of outside damage which makes what we find worse. Broken mounting hardware! The rest of the bolts all goofy and crooked. Come to find out all they do is "glue" bolts to the fiberglass. Not molded in, not reinforced. We spoke to an fiberglass specialist who pretty much laughed when he saw the photos and said there is no way they would hold up, let alone here in Alaska when it gets cold. We also noticed no instructions are included, worse then that no templet for drilling holes! There are some poor non-vehicle specific instructions on the Notch website. (http://notchcustoms.com) Basically hold the flair up using tape or someone and guess where the holes should go. There is no reference to where or how to locate them on the body. Bolt on trace and cut. Fill all the gaps with body filler and/or sand the fiberglass. If mounting bolts don't fit enlarge holes until they do. Don't forget the rear need cut, folded and welded. Ok, Wow. Another email back to Connor at Notch with photos of our dilemma, maybe, just maybe we got a defective set, and and we want to give them the benefit of doubt. The reply; "Our flares are designed so that the bolts will break loose before major damage is done to the flare." So what good is a fender flare that stays in one piece if you can't attach or mount it to the rig? And they said glue it back on using body filler! Glue, really did they just say glue? He goes on to say "it does not need to be perfectly perpendicular to the base of the flare. The holes that will be drilled are meant to be a little larger than the bolts." This goes back to the instructions that say keep making the hole bigger until it fits. Sounds like they might not be any consistency to how the flares are built. At the angles of some of the bolts we would need to make a lost 1 inch oblong holes to mount the flares. Even though this is Fiberglass they should still be precise and be able to provide a templet for the average customer. After all we want you to be able to use what we sale. How we feel. We loved the look of the flairs, although we would have liked them just a little wider. The fiberglass does seems strong and is a good thickness. They open the wheel well nicely but you do need to reinforce the fenders some. They don't fit well, it takes fiberglass, body filler, sanding of the flairs to get a precise fit. If you don't mind the extra work this is fine and will result in a better look. That is if you know what your doing otherwise look at paying $500-1500 to have a bodyshop do the work and these doesn't include painting. They are primed but not painted. Our biggest upset was the broken bolts and how the mounting hardware is attached using just some greenish-blue poop looking goop. We would have liked to have seen the bolts molded into the flare or better yet a metal skeleton the bolts are attached to with the fiberglass molded around those. What was even worse then the mounting was the customer service. Everything seemed like an excuse or copout. As much as we like the look of the Notch Customs fender flairs we think there is still some improvement needed before they should be sold to the public. These might be fine for your street queens and mall crawlers, but not Northern Alaska Off-Roading. Unless they can fix there mess up here and send a replacement that proves what we received was defective, we can not not recommend these to any of our customers. We can't even complete the the install. We tried a few more times to get them to replace them, but they were not intristed. They did offer to refund us our money if we paid the $300 shipping to send them back first but we felt that it was there responsibility to send a call tag for them. They even went as far as to have Facebook remove this very review for our pages. We also started find many posts online like this one on CherokeeTalk. "wjlizard Join Date: Aug 2012 Posts: 1,803 If you are using your XJ to wheel even a little bit stay away from notch customs x-max flares the mounting system sucks ask me how I know ,they look great but the mounts break real easy"
-
What I have noticed when looking for parts, mods and accessories for the Comanche is we are often overlooked. What would everyone like to see made for the MJ that's not produced by anyone or there is only one type of item that doesn't work for your needs?
-
Holeproof4x4Fab Project Arctic MJ
holeski replied to holeski's topic in Member Projects: Your Comanches
So far that's the plan. In the rear only the D70 shaft retainer bolts stick out past the tire. The plan is to us countersunk hardware. On the front there is about an inch. Only part of the hub and not even the whole hub is past the trie. We have a CNC Plasma table coming in the next few weeks. We have been playing with some rock-ring ideas which would help protect them some. We may make some thin spacers on the lathe as well, but it's not enough to recenter the rims. -
Opinions On Fender Flares Pics Wanted
holeski replied to 87mjdriver's topic in MJ Tech: Modification and Repairs
Mounting bolts brake off early and there is no good why to fix them. Plus it takes bodywork to fit them well. They aren't an out of box bolt on. -
But what the videos don't show you is that the mounts are all busted off from the start. We became a vendor and were excited 'til they showed up with the bolts busted off, the ones that were still on where all crooked, and the molds didn't fit the body lines well. This was after more then a month of waiting for them to ship. Instructions are written badly and you have to go to their website to download them. Their response was: drill the holes out to 1", use bigger washers. Then sand the flare to fit, then use bondo to fill everywhere they don't match up. Then they refused to fix or replace them, told us to "glue" the broken bolts back onto the fiberglass. I was going to write a review of our shop's experience with them. I am really interested in others' experiences with them.
-
There used to be 3 molds of the bushwackers. 2dr XJ, 4dr XJ and the MJ. The difference between the 2dr XJ and MJ rears where the MJ ones where open a little more length wise front to rear of the flair. They only make the 2 sets now for 4dr XJ and 2dr XJ/MJ. I haven't had a set of them in for years to tell which one they kept making. As the Notch Customs, they look great, but are poorly built and won't stay on if you rub them on something. The mounting bolts brake right off the fiberglass and there is now good way to fix them. They have poor customer service and absolutely no kind of warranty even if they show up damaged.
-
New Notch Custom Flairs
holeski replied to Alpine Paradise's topic in Member Projects: Your Comanches
But what the videos don't show you is that the mounts are all busted off from the start. We became a vendor and where excited till they showed up with the bolts busted off, the ones that were still on where all crooked and the molds didn't fit the body lines well. Then they refused to fix or replace them. I was going to write a revew of our shops experience with them. I am really intristed to know in what condition yours showed up in, how the molds fit, did you sand and use body filler like they told us to and how they have been holding up since you installed them? -
MJOTM - June, 2015 - MJ trailers!!
holeski replied to neohic's topic in Comanche of the Month (MJOTM)
These were not the best photos ever taken of the MJ trailer but you get the idea. -
Holeproof4x4Fab Project Arctic MJ
holeski replied to holeski's topic in Member Projects: Your Comanches
These were not the best photos ever taken of the MJ trailer but you get the idea. -
Holeproof4x4Fab Project Arctic MJ
holeski replied to holeski's topic in Member Projects: Your Comanches
I apologize for not posting up our progress. Summer hits Alaska and things get crazy. We have been very busy with shop and customer work as well as keeping our YJ trail ready for weekend trips to try and stay somewhat sane. I plan to keep this tread going on here, but for more up to date progress feel free to add and follow our facebook page at facebook.com/holeproof4x4fab. Our MJ trailer was also red. I'll post pics if I can find some. We removed the frame control arm mounts to make room for the long arms. We found the best way to do this is drill into all the spot welds then use an air chisel. Of course the plasma cutter came in handy as well. Ground everything smooth and welded any areas that might have been gouged, then grind smooth once more. some of the extra metal removed to fit the Rubicon Express long arm kit. The long arm crossmember was a lot more work then we had anticipated. In part was all the extra bits and bracing the MJ has that the XJ does not. As everything started falling into place it became apparent that the arms were longer then expected, pushing the front Dana 60 more forward then planed. The had us rethinking our mounts and if we could even fit normal size coils. We have decided to go with coil-over shocks, but have not decided what brand or spring rate yet. The High Pinion 60 is BIG, arms com close to the pinion yoke. If you look close at the Rubicon Express upper track-bar bracket it is dead center over the axle with the need to move the housing so far forward. Making templet to beef the pass upper mount, which will also flared holes with the dimple dies. We plan for some sort of a truss as well but type and design has not been decided as of yet. We would like to thank Red and Yukon Gear & Axle for all of the support they have given us over the years. This will be one bad @$$ Comanche when we are done thanks to them. Yukon offers only the best axle parts around and we wouldn't recommend using anything else. They have contributed more then any other single company. 4.56 gears & master install kits for both 60 & 70 Yukon Hard Core Hubs for the 60 Yukon Zip Air Locker for 60 Eaton Detroit Locker for 70 Yukon chromoly axle shafts for the 70 That's a lot of awesomeness right there. RuffStuff Rocks and they are another of our top contributors. We use products anytime we can. Quality is second to none and parts fit every time without issue ad there is never th need to grind or clean up any of the stuff they send. RuffStuff Diff covers are amazing Great thing about 70 rear & 60 front. Same rock-killing RuffStuff covers. Nice huge reinforced fill plug Ruffstuff XJ frame stiffeners are going to take some engineering to fit with the Rubicon Express crossmembers. RuffStuff Specialties steering kit. We got extra tube to be sure there will be enough for whatever crazy ideas we come up with. RuffStuff Specialties Dana 70 weld on disk brake mounts. New rotors & calipers from any parts store or have us get you a complete kit. out of these 5 Goodyear 37" MTs two were brand new. Sady one of the new ones had a 3-4 inch cut in the back sidewall. I'm not a fan of BFG tires for Alaskan use. they are outstanding elsewhere but we have seen lots of issues in the extreme cold. However I hope a few more of these find there way to our door. 37"on double beadlocks mounted on rear before trimming. -
Holeproof4x4Fab Project Arctic MJ
holeski replied to holeski's topic in Member Projects: Your Comanches
So a lot has been going on with the Arctic MJ Project. We are working on at least a dozen builds or installs at once on this truck. Parts are starting to slowly roll into the shop and we are busy making new contacts for other products to include in the build. The Hessco TPS adapter to use the HO intake on the old Motor is waiting to go on. We still seem to have an intermittent fuel pump/relay/wiring issues to work out. The Dana 70 rear is in and driveshaft hooked up. We will either have to move the axle back a little or cut down the drive shaft some. We will wait until everything else is done first. Once its dialed in, everything will be welded up. The 70 is open with 4.10s. We have Locker and 4.56 for the front so we are trying to come up with 4.56 and locker for the rear as well. Waiting on some disk brake mounts from RuffStuff. With the rear axle in place and the truck able to move under its own power, we moved it to the larger bay. We proceded to pull the bent and broken Dana 30 out. From here we started planning how the Ford HP Dana 60 would fit under there. It is open and loaded with 4.10 stock gears. We have a set of Yukon 4.56 gears, master install kit and a new Zip air locker, as well as some Yukon Hardcore locking hubs. Stripped the axle of its brackets and trimmed the drivers spring perch to make room for the new coil mounts. We decided to use some Balistic Fab combo mounts we had lying around, otherwise we would have chosen to use RuffStuff mounts. The new mounts are more centered on the axle tube where the stock ones were forward of the tube. This will move the axle somewhat forward, hopefully keeping the 37-40" range tires from eating the rear of the fenders. Being a High Pinon we set the caster at around 3-3.5 pos and still had a pretty good pinion angle without having to cut and rotate the knuckles. Slid the stripped axle under and continued to clean front end up. While not getting dirty in the shop I was designing bumpers and rock sliders in our bending software. These were quick ruff ideas which i'm sure will change as the build progresses. Front. Rear. Side rock sliders. About now I am pretty tired of crawling around on the shop floor and tripping over tube so I knock out some stands. The front bumper was done a few years ago but I had some ideas to improve it. It was fitted with a Superwinch EPi9.0 winch with Viking Winchline, as well as some PIAA lights. Found some tow hooks laying around and added those. I contemplated cutting it all up and moving it back closer to the grill but ultimately left the base alone. The aluminum fairlead is a Holeproof fairlead we designed a few years back and had Spidertrax run a batch for us. Added the side bracing. Never had an issue but I want to be sure if we take a hard hit on the side that it will hold up. Another benefit is we would be able to Hi-Lift off the sides now. The next bar planed isn't pictured but will run from the main bar down to the sub-frames core support. This will give the main structure for a new front skid. Took a break from the fab work to remove all the decals and badges from the comanche. Been getting a little excited to start the paint prep. We are planning a whole new color scheme to match the Arctic MJ name. After removing the tailgate decals, I ordered some new Jeep logo stickers in reflective black as well as some "MJ" decals. Just around this time the ARB air compressor & RE long arm kit was delivered. We picked a compressor that not only will operate the new Yukon Zip air locker but also inflate the tires after a run but won't be enough to run air tools. I started on the rear bumper. The stock one was removed and added to the MJ trailer I built. I loved that thing but had to sell it to help finance this Project. I wanted to do something different with the rear from anything I have seen before. Started with 1.75" .120wall DOM and bent it to wrap around the corners. It seems a bit high now but I still may trim the rear quarter panels or add some tube lower. plus the rear wheel wells haven't been touched at all yet. 1/8th" plate to fill the gap. Drilled holes using hole saws rather then the plasma and used dimple dies to add some flair. haha.. I have the flair holes facing upward for traction when stepping on the bumper rather then inward like most do. The 1/8" was much harder to flair then I thought it would have been and in retrospect I most likely didn't need to go so think. Better overkill then sorry. Added a 2" receiver hitch under with some gussets. The rear bumper is no where close to being done. I still have plans to wrap a skid down and under the back of the bed. -
It's been a while since I have posted here. I guess it is about time to start this build thread with all the questions we have been getting. It started with us getting 2 Jeep Comanche MJs from a guy in a local 4by club. Both were in pretty sad shape at the time. One we rebuilt and the other we made into a trailer. We have since sold the trailer to help finance the rest of this build. More specs to come as the build progresses.. We did the first stage of the build a few years ago with the help of some amazing companies. Worked as a parts getter and did some great wheeling with Dana 30/44 combo on 33" MTRs with Staun beadlocks, but now we want to go bigger. We we are going to put 37" tires on, but are using 40" for the mock up to get ruff ideas. Would like to end up running 40"s at some point though. We are able to use our bending software to design a new front bumper. 1988 MJ inline 4.0L with HO head & intake from 96 NV3550 5 speed NP 203 w/ HDSYE Ford HP 60 front (4.10)changing to 4.56 Dodge 70 rear (4.10)changing to 4.56 Holeproof built bumpers and bed cage. Superwinch Epi9 w/ Viking Winchline