


agamble
-
Posts
214 -
Joined
-
Last visited
Content Type
Profiles
Forums
Gallery
Everything posted by agamble
-
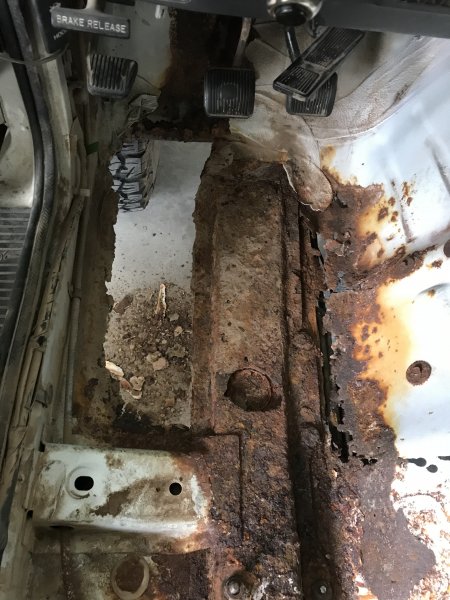
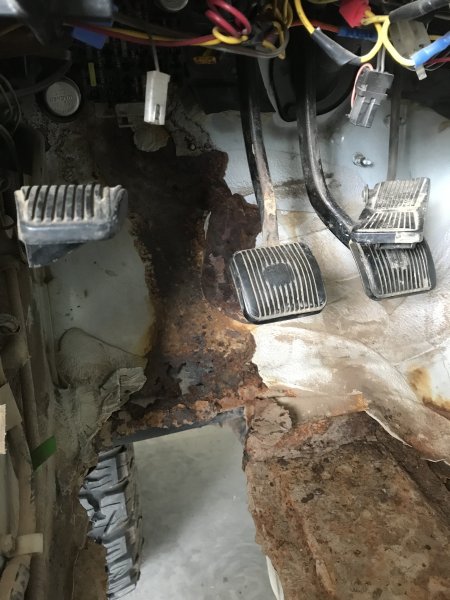
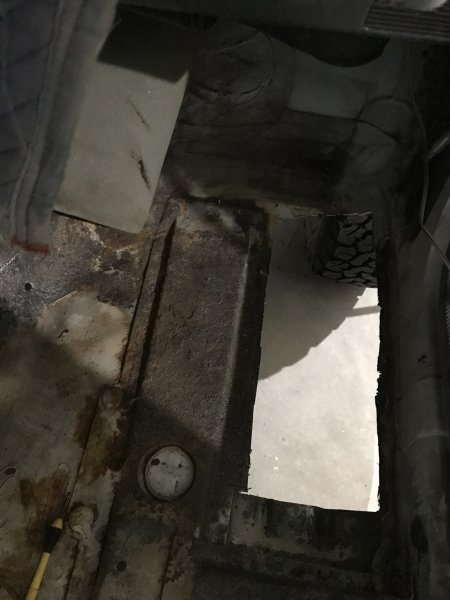
The drivers side floor pan definitely was not a close fit. Took quite a bit more than massaging to get it into place, I'd venture as far as saying it was more of a forceful coaxing to get into place. As with anything though patience pays dividends.

-
Thanks, I am glad to be giving it some of the TLC that it needed. It will never be show room nice, nor do I want that. Cars are made to be used. But I do plan on taking care of it. First on the list is the surface rust.
-
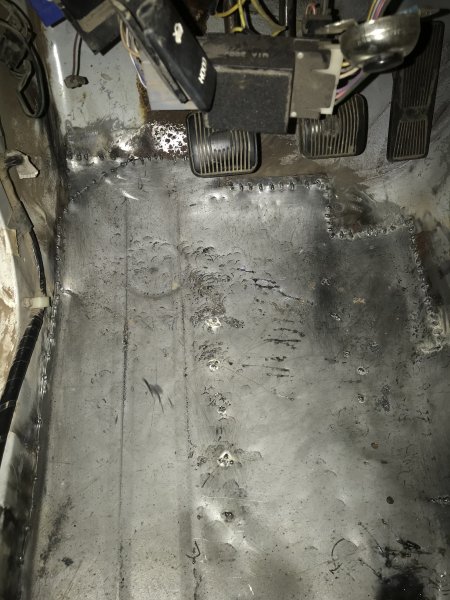
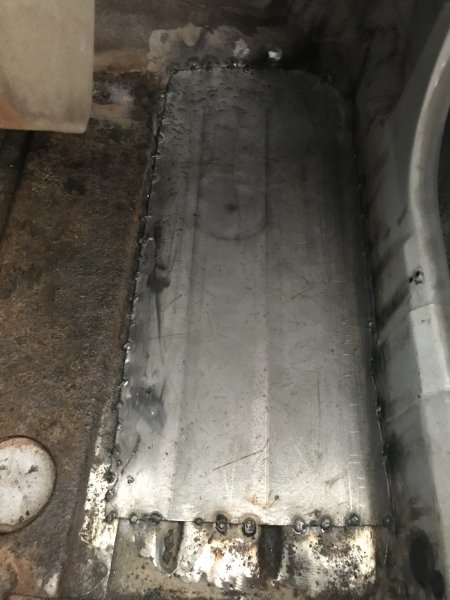
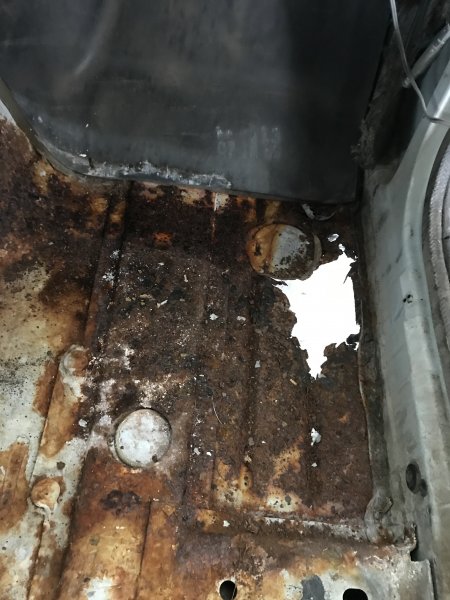
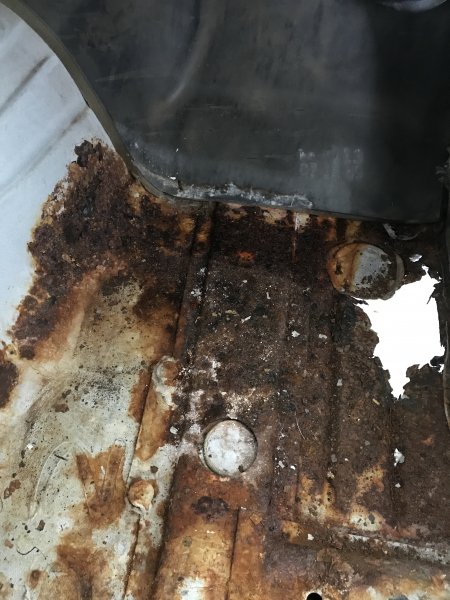
By this point the replacement floor pans that were ordered from classic2current fabrications had arrived. I've read mixed reviews on the fitment one the pans when put in both the MJ and XJ. However, for having all the bends and being made of 19-gauge steel I figured I didn't have too much to lose. It took a little massaging to get them into place. I worked my way around tacking it into place about every quarter inch. Once a portion was tacked, using a ball peen hammer I would massage the next section of the floor pan to the contours of the existing floor, then tack a little more in place. This manner was followed until the floors were replaced. The passenger side was done first as it was less material to work with. Some rust area were reassessed on the passenger side transmission tunnel. For the most part it was superficial. There were two spots that I was able to punch through using a screw driver while tapping around. I cut out the pitted metal and then used some of the extra material from passenger floor pan to cut out the two patches.

-
No front hitch on the truck. I just need to take the time to trace the look and see what/if it connects to anything.
-
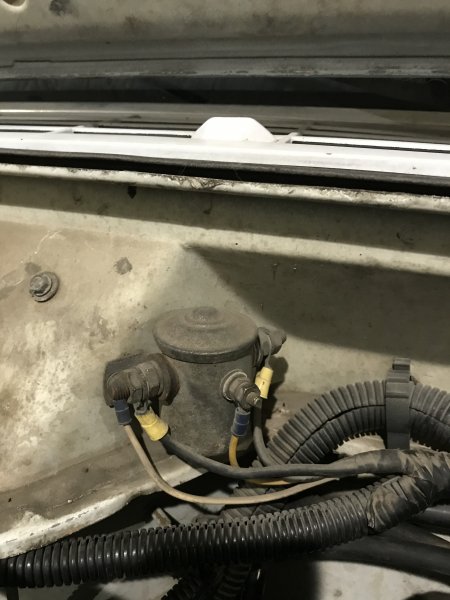
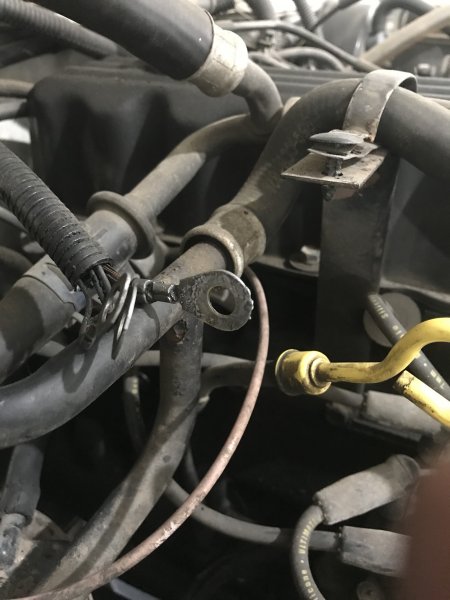
It doesn't have AC so maybe they thought they were going to add AC later on down the line? You appear to be spot on with identifying these parts as they have all checked out with a google search. I haven't seen one in the engine bay, so unless there is an inverter under the dash I am going to have to say no. The starter solenoid, as a quick google search returned several images that are similar to what is on the firewall of the comanche. Any idea as to why the generic starter solenoid would be connected to the starter relay? That seems redundant to me. Best guess is a PO had a generic starter solenoid that he wired into bypass the starter relay that failed???
-
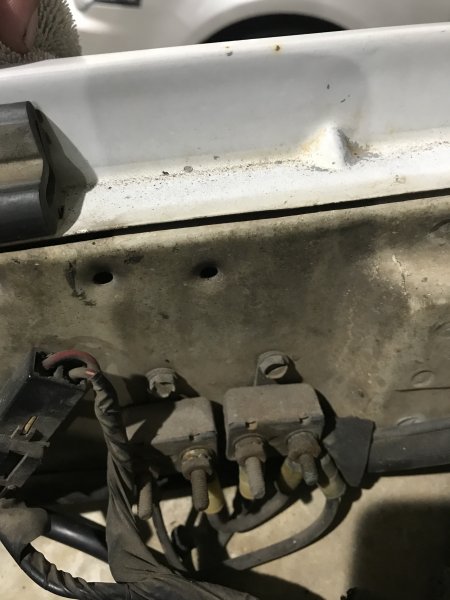
Can anyone shed some light as to what this component might be? I tried a google search and was unable to find anything. I've never seen anything like this before. As best as I can tell its connected to these two relays on the passenger fender, and the starter relay. This is based off of the connecters (yellow attached thicker gauge wire). I'm not 100 percent sure as the install appears to be done very well. The wire loom appears to have been split then put back together to incorporate the wiring, I would have to split the loom to trace all the wires.

-
Not to my knowledge. And no space has been created that I can see. Engine bay looks stock apart from the cylinder and two extra relays on the passenger fender. I will post there as well, grabbed a few more pics of some other parts I believe are tied to it. This is based of the connecters. I'd have to cut open the loom and trace wires to be 100 percent sure.
-
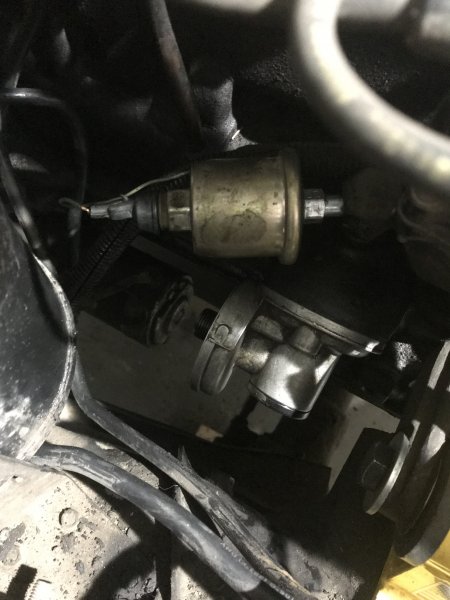
Can someone shed some light as to what this component is? I didn't have this on my 89' Comanche and have never com across one until now. I tried a goole search to no avail. Its hard to search for something when you don't know the proper name.

-
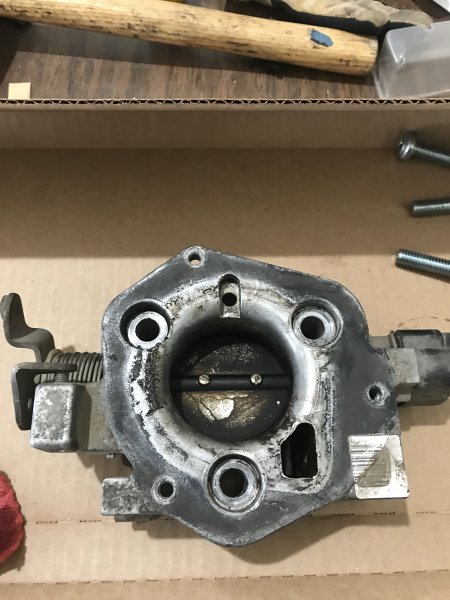
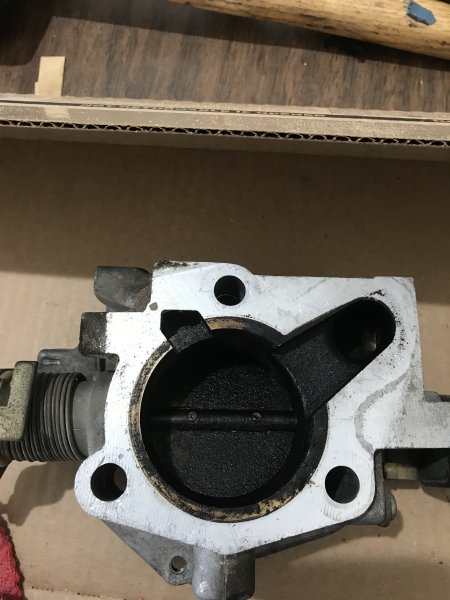
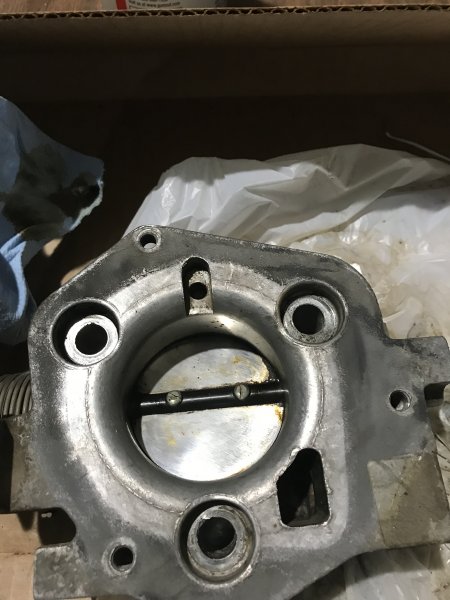
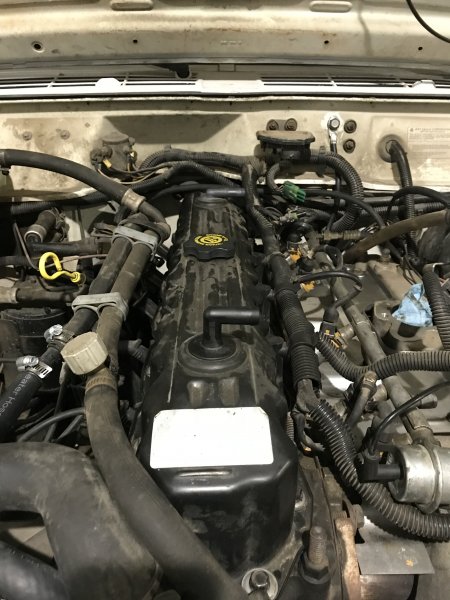
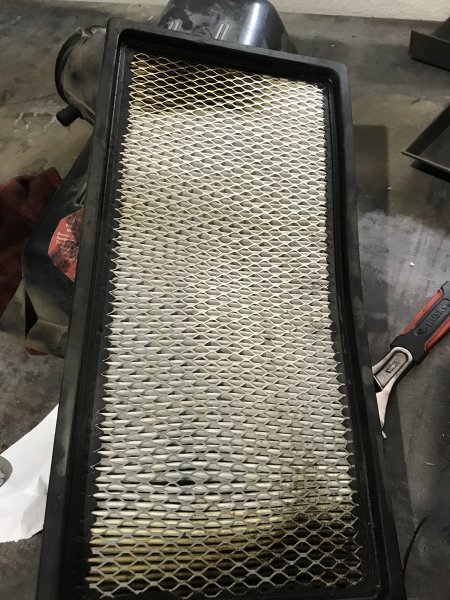
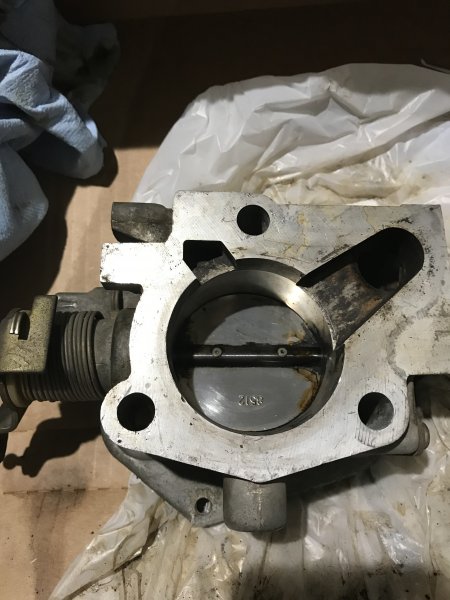
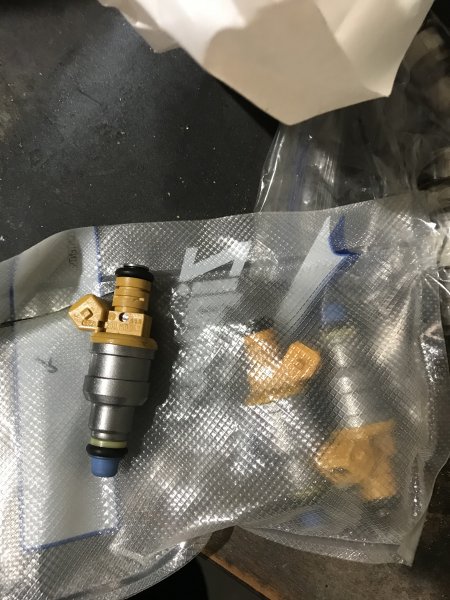
I was informed that the truck ran crappy when it was turned over to me. With the motor mounts in I then moved onto doing a tune up. Tune up wise I pulled and checked all the spark plugs (which included recapping them to .035 mm), as recommended by Cruiser's remix tips I installed a set of Bosch 4-hole injectors for better fuel atomization, installed new spark plug wires, new ignition coil, and a cap and rotor. The throttle body and the IAC were inspected and cleaned. This one was long over due as the photos can attest to. It took awhile but with some throttle body cleaner, elbow grease and time all the carbon build up was successfully removed; before: After: The air filter showed signs of oil getting on it from some blow-by created by the towers located under the aluminum valve cover being too low. To eliminate the issue a steel valve cover with baffles from a 98' XJ was swapped on (make sure to use a new style valve cover gasket with replacement grommets).
-
While I was waiting for the floor pans to arrive I took the opportunity to start swapping over parts and making repairs. I started with the engine bay. The first thing that I swapped over was the set of brown dog motor mounts with the flex rubber bushings to replace the stock motor mounts. I went with the flex rubber bushings to help reduce cab vibes. Initially they don't do a lot in dissipating the vibrations, but once the rubber has a chance to break in they actually do dampen vibrations from the engine. I've run these on 2 different rigs now. I ran these mounts in an XJ I had previously and never had a problem. While in the engine bay I started on the list of electrical maintenance items identified in Cruiser's Mostly Renix Tipsfor the Renix era jeep Mj and XJ. The various grounds were refreshed by unbolting, removing years of baked on dirt and grease, buffing connections to a new luster with fine grit sand, and a healthy dose of anti-corrosion gel being applied before reattaching them. Not wanting to have oil rain down all over the garage floor during oil changes and to allow for an easier time locating filters and a more ample selection of oil filters, an oil filter adapter with SAE threads from a 95' Cherokee was placed on the engine block. Battery cables were then upgraded. I did some research on battery cable replacements and came to the conclusion that the stock 6-gauge battery cable wasn't going to cut it. I float around several other jeep forums and have seen several people going with 2-gauge cables and others with 4-gauge cables. The general consensus is 2-gauge is best suited for heavy demand situations, while 4-gauge was a good upgrade for stock applications. At the moment everything is stock with no after-market accessories, so 4-gauge should be sufficient. The setup I ran is as follows:Positive battery terminal = (B+); Negative battery terminal = (B-)Battery clamps are brass wing nut terminals.Battery Cable Cable Length Cable Termination(B+) to starter motor 40" 3/8" on both ends(B+) to starter motor relay/distribution 12" 3/8" on both ends(B-) to engine block 40" 3/8" on both ends(B-) to inner fender 12" 3/8" on one end, 1/4" on otherEngine block to firewall 12" 1/2" on one end, 3/8" on other


-
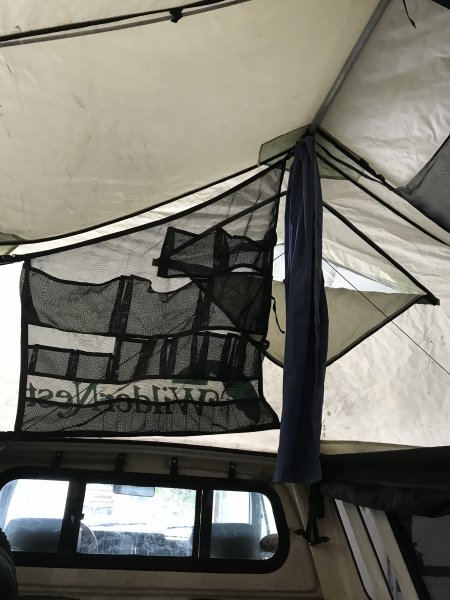
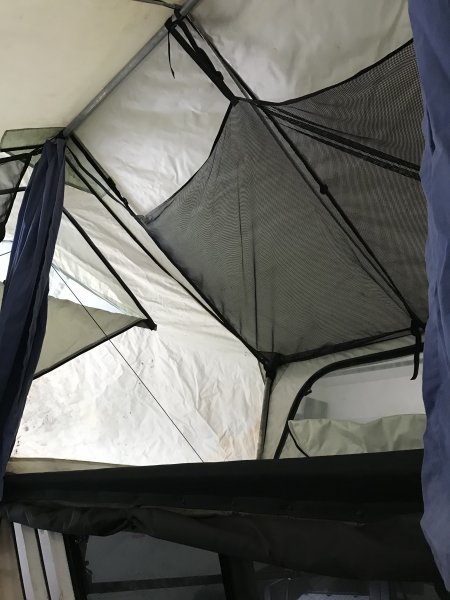
Thanks, it’s in good condition for its age Makes setting up camp a breeze.
-
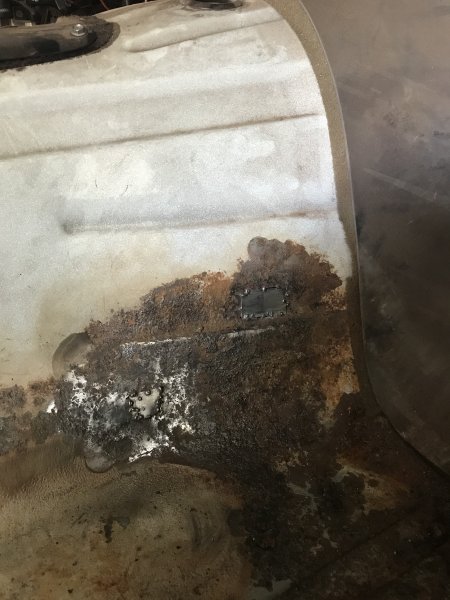
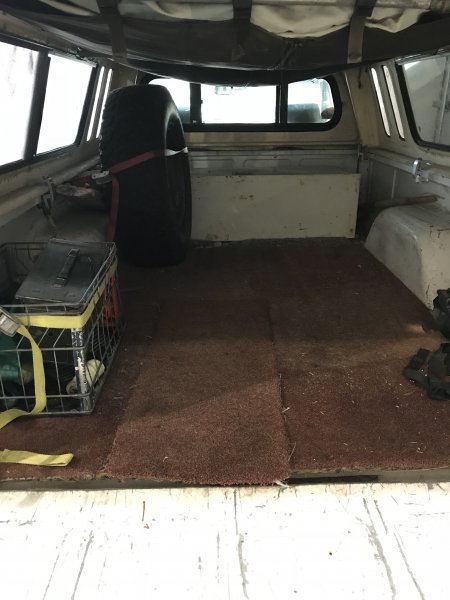
When last in my possession, almost a decade ago, it was in great shape. Since then it has had an engine rebuild and and I was told some metal had been placed on the floor board to cover the small hole. I pulled the interior to see the small hole for myself and indeed found a wee hole. The metal patch was half a stop sign molded to fit and was simply sitting over the hole. Passenger side was a little better. The first thing that needed to be addressed was the lack of floorboards. Started the process by removing all of the rust affected metal. A wire wheel was used to remove all the flaking rust to see the integrity. Passenger side was pretty easy to prep, a 18"x8" area was all that needed to be removed. Driver's side (neglected to take a photo) required most of the floorpan and portions of the transmission tunnel be removed. With the rusty floors removed, new ones were ordered. The closest floorpan I could find was for an XJ. I read mixed reviews on the fit of the pans during installation into both the XJ and MJ. But for having all the bends made and being made of 19 gauge steel, I figured I didn't really have to much to lose.
-
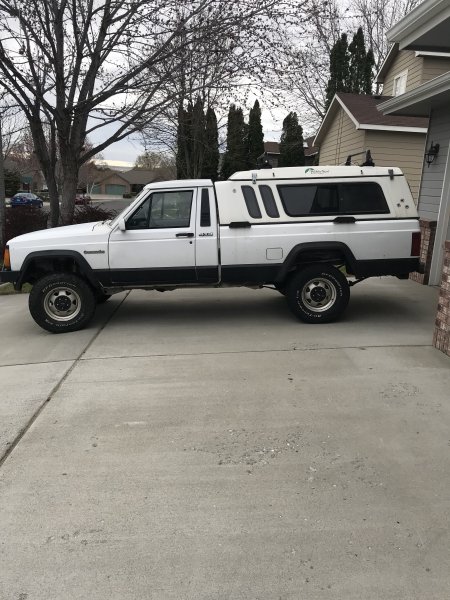
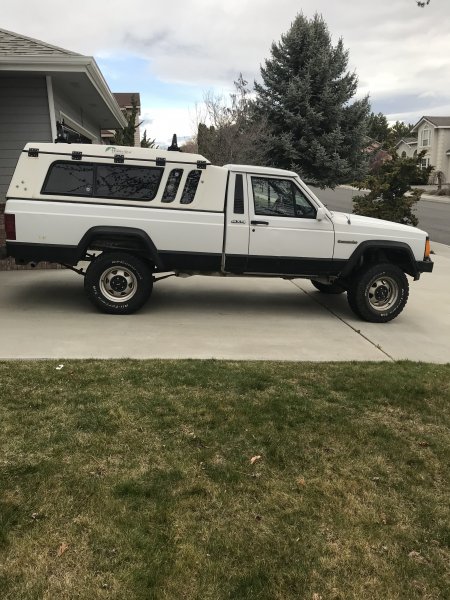
Specifications1990 Jeep Comanche Pioneer, LWB, 4WD4.0L I6, AX-15 manual transmission206,000 milesI originally had the truck about 10 years back. At the time it had a 4" lift, 29x9.5x15 tires and the stock 3.07 gear ratio. Interior entailed a very posh, bench seat with head rests. Needing a vehicle a family member gave me the truck and being new to jeeps I never thought much of it. At the time it had a 4" lift, 29x9.5x15 tires and the stock 3.07 gear ratio. I drove it around for a couple years and that was that. As I started reading and learning more about jeeps and offroading I thought that an XJ Cherokee would be a better vehicle to build. Most of the information I could find online was about XJs, as well as most of the aftermarket support being geared towards the XJ. Going with what was thought to be a better move I bought a 98 Cherokee Sport. The Comanche was given back and away I went building, modifying, and learning as I went.10 years later with a second jeep replacing the Cherokee, the Comanche came back into my possession when the family member decided to upgrade to a newer, nicer rig. They asked if I wanted the truck back, and you can bet that I wasn't going to pass it up. When they handed it over they listed a few changes they had since done: an engine rebuild, the addition of the WilderNest, some airbags and power windows......only functioned on the corresponding control, the drivers side and passenger side if you reach across the cab, and stated that it was a no maintenance truck. So with that I have already got my plans, for the direction that I want to go with this jeep. I have already built, wheeled and sold the XJ. Then moved on to a SWB Comanche that I have been building the last 4-5 years. That one I kept rather stock, all mods can easily be undone. This time I find I want to go between the last two and have a moderately built overland rig. To speed up the process, the plan is to take all the aftermarket parts from the SWB and move them over to the Wilderbeest. As much as I would love to keep both, I don't have space and I know I won't drive both. So I am going to consolidate down to one. I am going to take the best parts from the two and make good one. But enough with the chit chat, on to the pics.


-
Words, Test Complete.

-

Fuel Rail Disconnect O-Rings Broken
agamble replied to Jargon's topic in MJ Tech: Modification and Repairs
I've never encountered any disposable plug. Just the two o-rings separated by the plastic spacer. It is a rather snug fit and I have damaged perfectly good o-rings upon installing when I have not been careful. -
Yes I do need that. I have been unable to find a wiring schematic during my online searches.
-
Makes sense, if it wasn't there from the factory the cross-body harness wouldn't be there. Thanks for the information and response.
-
Before I tear my interior apart for the answer to my question I thought I would come here and see if someone already knew. Currently my comanche has doors with manual windows and locks. I need to replace the passenger door, but I can only find replacement doors with power windows and locks. If end up going that route, can someone tell me if the wiring harness is already there (either male or female connectors) for power windows and locks, making it a plug and play affair. I am I looking at wiring everything up myself?
-
I had been wanting to put some rocker guards on the comanche since its initially bought it. But there were not many people manufacturing rocker guards for the comanche and those that did were directed toward the long wheel base version. I had been playing with the idea of attempting to fabric a pair on my own, or even having a set fabricated locally. When read that krustyballer was selling rocker guards for the short wheel base I jumped at the opportunity and purchased a set. I don't plan on any extreme offroading, just some weekend warrior trips. Having that in mind I liked that the rocker guards provided good protection underneath, as well as the step. The step was a big plus as it will keep the doors and body away from the rocks bit more and protect the doors from being doored by others in parking lots as people get in and out of their vehicles. The rocker guards come bare metal. First, I applied two coats of a rust inhibitor to the bare metal, followed by two coats of Rust-oleum paint and primer in one. Then to finish, I applied two coats of Rust-oleum Appliance Epoxy. Epoxy Appliance was selected as it is moisture resistant, which should really help prevent rusting in the future. To mount the rocker guards, I debated on using nutserts as I had seen others on this site use and recommend, or use self tappers. After much reading on the web of the pros and cons between the two and internal debate, I went with the self tappers. I had had a lot of success with this mounting hardware on my cherokee and also concluded if one strips or pulls out it will not be that hard to enlarge the holes to use nutserts. I was able to find a lawn and garden retailer online that sold 3/8-16 x 1 in. bolts for 67 cents a bolt. I purchased 20, extras are always good to have as some times the bolt threads won't cut. With my mounting hardware selected, I followed/repeated the mounting procedure that I had followed when mounting some JCROffroad rocker guards on my cherokee ( http://www.jcroffroad.com/install_guides/SL_CL_XJ_ZJ_WJ_KK_KJ%20REV%202016.04.15.pdf). Mounting took me about 40 mintutes per rocker guard, that includes marking and drilling the pilot holes.
-
Since upgrading the steering to the 1-ton setup, I noticed that I had the talked about dead spot in the steering. Turning the wheel left and right, I would have almost an inch of play either direction where nothing would occur while driving. At first I simply ignored it/tried to adapt my driving around it. As time progressed, I determined that it was no an acceptable long term solution to the issue. After a number of internet searches I came across "The Cure", a product from RuffStuff Specialties. For a price tag of $20, this plastic part is placed on the face of the Y-link tie rod. Once inserted, it prevents the drag link from rolling forward and backwards, thus eliminating the dead spot in the steering. Going in I was a bit skeptical, but figured for $20 what do I have to lose. After a quick install, I can say that the steering is night and day difference. Dead spot is gone, steering has been much more responsive. Does it drive like a sports car......no, but as far as jeeps go, it drives great. The only other work I have had to perform, was to replace a few gauge cluster bulbs that had burnt out. While I had the gauge cluster out, I took the opportunity to freshen up the back of the bezel to brighten the dash lights at night. I hit it with some pearl white (forgot to get a post paint picture), something that reflects light well, then reinstalled.
-
They're not my daily driver, I went with tier one, rubber bushing on all ends. I've done Johnny joints before and the ride was a bit rough for an every day driver.
-
I installed both the upper and lower adjustable control arms and have had no complaints or issues with them. I liked that you can get the lowers with rubber bushing to dampen road noise and replacement bushing will be easier to find. And if you change your mind down the road you can get the Johnny joint upgrade. Some people will say save up and buy a reputable brand. I bought the IRO long arm upgrade when they first came out. Lots of guys said to not buy it, never had an issue with it, now it's a popular brand.
-
a question, this light foot on together with the upper door light ... I could help with better picture to see where you start wiring for light feet and identify the color of cables, I'm new to cc.com I have a Comanche 89 4.0 4x4,,, thanks The wiring and connector are already there, They wires are pink and black if memory serves correctly. This thread has much more detail: http://comancheclub.com/topic/22152-dome-lights/
-
i did have the key in the RUN position when I was trying this. When I checked the power (relay 30) I was unable to get power. I chased quite a few wires to check for a shorts, checked both relays but unable to get the fan to operate. I conceded defeat and wired the fan to a new switch and relay, it's accomplished what I originally wanted, except it's no longer tied into the A/C system. A/C never worked anyway. The compressor kicks on but I don't think the system is charged. I've not bothered fixing it as I don't run A/C, never liked the feel of the artificially cooled air. I originally bought the truck there were lots of randomly done splices, for the most part I have removed/fixed them. In this recent event I found a ground spliced via wiretap into the A/C wiring harness, why and for what purpose a previous owner only knows. As I am not messing with the A/C I left it be. Thanks for all of the input and help, you made what was confusing to me at first make much more sense. I would not made it as far as I did without all your input.
-
Still not working, I spliced on all new connectors at the fan relay, tried three different relays, and I still cannot get the fan to come on at any given point. I know the fan motor works as had it running just an hour ago to make sure the motor was good. Is there something else that I missing that would cause the fan not work?