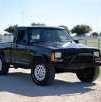
hgeranium Posted November 4 Share Posted November 4 Hi everybody! I figured now would be as good a time as any to start my build thread. I've already done a bit of work in the past 3 years that I've owned it so I will fire off the work I've done to it to get y'all up to speed. 10/2022-12/2022 Air Filter (10/22) (oil leakage from CCV hose) Power Steering gearbox and HP hose (first major fix, leaked tons of PSF from the bottom of the gearbox. For a few weeks beforehand, I would keep an empty bottle of PSF under the leak point while I was at work to catch an entire quart in 8 hours, then pour it back in to drive home) (10/22) Oil change #1 (10/22) Tune-up (spark plugs, cap/rotor, coil) (10/22) Valve cover gasket (here I snapped the front VC bolt and haven't had the drive to fix it. I put a ton of RTV and it is bone dry from oil. ironically the back still leaks while the front with the broken bolt is the driest part of the engine) (11/22) IACV #1 (11/22) TPS (11/22) Shortly after doing the IACV and TPS (didn't even know I had to set/align it!), I began having an intermittent no-start. Being an inexperienced Renix owner, I had no idea it was as simple as the CPS. I ended up putting the old IACV and TPS on thinking the new ones were faulty. Eventually I stumbled across cruiser's site and realized how big of a deal the CPS is and subsequently replaced it. CPS (11/22) Alternator (Figuring out how to manually loosen the belt with my worthless Chilton's manual was a lot of fun after I got stranded at work when the alternator took a crap)(12/22) Serpentine Belt (12/22) 01/2023 Oxygen sensor (1/23) Oil change #2 (1/23) There is a huge gap between here and the next time I did any wrenching. In March 2023 I bought a second car; a fully loaded 1997 Toyota Camry that I was driving around while I kind of let the Jeep sit, especially in the summer. It became mostly a winter or outside work vehicle at this point. Spring 2023 I graduated with an Associate's degree in San Antonio. I moved to College Station August 2023 with some friends to get some independence. I applied and got accepted into A&M for the Fall 2024 semester. I brought both vehicles to College Station, and took the Jeep back down to my parent's house after my first semester at A&M accepting that I wasn't driving it enough. I planned to come back to it when I graduated. Fast forward to May 2025, my girlfriend takes a road trip to SA without checking the oil and seizes the Toyota. I get a ride to San Antonio, resume insurance on the Jeep and drive it back to CSTAT. 5/2025-11/2025 (the time of making this original post) Air Filter #2 (more crazy oil leakage from CCV hose) (5/25) Oil change #3 (5/25) ALTERNATOR #2 (crappy reman unit went out after 6000 miles. If it goes out again I'm buying a brand new ACDelco/Bosch from Rockauto. Screw the reman lifetime warranty) (6/25) Fuel Filter (completely failed and was dumping fuel from both ends) (6/25) New passenger door check bracket and old pin->bolt (7/25) Air filter #3 (finally plugged the hole from CCV to air box hole and routed the hose itself to a can. Moderate oil smell, but no more oil soaked filter!) (7/25) Rear diff fluid (very nearly sliced my finger in two when my breaker bar slipped here and barefist punched a sharp piece of the frame. I've never bled so much) (7/25) TPS (after learning about TPS adjustments and getting the right voltage was impossible on the old unit, I put the new one from 2022 back on and it adjusted like a charm) (7/25) Electric aux fan replacement (bearing was going out) (8/25) Coolant flush (got my first taste of the PITA that is renix burping. It's easy now that I know what to do) (8/25) STEERING LINKAGE OVERHAUL! (all tie rods, steering damper, track bar, alignment) (late 9/25-early 10/25) IACV #2 (9/25) Throttle body gasket (9/25) Coolant overflow bottle (got my first taste of boiling water geysering all over my hand and engine bay here from the old bottle) (10/25) EGR Gasket (11/25) Cruiser tips completed: 2, 3, 4, 5, 7, 8, 11 In progress/priority: 1, 6, 9, 18, 29, 31 I know this build isn't anything particularly impressive. It's more general maintenance and trying to keep it running in as good of stock shape as I can keep it. Before I got the Comanche, I was not very mechanically inclined. I learned a bit on a 94 GMC C1500 I had from 2021-2022. Fun fact, I bought the Comanche TWO DAYS after my GMC got wrecked by a distracted driver. Paid $3000 for the GMC, insurance paid out $6000. Naturally, I picked up the Comanche for $5000 and bought 5 31x9.5 ATs for ~$1000. I'd say it was a fair trade. The Comanche has been the poor guinea pig that I have learned to work on, but it has been so good to me other than the CPS issues in 2022 and the lovely intermittent high idle that I've been chasing since May of this year. The 4.0 is such a beginner/intermediate friendly motor to work on, and the MJ/XJ community is always so friendly and full of knowledge. Hopefully I can keep up with this build thread. While I'm in school I'm trying to iron things out and get it as 'nice' as possible. Once I graduate, have a bit more time/income, and get a second vehicle I want to do a bit more hardcore upgrading/modification. Either a 4WD swap (very likely), keep it a 2WD pre-runner build, or go all in on the motor and build it to drag race. Or I can get another XJ/MJ that's 4WD already and restore this one and keep it as a going-to-town rig. Here are some pictures in chronological order from 2022-present. Original listing! Saw it on 10/8/22 Taken the day of picking the truck up. I drove an hour and a half in the morning to pick it up and then drove it to work that afternoon. This was a night and a day after my GMC was wrecked and seeing the listing, 10/9/22. First "photoshoot" with the guy that got me into the XJ/MJ platform to begin with. I didn't even know that a Comanche existed before he told me about them. Still on old tires. I miss that American flag magnet, idk where it went. Taken the day that I got my new tires installed. The only cosmetic exterior change I've made. First and only tow! In retrospect, I know it was the CPS and I probably could've unplugged/replugged to start it but Taken with my buddy after we moved from SA to College Station together. Taken 10/2025, a recent picture. Same old Jeep. Sorry for this absolute block of a post, but consider this to be a very condensed 3 years worth of posts on the build thread. My subsequent posts, assuming that I keep up with it, will be much shorter and a typical fashion to other threads. Thanks for reading! Link to comment Share on other sites More sharing options...
hgeranium Posted November 4 Author Share Posted November 4 Current Project: Fixing the intermittent high idle that I've made 3,000 posts about. I ordered a third IACV with the hopes that I somehow have gotten faulty IACs twice in a row out of the box, which is definitely possible. The symptoms line up pretty well with an IAC issue. High, sticking idle that usually goes away when shifting into gear but not always. A few times I've driven it with the high idle and it's like someone is stepping on the gas at all times. It makes sense that the IACV is stuck open when it shouldn't be open at all causing unmetered air to enter the TB and raise the idle. Other than the IAC, it would have to be a vacuum leak. I have gotten under the hood a couple of times when the idle is sticking and checked the lines/connections with brake cleaner. Nothing raised the idle, even the MAP->TB and the PCV lines. EGR is not yet fully deleted, but capped off. I have cleaned the TB, replaced IACV x2, replaced TPS (in spec), new TB gasket and TIGHTENED MANIFOLD BOLTS only for the problem to still come back. Today I replaced the EGR gasket just in case there was a leak there, plus it was dirt cheap. The gasket was toast, one layer stuck to the valve hard when I peeled the other layer off. After replacing it, the high idle on startup is 'gone' but could just be a coincidental alignment of the cyclical nature of this problem. Oddly, the truck will idle in park a little higher than usual on initial startup (~900-1000) and go to normal idle when I shift (~750RPM). After dropping the idle and going back into park, the idle is back to normal at 750. For that, it makes me think that I didn't fix the problem and its intermittent nature allowed it to conveniently go away as soon I changed something! The EGR gasket was so oil soaked from a lifetime of oil-soaked air filters, so it's good that I replaced it regardless. My current course of action is as follows: 1. Install new IACV on 11/5 and pray that the issue is resolved. If not, I will have to go to 2. replace the manifold gasket. I am greatly dreading having to do this. I understand I can get those lower bolts by removing the air box but it doesn't make it seem like any less of a PITA to do. Starting the bottom bolts after replacing the gasket sounds awful. I actually had more luck getting to the lower bolts from the bottom of the truck when tightening. It was more effort than it was worth saving a minute or two on the ground trying to get a socket on the bolt completely blind from the top of the engine. If the manifold gasket doesn't solve the issue then I'm kind of SOL. I guess my next moves would be to completely redo the vacuum lines and possibly try another IACV? Link to comment Share on other sites More sharing options...
89 MJ Posted November 4 Share Posted November 4 Glad to see you started a build thread Link to comment Share on other sites More sharing options...
hgeranium Posted November 7 Author Share Posted November 7 Great progress has been made! I will submit more pictures when I’m home from class. new IACV installed and so far running GREAT. The starts are so smooth and consistent. We will see how it lasts. Upgraded the engine-to-chassis ground with an extra ground cable from the chassis to a fuel rail bolt. Also cleaned up and correctly routed all of the cruise control and HVAC vacuum lines. Old worn out headlight bezels have been quickly rattle canned to freshen them up and they look great (from more than 5 feet away). I was messing with the dipstick ground but that stud kept spinning and I ran out of time. Eventually I’ll get that ground freshened up. next on the list is re-doing the blower motor and fuel pump grounds while I’m in a groundy mood Link to comment Share on other sites More sharing options...
Eagle_SX4 Posted November 7 Share Posted November 7 11 minutes ago, hgeranium said: It appears like your transmission kickdown cable is disconnected. Link to comment Share on other sites More sharing options...
hgeranium Posted November 7 Author Share Posted November 7 33 minutes ago, Eagle_SX4 said: It appears like your transmission kickdown cable is disconnected. Yeah don’t worry I put that back on after the picture was taken. I took it off for easier access to that fuel rail bolt. Link to comment Share on other sites More sharing options...
hgeranium Posted November 7 Author Share Posted November 7 This was the condition of the worse of the two bezels originally. At some point the entire front end (fenders, header panel, bezels, and grille) was replaced and painted black (maybe an accident? But clean title) and this bezel did not hold up. That’s why you can see my eliminator decal stop at the fender and a pretty horrid paint mismatch. You could see the original paint starting to show on the bezel and it was killing me for years. I took this last night. The flash makes it look way worse than it actually is but you can see the difference. Also you can see that upper lip with the jeep logo is from a green XJ lol. I wish I knew what happened to the front end for all the parts to be cobbled together from different XJs. There’s 3 different paint colors that I can find in the front end other than black. Link to comment Share on other sites More sharing options...
hgeranium Posted November 8 Author Share Posted November 8 this is a much better picture. I may have to do the grille sooner than later because it makes it look bad in comparison. Also I’m not too well-versed on auto body paint, but could repainting the front bulbar be as simple as stripping the paint, sanding it, primer, and then black? Link to comment Share on other sites More sharing options...
89 MJ Posted November 8 Share Posted November 8 55 minutes ago, hgeranium said: Also I’m not too well-versed on auto body paint, but could repainting the front bulbar be as simple as stripping the paint, sanding it, primer, and then black? Depending on the color you want to go with and condition, you could just sand it and paint it. But your method would leave the best and longest lasting finish. Link to comment Share on other sites More sharing options...
hgeranium Posted November 8 Author Share Posted November 8 Absolutely knocking on wood here, but I think the work that I’ve done has finally fixed my idle issue. Of course I’ll never know if it’s truly gone, just that it hasn’t happened yet. But the truck has never started, idle, and ran so smooth. I’m getting consistent 2-3 crank starts (cold and warm, quite different from the 8-10 I’m used to.) with no extraneous revving. It blips to about 1500 and comes right back down to idle. Who knows if it was the new idle air control valve, the new EGR gasket, my redoing of the vacuum lines on the HVAC (if that would even make a noticeable performance difference compared to the other lines), or all of them fixed it but I’m grateful. Fingers crossed! If the issue doesn’t come back for a while and then suddenly starts reappearing, I would only have to assume it’s a faulty IACV, in which case I’ll fork out the money to buy a Mopar. Hopefully the tech forum will be safe from my many posts trying to figure out the idle problem for a little while. Cherish it while you can lol. Now I can more comfortably focus on more general maintenance, upgrades, and cosmetic stuff. Link to comment Share on other sites More sharing options...
hgeranium Posted November 8 Author Share Posted November 8 20 minutes ago, 89 MJ said: Depending on the color you want to go with and condition, you could just sand it and paint it. But your method would leave the best and longest lasting finish. I don’t even know if I’m going to keep the bullbar. When I graduate I may end up sourcing a new set of fenders and a stock bumper to replace it. I’m just sick of seeing all the paint chipping off and the rusty bare metal. I’m sure a sand and paint would be just fine for a few months. It’s not like I’m wheeling it anyways. Link to comment Share on other sites More sharing options...
hgeranium Posted November 12 Author Share Posted November 12 It’s always nice when your best friend is an automotive photographer! These are a few of the 200+ pictures that he took this past Sunday. Link to comment Share on other sites More sharing options...
89 MJ Posted November 12 Share Posted November 12 Looks dang good! Your friend is a great photographer Link to comment Share on other sites More sharing options...
hgeranium Posted November 15 Author Share Posted November 15 I’ve got all my parts ordered for my day of work. I’m coming back into town next weekend to hopefully finish it before Thanksgiving because I really don’t see myself having any daylight to work before or after festivities. New Bosch fuel pump, new strainer, new fuel tank lock ring (just in case), fuel filter, champion copper plugs (I don’t think they’re bad but I’ve been meaning to switch back to copper from iridium and I was already putting together a rock auto order, I’ll just have the iridiums as extra), PCV grommet, valve cover gasket, NTK CPS (this is huge, mine has been getting .1 V at the connector and I have that no start about once every 1-2 weeks. It always fixes by unplugging and re-plugging but I know it won’t work forever), and new washer pump and wiper blades (that pump has never worked so it’ll be nice to have some sprayers for once. Hopefully it’s as simple as replacing the pump though.) Oh, and i’m going to upgrade the fuel pump ground while. Hopefully I have time to get all of this done in the order of importance next Sunday, but at minimum I need to do the fuel pump, filter, and CPS. I’m going to be very sad if this doesn’t fix my issue. I’ve really gone all in on this with ordering parts so far in advance. But everyone on this site, plus a buddy that owns a shop, and mechanic family members have all told me independently that it’s the fuel pump, so I’ve got a good fighting chance. I feel like fuel is the worst case scenario anyway (other than motor internals, but they’re fine), so my next stop would be spark which is pretty easy as long as the distributor isn’t going out. i’m very excited to be back with the truck and working on it. It feels so wrong being so far away from it. As a reward for anyone reading my ramblings, here’s another picture: Link to comment Share on other sites More sharing options...
hgeranium Posted November 23 Author Share Posted November 23 Check this out! I was looking at my fuel pump before I got started on replacing it and noticed a strange red box on the undercarriage Its a magnetic bending LED light! AND IT WORKS! I have owned this truck for three years and I’ve never noticed it, who knows how long it’s just been sitting under there waiting for me to do the fuel pump. This definitely means that it’s been replaced before and whoever did it forgot to take their light. I’ll be curious to see what brand was put in there. Link to comment Share on other sites More sharing options...
hgeranium Posted November 23 Author Share Posted November 23 Two things that I got done last night from my laundry list of parts. H6054 housing and H4 halogen bulb swap. They’re brighter than those ancient LEDs I had lol. It was a $40 glass housing set from Amazon. I’m sure it’ll last me a good year or two and then I’ll just buy hella housings. They seem to be of decent quality though. No point in adding a picture but I also replaced the PCV grommet. I had no idea how well it was supposed to fit. My old one had so much play and gappage but after getting the new one in it’s real tight. No wonder I was getting blow by on the back of the valve cover. On the agenda for when the sun comes up: fuel pump, strainer, fuel filter, CPS, spark plugs, valve cover gasket, and washer fluid pump. In that order Link to comment Share on other sites More sharing options...
hgeranium Posted November 23 Author Share Posted November 23 I already kind of spoiled my progress in another thread but I’ll add it here just to keep track. Removing the pump was incredibly easy. This is the first fuel pump job I’ve ever done, and it took me like 15 minutes. The previous owner indeed changed the fuel pump with a Delphi unit, but he either forgot or neglected to put on a strainer, which I’m sure didn’t help its lifespan. (PO’s “installation” above) Getting everything back in was another story. It was an absolute nightmare because I removed and reinstalled the pump four times because one of the quick connects for the pump would come loose getting the lock ring on. Not to mention I was stubborn and decided to forgo removing the driveshaft, which made my maneuvering and angles quite interesting, but it wasn’t that bad overall. I got significantly faster every attempt. I went from about an hour for my first installation failure to my final installation success taking about 15 minutes. So far it’s running great. I’ll be curious to see the gas mileage. It’s true test will be tonight when it has to make a 180 mile road trip back home. I can’t attest as to whether or not it’s running better because it was running just as great up until my previous road trip where it broke down, but it’s at least equal. Link to comment Share on other sites More sharing options...
hgeranium Posted December 8 Author Share Posted December 8 I’m losing motivation to keep up with this thread because the work I’m documenting seems so mundane and basic compared to many of the other threads, but we push on. Hopefully after graduation I’ll have more time and space to tackle less boring projects. I put this in a separate thread but I’ll also tack here for posterity. Turns out, the reason I had so much trouble getting the lock ring on was because my fuel tank O-ring wasn’t fully seated, so when I got everything on it was not sealed. I found that out about to drive back 180 miles home when I filled up the tank past half and heard what sounded like a waterfall under the truck. After desperately trying to hammer on the lock ring more, thinking that was the problem, and getting covered in gasoline again, I had to concede and let the gas drain down to below the leak point. Once again, I had to leave the Jeep for another week. Luckily one of my parents let me borrow their car so I wasn’t stranded. My dad took it to a shop that we are very familiar with and that I know from working the parts store circuit, and on a very busy Thanksgiving eve only charged us $40 to get everything sealed up right. I can’t bash myself too hard because making mistakes is a part of learning, and I definitely learned a few things that day. Since then, the truck has driven fantastically. I’m very grateful to the people here that were so confident in pointing towards the fuel pump being the culprit. Who knew that neglecting to put a strainer on the fuel pump would fully destroy it and the filter in just a few years? Preview owner sure didn’t. At least he left me a $75 ATS Saber work light stuck under the truck pointing at the fuel pump for my troubles. Jumping to present day. I finally replaced the PCV hose and grommet, which was long overdue. I was getting plenty of seepage and leakage out of that. Since replacing them, the back of the valve cover has been significantly drier. I replaced my oil cap not too long ago and it’s already starting to seep out again. I may have to invest in cruisers tip for the cap. Doing the valve cover mod and reinstalling a new CCV hose is among the most urgent to do right now. I’m getting lots of leakage from the front top of the valve cover, plus having it disconnected from the airbox (to avoid soaking the filter) is causing a much stronger oil smell outside and inside the cab, which has been quite a red herring a few times now. I wasn’t having any misfires, but I did bring in a set of champion RC9YC copper spark plugs on my last rock auto order as recommended by many Renix guys. When I bought the truck, I originally replaced them with NGK G power platinums. They served me well for the 10,000 miles that I’ve been using them, and I try very hard not to get tricked by placebo, but the truck really does feel so much smoother in power delivery with the copper plug. it probably didn’t help that all my valve cover leaks are seeping right into the spark plug holes. Picture shown is, from left to right, cylinder 6-1. I’m not sure why cylinder 4 is so much more fouled than the rest. I know my copper plugs will suffer the same fate in a few thousand miles if I don’t fix the VC leaks, but that gives me more motivation. At the very least, since the platinum plugs are still working, I finally have a back up in the glove box. Apologies for another info dump (if anyone is even reading it), it just feels like such a waste to make a single small post telling the forum that I changed my spark plugs. I’m sure many of y’all don’t even document maintenance. Ideally, next on the chopping block will be valve cover mod, VCG, and a new/alternate front CCV hose. Link to comment Share on other sites More sharing options...
89 MJ Posted December 8 Share Posted December 8 12 minutes ago, hgeranium said: Hopefully after graduation I’ll have more time and space to tackle less boring projects. What are you studying? Graduation in May? Link to comment Share on other sites More sharing options...
hgeranium Posted December 8 Author Share Posted December 8 11 minutes ago, 89 MJ said: What are you studying? Graduation in May? Yup, in May. I got my associate's in business, realized how boring it was to me, then got accepted into A&M in the philosophy program. As dumb as that sounds to many, I have my reasons and it's not as bad of an idea as some may think. Philosophy is a great passion of mine. Plus it helps you develop strong skill in reading ,writing, and decision making (something becoming increasingly rare today). Sadly it has, like many of the humanities and liberal arts, become a vestige of when higher education was for the sake of learning and becoming an intelligent, more well-rounded person. We only have the corrupt university system in the US to blame for that. It's become so expensive that many people must forego their true passions to have any chance at paying back their debt. However, I'm also very blessed by the great state of Texas that, as a transfer student with an associate's, I received a transfer grant that covers all of my tuition minus books. I'll be getting out debt free with knowledge in a field that I love and doesn't bore me to death. Link to comment Share on other sites More sharing options...
89 MJ Posted December 8 Share Posted December 8 6 minutes ago, hgeranium said: Yup, in May. I got my associate's in business, realized how boring it was to me, then got accepted into A&M in the philosophy program. As dumb as that sounds to many, I have my reasons and it's not as bad of an idea as some may think. Philosophy is a great passion of mine. Plus it helps you develop strong skill in reading ,writing, and decision making (something becoming increasingly rare today). Sadly it has, like many of the humanities and liberal arts, become a vestige of when higher education was for the sake of learning and becoming an intelligent, more well-rounded person. We only have the corrupt university system in the US to blame for that. It's become so expensive that many people must forego their true passions to have any chance at paying back their debt. However, I'm also very blessed by the great state of Texas that, as a transfer student with an associate's, I received a transfer grant that covers all of my tuition minus books. I'll be getting out debt free with knowledge in a field that I love and doesn't bore me to death. I see. I’m in the same boat, done in May. These last few months are just painful lol. Philosophy is very interesting. I always enjoyed learning about it. I agree with you completely. Colleges have become something that they should not be. Getting out debt free will be huge! Link to comment Share on other sites More sharing options...
fiatslug87 Posted December 8 Share Posted December 8 If you're studying geology, which is all facts, as soon as you get out of school you forget it all, but philosophy you remember just enough to screw you up for the rest of your life. -Steve Martin But seriously, good for you. Link to comment Share on other sites More sharing options...
hgeranium Posted December 9 Author Share Posted December 9 At some point my CCV hose lost a small chunk on the inner grommet and no longer has any semblance of sealing. It just sits in there and lets oil splash out. As a temporary fix until I get to the VCG and VC mod, I stuck in my spare new PCV grommet and hose to seal it up. No adverse effects so far in terms of excessive blow by or crankcase pressure. I’ll see these next few days how good it does with sealing up the oil there. I know about the alternative setup where you can fit a ford PCV elbow in there with a 19/32 hose to the air box, but there’s no point in doing that until I can make sure my air filter won’t get soaked in oil. The 2 new PCV grommets, plus my double stacked gasket in the oil cap should help a lot with the VC seepage for now. Link to comment Share on other sites More sharing options...
hgeranium Posted December 9 Author Share Posted December 9 Welp, onto the next oil cap! After a nighttime Italian tune up, I (luckily) checked the engine bay for this exact thing. I didn’t tighten the cap enough with those double gaskets and it flew off into oblivion during my drive. I for some reason still have the original PCV grommet and I just stuck it in there in the meantime to cover the oil splash. Another win for the hoarders What a sight to behold. Is it safe to say that I may be one of the, if not the first person to run triple PCV grommets on a Renix valve cover? I surprisingly did not lose very much oil at all. There wasn’t nearly as much spray as I was expecting there to be Link to comment Share on other sites More sharing options...
hgeranium Posted December 9 Author Share Posted December 9 I had some time to install the NTK CPS that I bought a few weeks ago. I forget how frustrating and nerve-racking of an install it is. Even with the tape in the socket trick I was so worried about the bolt falling into the bell housing. The easiest way I found to do it is to get multiple feet worth of extensions and put it in straight through from the back of the transmission tunnel but it’s so scary knowing that one mistake will turn this 30 minute job into potentially days of an ordeal I hooked up my multimeter and back probed the new cps but I for some reason wasn’t able to get a reading. I had no issues testing my old one, where I got .2 AC volts but I couldn’t pick anything up. Clearly the sensor works because of the truck turns on so time will tell. I have two working spare CPS’ in the truck just in case anyhow. Link to comment Share on other sites More sharing options...

Recommended Posts
Create an account or sign in to comment
You need to be a member in order to leave a comment
Create an account
Sign up for a new account in our community. It's easy!
Register a new accountSign in
Already have an account? Sign in here.
Sign In Now