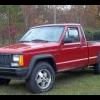
1987Comanche Posted April 10, 2011 Posted April 10, 2011 So after owning 2 MJs and being on the forum for 4 yrs I figured I should finally post a few pics of the trucks, current and former. First off, the current ride: Maura: 1990 Renix 4.0, AX-15, NP231. Picked her up with 117K on the clock, not running (electrical problems), leaking everything, filthy interior, steelies with bad tires, and had every dents on panel on the pass side (bed, cab, door, fender). The PO said he slid off a dirt road into a strand of trees :dunno: I'll have to list all the mods later but I've used mostly XJ/MJ components except for the 2002 Grand AM GT seats and S-10 coolant overflow tank. I don't have any before pics but I believe my '87 can fill in quite nicely. I swapped the ratty front bumper, some interior parts (cluster, headlight delay module, etc) steelies, and cap from the '90 to the '87 and then sold the '87. The '87 was a Renix 2.5, AX-5, 2WD with the factory black interior and no A/C (originally from Indiana). I miss that truck but trading up to a 4.0 4WD with 80K less was too good of an opportunity to pass up. I should have taken pics of the two side by side but I had very little time available when I got the '90. Here's a few pics of the Meg: my old '87: I'll try to add more info later on.
btm24 Posted April 12, 2011 Posted April 12, 2011 Really nice and good buy. I'm glad you started a build page ill be keeping up :popcorn: And when you put in the new buckets was it the same as putting in XJ buckets or more work? Thanks Brandon
1987Comanche Posted April 13, 2011 Author Posted April 13, 2011 Putting in the Grand Am GT seats was more work than the standard XJ bucket swap but they're quite comfy. :clapping: The hardest part of swapping any seats in is trying to figure out: 1. if they'll fit and 2. what adapters you have to make. The GT seats were a good choice b/c they have 4 symmetrically located bolts that secure the factory seat tracks to the steel seat base. I ended up drilling and bolting 2 pieces of plate steel to each base, then installing the MJ seat brackets in the truck. I placed the seats on the brackets and marked where to drill the plate steel. I ended up having to raise the seats with 1" spacers as the trans tunnel in these trucks is huge. The seats were perfectly located except for the fact that I couldn't close the door. Raising them 1" allowed me to slide them over just enough to clear the doors. Here's a pic of what I ended up with:
1987Comanche Posted October 7, 2012 Author Posted October 7, 2012 I haven't updated this thread in quite some time but there has been a big development. My MJ's motor is very, very tired and as of late she's been moved to the semi-retired list. I have tons of blowby, a very healthy oil leak, worn valve guides (almost constant smoke from the tailpipe), and rod knock. She'll run but is consuming & leaking about 1 qt of oil every 150 miles :eek: . I'm helping a friend rehabilitate his '90 MJ and we pulled a donor engine for him @ the jy a few months ago. He rebuilt it and we pulled his drivetrain this weekend. The motor from his '90 will be rebuilt and find a new home under the hood of my '90.
1987Comanche Posted October 15, 2012 Author Posted October 15, 2012 Tore the donor engine down (from the other '90 MJ) and it turns out the motor is fried. Cam bearings are gone, journal bearings are gone, crank is scored, valve guides are worn out, and last but not least there's a huge (0.030") ridge on the top of cyl #1 and 6. Add to this the crack in the top pass side bell housing bolt and this engine is in rough shape. I spoke with the machine shop and they said I'd be better off looking for another engine.
Dadinator Posted October 15, 2012 Posted October 15, 2012 Yep. Get a new motor and start over. Good Luck!
1987Comanche Posted October 21, 2012 Author Posted October 21, 2012 Maura's new heart arrived this week. I'm currently collecting parts for the transplant...
Dadinator Posted October 21, 2012 Posted October 21, 2012 Stock? What are the plans? Still gonna stroke it?
1987Comanche Posted October 23, 2012 Author Posted October 23, 2012 Bored 0.030" over but other than that bone stock. Right now the plan is to finish putting it together and transplant her. I did, however, run into a snag. I was checking everything out with a borescope and found a big chunk of something (cooling system sealer? Grease and sand?) in the water jacket. I had to pull freeze plug #2 to get it out. Everything else seems ok so far.
1987Comanche Posted October 29, 2012 Author Posted October 29, 2012 The new engine is almost done!!! I have to pick up a balancer tomorrow, then it's time to add oil, chuck the drill to the gutted distributor, and prime the new motor while checking oil pressure.
1987Comanche Posted October 30, 2012 Author Posted October 30, 2012 Put the balancer on, filled her with oil, and primed the new engine last night. 72 PSI oil pressure on the stand!!! :banana: I don't think the gauge in my truck has ever seen anything above 40psi.
1987Comanche Posted October 31, 2012 Author Posted October 31, 2012 That's what I thought too :D . Got the reman dizzy in tonight and set the timing. Ended up having to hand sand the distributor body to make it fit b/c it was shot blasted during reman. That screwed up the OD in relation to the reamed hole in the block. :doh:
1987Comanche Posted November 3, 2012 Author Posted November 3, 2012 Started prepping the patient for her heart transplant last night:
1987Comanche Posted November 9, 2012 Author Posted November 9, 2012 Engine should be ready to come out this weekend...
1987Comanche Posted November 10, 2012 Author Posted November 10, 2012 Engine & trans are out!!! The trans mount was dripping rubber! The oil leak had turned it into Jello
1987Comanche Posted November 11, 2012 Author Posted November 11, 2012 New engine is in!! Trans conversion to external slave is complete: Flywheel, dust shield, pilot bearing New engine and trans with external slave conversion, ready to go in! Engine is in
1987Comanche Posted November 24, 2012 Author Posted November 24, 2012 Almost fully assembled... She runs!!!! Out on her maiden voyage (note lack of front bumper and the fact that the wiring is zip tied off the ground) She was running poorly and, subsequent troubleshooting uncovered a bad fuel pressure regulator, vacuum leak, and exhaust leak. She runs great now :MJ 1: I still have a leaky rear main to deal with (one of the 3 seals I didn't install myself...thanks ATK :fs1: ) but I have almost 100 miles on the new motor :banana:
collkid Posted November 24, 2012 Posted November 24, 2012 Oh that sucks that the new motor leaks. I'd be mad. But good that its back on the road!
ComancheKid45 Posted November 24, 2012 Posted November 24, 2012 Lots of hard work in this thread, Glad to see new life givin to a truck in equally good condition!
1987Comanche Posted November 25, 2012 Author Posted November 25, 2012 I am kind of ticked about the rear main but I'll go back in and take care of it at some point. It was a ton of work but I'm glad she's running/driving again :yes: . I started autopsying the old engine last night and found that thing was in horrific condition. Piston #1 had some weird problems with the piston ring groove for the top compression ring: My rod bearings were in bad shape too. Take a close look at #3. Why is the backing on both sides of the rod down to copper? I'm assuming that means I spun the rod bearing? I definitely had rod knock at startup but this is pretty wild: And of course there's #6. The piston skirt must have been cracked. None of the pistons required much force to remove but 6 came out in 2 pieces! You can see how it's scuffed on the sides as well.
1987Comanche Posted November 25, 2012 Author Posted November 25, 2012 I'll get pics of the cylinder walls after I pull the crank (have to rent the harmonic balancer removal tool again) but, in the meantime, I'll post a few pics of the sludge
1987Comanche Posted November 25, 2012 Author Posted November 25, 2012 Check out the sludge inside this motor. This 4.0 had 137K on it when I pulled it but, as you can see, it had been horribly neglected. I managed to nurse 20K miles out of the truck after buying her but I definitely pushed it.
77mud Posted November 26, 2012 Posted November 26, 2012 don't look like the oil had been ever changed in it, I pulled apart a Toyota 22R that had 90k on the clock and the guy had never changed the oil just added to it when it need the inside of the block was terrible.

Recommended Posts
Create an account or sign in to comment
You need to be a member in order to leave a comment
Create an account
Sign up for a new account in our community. It's easy!
Register a new accountSign in
Already have an account? Sign in here.
Sign In Now