

1bolt
-
Posts
160 -
Joined
-
Last visited
Content Type
Profiles
Forums
Gallery
Everything posted by 1bolt
-
I'll go check that thread, at first blush I can't figure out why sectioning a 4 door into a Camanche would be any easier than a 2 door, assuming you're using the front clip of a 4dr and a long bed MJ, bobbing the bed, and grafting the MJ cab onto the 4dr at the C pillar. Basically the same operation. It seems like more work if the rear seat is to actually be useful you'd have to do more metal work behind the C pillar where the Comanch rear cab gets grafted in. at a guess the rear seat back is a foot back from the edge of the door, so a filler panel would probably be needed between the C pillar where the 4dr rear window starts and the MJ cab back.
-
just an opinion but it would look better if you deleted the comanche side vent in favor of slightly more window. You could use the other end of the 2 door window sectioned in in place of the vent for a window that looks more proportional to the long 2dr windows and doors you've got. Of course what looks better to me and what looks better to you are probably totally different. talk is cheap and you're in rare air making such a custom Jeep, great work. Are you still planing on tubing out the rear half? Personally with all the work you're doing it'd be a shame not to put a short bed on there. Speaking of talk is cheap, I've been slowly gathering the pieces to do a crew cab Comanche so this thread rocks. Keep up the good work.
-
Made is myself out of a spare XJ hood and two peaces of sheet metal for the raised profiles. I'll post a little bit more about it when I get a chance, but a full writeup is on the NAXJA XJ mods forum. Search for "home brew cowl" in titles only. I'm upgrading the XJ's using what I learned making this one, but I didn't want to just toss it.
-
Go for it man it doesn't take much courage (a little to get past the learning curve, and get started) just a bunch of hard work, the results can be fun or a lot more work depending on how well you setup your spray gun and compressor. And how well you maintain distance and perpendicular gun control. I've done half a dozen of these outdoors and between junky harbor freight paint guns and my own bone headedness (shooting so late that the clear went on in the dark) there are always some errors to fix. I'm going to write up how to repair sags in clear coat. I recommend you not get intimidated by "base clear" paint systems... If you shoot a single stage color (uses a "wet look hardener" to look like it's clear coated) you will see FAR more of the mistakes, and if it's metalflake you won't be able to block sand them without making color variations in the metal flake. There are a couple dust nibs and an insect or ten in this paint but standing there you would never realize it wasn't shot in a clean paint booth (by a novice painter admitedly).
-
It's definitely out of the ordinary, but it doesn't look that gray in person it's very olive colored with a gold metal flake "effect" which I think is Dupont's way of saying it mimics the color flop of a "pearl" paint job. but not as much work or as many steps to paint and not as in your face. It is a common color on late ford explorers with the tan metalic lower body clading, newer F150's and Explorer Sport-trac's, which is where I noticed it and thought it would look awesome on a J-truck. Which is what I originally planned to use it on, but I couldn't pass up the MJ with the new motor and 99% rust free body. My XJ's CR is in the low 9's I figure with 24lb Injectors (using 19lb Bosch Design III's at the moment), an intercooler which I'll mount below the radiator with a custom bumper that will force air through it; I should be able to manage 6 or 7lbs of boost on 93 octane without ping and without breaking anything. Depending on how (or if) it works, I will either be expanding the CC's of a 0630 head I have or swapping the setup to a fresh Stroker I have ready to go on the stand for an experimental E85 high compression turbo'd stroker. Anyway so as not to highjack my own thread with Turbo stuff, here's a quick pic in progress that does show the color better: You can see the runs in the clearcoat below the door handle, the area's left red and the hood top still need to be blacked out.
-
Quick update: I almost forgot to take a pic before painting. I thrashed on it for an entire day sanded, prepped and masked and started painting it about two hours before dark. I stopped and took a couple pics right after I started but it was dark when I finished (thank HF for cheap halogen work lamps) The lower belt line, top of the cowl hood and tops of the bedsides are getting Semi-flat black for ease of touch ups (and I like how it looks). The Cowl hood is off my XJ and might possibly be familiar from my NAXJA writeup. I decided to swap it to the MJ because I had damaged it leaning too much weight on it and needed to repair it, but wanted to do a better improved version for the XJ for when I Turbo it. It will let me experiment with cold air induction to get that Renix breathing easier. The color went on perfect. However My crappy Harbor freight HVLP gun gave me fits with the clear coat so I have some blocking to do to get rid of sags. Another update tomorrow if I get time to take a daylight pic. Hopefully semi-flat black will be done and the truck will be back on the road in a few days. This shot gives a hint of the color a little better until I can get a pic of the whole truck sprayed, this was right after I started and realized I hadn't taken any pics:
-
That would be a extra thick bedmat made of rubber, not a drop in plastic bed liner. I have installed about 100 drop in over/under the rail plastic bedliners over the years and none of them were even close to 120 pounds. This things an easy 1/4 inch thick everywhere bare minimum it wieghs 150 anyway it's a guess, good luck trying to wiegh one.
-
Oh yeah on the steel wheels for aluminums, the steel ones with 205's weigh about 5 or 6 pounds more than the Ecco's with 225's, I believe (correct me if I'm wrong) that is about a 25 inch tire versus a 27" So that's probably worth 4 or 5 pounds. So 8 or 10 pounds per wheel if I put 205's on the Ecco's x5 that's around 50 pounds of weight lost. Could shave 20 more but I don't like doughnut spares. I've got a hardened anodized aluminum bumper for the front, which should shave some pounds depending on how much the factory stamped steel job wieghs. The rear step bumper has to be very heavy and it getting tossed; for a hidden hitch and a roll pan. Maybe 75 or 80 pounds at a guess So with the wheels/tires that's somewhere around 200 pounds of easy to shed weight, that's without thinning out the junk in the truck box.
-
I'm guessing on my bed liner, it's heavy thick plastic, just hefting one side of it because it's too bulky to lift I'd say it's over 150 pounds total It's done a great job and from the looks of it has been in the bed of this MJ since 89 or 90... there's no real wear from not having a liner. I'm thinking of dismounting the 30's and buying tiny little 195/70's for the Ravine wheels; for economy. On the other hand I may see what the stock gearing does with the 30's. The Icon's/BFG AT's are my favorites for looks and Utility so once the winter weather hits they are going on for sure, if they don't go on immediately that is. Tire size should have a real impact on MPG's and I'm telling myself that economy has to come before coolness on this one. My XJ has 33's can't justify three lifted Jeeps; for now anyway. I think the stock gearing for an auto MJ is 3.07's not sure. The door panel was painted black with Duplicolor spray vinyl dye, it does a damn good job on vinyl (like you can't scratch it off or crack it or stretch it off when trying to!) but not hard plastic. On softer stuff you would be hard pressed to tell it isn't OEM black vinyl. With good prep it won't scratch off. It does scratch off anything that doesn't absorb the dye like rubber or hard plastic panels. I'm probably using Krylon Fusion for the hard stuff, but it also doesn't stick that well to the type of plastic that interior panels are made off.... nothing does that I've found. Even using adhesion promoter and a lot of prep (Acetone cleaning, scuffing etc.). However this interior is so far gone from sun fade that the tan color was almost a sickly white, like a worm in a water puddle. So anything is an improvement.
-
I am just geek enough to take my shipping scale and weigh Jeep stuff I tell myself it's because I may need to know for Ebay (NP231's weigh about 71 pounds, 4.0 cranks 66lbs, Carter BBD's about 6 pounds) My OEM 15" steelies with some generic 205/75's , with maybe 20% tread left weighed in at just over 50lbs each. These Ecco's with BFG 225/75/R15's were 45lbs These Ravines with 30/9.50/R15's B load range were 51lbs And these 16" Icons with 225/70/R16LT BFG AT KO's with 3 ply sidewalls, a D load rating and lots of tread weighed 49lbs On another note which ones would you guys use? The 30's should clear and those Ravines are mint, but the Icons + BFG's look more aggressive and have better load range for my uses. Plus I'm not geared for 2 inch larger than stock, although the reduction in cruise RPM may actually improve fuel mileage.
-
everyone has to be a smart @$$ :D Question is do I put the plastic bed liner back in... it's got to weight 175 to 200 pounds, a gallon or two of DIY bed liner on the other hand only about 8 or 10 pounds. Weight reduction wise, 200 pounds of bed liner would make a huge dent in that 3920 pounds. Another couple hundred is all I will probably manage, with Aluminum bumper, and rear bumper delete, swapping steel wheels for alloys is worth about 45-50lbs counting the spare. So maybe I can cut it down to 3400 to 3500. That should probably be enough for a MPG or two, at a guess.
-
Definitely behind and feeling some pressure to get paint on the truck, if it gets too cold I won't be able to paint. The tank was fixed with JB weld, I went to Monster Joe's JY in Fredericksburg VA (used to have nothing but trucks and specialized in Jeeps) to get a tank but the MJ tank that was there weeks before had been pulled by someone else. So I settled for JB weld. However while wrestling the tank back into place I created a new pinhole leak in the bottom of the tank. Which I fixed today. This thing must have had several weak/thin area's in the metal to rust through so easy. So I'm not looking forward to filling it back up, I suspect I may have to drop it again. When I took the bed liner off this is what I found < :eek: 100% rust free... hard to believe on an 18 year old work truck that has logged 200k miles. Speaking of rust, this was the days next project: So I pulled the gun from my uber cheap but very good Harbor frieght blast cabinet, stuck the feed hose into a bucket of media and made rust go away Blasting to clean metal is the only way short of welding in new metal or POR15. Hope to have it sanded and masked tomorrow.
-
AMC went out of business because they just couldn't stop themselves from making stupid looking cars... Car after car you would think that they eventually would have figured out that the buying public doesn't want dorky... Even their late muscle cars suffered from it.
-
not without the blue wrench lol, no I just set it there to take a pic of the stripped teeth. Spent today at the JY, got 6 doors worth of perfect trim and moldings for 10 bucks, 4 Ecco wheels for $120 a double diaphram brake booster out of a later XJ and some gas tank straps/hardware for 20 bucks. Made no progress on the MJ but I've got parts.
-
It looks good in pics but the paint is dull the PO did a decent job but I think he didn't use enough hardener or he didn't wax it after he painted. Either way I want a green MJ (I've had the paint longer than the truck). I am going to paint it Ford Estate Green Metallic which is best described as gloss Olive drab with gold metal flake. Giving it a military look without actually being flat. I'm using Dupont Chroma system base clear. How it turns out is anyone's guess as I've never shot this paint before and it has tight flash times and the clear must go on before the base cures too far (the clear has a "window"). I got the paint when I still had access to pro equipment and a booth to shoot in, now this stuff is going on outdoors :( Fawk it it's only a work truck. I'm going to thumbnail the majority of my pics so the thread will be dialup friendly (Imageshack rocks btw) this is what it looked like inside when I first got it: and the only spot of rust on the body, even the underside has only surface rust. Today I was called away unexpectedly; had to work a trackhoe to help some blasters dynamite for a house foundation so didn't make as much progress as I had hoped. The driver window regulator was replaced due to it falling down when rolled down too far. It was stripped: I pulled a regulator out of my parts XJ notice the shattered glass: That torx head fastner in the XJ is pretty much impossible to get lose, the hex head one in the older MJ was easy. I had to break the window to get the regulator. and then cut off the fastner. Waste of spare parts. Also dropped the gas tank because the truck has a slight leak when filled up totally... Probably improve my MPG slightly. Here it's 90% stripped and ready for washing then sanding. I managed to get the flares off and all the rest of the trim as it get dark. I'm not optimistic I will shoot color this week. Working today screwed that all up. The 65 is my other obsession
-
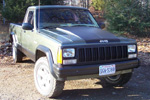
Well I'm bored and about to paint my Comanche work truck with a few days off. So I thought I'd make a project thread or mod diary like everyone else. This will not be a built up off road rig (at least not any time soon) the aim is a practical highly utilitarian truck that gets good mileage for getting back and forth to jobs. Mostly it hauls wheel barrels and tools. There will be some custom mods and touches to personalize it a little. First about the truck, some before pics and then my plans for it. It's a stock 89 4.0 AW4 4X4 D30 and D35. I'm the second owner. It has 190K on the body and got a Jasper about 20k miles ago (documented), as well as a driveway special paint job (not too bad as those go). It has get this next to ZERO rust (and no bondo), only a small spot at the pass. cab corner. Which is amazing for a northern MD or Virginia truck. I got it off Ebay, listed with a buy it now price of $1200. So having spent 2 years casually watching MJ's on Ebay and elsewhere, I fell all over myself clicking the buy button. I am planing to do an XJ trailer that will match this (back half of a 2 door turned into a lockable enclosed trailer). Which I will document here. I may be doing aerodynamic and engine mods and experiments as well aimed at improving MPG. As well as lowering the weight. So maybe this will be an unusual build. As I got it, it got an average of 16 MPG over several tanks which quickly went up when I partially tuned the truck up and replaced a dying TPS. As it sits now I'm getting 19 MPG with several known issues and a handful of things I need to replace due to age or brokenness that should effect my MPG. It's weight is 3920 pounds with a full tank and me in it. I used a G-tech meter to baseline for mods, and got an average of 126 HP at the wheels (roughly 90 less than my stroker) Early plans after I paint it this week, are to finish the tune up; Fix the broken off knock sensor. Which may allow the ECU to advance timing more for better power and economy. I'm no Renix expert but I imagine the lack of signal from the knock sensor means the ECU is using a default "safe" timing curve. The engine is a dog compared to the stroked 4.0 in my XJ. I will try to reduce drive line losses, and improve fuel mileage and thus to some extent power in every way concievable. Some of the work I will document will be fairly mundane s**t involved with restoration. I think there will be some cool stuff; the trailer, Cowl induction cold air for a Renix, dual exhaust, probably some built in's welded into the bed, bed linered lower panels. a DIY paint job using pro paint in crappy conditions (no paint booth). Cherokee Icon 16 inch wheels. Italic Comanche emblems I bought from beaterjeep here. Should be interesting. Paint happens this week if the weather holds. and I've already started modding the interior:
-
swaping 91 wrangler 4.2L into 88 comanche
1bolt replied to inline242's topic in MJ Tech: Modification and Repairs
my opinion brown like everyone elses so take it for what it's worth, by the time you get done bolting on pieces and throwing money at a 110-ish RWHP 4.2 you'll have somewhere around the power of the 140-ish RWHP 4.0 HO... I have rebuilt two, added TBI injection to one, swapped aftermarket cams into four, swapped a 4.0 head onto one, done a half dozen exhaust mods to just my 88 YJ alone, and I've never ended up impressed with any 4.2 that wasn't blown. My 4.6 stroker in my XJ on the other hand is bad @$$ and makes me happy about my work on it, money well spent. -
Hey was the old paint job made to look like marble? Looks kind of funky, and what does the gold colored emblem on the fender say? I've never seen gold Comanche badges... can you post a picture of them?
-
Not to mention those Emblems are peel and stick: (my XJ with same emblems only painted black before I applied them)
-
couple points to think about... Most small block V8's are not significantly heavier than the 4.0 they aren't. In fact all aluminum SBF 5.0 are lighter by something close to 100 pounds. The main reason not to swap a V8 in is the fact that you then need to swap just about everything else that's attached to it... Stroking the 4.0 doesn't have that problem and you end up with pretty similar power to a stock late model Ford or Chevy small block V8. Possibly more torque than either, and lower in the RPM range. Of course you can build up the V8's with limitless aftermarket parts to make power where ever you want it... but that's a different discussion and added expense. This topic comes up all the time, and it seems like everyone has the same advice me included... If you want good bolt in power for cheap using the stock driveline, then a stroker is the hands down winner if we're talking fresh engines. The cost of a rebuild, a 258 crank, and a set of pistons. If you want 300 HP+ then start looking for a V8, transmission, T-case, custom drive shaft, complete wiring harness, radiator, conversion motor mounts, and probably an axle upgrade.
-
Watson I believe when they cast the block they get a thin spot of casting flash there. The same sort of casting flash you would get with plastic boyhood models, which often had thin flash filling area's that were supposed to be holes. Then the factory would punch the hole out afterward, due to core shift sometimes the punch removes a nice neat rectangle, and sometimes the hole looks like someone blew up something. :smart:
-
cool, for some reason (call me anal if you want) I hate how the stock black one has multiple lines and ridges around the openings... Now I know how to fix that thanks
-
damn that was fast! I'll do that I had no idea it pried off from outside.
-
the outside black plastic bit behind the windows that is... Wondering whats behind there but don't really feel like pulling the interior panels off to remove the exterior trim piece just for a look :)
-
Bigmass, did you smooth that dash bezel or is it stock? Never seen them with rounded edges like that.