

1bolt
-
Posts
160 -
Joined
-
Last visited
Content Type
Profiles
Forums
Gallery
Everything posted by 1bolt
-
To answer one question: the bumper end caps are a b*@$£ to get off because of how the upper bolt is situated, i tore mine off (one already was). If I did it again I would either take them off properly or paint them on the truck (easy enough). As now one of them is crooked and will be until I pull it back off.. Plastic won't get fuzzy if you sand with something moderate to fine grit, they are hard enough plastic to sand. Wire brush for rust is better than nothing but it will leave tiny rust spots in the deepest pitting that will eventually bubble, so at least use a neutralizer (rust converter spray) and follow the instructions explicitly as rust converter is corosive and will "pickle" through the top coat if you don't let it fully cure (24 hours usually) and then prime it with multiple layers and a primer sealer before body color and clear. Even better would be POR15 then top coat it. I had a 65 Fast back Mustang when I was a teen So I learned all sorts of stuff about rust :D main thing I learned is that only sand blasting is a truly permanent 100% fix every time. As rust repairs with converters and rust primers and wire brushing etc. usually eventually will bubble back up i might take years but it comes back.
-
diggin the street 'Manche I have been day dreaming a street MJ build for a while now... certainly don't see MJ's in the mini truck scene very often.
-
Lots of stuff to come, the paint and cosmetics are mostly done. I'll probably be adding to this as long as I have the truck anyway. Here's the current to do list in no order: Interior makeover Headliner New injectors Tuneup Knock Sensor Open cooling system Re-install AC system (deleted by PO) Full gauge cluster Minor custom treatment for the grille Intake sealed to Cowl opening Tow package Springs front and rear New Rear (44 or 8.25) Detriot Truetrac LSD's front and rear Borla header Higher Flow exhaust Rear disc upgrade dependant on what rear I put in Front Speakers, rear 6X9's, rear small sub + amp That's just the stuff I'm pretty certain on for the next 3 to 6 months, some stuff I'm still mulling over are porting an HO head and 99+ intake for a swap.
-
depends on what level of perfection you're going for :) If getting unpainted (or well painted ones that don't have chiping and flaking) ones is out of the question? Then I would just sand them with two grits, like 220 and 400. Probably wire brush them agressively to get the loose paint edges scaled off, then the 220 to knock the edges of the chips down where the old paint is still sticking. Follow with the 400 to get rid of the 220 sanding marks. That'd work for flat and semi-flat paint... if you wanted semi gloss or worse body color then clear coated, I would recomend totally sanding them smooth. Unfortunately rear MJ flares aren't as easy to find as XJ's otherwise I would just start with a fresh unpainted set or like I said, a factory painted set that still had paint adhesion. Mine are in terrible shape, but it's a work truck, I have the PO's drippy paint, gouges, chips etc. I just scuffed them and painted over it all... drips included. Can still see some of the PO's paint mistakes... which makes me which I had spent a week sanding everything... Until once again it hits home that it's a work truck :thwak: BTW no sun for the glory shots yet... I really like the Icons on it, Can't wait to get good pics.
-
yep that is a pretty good selling point, it's already got a GM engine in it bolting in a bigger one makes sense but if it were me I'd still have to weigh the money involved. Still I'm sure he can get cheaper lower mile engine.
-
Yeah but you got the complete Camaro and at $350 bucks you probably parted out the interior and dash for $500 to $1000 dollars depending on what trim level it was, the rear and front suspension parts were probably worth $500, mirrors, doors or door hardware etc. another $300 or $400. In other words you made a profit on it and got an engine out of it. Pretty good swap when it pays for itself.
-
If I get some sunlight I'll take some true "after" pics today. The lower beltline blackout also extends across the tailgate and I might run it up the tailights (sort of box the tail lights with a black border). Seriously it is a work truck and the pics don't show some of the imperfections... On the grille and headlight trim: I washed the crap out of them, sanded with 320 and a scotch brite for the nooks, then Duplicolor adhesion promotor which deglosses anything I missed. Then hit them first with Krylon Fusion, with a flash coat then after a couple minutes a nice even medium wet coat. Then I let them cure for 24 hours before putting the semi-flat normal krylon (rust tough enamal). Which I did because the Fusion only comes in satin which was too shiney for me. Did the bumper end caps the same way, along with the fender flares basically using the Fusion as a plastic primer. I've used other plastic primers over the years and all of them sucked hard. I don't know how well the fusion will hold over the long term, but I do have a Chevy 2500 with satin black fusion on the flares that has held up for two years now, and sees lots of work.
-
$600 dollars to get a less than 4.0 engine with 125k miles on it which you need to swap in...... You chevy guys kill me :nuts: Seriously man unless you're getting the engine for very cheap there's no way you end up spending less than the cost of a 4.0 equipped MJ. At 125k miles that Camaro engine has probably been flogged to hell by a half dozen teen agers who thought it was fast. :rotf: I'm just sayin' :D
-
Got the decals on, wouldn't be spam if I heartily endorse Jeepsticker.com would it? Good luck finding tail gate decals for an MJ anywhere else... A hint, the highly reflective stickers don't go on with water... As I figured out... I still got them to stick but only after all the water had dried up (over an hour later). The decals worked just fine using water use a light misting of water which keeps them movable until you get them centered right, then press them down with a plastic bondo paddle and then use it to squeegie the water out. make sure to get all the water out. I mean squeegie the hell out of it... It's amazing how well this trick works it's definitely the easy way to avoid creases, wrinkles and messed up edges. Also got the new wheels and tires put on, but after dark so final paint pics will have to wait. I have fresh 19lb injectors Two of my injectors are leaking at the bodies and tune up bits going in soon. Unfortunately the wifes XJ needs more attention and go figure the Alt went out on my XJ... As if that isn't enough (When it rains it pours?) the MJ's radiator sprung a couple leaks on a long rush hour stop and go torture session... Looks like the open cooling system conversion, a new rad, and an electric fan with mechincal fan delete will be coming up much sooner than I thought.
-
mfpdm: Yeah I covered the Stang, I'd love to make it my first choice too, but I can't afford the things I want to do to it yet. It'll get a mild resto-mod (disc brakes, power steering) and the 289 will get massaged heads, Shelby intake hot cam etc. Eventually I'll even paint it.
-
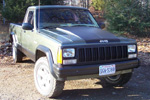
Well work finally slowed down and the Wifes XJ has finally stopped breaking things left and right ( I didn't get a 97 XJ for $850 bucks without it having some problems...) Mainly every single regular maintainance item except the fresh engine was about to take a dump! Crusty wires, leaky injectors, clogged cat, ORIGINAL PLUGS with 140k miles, original cap and rotor, a dying coil. No wonder it needed a Jasper. I'd be surprised if the PO changed the oil. I finished several details on the comanche. I extended the hood black out down the header, IMO this gives a much more finished look than just abruptly ending it at the front hood line, just like masking the blackout purposefully back from the edges of the cowl hump. Lets face it; it's also an easy way to cover the filler and glaze I used to cover those emblem mounting holes. The last pic shows that the original shapes of the emblems are still faintly visible making aligning the new ones a snap. Here's the after shot. I had already re-painted the grille and headlight bezels to match all the other blackout areas like the lower body lines. Now I'm Debating black pin stripes surrounding the hood blackout. Again another touch that can make things look more finished. Not that anyone likely noticed but those are E-code (European) headlights not sealed beams which let you use H4 bulbs, these kick serious @$$ compared to DOT headlights. I wrote these up on NAXJA a while back and now have 3 sets of them in my XJ's and MJ, and sooner or later I'll get a set for the YJ. Here's the current state including dirt, the truck's been on the job since I finished blacking out the lower belt line. I still haven't gotten around to putting the XJ Icon wheels and BFG AT KO's on. Oh and I have to say the 97-01 style side mirrors... that is the best bolt on low buck mod I've done to any of my Jeeps. These mirrors kick the @$$ out of the tiny pre 97 style. They are 2 1/2" inches further out and that makes a huge difference. From totally useless to better than most other truck mirrors with 6 screws... Can't beat that IMHO. If you like knowing whats in your blind spot do this mod.
-
just an alternate opinion here but, part the van out, for $500 to $1000 (depending on whats it's got left of course), part the MJ out for $500 to $1000 and buy a 4.0L equipped MJ for $1000 that running perfectly or has a fresh engine. And more than likely have money left over. My 89 had 180k on the body and 20k on a Jasper engine and zero rust, got for $1200 bucks. By the time you finish buying stuff for that swap you'll end up there. And that's not counting your time.
-
400sbc in the jeep
1bolt replied to billybob_jeep's topic in MJ Hardcore Tech: Epic Journeys to Greatness
Did you already ceramic coat your custom headers? Did you get them jet-hot coated or did you paint them yourself? They look good. Curious because some of the powder coating supply houses have ceramic paint, the same basic stuff jet hot uses, and can be buffed to a shine. -
New Comanche owner looking for info
1bolt replied to Amos manche's topic in MJ Tech: Modification and Repairs
The 4.0 (242) was in fact also developed off of the 232, there also seems to be misconceptions that the 4.0 is based off of the 258, but that's a myth as well. The MJ is rare to some degree... you don't see many and even some Jeeper's I've met have been surprised that my work/parts shagger MJ is a Jeep (well one guy anyway, but he only owned a ZJ and a JK so I don't know what that's worth). The thing is it's an incredible truck, it has full sized truck cargo capacity, more if you get one with the Metric Ton package. Jeep 4x4, and is damn near bullet proof at least the 4.0 and AW4/AX15's are. They look tougher than just about any Mini, and they don't rust NEARLY as bad as Toyota's of the same vintage. That and they offered WAY more engine than most mini trucks of the same vintage. -
Well it's almost done, putting the badges back on and the tail gate Jeep decal... Then I came across this: A 97 XJ automatic with heated mirrors power everything except seats, with 144k on the body and a freshly installed remanufactured engine... I got it for $850 bucks :eek: :jump: :driving: So work on the MJ got interrupted while I track down some nice Wife and Baby friendly AT meats, (tires were toast) and shampoo the living crap out of the interior along with a dozen other minor fixes.. Not fond of that Green! I know I just painted my MJ green right? Well this is same exact emerald metallic green as my Wife's Acura I just got rid of. The color was inexplicably popular in the mid 90's. Sooner or later I'll fix the color... maybe Silver or Steel Blue :D It's going to be the Wifes, 4 doors, 4x4 for winter, clean, no lift, lots of creature comforts and some minor mods in the future (leather seats) maybe some Moab rims.
-
Stomper named for the toy that was the rage back around 1980-84? Funny I had the same idea for my XJ sooner or later I'm going to get a Windshield and back window banner in the same font as the toy... heheh probably 90% of why I own a lifted big tired Jeep is childhood memories. I also wanted to paint an MJ yellow and get TONKA stickers for it. Nice getting all that free labor, you still supplied the parts though right?
-
not a pro I just love painting my own stuff and have done just enough driveway paint work that I'm starting to get the hang of it. The color is Ford estate green metallic, and looks like what would happen if you took army OD green and threw some gold metal flake in it and clear coated it. The paint is Dupont chroma system base clear. Best paint I've used yet, easy to get the color right without tiger striping or mottling in the metal flake. The clear was much easier than I anticipated. If not for a freak cold snap that sent a 70 degree day into a 30 degree night and my own bone headed painting in the dark (git-r-done!) it could have been even better. I'm really happy with it but it does have warts but I can live with the ones that are left. The base, clear was way easier to use than I expected, and turned out better than any single stage paint with wet look hardener I've used. I used to do this in a shop, but now I think I prefer a cool crisp fall day... less bugs, and less dust.
-
Blacking out the top of the hood was a back and forth thing the solvents in the new paint didn't like some etching primer I used on an earlier repair (where the cowl hood hump flexed as I noted in an earlier post) so I ended up blacking it out even though I didn't originally want to. I have a like/hate thing with Duplicolor. I used a socket to get a pleasing radius. I think if you don't mask the top back at least a quarter inch and make rounded corners it looks too home brew. For instance it looks cheesy to me if you use the exact edge of the hump as a mask line. 3/8's back from the edge gives me room to pin stripe the edge if I want to. The razor trick works for giving the exact edge of the graphic some mechanical adhesion, without messing up the masking tape with sand paper. This blackout graphic will extend down the top of the header and surround the Jeep emblem. This also lets me hide the mounting holes of the old style Jeep emblem that are solid inside the "e" and the "p". I forgot to fill them before I shot color and they would show through my newer style freshly painted emblems. I'll spot putty them closed and then black it out. This should also make the hood graphic look more finished, and intentional. Instead of screaming "I did this to hide some screw ups" :oops:
-
I'm not a very good body man, but I am persistent and willing to re-do things I fawk up the first time. I like doing sheet metal work but I'm still learning a lot. Progress has been slow as a sudden unexpected and welcome increase in work popped up. Progress really ground to a halt when I started nit picking the minor and major goofs in my paint job. I even made a major goof when I repainted the roof and hood because of minor problems. But the clear did not completely cure up before an unexpected cold snap caused frost on my fresh tender clear coat. Which means I ended up wet sanding anyway. That will teach me to nit pick minor problems on a work truck. I have a problem with getting fixated on details and imperfections so I told myself it's a work truck with a driveway paintjob and started putting s**t back on the truck the other day. Details like these sags in the clear (first pic). I cleaned these up using a trick that was recently shown on the TV show Trucks that involves using a razor like a cabinet makers scraper, you burr the razor 90 degrees on a piece of sand paper the finer the sandpaper the smoother the burr. Then drag the razor across the bump just like a scraper in woodworking, it peels off layers of clear without the danger of digging in (you hold it at a 90* angle) it leaves a very smooth repair . Then you sand with 2000 grit and hit it with polish and then fine polish. I worked on my Emblems. Restoring them without getting them re-electro plated means painting them. So it's either blacked out which I've already done to my XJ or Silver... Started by deglossing them with adhesion promotor, (first pic) hit them with some wheel silver metal flake and then on a whim I painted the outside blackened area body color just for the hell of it. (second pic) and cleared them. After looking over jeepsticker.com I really wanted to shift the looks over to modern, with the 97+ style front clip maybe. He has Comanche decals that mimic the Cherokee Classic style I was thinking about stenciling them on either side of the hood like the Dodge Charger HEMI hood graphic (where HEMI is masked out of the black). But again it's a work truck I have to remind myself. So I ordered a tailgate decal set and will put that on. I also worked on blacking out the cowl which I'll update tomorrow as I've hit a lull in work and should be finishing up the paint job, and putting trim back on. Definitely doing a D44 or 8.25 and tow package springs this winter.
-
oh man matching paint and wheels/tires and along with the SporTruck decal extend the black stripes. I agree with everyone else though nice job, very creative build and I love the chunk of the front header panel with Jeep emblem. I bet the dude that runs Jeepsticker.com could hook up a Sportrailer decal and stripe set.
-
I remember the supposed weld inside the bed, The thread you're thinking of is on NAXJA and was just a bunch of us speculating. Most of which was based on some crappy shrunk down JPEG's pulled off of Ebay. Someone decided the welds were "bird $#!& welds" based on some bumpy looking specular highlights on the inside of the bed in one photo. Which could have been anything including orange peel in the paint, clear coat sag or paint over seem sealer). The "bird $#!&" comment in relation to sheet metal lead me to wonder if the person who came up with it ever welded anything but farm equipment. But I kept my opinion to myself. (hint, you can't lay nice beads on thin sheetmetal unless you want your body panels to look like fried bacon) If you look at the roof line, the front bed line where he bobbed and the area where the MJ cab back must have been grafted onto the C pillar of the XJ, you will notice no wavy lines... no visible seams, and crisp body lines... So either the guy was a good sheet metal fabricator, or he was an excellent body man, or both. If he was poor at either one these area's would look like s**t The body lines are good, the door gaps are better than stock, the paint seems good, and yeah he left the rear door alone. I don't think the rear door is enough to warrant crapping all over something that was obviously otherwise well done... That suicide door light blue 2 dr looks worse to me. It also has the wheel relief and doesn't look well proportioned to me, but no one is crapping on it :dunno: Far as the bed goes and the back seat proportions, the photochop is the only one that gets closer to "right" for me. It does it by stretching the front door in a way that would be hard to duplicate without exact measurements, and the biggest part. The rear door is a total fantasy... It's square, look at a real rear door. At a minimum it would have to have custom made glass, re-worked window tracks and longer than stock window trim (that doesn't exist on any XJ to be easily converted) and so would need to be hand made from longer stock. Then you need custom made interior trim panels for the door and behind and below the door. There's a couple thousand dollars per side and several hundred man hours worth of good reasons not to start f'ing with that rear door if you're building something to be used, and not a show truck or trailer queen. Anyway mine will have stock rear doors and you all can crap on it all you want it'll still be badass
-
That thing seems to garner some disproportionally hateful reviews. Thing is I can't figure it out, here and on NAXJA two places filled with more reckless sawsall hackery, and booty fab than just about any other enthusiast vehicle web sites out there. How are you guys setting your standards? No offense to my fellow Jeepers, but the amount of cosmetically "done right" one-off custom Jeeps here or there can be counted on one hand. We (and I include me in this) got saber sawed front fender flares for tire clearance, cut and tucked rear quarters where they rust out, back window and hatch "back halfed" XJ's, tube bed MJ's, labaron hood vents, rattle can and drive way paint jobs (Me too!), Exco cages, HERCULINER INTERIORS... LOL I also like the Photoshop'ed version better, the problem with the photoshop'ed version is that it's photoshopp'ed... That means it was not built using real world structures, measurements or man hours. It looks like the the front doors are stretched, and the rear doors and MJ cab graft don't leave enough room for a functional back seat, just like the real red one. The rear door on the photoshoped one is sweet and the amount of work (and extra doors and B pillars for grafts) it would require might only be worth it to someone who's trying to win shows... How many of us here are trying to win shows?
-
Hah I bet you were the one I had an argument with about it, oh well to each there own, having never seen it in person or even high res pics of it I can't judge too harshly. Found pics of it stashed on my HD Not being a professional body guy I'd say that's not too shabby. He obviously used a couple MJ roofs to avoid having to massage the XJ roof into the MJ cab back.
-
There is a four door crew cab short bed Cheromanche out there, it was on Ebay a half dozen times and got talked about on NAXJA in a thread or two. I'm not talking about the burgundy crew cab 2 wheel drive MJ with the full size bed (also been talked about on NAXJA and probably here). But more of a SUT "sport utility truck" in the mold of Avalanches and Explorer sport tracks. Sadly I never got the guy to send me high res pics of the thing, it's basic proportions were quite bad @$$ though. It looked really good but didn't quite have enough rear seat because his MJ graft was right behind the rear door (C pillar) he bobbed the bed in the front, and didn't do anything about the rear wheel relief of the rear doors.
-
Can you give more details on swapping the guts of the newer style XJ windows? I've seen people hang the later doors on without much dificulty it seems like swapping the guts is a lot more work. On the other hand you get to keep the door with your paint on it... Couldn't you just bolt the newer style window into your older regulator and swap the forward track?