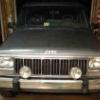
Skorpyo Posted October 6, 2017 Posted October 6, 2017 So 4 years ago I bought the MJ. I managed to find a low miles well maintained Jeep whose only issue was it was 2wd and had horrible paint. So about a year ago I started the process to convert it to 4wd and next thing I knew it turned into nearly a year long rebuild with a 4.5” lift new tires new axles, new gears, new carpet and lots of other ods and ends. Today it’s back driving but it’s in check mode since I’m still working out some kinks. Here’s the Jeep back in 2013 when I bought it. It had 96K miles on it and was pretty much bone stock Today as it sits: I still have a ton of small jobs to finish on it but I’m so glad it’s finally rolling and will be back on the road very soon. I will say a bath in its very near future. I documented the build on NAXJA but I don’t think anyone really cared lol so I figure I’ll transplant it here and keep the progress going on here.
Skorpyo Posted October 6, 2017 Author Posted October 6, 2017 Today’s issue was a busted ebrake cable:I managed to get it put back together with a wire clamp but I’m thinking I may need to work on the cables more as they aren’t actuating well at the 8.8. I think the springs need to totally come off and take in more slack at the turnbuckle.
jeeppapa Posted October 6, 2017 Posted October 6, 2017 Today’s issue was a busted ebrake cable:I managed to get it put back together with a wire clamp but I’m thinking I may need to work on the cables more as they aren’t actuating well at the 8.8. I think the springs need to totally come off and take in more slack at the turnbuckle. I like what your doing with the truck, looking good. You've taken it in a good direction. Sent from my iPhone using Tapatalk
Skorpyo Posted October 6, 2017 Author Posted October 6, 2017 8 hours ago, jeeppapa said: I like what your doing with the truck, looking good. You've taken it in a good direction. Sent from my iPhone using Tapatalk Thanks, she still has a ways to go, but its nice to drive her again. I'll be sharing up pics from the progress of the past year too, it's been an (expensive) adventure...
Skorpyo Posted October 6, 2017 Author Posted October 6, 2017 After buying the truck in 2013 I was at a JY with my buddy and we came across a black 2 door XJ that was pretty clean. I regretfully did not pull as much as I should have but I did come away with all of the chrome front end pieces which I promptly dropped on the MJ. Bumper, grill, headlights and an over head console along with the handles from a 99 XJ for $100. I also pulled the door checks since mine were shot and some hatch struts for an eventual hood lift.
Skorpyo Posted October 6, 2017 Author Posted October 6, 2017 In 2016 I found a 95 XJ with a manual tranny and 4wd and started on my conversion. I decided I also wanted to put a mild lift on it and at first I was thinking just 2 or 3 inches but after much debating I decided on a 4.5” SOA. I scored the XJ for $300 and with a $80 trailer rental I had it back home for under $400. Way cheaper than buying the trans and tcase separately. Since I knew I would be regearing and planned on putting on 31” or 32” tires I settled on 3.73 gears. Since the only axle I’d ever busted was a D35 and I was gonna regear it was back to the JY in search of an 8.8. As we were checking the yard a 2002 explorer in perfect shape came in and it had an 8.8 with 3.73s and an LSD. The brake lines on the 8.8 were shot but I didn’t care so we pulled it and brought it home for $120 after core refund. The moment of truth on the axle, which had about 200K on it, came when we popped the cover and found beautiful gears and a perfectly working LSD. Very lucky.
Skorpyo Posted October 6, 2017 Author Posted October 6, 2017 With my rear axle secured I started in on stripping down the HP D30 from the 95. New ball joints, u joints, new driver side axle and new knuckles went in. Next it was the new gears, along with an Eaton TruTrac and that job went to a local shop since setting up gears is not in my skill set. After coming back from the shop the D30 went in along with new springs. Along with new brake lines and shocks the front end was almost done. I also scored a Currie CurrectLync steering setup and with new TREs that went in with the adjustable trackbar.
Skorpyo Posted October 6, 2017 Author Posted October 6, 2017 Next came the interior tear down for the new tranny install and I figured it was time to check the floors for possible rust. I knew they weren’t rotted but I wanted to be sure they weren’t on the way. I am really feeling lucky! Only minor rust and mostly cause some P.O. tried to jack up the MJ by the floor pan on the driver side. I hammered that back down and POR15’ed the interior floor after some minor rust removal. Much better :-).
Skorpyo Posted October 6, 2017 Author Posted October 6, 2017 With the interior bare it was time for the tranny swap, so out goes the BA10 Once it was removed it became evident that there was a very slight RMS leak... So with that issue it was time to pull the pan and replace the RMS and oil pan gasket with FelPros. Since I had some POR15 left over I gave the pan a new coating. Afterwards we re installed the flex plate, flywheel and the clutch from the 95 which was almost new. The PO of the 95 XJ had it replaced about 10K before he parked it. The 74 CJ bushing went in just fine on our second try. Used a wooden drift to get it in cleanly. After replacing the throw out bearing and taping the rear frame rail bolts the AX15 and tcase went in on the 95 XJ crossmember. Almost too easy.
jeeppapa Posted October 6, 2017 Posted October 6, 2017 Your doing it rite. Good write up and pics too. I really like the stance on this truck. I've got as set of those rims and now you got me thinking about my truck. Sent from my iPhone using Tapatalk
HOrnbrod Posted October 6, 2017 Posted October 6, 2017 38 minutes ago, Skorpyo said: Did you find that pan lying on the side of I95?
Skorpyo Posted October 6, 2017 Author Posted October 6, 2017 24 minutes ago, HOrnbrod said: Did you find that pan lying on the side of I95? Not really sure I get it, the pan was in perfect shape except for the paint flaking off.. I ground it down clean with wire brushes and painted it with POR. If it looks odd in the photos its the reflections in the paint from the outside...
HOrnbrod Posted October 6, 2017 Posted October 6, 2017 The reflections make it look like the rear of the pan is all dented up.
Skorpyo Posted October 6, 2017 Author Posted October 6, 2017 Yeah, it's a different shape than my 99's oil pan, it has a concave rear with two ridges that makes it look like it's been kicked in on the back, but the reflections make it looks worse. It looks just like this pan though:
Skorpyo Posted October 6, 2017 Author Posted October 6, 2017 With the oil pan reinstalled and a new wix filter and oil I moved on to some smaller projects. I also took the opportunity to install some new motor mounts since the ones on the MJ were probably the originals and were shot. Next was to install the brake booster I pulled from the 95 XJ. I did my best to mill the push rod to the correct depth but ended up having to add some aluminum foil to get the sensor to work for the brakes. I still kick myself for not pulling the pedal assembly from the 95 before I sent it off to the grave. Since I pulled the air box, and I got a 40% off coupon for advance auto I decided to buy the parts for an air tube setup. With my discount it was only $20. Mind you the post in the photo is only temporary until I make a better one. I may end up scrapping this for a cowl intake when I eventually get a 62mm TB. I also have a 97+ washer reservoir that will be going in but for now I’ve just moved the stock bottle up a few inches to clear the booster.
Skorpyo Posted October 6, 2017 Author Posted October 6, 2017 Turning back to the interior the seats were definitely in need of some love. I tore them down to get the clean but also to fix the non functional fold down levers. Here’s the “before” on the passenger seat:I found the seats had broken retainers for the wings with the driver side left being the worst. I used upholstery thread and heavy duty stitching to piece them back together and now the wings are nice and firm.The fold downs were a matter of readjusting the cables and that solved it right away. I refilled the cracks in the foam and the covers got a full treatment of machine washing and purple power on the vinyl. The only thing I couldn’t get super clean was the headrests that are some weird foam junk. But no worries as I already had covers for them. I was pretty happy with how they turned out. I wrapped them up by replacing the lever bezels with the ones some guy was selling on here from his 3D printer and they worked great. Here’s the “after” on the same seat:
Skorpyo Posted October 6, 2017 Author Posted October 6, 2017 The rest of the interior needed some love too so rather than out back the 30 year old stained carpet a new one was ordered from StockInteriors.com (they just resell ACC) but we’re the best price I could find. Fitment was great and after much finagling I got it JUST right. I also opted to install a 97+ center console since I never liked the old ones and the cup holders are waaaaaaay better. I bought a dirt bound off-road mount which was very stout and installed it. I should add that I had to seriously alter the 97+ shift plate to take the 89 shift boot retainer but with a lot of trimming and testing got it right.
HOrnbrod Posted October 6, 2017 Posted October 6, 2017 31 minutes ago, Skorpyo said: Yeah, it's a different shape than my 99's oil pan, it has a concave rear with two ridges that makes it look like it's been kicked in on the back, but the reflections make it looks worse. It looks just like this pan though:
Skorpyo Posted October 6, 2017 Author Posted October 6, 2017 So I’ll have to admit I sucked at taking pictures the last few months and so the majority of the work at the end is not photo documented. After the interior was complete I focused on getting the 8.8 installed. I went with MORE mounts and welded in tabs for the brake hose mounts. Lastly I welded in a bolt to mount the down hose which I replaced with one for a 95 Durango (I think... can’t remember for certain). The LSV has never been connected in the MJ and when the D35 went to scrap I forgot to grab the mount off of it. So with that, and my desire to use the spare tire mount under the truck I removed the LSV, deleted the rear brake line and ran the LSV line to the stock brake junction.Oh that reminds me. I forgot to mention that I scored a set of 255/75/17s from a JKU with only 500 miles on them for $300.
Skorpyo Posted October 6, 2017 Author Posted October 6, 2017 I never cared for the stock step bumper and I wanted a hitch for the jeep and ended up finding a guy selling a nates4x4 MJ bumper locally for $175 which was worth it to me so I picked that up. It was bare when I got it but with some grinding, primer and paint it cleaned up pretty well. I also installed LED mounting bolts for the plate so it’s lit and wired that back to the stock plate lights connector. I must say they’re almost silly bright. My father in law insisted on being in this picture... he’s a great guy and is my mentor on most things jeep. He calls me the muscle and himself the brains... we argue that last point...
DesertRat1991 Posted October 6, 2017 Posted October 6, 2017 34 minutes ago, Skorpyo said: With the oil pan reinstalled and a new wix filter and oil I moved on to some smaller projects. I also have a 97+ washer reservoir that will be going in but for now I’ve just moved the stock bottle up a few inches to clear the booster. Might be a good idea to throw a shield around that hot air intake.
Skorpyo Posted October 6, 2017 Author Posted October 6, 2017 1 minute ago, DesertRat1991 said: Might be a good idea to throw a shield around that hot air intake. I debated using the old box to make a shield but I'm pretty sure I'm going to swap this out for a cowl intake anyways but that thought did cross my mind. My XJ is setup without a shield and I havent' had any issues, but it never hurts to get as cold of air as possible for sure! Thanks!
Minuit Posted October 9, 2017 Posted October 9, 2017 I regret to inform you that that truck is far too rusty to drive. You'll have to ship it down to TN where I'll dispose of it properly. Sorry that you had to hear it this way.
Skorpyo Posted October 9, 2017 Author Posted October 9, 2017 I regret to inform you that that truck is far too rusty to drive. You'll have to ship it down to TN where I'll dispose of it properly. Sorry that you had to hear it this way. :laugh: Lol I did get pretty lucky when I found this rig. I shopped for months and saw many rotted MJs along the way before I scored this one. I used to live in TN and I do miss the beauty of that area over NoVA.
jeeppapa Posted October 10, 2017 Posted October 10, 2017 Looks like he could be the muscle. Great job on the seats just reconditioned an identical set my 88 Eliminator. Sent from my iPhone using Tapatalk

Recommended Posts
Create an account or sign in to comment
You need to be a member in order to leave a comment
Create an account
Sign up for a new account in our community. It's easy!
Register a new accountSign in
Already have an account? Sign in here.
Sign In Now