

NickyV
-
Posts
149 -
Joined
-
Last visited
Content Type
Profiles
Forums
Gallery
Everything posted by NickyV
-
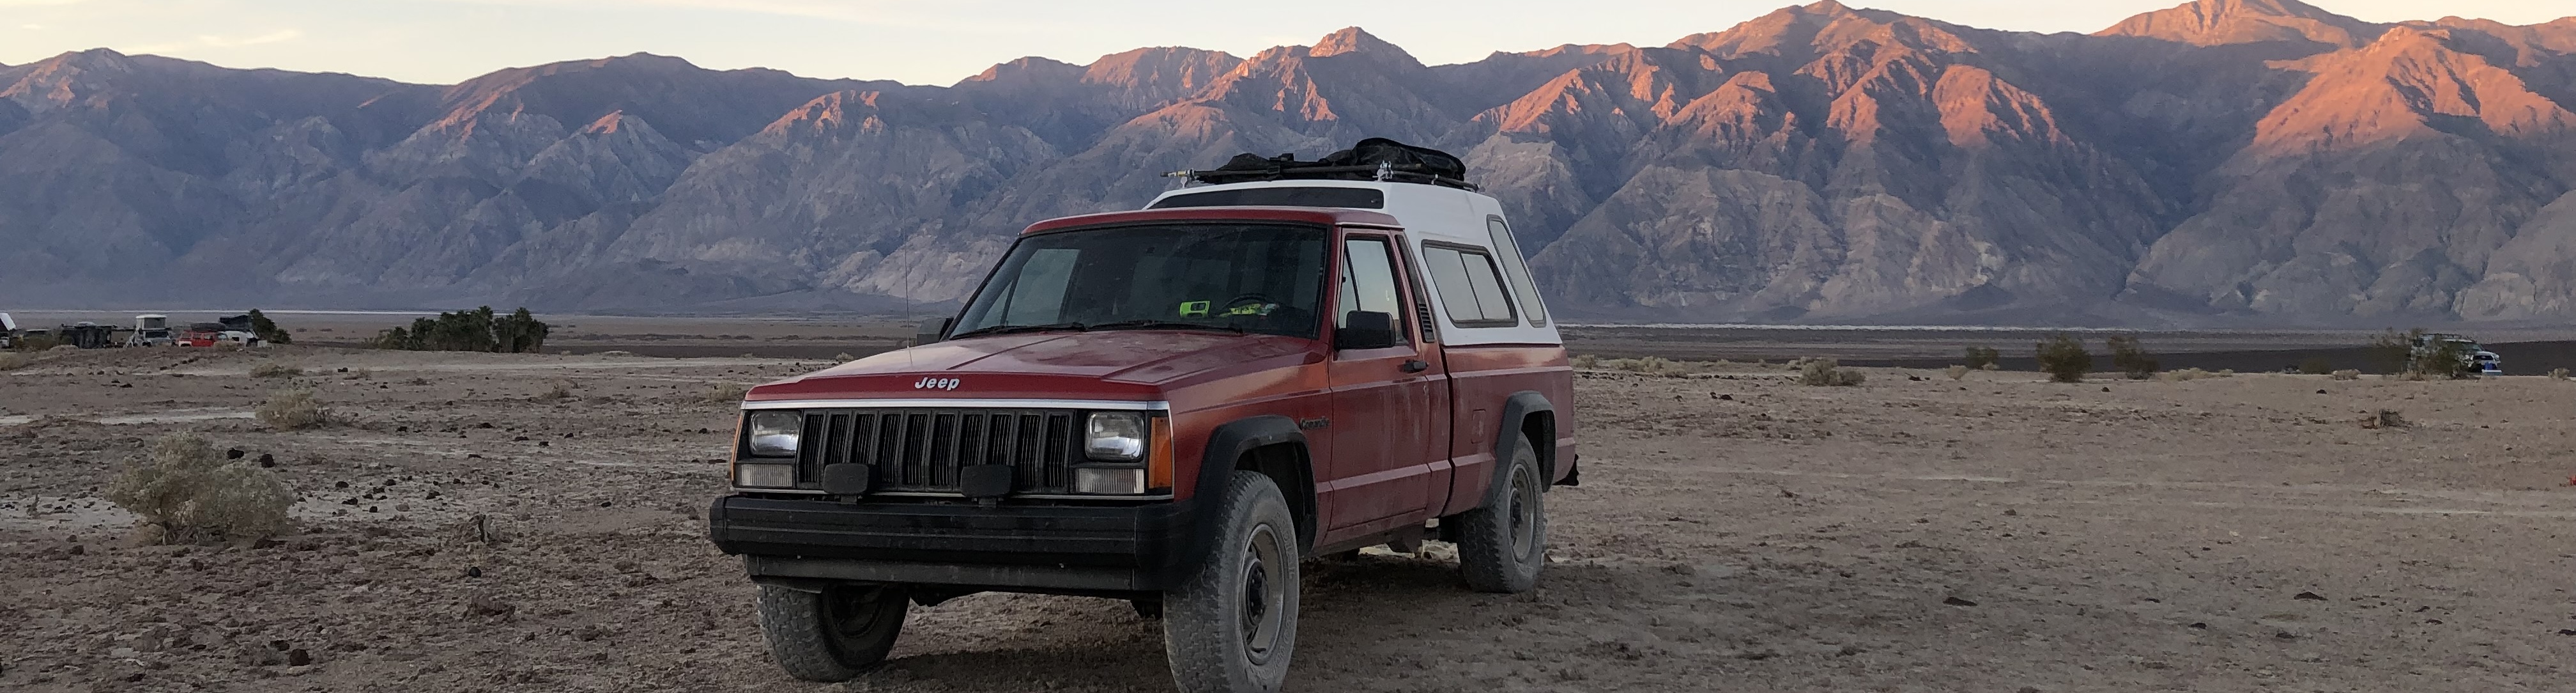
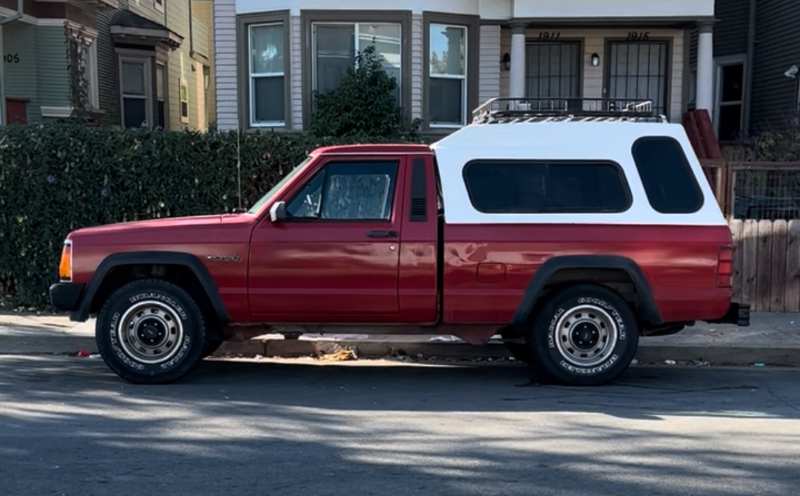
Year: 1987 Make/Model/Bed: Comanche/Base/Short Bed Engine: 2.5L Transmission: AX4 (It's definitely a four-speed manual!) Transfer Case: It is 2WD, so no transfer case, right? Front Axle/Rear Axle/Wheelbase: I don't know about the axles, but I think they are from factory. Wheelbase is 113 inches, I believe. Build Date: Sticker on the door is not clear. Current Location: Bay Area, California Status: Roadworthy. Not a daily driver, but I drive it regularly around town and take it on camping trips.
-
EGR Valve Questions: 1987 2.5L Renix
NickyV replied to NickyV's topic in MJ Tech: Modification and Repairs
Thanks! I honestly don't remember if I've posted my VIN on CC. But I'm thinking that I haven't. Where should I do that? -
EGR Valve Questions: 1987 2.5L Renix
NickyV replied to NickyV's topic in MJ Tech: Modification and Repairs
To your question about when my MJ was built: I'm not sure. I don't know if I have ever taken a deep dive into that. I just checked my VIN on Jeepz.com and all it said was that it was a 1987 model year. What I can tell you is that there is definitely a T valve right next to the EGR solenoid. One end of the T valve traces to the hookups near the TBI. The other end is on a thicker vacuum line that goes to a plastic bottle under the passenger side headlight. The third end goes into the solenoid itself. By the way, I've never had a terribly rough idle. It could be better. But it's good, all things considered. Also, I haven't ever encountered much to suggest PO tomfoolery (at least not under the hood... inside the cab... that's a different story). Then again, I'm still very much a novice under the hood, so who knows? -
EGR Valve Questions: 1987 2.5L Renix
NickyV replied to NickyV's topic in MJ Tech: Modification and Repairs
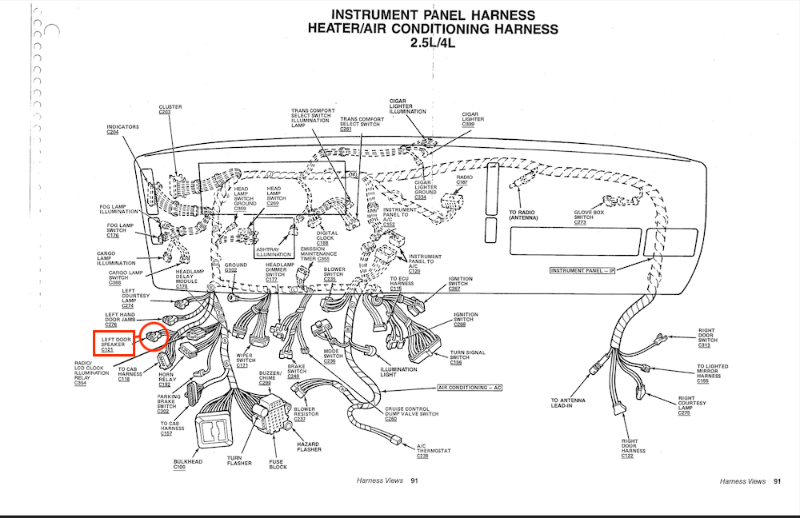
Hey hey, @eaglescout526! I can always count on a quick response from you. I was thinking about making a new thread about this, but since you just replied to me, I'll post this here for now: The emissions diagram sticker on the driver's side firewall of my truck matches what I've found online for the 1987 2.5L. But it seems like the EGR may actually be routed like a 1986. On the 1986 diagram, there is a T valve right before the inlet of the EGR solenoid. On the 1987 diagram, it appears that there is not a T valve. The orange rectangle is the diagram I have under my hood. The red circle shows the T valve that my truck seems to have. Maybe I'm reading my diagram wrong and it shows a T valve. But if not, I'm wondering if that could be a problem? Could it indicate other issues? Or is this just a common peculiarity?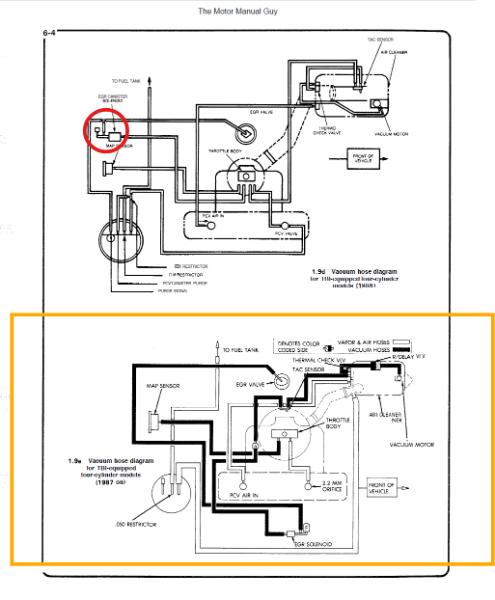
-
EGR Valve Questions: 1987 2.5L Renix
NickyV replied to NickyV's topic in MJ Tech: Modification and Repairs
Got some updates on this project. I am planning to do a video or more comprehensive write-up on this once all is said and done. But for now, I am now quite certain that @eaglescout526 is correct about the EGR Valves in 2.5L Renix MJs. Thanks! The EGR valves for this model have a "bleed" feature and they cannot be tested using the traditional hand-pump vacuum test. Due to some science that I understand in the abstract but can't really explain using words, the truck needs to be warm and under load (not in neutral) for the EGR valve to actually open up. I guess it uses a combination of vacuum suction from the EGR nipple and pressure coming directly from the engine. Anyway... I'm going to put it in bold, in case anyone comes across this later: The vacuum pump test that works on many older EGR valves DOES NOT work for the 2.5L 1987 MJ. Testing your EGR valve this way will not help you diagnose it. What you can do, is get a pen or pencil or something like that, and push up on the diaphragm from the underside of the EGR while the engine is running. That will at least give you the sputtering idle test. And it will tell you that, at the very least, your EGR valve is doing what it is supposed to when it is shut. I hope to eventually make a video about all of this. But now I've got another conundrum! The vacuum diagram under the hood of my truck does not match the actual vacuum routing under the hood. So far, I've only discovered this discrepancy for the vacuum hoses routed to my EGR, but I'm wondering if there are other peculiarities. I'm going to do a little digging on the forum to see if anyone else has encountered this, and I may start another thread. -
EGR Valve Questions: 1987 2.5L Renix
NickyV replied to NickyV's topic in MJ Tech: Modification and Repairs
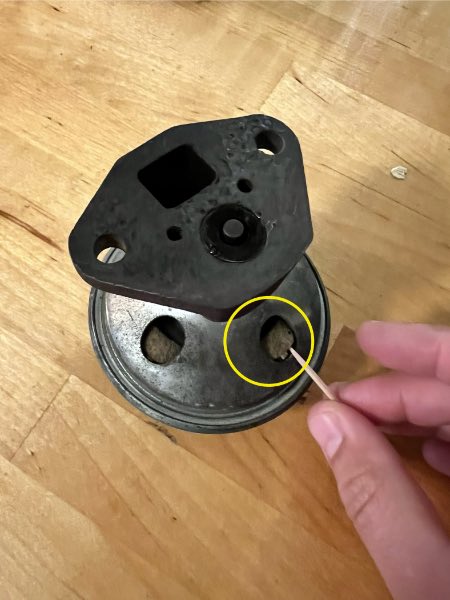
This is my old EGR valve. In the bottom view I can see what appears to be a gasket that has shrunk. That’s what I’m pointing to with the toothpick. In the top view there is the vacuum port. It’s wrapped in a little white electrical tape, which I used to make a seal for my vacuum pump when I was trying to test it. You are saying I should not be able to pass any air through that tip when blowing into it? I do think there are some models of older EGR that will hold vacuum if you attach a vacuum pump to them, even if they are cold. But I am now convinced that my MJ uses a back pressure EGR valve. And I don’t think they hold vacuum unless the engine is running and under load. Watched a ton of YouTubes today. Lol. At any rate, I appreciate the insights, as always!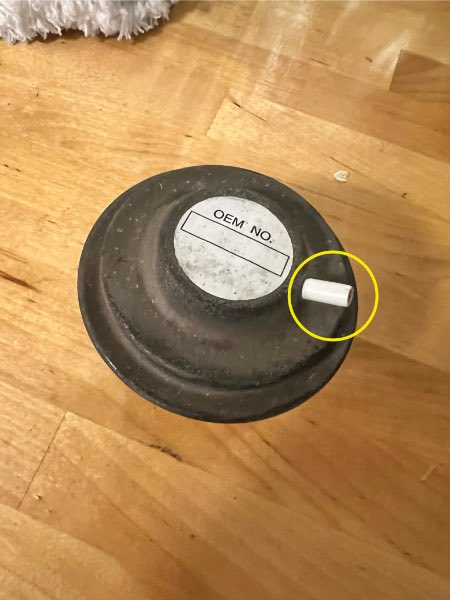
-
EDIT: I've done a bunch of tests and am more familiar with this system now. A few updates here. I only failed smog on one portion of the test -- NO (PPM) at 25 MPH. When on the dynamometer at 15 MPH, the truck was well within the permitted NO (PPM) numbers. It failed at 25 MPH when the NO (PPM) spiked significantly. From my reading, this could be due to the cat starting to fail (ugh...) or perhaps the EGR wasn't working properly. --- --- --- My MJ failed smog so now I'm troubleshooting. This is all new to me and I wish I'd taken a video when the smog tech was giving me advice, but here's what I remember of what he said: 1) Something about not seeing any pressure when connecting his vacuum tool to my EGR valve. 2) Something about too much NOx? 3) Suggesting I replace my EGR valve, my O2 sensor and replace my tailpipe which is full of holes (not sure where... I haven't identified all of them). I have since replaced the EGR valve, with a Standard Motor Products EGV580 from Rock Auto. But before moving onto the O2 sensor and the exhaust, I wanted to make sure I did it right, so I tried to reverse engineer what he did and now I'm just getting confused and wondering if I picked up a bad EGR or if I'm just not doing these tests right. I've tried various tests by hooking up my own vacuum pump to various connections under the hood and I've noticed a few things: 1) With the engine off, I hook up the vacuum pump directly to the newly installed EGR vacuum port. It does not hold pressure. 2) With the engine running and warm, I hook up the vacuum pump directly to the newly installed EGR vacuum port and I do not see it creating any pressure. 3) With the engine running and warm, I hook up the vacuum pump to the vacuum line that normally connects to the EGR vacuum port. I rev the engine and the needle on the gauge reacts, but only for a split second. I don't know enough about this to understand if this is a normal behavior or not. I've been Googling around and getting more confused. At first I thought that the EGR valve should hold vacuum right out of the box. (Unfortunately, I did not test it out of the box and am only testing now that it is installed). But then I'm coming across information that with back pressure EGR valves, it will NOT hold vacuum out of the box, and maybe this is a back pressure EGR valve? Any and all advice is appreciated. Thanks.
-
Advice Needed: Internal-External Slave Cyl Swap on AX-4
NickyV replied to NickyV's topic in MJ Tech: Modification and Repairs
Update: Since working on the clutch back in May, I haven't lost pressure. Been driving it longer distances too. Not sure if that pinhole was really a pinhole, but maybe. My theory is that the real culprit was actually the bleeder valve itself. I found some old paperwork on the truck from back when I wasn't as handy with this stuff. A mechanic replaced the internal slave in like 2020 or thereabouts. In the notes, he wrote that he had to try a few after market slave cylinders that failed before buying an OEM one. He also mentioned that there was an issue with the tiny internal gasket inside the bleeder. When I did my more thorough fix, I paid close attention to the bleeder and actually wrapped a little bit of teflon tape around the threads of the bleeder because I thought it was weeping a bit. Starting to think that might have gone a long way. I will eventually replace the line between the master and the slave cylinder, but I'm feeling a lot better about the clutch. Now I gotta figure out why the brand new thermostat I put in there in April is acting up. I'm starting to think that the real lesson here is to not buy cheap parts. Who woulda thunk it? -
Advice Needed: Internal-External Slave Cyl Swap on AX-4
NickyV replied to NickyV's topic in MJ Tech: Modification and Repairs
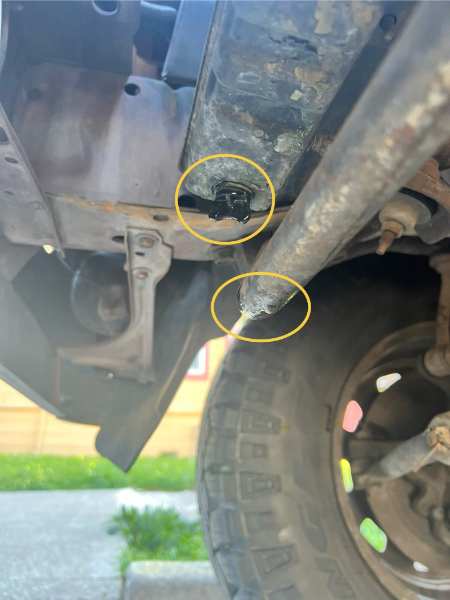
Hey @eaglescout526 and everyone else. I got busy with life the past couple weeks. I just sat down to do some more research. Everything I'm finding on EBay when it comes to bell housings says AX5 or AX15. But I have the four-speed. Does that matter? And another question, I've learned a lot over the years, but I'm getting lost in a lot of the technical talk here. I feel confident I have the tools and capability to do this, but I'm just getting overwhelmed by figuring out what parts I should even get in the first place. As for @ghetdjc320's point about an internal slave working well if it is a quality build... that has me thinking. If I have to drop the transmission anyway and I'm getting overwhelmed by trying to figure out this bell housing and additional equipment stuff, maybe I should just replace the internal slave. If I went that route, do you all have recommendations for the parts I should buy. A few more observations and questions: When the clutch went out most recently, I had to park the truck overnight on the side of the road and come back out and fix it there. It was not ideal. I found what appeared to be a pinhole in the hose that connects the metal portion of the clutch line (up in the engine bay) to the transmission. I put tape over it and wrapped a couple small hose clamps around it. I drove it about 20 more miles and it was starting to fail by the time I got home. Once I was home, I worked on it some more. I took my time re-wrapping the location where I found the pinhole using some pipe tape and I re-tightened the hose clamps. It's been a few weeks now, and I haven't driven it very far, but every time I've gotten in the truck since then the clutch has seemed pretty good. All of this to say I'm not 100% that the slave is actually leaking. It might have been that pinhole that I think I found. Maybe I should start by replacing that length of hose and the master cylinder first. I'm not entirely sure what kind of hose I should get though. All the creature comfort work I've done on this truck has come pretty easy to me, but the mechanics under the hood is harder. Sorry... I'm just kinda thinking out loud right now. And I know I'm going to be busy this weekend and next so I don't really have the ability to work on this thing yet. I know I can figure this out. But any more help would be appreciated. And explaining it like I'm 5 would also be helpful. Thanks. -
Advice Needed: Internal-External Slave Cyl Swap on AX-4
NickyV replied to NickyV's topic in MJ Tech: Modification and Repairs
OK. I just read it real quick. I need to take a closer look. Wonder if @eaglescout526wants to chime in. Based on my initial understanding of this method, I’m a bit concerned that I would have to first FIND the parts or locate an XJ that old and pull the required components. Then they would have to work. And if they broke, I’d have to do it all over again. The point of doing this swap is so I can do a bunch of work all at once and then make my life easier down the road. Not sure I want to set myself up for finding 40 year old components every time my clutch starts acting up. Oh the joys of MJ ownership! -
Advice Needed: Internal-External Slave Cyl Swap on AX-4
NickyV replied to NickyV's topic in MJ Tech: Modification and Repairs
Hey @89 MJ and @ghetdjc320 — So if I am reading you both right, you are saying that there is a way to do this without swapping the bell housing, input shaft retainer and all that? But in order to do that, I need to find a working external slave cylinder on an 84-86 XJ? Sorry… I’m doing this out of order. I will read the post from @eaglescout526 and hopefully that will make it clear. -
Well… I was collecting the parts and psyching myself up to finally tackle installing AC in my MJ. And then the clutch went out. Again. So now the clutch is my priority. I have been limping along by bleeding it regularly (not fun, but I guess I’m getting better at it). Can someone give me a shopping list for making the internal-external slave swap? I have a 1987 2.5L AX-4. I’ve seen some posts that say I just need a different bell housing plus a few more parts. So what do I need? One more question. I’ve had the clutch fixed a few times by mechanics. This was before I really started researching how to do this myself. I know the most recent time it was done that only the master was changed out. If the clutch keeps going out, and even if it is leaking at the master (it is) should I assume the slave is going out as well? Maybe you can tell, but I’m just wondering if there is any way I DON’T have to drop the transmission. Sigh. I know what the answer is going to be already. No way to know. I should probably replace all of it to be sure.
-
SOLVED: Chime Module not chiming
NickyV replied to NickyV's topic in MJ Tech: Modification and Repairs
Thanks @Ωhm! You helped me to start looking in the right place, and I realized that my issue was between the chime module input and the driver's side door jamb switch (which the manual calls "LH door jamb switch"). Plugging in the seatbelt switch got rid of the "OL" multimeter reading on Port 4. Then I started troubleshooting Port 6. I think this is where the bigger issue was. For those who are experiencing the same issue (chime module passes bench test but doesn't work when plugged in) I'd recommend checking your driver's side door jamb switch as a very early step in the troubleshooting process. There are two ground connections on the driver's side door jamb switch. I now realize that one of these grounds serves the circuit for the courtesy lights and the other ground serves the chime module circuit. Based on my experience, you need the second ground for the lights-on warning and the key-in warning. It seems like the seatbelt warning is independent, and plugging or unplugging the connection under the seat only impacts the seatbelt warning. A mistake in logic that I made during this process was reasoning that my door jamb switch was fine and not looking at it sooner. I thought it was fine because my courtesy lights were working as expected. But, as I said, there are two grounds going to the driver's side switch. After all was said and done, I ended up unplugging my seatbelt warning connection again and leaving it that way. After driving around for a bit, I discovered that there is some kind of loose connection in the buckle itself, because the seatbelt sound/light would come on periodically and I'd have to jiggle my seatbelt to make it stop. These modules really do make an awful sound. Haha! I hope it serves to ensure I never leave my lights on or lock my keys in the Jeep again. -
SOLVED: Chime Module not chiming
NickyV replied to NickyV's topic in MJ Tech: Modification and Repairs
Before I pull the bench seat and fish out C199, I want to mention that I have done the Headlight Harness Upgrade. I also recently replaced my headlight switch. Looking back at my old post, when I did that, I installed a headlamp switch that had the extra prong, which is related to the parking lamps... something about turning them off when the headlights are on? I don't know if this input actually does anything on an MJ, but I also don't think I have ever looked to see. -
SOLVED: Chime Module not chiming
NickyV replied to NickyV's topic in MJ Tech: Modification and Repairs
Oh. OK. I get it. Bridge the A and B through a fused jumper. Got it. -
SOLVED: Chime Module not chiming
NickyV replied to NickyV's topic in MJ Tech: Modification and Repairs
OK. Thanks for that suggestion. I should jump it to a ground, yes? -
SOLVED: Chime Module not chiming
NickyV replied to NickyV's topic in MJ Tech: Modification and Repairs
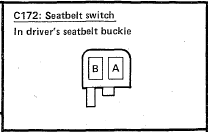
To clarify. The parking brake lamp only lights up when I engage the parking brake. It lights up independently of the seatbelt light. So the parking brake lamp seems to be working correctly. I only mentioned checking the parking brake lamp, because it is the first step of the troubleshooting procedure. I copy/pasted the troubleshooting procedure into my original post above. It seems that the purpose of this first step is to rule out a blown "Gauges" fuse. The seatbelt lamp lights up when start/run is engaged. In my truck, it lights up even though it is not properly connected. As I mentioned above, C172 and/or C199 is just dangling free. By the way, I'm not sure if C172 and C199 are two sides of the same connection. They look exactly the same in the troubleshooting manual. Thank you for your input here. I agree... I wondered if there was some kind of shared ground that could be causing the issue. But that didn't entirely make sense to me.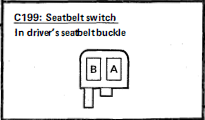
-
SOLVED: Chime Module not chiming
NickyV replied to NickyV's topic in MJ Tech: Modification and Repairs
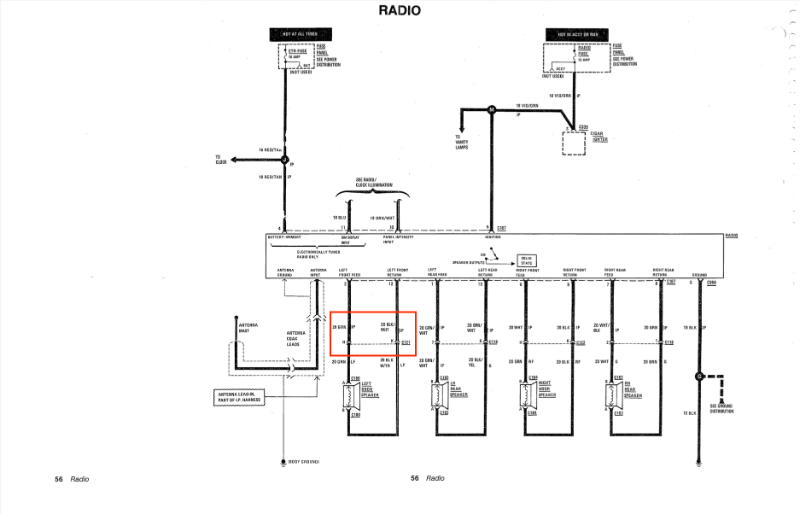
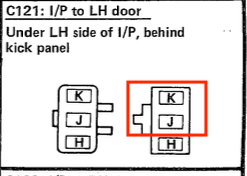
Thanks. I didn't think to tag @Ωhm — great user handle! Maybe @fiatslug87 has some ideas as well? To recap and hopefully add some clarity: I have both the black buzzer and the blue buzzer. Both of them buzz when I bench test them using the method described in this thread. Both of them cause my Parking Brake and Seatbelt Indicator lamps to light up properly. Below is the result I get for each step in the troubleshooting. TESTS PASSED: Remember T3 is the ground terminal. - T1: With COM prong of multimeter attached to T3 of C299 (ground), I get good voltage. OK - T3: With COM prong attached directly to negative terminal of battery via jumper, I get 0.068k Ohms (that seems like basically zero to me, considering this truck is nearly 40 years old. OK (?) - T2: With COM prong attached directly to negative terminal of battery or attached to T3, I get about 0.1k Ohms. This seems like "almost zero" to me. OK (?) - T7: With COM prong in T3, I get voltage pretty much as long as the key is in the ignition. Just inserted, at "off-lock" and in "ACC/RUN." OK (?) - T8: With COM prong in T3, keys out, headlights on, or running lights on, I get voltage. With keys in all positions and truck running, I get voltage. OK (?) PROBLEM AREAS: Multimeter reading of ".OL". - T4: With COM prong on negative terminal of battery or on T3 (ground), I get a reading of ".OL" on multimeter. NOT OK (?) - T6: With COM prong on negative terminal of battery or on T3 (ground), I get a readong of ".OL" on multimeter. NOT OK (?) KNOWN/POSSIBLE CAUSES: Things that I currently can think of that might be contributing to this. Seatbelt connection is not hooked up. I will try to hook that up eventually, but right now, the harness side connection is hidden under floor covering. Two of three wires snipped on C121 (see harness diagram below and picture). I believe that "J" and "K" are the ones that got cut. Something I didn't think about last night: My stereo is not hooked up using the factory wiring. I honestly can't recall exactly how I did it, but I know I ran several of the connections using new wire directly from the back of the radio directly to my speakers. It is possible that I used some of the factory connections on the passenger side to carry signal, but I think I used all new wiring on the driver's side. I am also using two separate amplifiers — one for mid/highs and one for the sub. And I have other customizations running here, like a bluetooth connection, door speakers and tweeters connected in parallel. Currently my theory is that it has something to do with either the seatbelt connection or the snipped C121 wires, but wiring is still new to me, and by simply looking at the diagrams, I can't see what the heck it would be. Picture of C121 Snipped: Location of C121 for reference: Diagram of Radio/Stereo circuit for reference: Diagram of C121 for reference. I believe that "J" and "K" have been cut. "H" remains connected. I am not using this connector in my stereo setup, so there is only the female connector present.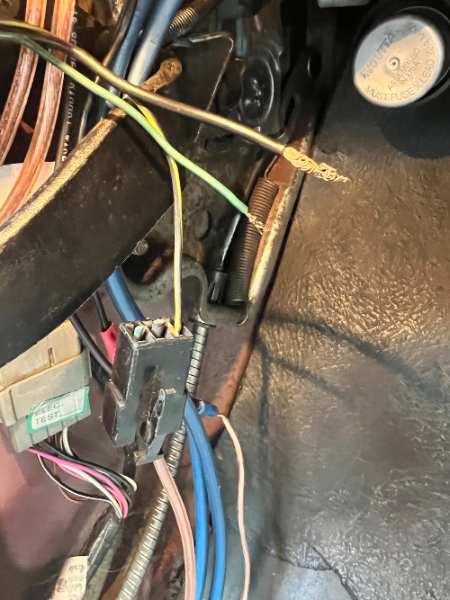
-
SOLVED: The main issue was that one of the two grounds connected to the driver's side door jamb switch had been disconnected. Secondary issue was that the seatbelt connectors under the seat weren't connected. Fixing the severed ground on the door jamb got most of the warnings working. Plugging in the connectors for the seatbelt solved the seatbelt warning. --- --- --- ORIGINAL POST: I recently picked up a blue chime module from the JY. Had a black one before that. It didn't make sound, and I figured was busted. But after plugging in the blue one, I had the exact same symptoms I was experiencing with the black one: [NOTE: This post has been edited since a new thread was started.] Parking Brake Light and Seat Belt Light both illuminate, but no sound. So, I found this older thread and did the bench test that @schardein outlined there (quoted below). Both the black one and the blue one seem to work properly during bench test. That is, they make noise as expected. Testing Procedure from "Electrical Troubleshooting" (1988 MJ Edition): So what gives? Well... I have some theories. I followed the troubleshooting guide and discovered that I'm getting proper voltage out of ports 1, 7 and 8. I am also getting proper ohms readings at Ports 2 and 3... at least I think they are OK. Feel free to let me know if I'm wrong. Here's what I am getting: - Port 2 gives me 0.103K ohms (black lead directly on battery, red lead coming out of port 2). - Port 3 gives me 0.068k ohms (black lead directly on battery, red lead coming out of port 2). - Ports 4 and 6 seem to be the problem: - Port 4 and Port 6 give me "OL," which I believe means there is a problem in both of these ports. I think it has to do with a ground. Here is what I know for sure: 1) The previous owner cut two of the wires on the driver's side door speaker connector. He did a really bad jury-rigged job on a speaker that wasn't even mounted. It was literally just tucked up under the dash. The black-with-red-trace wire is still in tact. The thicker, black (14 gauge?) wire was snipped, and the green (?) 16/18 guage wire was snipped. I think the thicker, black wire is a pass-through ground for the power windows (which I do not have). 2) I also know that the seatbelt connection is not connected. I'd have reconnected it tonight, but I didn't want to take the bench seat out. I can see the connector going directly to the belt, but I can't see the second part of the connection, which makes me think it's gotten wedged under the vinyl flooring. So... Does anyone here know if one of those two things sounds like the culprit here? If the seatbelt connection isn't hooked up does it cause all sound to stop working on the chime modules? Could it have something to do with the snipped wires on the speaker connector? Maybe a combo of both? Or something else entirely? @eaglescout526 — any ideas? P.S. Thanks for starting a new thread. Pics are below in follow-up post. I'm tired and I always forget to take pics, but I can upload some tomorrow if anyone wants to see what I'm ranting about.
-
I was just thinking about Cruiser today and wanted to check in to see if his stuff ever made it over here. I'm glad to see y'all got it on the site. Pete will be missed! Weather is getting nicer in NorCal and I'm feeling the itch to tackle a big project this spring/summer. So grateful for CC and folks like Pete.
-
Thanks to both @AnotherOldJeepGuy and @89 MJ for the advice and hope to get more. It all makes sense. I took a break from working on the truck for the past few months as it's been raining pretty frequently and I've been busy with other projects, but hope to get back into it soon. I'll try to do another post on the water pump and other fixes that I end up making. Keep on truckin!
-
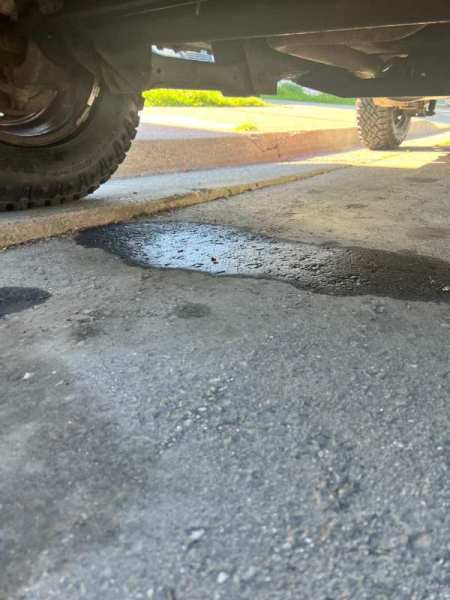
Update - Photos: I took some photos this morning in the daylight. I'm not sure if the liquid on the ground was from my MJ or something else. Hard to say. But it definitely looks to me like I'm getting some leakage around the base of the radiator. I've pasted them at the bottom of this post. I snapped these real quick on my way out to work. Will take a closer look after I get off. Some Background: If you have time, please read the whole post for all the details and then see my questions at the end. It took a while, but I finally got new tires on my MJ. I'd been driving on very old tires for way too long, and I was pretty sure they were causing the truck to shake at highway speeds. After getting the new tires installed (Good Year DuraTracs - 235/75/15), I was stoked to find that they significantly improved my drive on the freeway, and I drove about 30-40 miles at normal highway speeds for the first time in a long time. It felt great to be able to do that again, and I hope that I may finally be close to resolving my long battle with death wobble and not-so-deadly shimming. (If you've followed other posts of mine, you may remember that I had a lot of work done on the Jeep to fix the death wobble and that I'd made a lot of progress, but still needed to replace the tires). Anyway, that's not really what this post is about. The Overheating Issue: When I got off the freeway, I noticed that my heat gauge was redlining, so I pulled over. I popped the hood and saw that the coolant reservoir was boiling and that the cap on the reservoir is cracked. I let the truck cool off for a few hours and then drove back home (another 40 miles or so). It was probably around 80 degrees when I started driving earlier. By the time I drove home, it was night time and it was much cooler outside. I turned on the heat in the cab and made it all the way back home without any overheating issues or boiling (at least none that I could hear... I did not pop the hood when I got home, I just listened to see if I could hear any gurgling). My Theories So Far: The crack in the coolant reservoir cap concerns me, but I actually think that's been there for a long time. I have a 1987 2.5L, and my Haynes manual says that the overflow reservoir in these is not part of a pressurized system. But I'm no expert on this front. I have to do some more troubleshooting, but my first thought is that the water pump might be dying. The only other time I've encountered the boiling reservoir it was when my first water pump was shot. I replaced it probably 4 years ago now. Right before I noticed the overheating, I heard some engine noise that sounded similar to what it sounded like the last time the water pump went out. It was kinda like the sound of clanking metal being carried into the cab via tubes. It's not as pronounced as it was when I last changed the pump, but it definitely sounded similar. My Questions: Do you all think my water pump is going bad again? Do you think that's a good, low cost place to start? I drive the truck a fair amount, but it is not what I'd call a daily driver either. I have taken it on some pretty bumpy roads though since replacing the water pump and gone on some long road trips... so there's that. How vital is it to get a new reservoir cap for a 1987 2.5L? I definitely am planning to fix that ASAP, since it will be pretty cheap and I think relatively easy. Not trying to avoid it. Just wondering what my priorities should be. Is there any chance you think having the tires changed could have resulted in knocking something loose or shifting some fluid around or something? Like I said, this isn't exactly a daily driver, but I have made the trip I made today plenty of times over the past few years and sometimes on much hotter days. I wouldn't think the shop could have caused this, but I just am trying to understand why this happened today. I'm also wondering if driving it over 70 mph for the first time in a long time is why this cropped up today. Maybe the water pump has been going for a while and I just haven't pushed the truck hard enough in a while. Maybe the installation of power steering and new belts helped speed this problem along? When I got it worked on for Death Wobble, I also had power steering put in. And ever since then, there has been what I have assumed was belt noise. I tried a few simple things to resolve it, like tightening the belts, but I didn't ever get to the bottom of what was causing the noise. It wasn't a tell-tale screeching, but the noise would temporarily go away when I sprayed soapy water on the running belts, which made me think it was the belt. But maybe the soap was also lubing up the bearings in the water pump housing and thus stopping the noise temporarily? Finally, on a side note and in relation to the Death Wobble: How much jiggle is normal on a healthy MJ when driving on the freeway? I drove my truck for way too long with it's wobble issues before all the fixes (which I outlined in this comment). Now I'm a bit traumatized and I can't really remember what it was like before the wobble started presenting itself. I'm hoping that I start to get my trust back with time. Driving the truck today, after getting the new tires on, it felt soooo much better, but it still shakes when I hit a bump. I mean, obviously a 38 year old truck is going to shake when it hits a bump in the road, but I'm left wondering what is normal and what isn't... --- --- --- OK. I hope some of you will read this and respond to my questions. As always, any and all insights are appreciated, so thanks in advance!
-
Diagnosing Clutch Issues: Help/Advice Wanted
NickyV replied to NickyV's topic in MJ Tech: Modification and Repairs
Thank you all so much! This business about internal vs external slave cylinders is refreshing my memory. I did a bunch of research on this years ago. Hopefully I took good notes. I’ll have to check ye-olde Google Doc. @Eagle_SX4 and @pizzaman09: The possibility that it is sucking in air is intriguing to me. I feel like that might explain some of the weirder symptoms I’ve experienced over the time I’ve owned the truck. For example, sometimes the clutch will lose pressure completely and then get pressure back, all on its own. Does that sound like an “air in the lines” symptom? If this is part of the issue, what do you suggest besides resetting with a gravity bleed? Finding a gasket of the right size/shape to place on the master bath underside and of the master cylinder cap? Or is air more likely getting sucked in at the slave cylinder? Or is it a bit of a crapshoot as to where the air is getting in? -
Hey there! So, I've had my clutch worked on twice in the years I've owned my 1987 MJ. The first time, after about a year, the clutch's master cylinder was leaking. I do not recall if this was the issue the first time around, but it definitely was the second time. I know that is a common issue with these vehicles. I am eventually going to need to redo my fuse box... The second time, I took it to a mechanic I liked a lot better than the first. He and his team were very thorough. Explained everything to me. Pictures and videos provided. The whole nine... It was great! Except, I can feel my clutch going soft again. First time this happened, I took a peek in the master cylinder reservoir and it was dry. That's what used to happen... However, this time around I'm not seeing evidence of the DOT-3 fluid on my shoes or fuse box or anywhere. Just a few nights ago, I was noticing the clutch was feeling soft again, so I took a peek in the master reservoir and it was full. TL;DR: - Clutch is going soft. - Replacing DOT-3 fluid will bring it back to functionality (with plenty of pumping of clutch pedal) - But the fluid does not appear to be leaking from master cylinder - at least not into the cab. Thoughts: - Maybe it's leaking on the other side of the firewall? - Maybe we are dealing with something in the slave cylinder or somewhere along the line? Advice (?): - What should I do? - Where to start? - Diagnostic procedures? Background/Capabilities: - First time I had the clutch done, I also had the plates replaced, so hopefully that is still good. I don't think it's an issue with the plates. It seems like an issue with the pressure in the system. - I did bleed the clutch myself once. I'm not confident I did a perfect job, but I do know I can do it.
-
dimmer Dash Lights Work, but Dimmer Doesn't...
NickyV replied to NickyV's topic in MJ Tech: Modification and Repairs
Thanks for the explanation and advice, @gogmorgo. Good luck for when you get around to it, @AnotherOldJeepGuy!