

coolwind57
-
Posts
992 -
Joined
-
Last visited
-
Days Won
6
Content Type
Profiles
Forums
Gallery
Everything posted by coolwind57
-
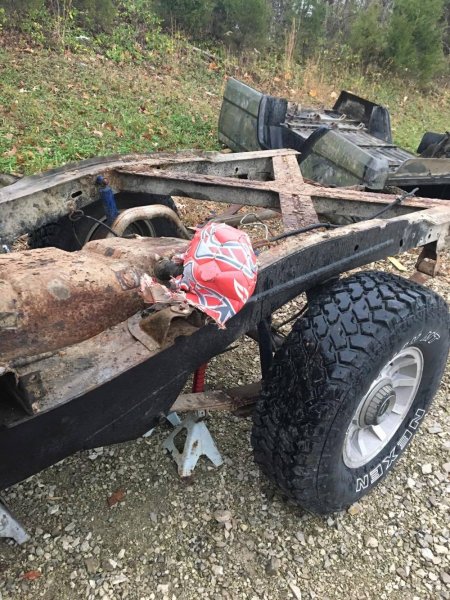
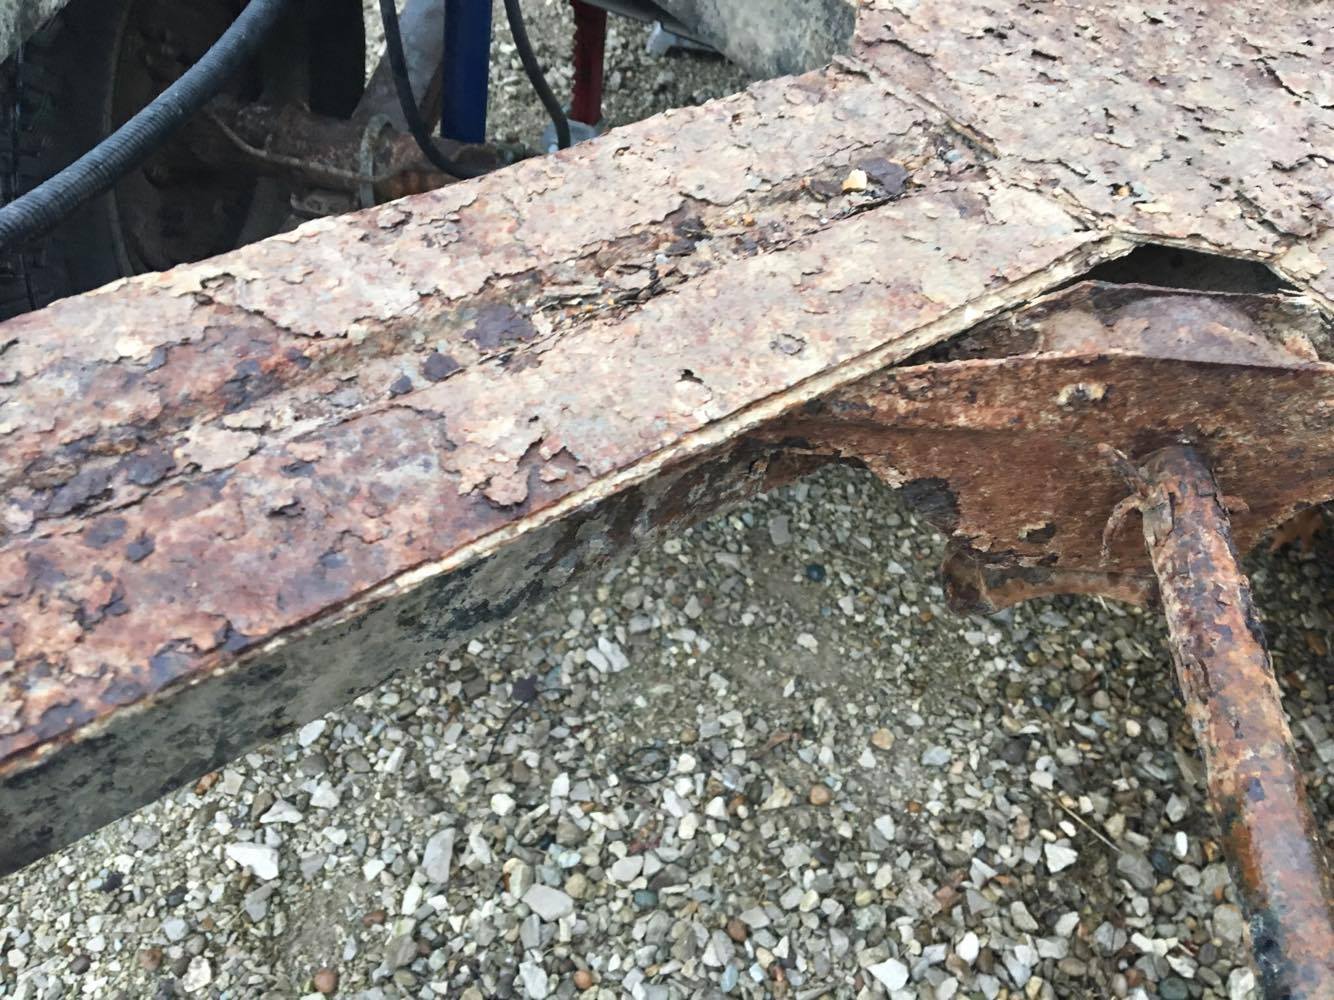
Frame condition is ok overall, with everything structurally good...Sides and bottom are excellent but it was the top that was full of flaky rust and mud. I'll feel better about it once I get it all cleaned off to better see the damage. But from what I could tell, it was surface flaking...didn't see real cancer. This picture looks really bad.

-

-
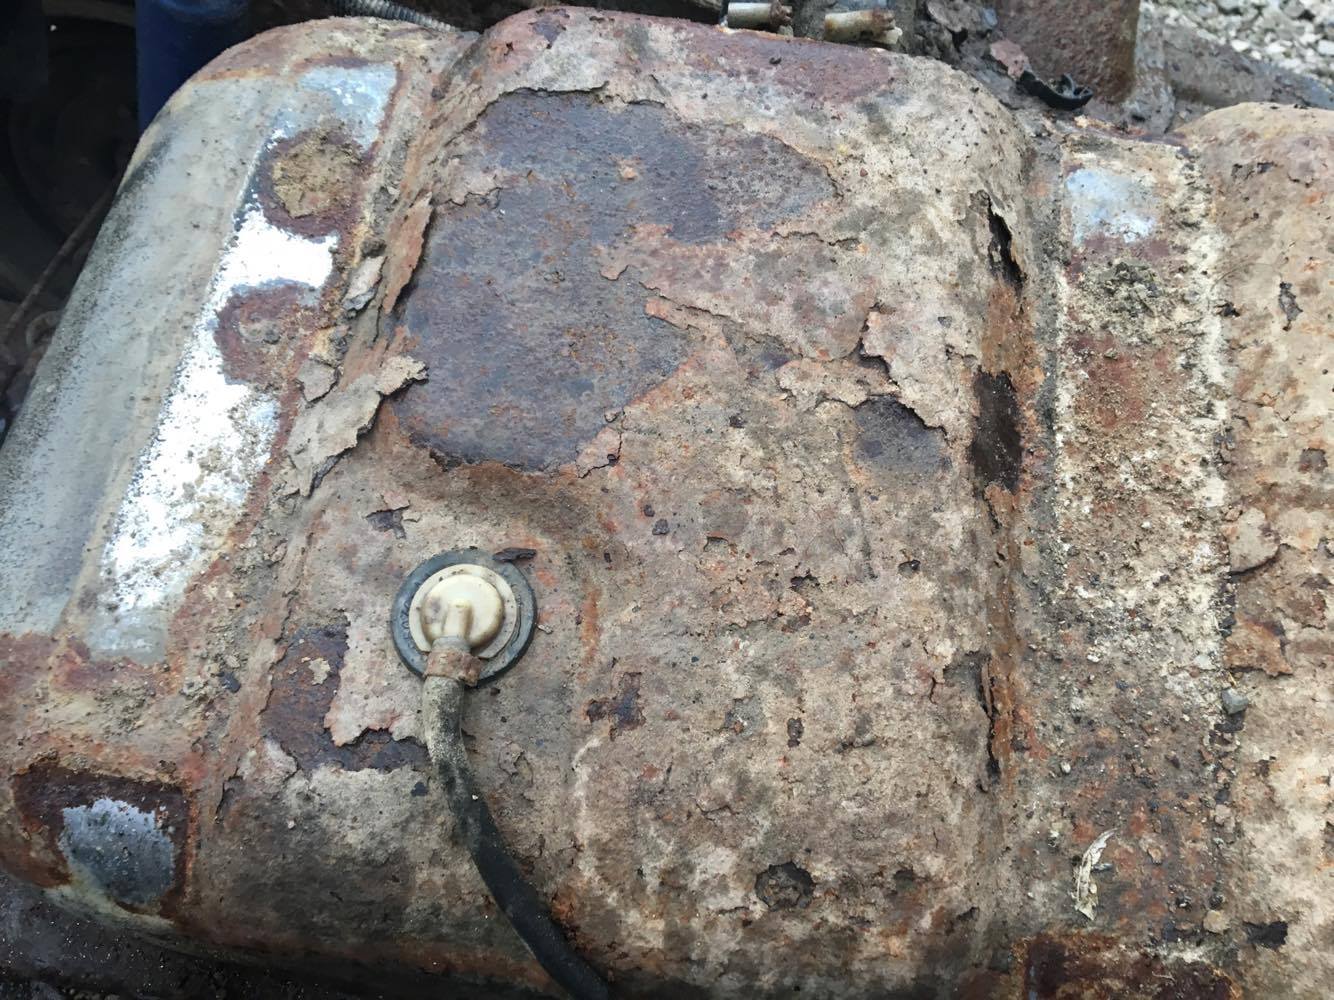
Tank has lots of surface rust. I think the flaking is a combination of dust/dirt buildup and flaking rust. I didn't stick around the scrape on it much, as it started pouring down. looks like I'll be POR-15ing this bad boy.

-
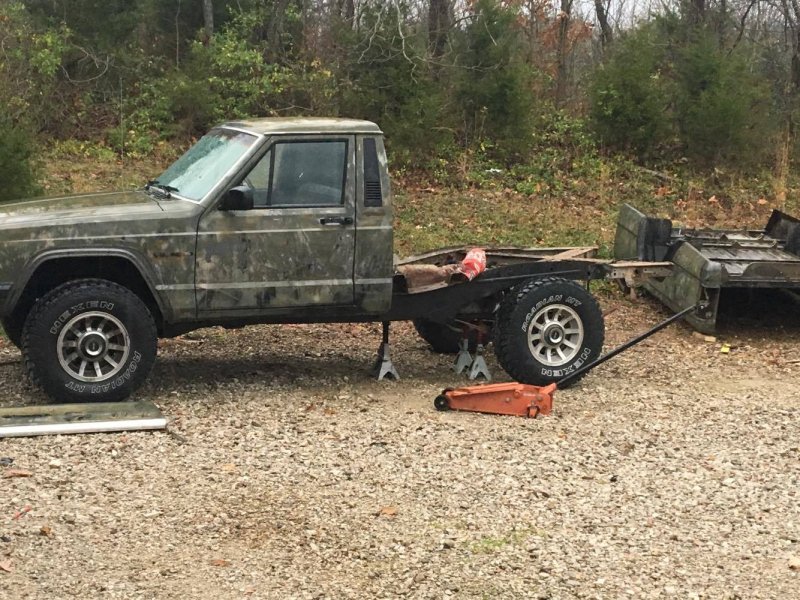
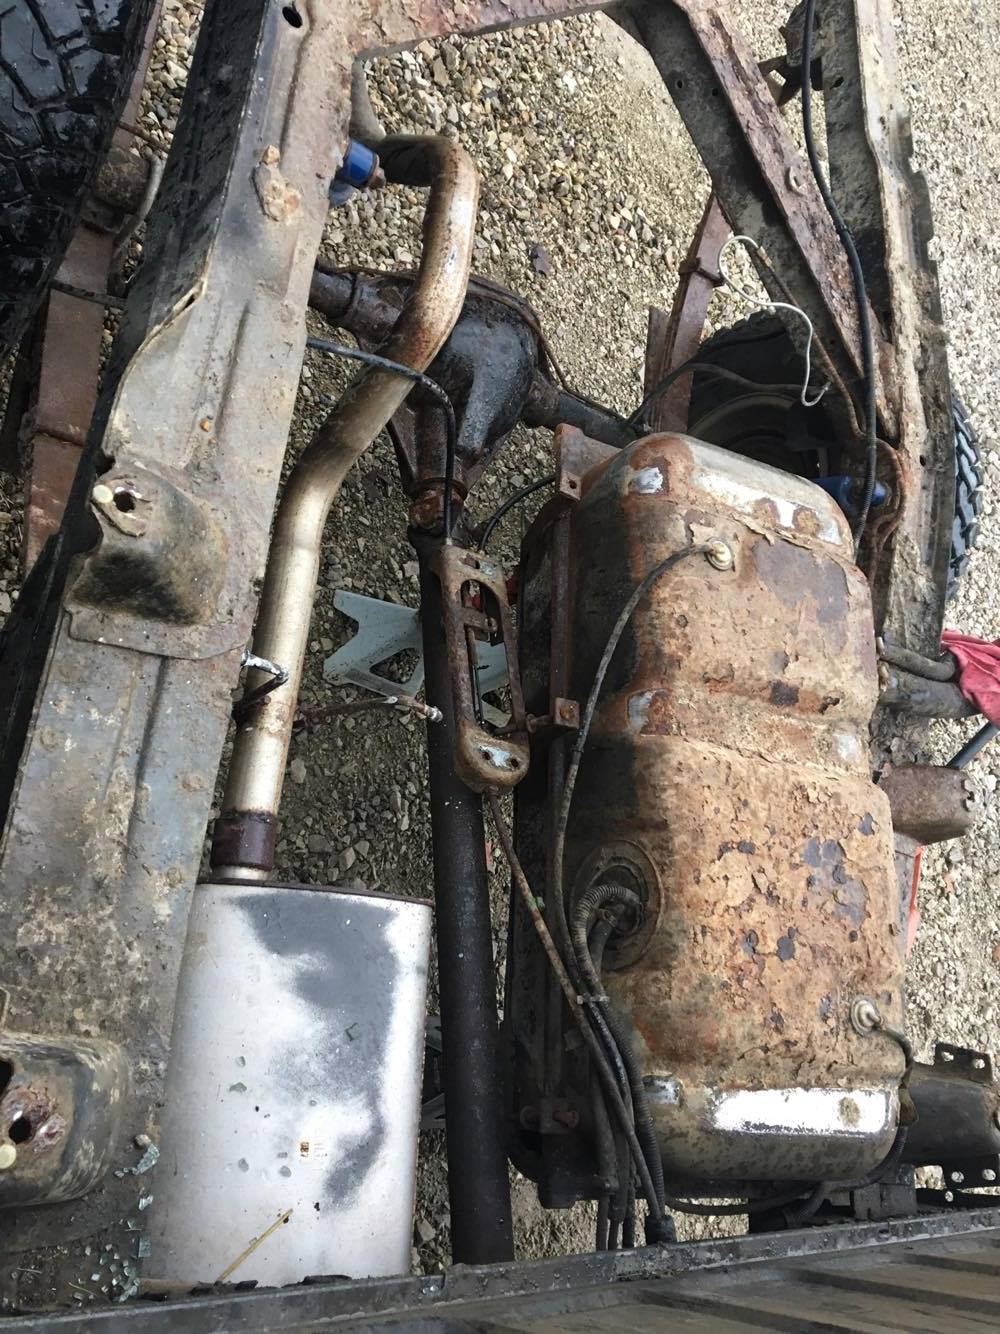
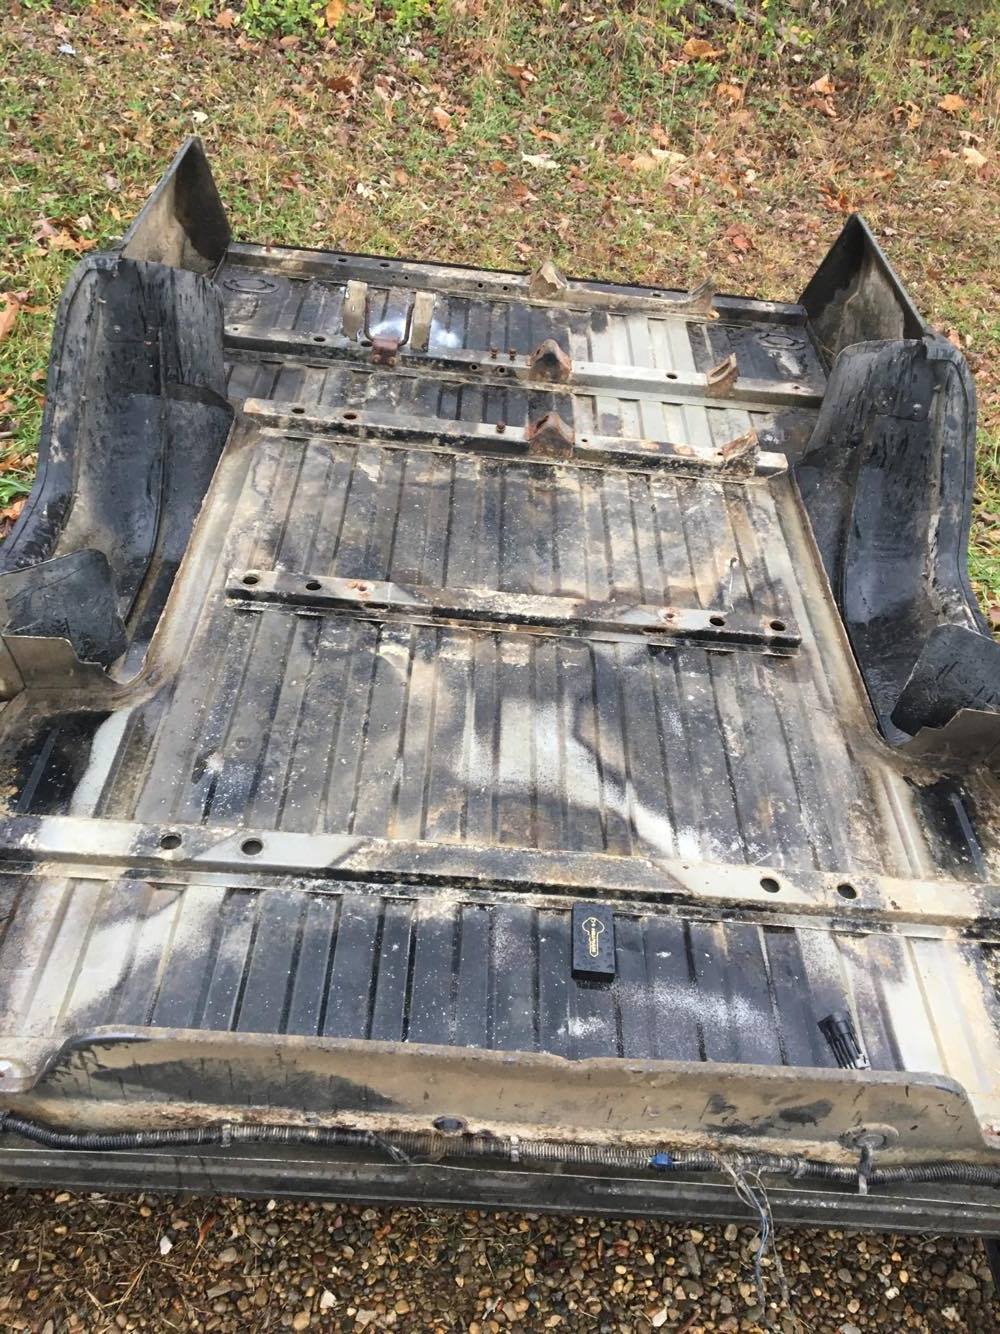
Bed underside was in good shape, albeit major dust. PO lived on a miles-long gravel road. It just started raining as I set this bed down in place, so she'll look a lot cleaner tomorrow morning, I'm sure. I am VERY happy that my interior quarter panels are in great shape. No real rust.

-
I've been anxiously awaiting this day. I took my bed off today. After reading over about 30 different ways of doing it (spend most of my workday yesterday doing so), I figured I'd had enough information to tackle it. Here's what I learned: 1. I've seen most guys state that there were 8 bolts holding it on. 6 bolts, and 2 studs. 2. I've heard 6. 3. I've heard one guy say he had 10. Well, on mine, I had 8 total. The front two were studs/nuts. Next two were bolts, located just in front of wheel wells. Next two were bolts, located on forward X-frame, near center. Last two were studs/nuts, located at the very end of the frame. I was SO LUCKY! I didn't snap any! I soaked them a couple of days ago and then again first thing this morning. I used a whole brand new can of WD40 high-end bolt/corrosion spray (forget the name). It cost more than the other break-free products there and came in a silver can. It must had paid off. Plus, I believe my truck is perhaps in better shape rust wise than most. I did have to remove my bumper and hitch to access the last two studs. That took the longest of anything. Other observations--all three bolts holding gas tank moved ok, but I did have to cut the rearward one to get the tank totally loose from the bed. I didn't have to remove any part of the spare tire carrier...I pulled the bed off towards the rear, walking it back and forth on pieces of 2X4s until I could softly drop it off on back edge. I removed this long bed by myself, believe it or not. It is possible with patience man. I didn't strain whatsoever. Removed brake light lenses. Removed middle section bed-mounted tailpipe holder--just pulled the rubber mounts off, that's all. Pulled hose clamps off of gas filler tube. All in all, it took me by myself, a little over an hour and a half total.
-

Rust Removal Above Inside Wheel Well
coolwind57 replied to Hudy's topic in MJ Tech: Modification and Repairs
You'd need to remove any coating/paint down to bare metal for the POR-15, correct me if I'm wrong... -
Oh I misspoke then. I suppose I forgot exactly how they attached when I removed them. Sent from my iPhone using Tapatalk
-
Dang. I'm pretty impressed with this eBay custom rear bumper. I may have to go for it. The design looks really good: 1. Appears to include the mounting brackets 2. Has added attachment plate for trailer chains. 3. Looks sturdy and very well built. 4. Hitch pin installs at rear---instead of having to reach under the backside of bumper to install pin. 5. Includes skirt, which helps visually close the gap from the bed. The price of $269.00 seems really quite good, plus he has a "Make Offer" option on there. I wonder if he'd bite on $250.... And FREE SHIPPING. Beginning to wonder how he's able to do it. Am I missing something here? Anybody know this dude? Anyone own this bumper? https://www.ebay.com/itm/Jeep-Comanche-Heavy-Duty-Rear-Bumper/122770960684?hash=item1c95b8312c:g:zq0AAOSw5jpZfYpZ&vxp=mtr
-
Thanks fellas. Besides the broken studs, my brackets are in decent shape, but I suppose I now feel that the extra time in modifying them is probably not worth it if nuts and bolts work just as well. Maybe I'm being too anal, but metal bracket against metal fender was also a bit unsettling. These areas are pretty darn prone to rusting.
-
Here's a question for you guys that had decided to simply use nuts and bolts to reattach your flares, versus restoring the original flare retainer pieces: Any regrets? Do you have any viable gaps in area between each bolt when you look at your flares? Perhaps noticeable sagging or curling or anything? My concern is perhaps the use of bolts over the retainer will become noticable , especially in temperature extremes. BTW, yes, common experience here on my end...Nearly all original 5mm studs on my retainers snapped during removal.
-
Yes Sir. Happy 242 to you as well. S/Fi
-
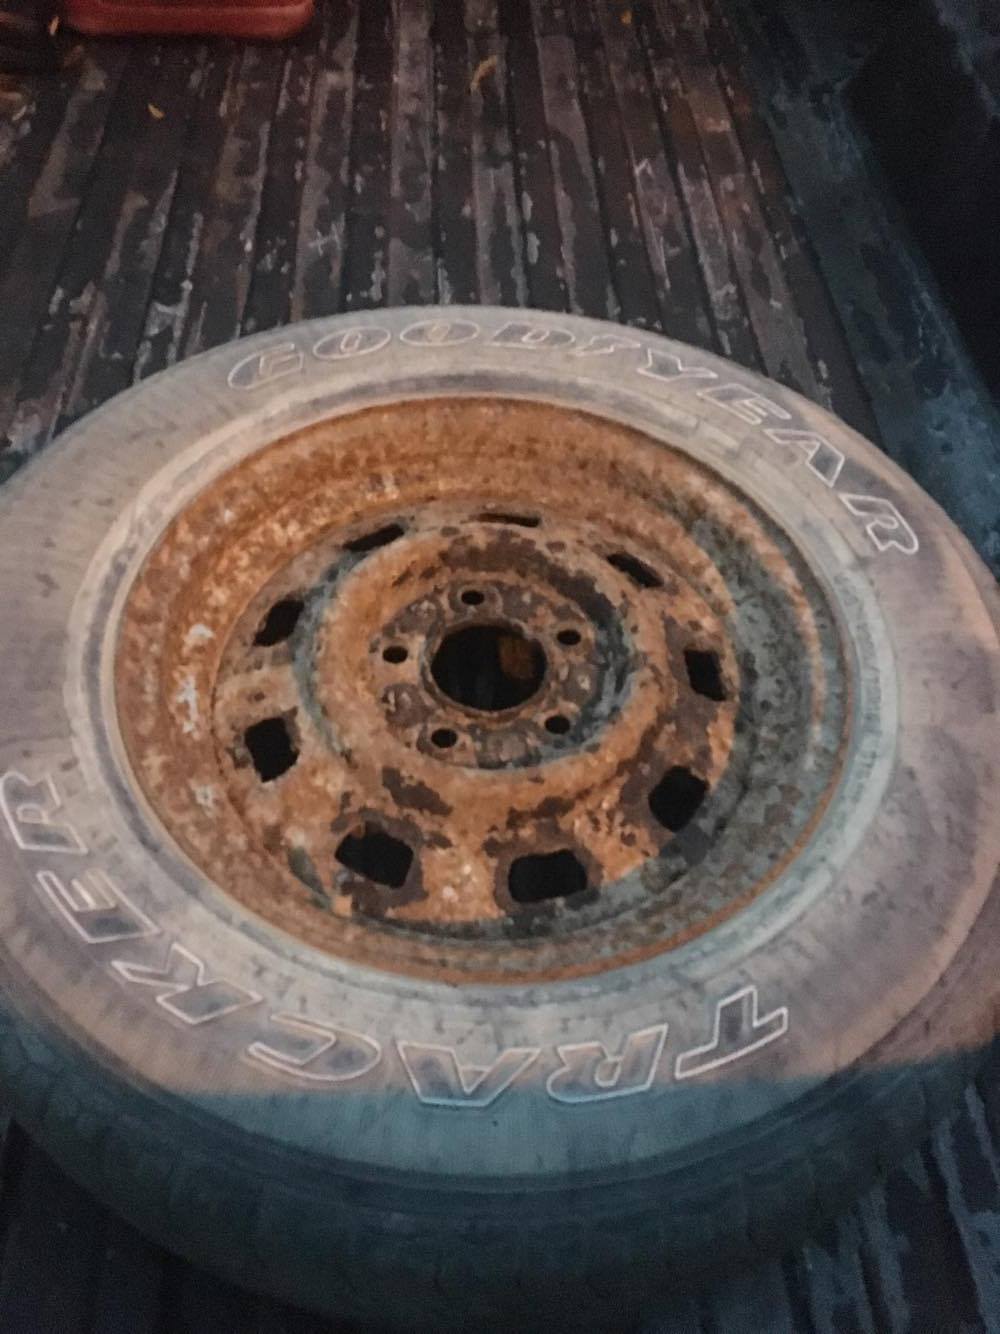
Here's another issue to correct: My spare tire carrier is badly rusted. Must be a very different steel than the rest of the steel under there. My bed steel is fine, other than just being very dusty/dirty. I'll be taking this bracket off to evaluate whether or not I can salvage it. If so, I'll blast it and POR15. It did operate well, dropping the spare tire. But check out the spare: Daaaaang!! I'm certainly not even going to try to salvage this wheel. Same flaking, extreme rust as the carrier. No surprise, the tire wasn't holding air. I'll go to the junk yard and get me a new one. The plan is to remove the bed over the next week or so. I'll clean and coat the underside, clean and coat the frame, re-do rear brakes--properly deleting the self-leveler (I currently have a half-assed delete by the PO) and installing new brake lines. Once the bed is off and cleaned up, I plan on using Monstaliner on the body, then putting her all back together. Baby steps. That's the way it has to be when you're poor.


-
New Disc Brakes Squealing...Dumbfounded
coolwind57 replied to coolwind57's topic in MJ Tech: Modification and Repairs
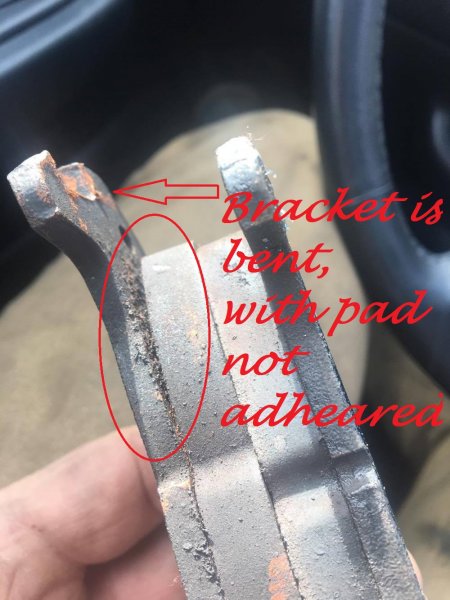
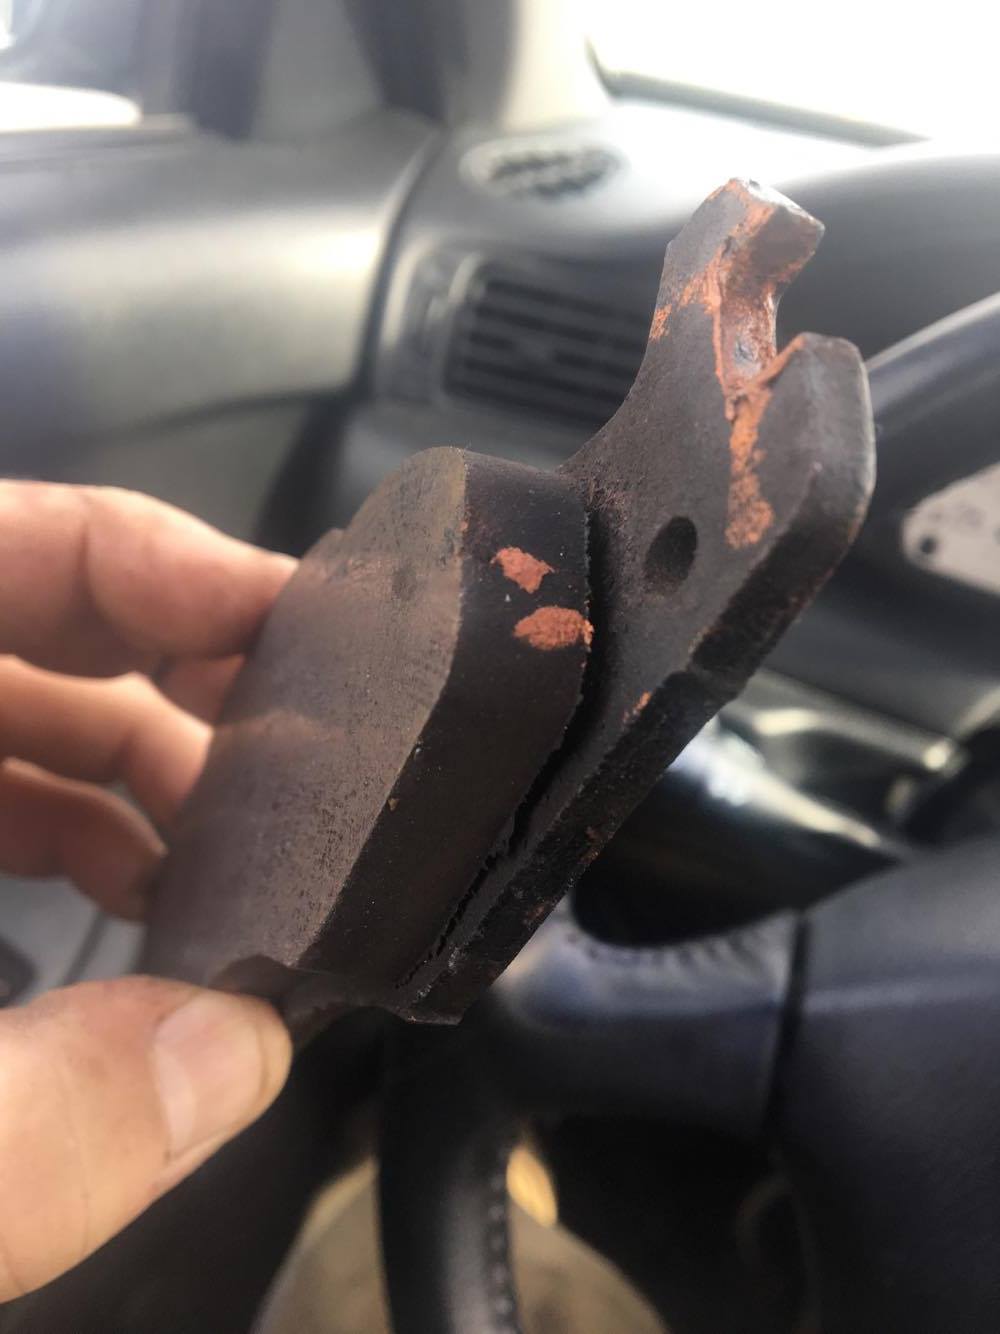
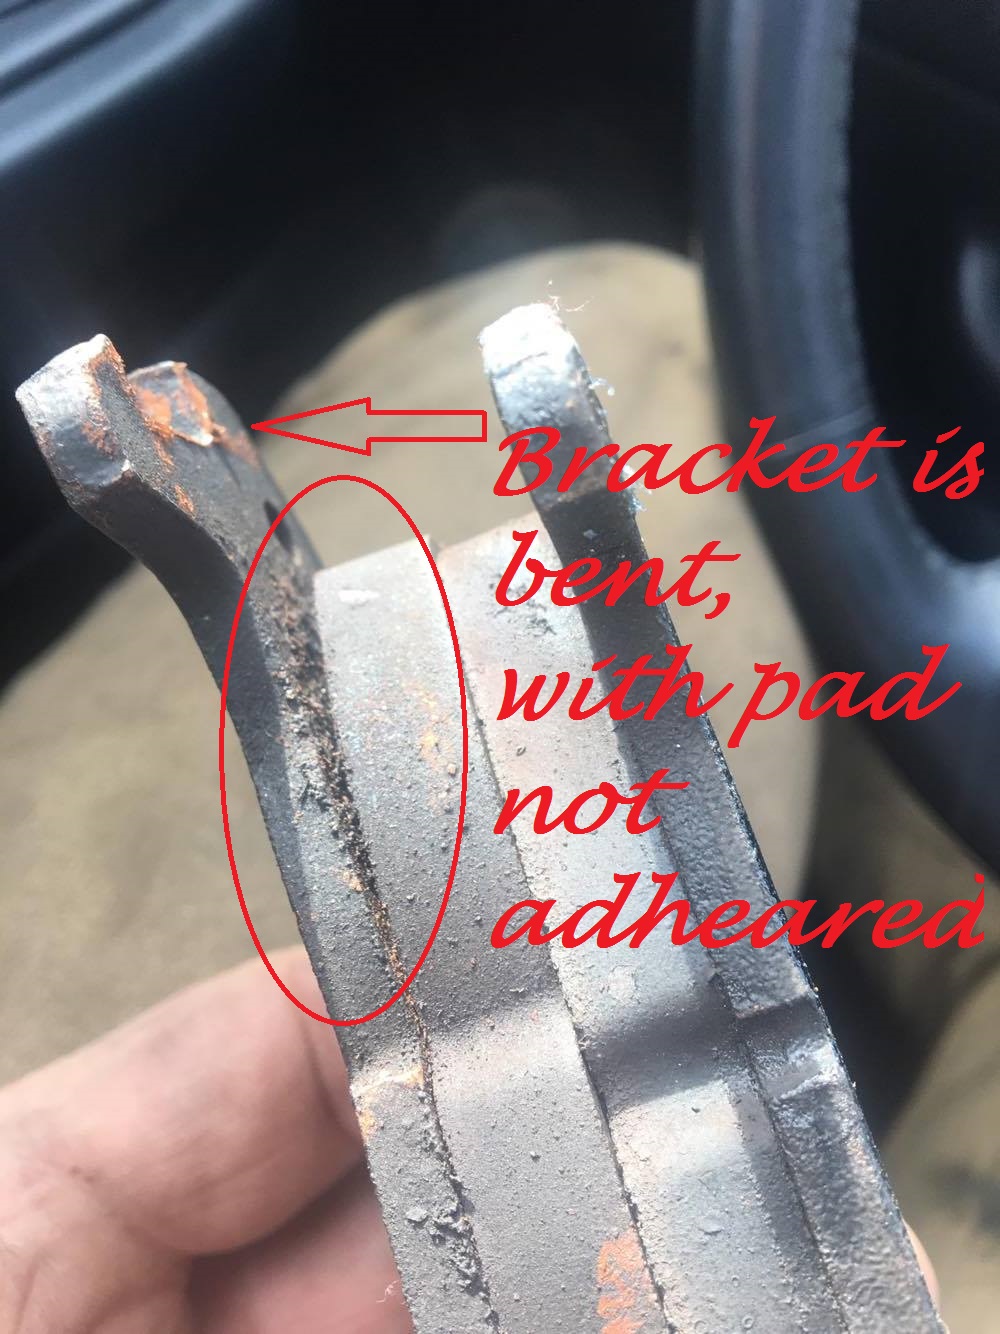
I think this is mystery solved: I am frustrated that I did not see this before the install. I am quite sure that it is a factory defect as there is no other sign of damage caused by any improper installation. I did confirm that the pads were installed correctly before I removed them, with the shorter pad installed inboard and the anti-rattle clips installed right. It was after I removed them that I noticed that the pad on one was jacked up. It was easier to overlook this flaw in person than in my closeup pictures, but I should had better inspected them before the install, hands down. Dumb mistake on my part. Advance Auto replaced them with no arguments. Learn from my mistake, fellas. Thoroughly inspect your parts before the purchase!! New replacement brake pads are great, no noise. Copper color you see in the pics is anti-seize paste. I prefer it over grease for this particular application. I am relieved.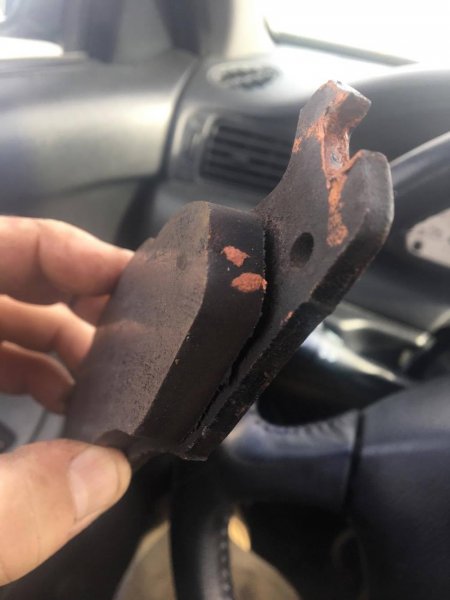
-
Cracking up...along with my inner fenders!
coolwind57 replied to coolwind57's topic in MJ Tech: Modification and Repairs
Rock Auto's part numbers for the inner fenders claim to cover 84-96 Cherokees (plus 84-90 Wagoneers), so I hope any changes on size that they may had made in sizes over the XJ year span still adequately cover my MJ openings. We'll see tomorrow providing I have time to put them on then. Curiously, inner fenders are not found on Rock Auto's site for MJs. -
Cracking up...along with my inner fenders!
coolwind57 replied to coolwind57's topic in MJ Tech: Modification and Repairs
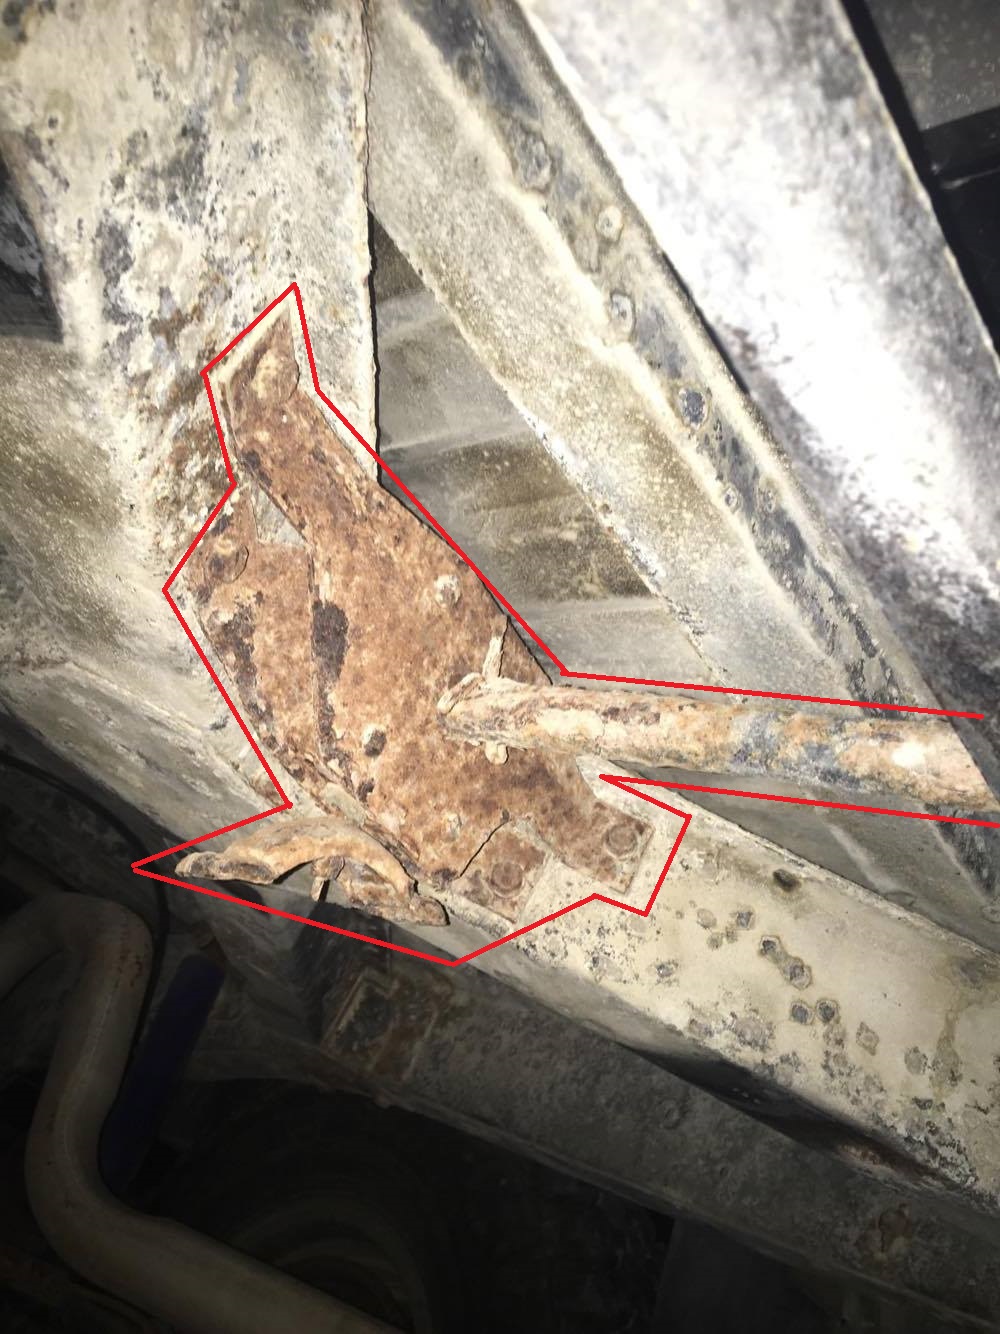
Notice that 3, 4, & 5, labeled "retainers" are outboard of the fender (item 1) in the illustration, which would indicated that the 3/4/5 retainers are outside the fender, not inside. I don't see an "extra trim piece" on the illustration. So I too assume HOrrnbrod's photo is sort of an optical illusion. What I have in red here, is essentially what Skorpyo had identified in his posted pic too, right? Any chance HOrnbrod's 1991 model changed after the illustration was published? I'm anxious to get home tonight and see what my wheel well looks like..thumb.jpg.6ede2a65b85bbad4e092b56ef1b93b0d.jpg)
-
Cracking up...along with my inner fenders!
coolwind57 replied to coolwind57's topic in MJ Tech: Modification and Repairs
Great minds think alike. I was planning on figuring a better, more robust way to mount these. Perfect idea. -
Cracking up...along with my inner fenders!
coolwind57 replied to coolwind57's topic in MJ Tech: Modification and Repairs
Here's what Rock Auto sent me today. I'll get them installed during the next couple of days and we'll see if they leave gaps. Material is flimsier than I expected, but maybe that's a good thing...certainly has give and will possibly make stones bounce back instead of exploding through. Hoping and guessing, but we'll see. And this set was made in Taiwan, BTW..thumb.jpg.b8c9f43b4f943340a05443bd78e23ead.jpg)
-
New Disc Brakes Squealing...Dumbfounded
coolwind57 replied to coolwind57's topic in MJ Tech: Modification and Repairs
Certainly was what I imagined the problem as being, but it wasn't. I have some advance corrosion on the driver's side and removed anything close to touching the rotor. Afterwards, both sides were well away from the rotors. I'm anxious to open her up again and check for this stuff. I'm hoping you're on to something despite mine being 4WD vs your 2WD. Oh, my Lord....I would be PISSED! haha Nothing more infuriating than discovering that you'd gotten wrong parts in the middle of a job. -
Will these gauges swap??
coolwind57 replied to rylee144's topic in MJ Tech: Modification and Repairs
Did they make clusters for automatic transmission trucks with tachs? -
Will these gauges swap??
coolwind57 replied to rylee144's topic in MJ Tech: Modification and Repairs
Can one assume the difference is that one is for Auto transmission (no tachometer) and one is for manual (tachometer)? Sorry I am not answering your question, but I'm in the market for upgraded gauges myself. I want to go from idiot gauges (automatic transmission) to full gauge setup. -
Hey guys, let me run something past you before I go throwing money at this problem. By the way, I read maybe 10 topics on this issue here at the forum and couldn't really find a solution specific to what I'm experiencing. Two weeks ago, I replaced my rotors, calipers and pads. Calipers came with new, well-greased slider pins and pin cover boots. I did reuse the anti-rattle retainer clips for the pads, as they appeared to be in fine, serviceable condition. Here's the symptoms: After the vehicle is driven and warmed up, I usually always get a metal-to-metal "ringing" squealing sound at low speeds. It instantly disappears when brakes are applied. I had my wife drive at a creep while I walked along side the vehicle in an attempt to pinpoint the sound source. I never was able to pinpoint with absolute certainty, but my guess was passenger-side front. So the other day, I took the front brakes apart, seeking for anything obvious. I checked for debris--all clean (again, most are all new parts). Slider pins were clean and still lubed. Took pads off, re-sanded the backs and applied anti-squeal spray. Lightly sanded the braking surface a bit while I was at it, thinking that there might be some "extra" metal in the pads. Inspected and lubed the contact surface where the pads notch onto the knuckle. No excessive wear there either, by the way. Inspected the anti-rattle retainer clips for the pads. Looked for shiny wear spots, nothing. Inspected them to see if they were making contact anywhere once they were installed. Nothing--we've got good clearances there. I'd read that pads can be installed backwards, but I'm quite sure my pads were installed with the correct orientation. Anyhow, I put the brakes back together, assuring all was clean and went back together. I even took my rear drums off, checking them, knocking dust out and reinstalling. Those shoes were replaced one year ago. All looked good in there. To my disappointment, once I was back rolling down the road, none of this killed the squeal. My new pads are Wearever SILVER Semi-metallic, $15.99 from Advance Auto which are not the super premium pads. It was all they had in stock at the time. I'd really like to see if there is anything else I can check before I go buy premium Duralast Golds at $19.95 or even Duralast Max from Autozone at $47.99. The noise does immediately go away the moment I step on the brake pedal and returns the moment I let off. This seems to tell me that its likely a brake issue, but perhaps not. Either it goes away at highway speeds or my aggressive tire noise covers it, but I do hear it faintly at 0-20mph--enough to drive me nuts. What else should I check? This does seem to be a brake-related issue, right? can't think of anything else that would create metal-to-metal noise that goes away when one applies the brakes.
-
Quick upgraded oil filter nipple question...
coolwind57 replied to coolwind57's topic in MJ Tech: Modification and Repairs
I found a long 22mm impact socket that worked well. Definitely required a cheater bar. -
Like I said, I'm actually down for it...but I want to hear about your results first. As I mentioned above, the Uppers were much more difficult than the lowers. The passenger side uppers took two bottle jacks and a come-along wrapped around the front axle bearing housing. The driver's side only one of each. I found that it took patience as well as some creative bottle jack positioning mostly. I had added stress because I had to have the truck up and running to drive my wife and then myself to work early the next morning. Add that anxiety and it wasn't the most pleasant experience, as you might imagine.
-
Jeep86, you may consider doing the uppers too if you're under there and feeling froggy.
(2)(768x1024).thumb.jpg.42544ae126a70bde258c89a0dcd32988.jpg)
-
More power to ya, Brother. There ain't NO WAY I'm going to get under there and take it all lose to fight that bolt alignment issue again. The LCAs weren't as bad as the UCAs, but it still was no picnic. I'm very happy with the effect of having these WJ LCAs on over the stock. Do let us know if you experience any difference. it the difference absolutely blows your mind, then I may consider sucking up my pride and rolling back under there.


.jpg.10178451d4d01cc59f41a35a9449738a.jpg)
.jpg.64f8559f868e4e18cbaa369780a91197.jpg)
(2)(768x1024).jpg.d9de4f407c04786a99ac281a4a18c3bb.jpg)