eunique Posted April 5, 2010 Posted April 5, 2010 well, here are the pics..i'm going to try and upload them. I am naming the MJ "Commander" in tribute and respect for the previous owner I acquired it from. I am keeping this project for life since I have high respect and look up to him...and in the department where he is from, his nickname is "Commander." :clapping: IMG IMG IMG IMG
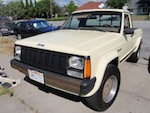
eunique Posted April 5, 2010 Author Posted April 5, 2010 well, here are the pics..i'm going to try and upload them. I am naming the MJ "Commander" in tribute and respect for the previous owner I acquired it from. I am keeping this project for life since I have high respect and look up to him...and in the department where he is from, his nickname is "Commander." :clapping: let me try that again interior after getting these wheels refinished engine bay
-600JeepMJ Posted April 5, 2010 Posted April 5, 2010 how much did it cost you to get the wheels refinished?
eunique Posted April 5, 2010 Author Posted April 5, 2010 more pics after cleaning the engine a bit and painting updated valve cover painted bumpers after cleaning the interior ...custom shift boot
eunique Posted April 5, 2010 Author Posted April 5, 2010 how much did it cost you to get the wheels refinished? well...kind of a different story... the actual cost to get the set of wheels refinished was $200 (which is cheap IMO) but..it was shipped out of the US..to the Philippines...and then shipped back here. :wavey:
jteckmann Posted April 5, 2010 Posted April 5, 2010 Looks like a good find! That's the same color combo as my '86. Glad the inside looks clean & intact, because tan interior pieces have been nearly impossible for me to find lately.
eunique Posted April 6, 2010 Author Posted April 6, 2010 Looks like a good find! That's the same color combo as my '86. Glad the inside looks clean & intact, because tan interior pieces have been nearly impossible for me to find lately. Still a work in progress.... I just got the seats done today... I had custom upholstery done from the Philippines to commemorate our Commander. It has his signature embroidered on the seats. I'll post pics in a bit. Hopefully I get the tires tomorrow and get them mounted. I still need to work on the headliner. It's sagging/drooping down. ...and of course, lots of other stuff to work on. I guess, a little bit at a time.
Drahcir495 Posted April 6, 2010 Posted April 6, 2010 Looking good! How about a picture with those refurbished wheels back on - they came out nice :cheers:
High2by Posted April 6, 2010 Posted April 6, 2010 That's a nice looking truck. One day maybe mine will be that slick.... :thumbsup:
eunique Posted April 7, 2010 Author Posted April 7, 2010 Looking good! How about a picture with those refurbished wheels back on - they came out nice :cheers: I don't have the wheels mounted back on..those tires they were on were already old and cracked...didn't want to chance them blowing up. I'm still waiting for my buddy to come through with a good deal on some tires. I'll keep you post and post the pics as soon as I get them mounted and back on the MJ
eunique Posted April 7, 2010 Author Posted April 7, 2010 That's a nice looking truck. One day maybe mine will be that slick.... :thumbsup: Thanks! :clapping:
eunique Posted April 10, 2010 Author Posted April 10, 2010 Looking good! How about a picture with those refurbished wheels back on - they came out nice :cheers: well...look what I acquired yesterday. My buddy still has not come through with the tires...so, this is what I got for now. new set including spare installed side view 3/4 view
eunique Posted April 10, 2010 Author Posted April 10, 2010 and this was what I did last week... I used this...after sanding and cleaning up the rust masked it off done
eunique Posted April 10, 2010 Author Posted April 10, 2010 just found these older pics...this was before the bumper was painted here was the before shot...just as we picked up the MJ removed the grille painted with Plasti Dip after painting and putting the grille back on
CaffeineSam Posted April 11, 2010 Posted April 11, 2010 I'm pleasantly surprised, those wheels sure rock on a beige Comanche !
eunique Posted April 28, 2010 Author Posted April 28, 2010 I'm pleasantly surprised, those wheels sure rock on a beige Comanche ! Thanks, I'm liking it too! So, this is what I have been doing for the past week on my project... within the past couple of months, I had gotten a double booster/master cylinder from a V8 Cherokee (Grand, I believe) and have been trying to get together what I needed to do the conversion. I got these steel brake lines from the local NAPA auto parts store. here's the new double booster (LEFT) and old brake booster (RIGHT) original the junkyard part that I got...was hoping that the shaft was going to be same length so I wouldn't have to modify the rod/shaft...but after fitting it...it would make the brake pedal higher (even with the spacer on the firewall) :fs1:
eunique Posted April 28, 2010 Author Posted April 28, 2010 inside the pedal assembly the old master cylinder and brake booster so, I removed the MC and took both boosters to Power Brake Exchange in San Jose, CA since they are local...located at Phelan Ave. Martin helped me out to get the shaft into the new dual diaphragm brake booster They did not want to just replace the shaft/rod into the j/y part..they wanted to rebuild the booster just to be sure...since it's their name on the line...cost $90 to rebuild and get matching rod in.. and here's the master cylinder and dual diaphragm brake booster bolter together..pretty simple, direct bolt on :rotf:
eunique Posted April 28, 2010 Author Posted April 28, 2010 used a brake line bender tool purchased from Harbor Freight Tools in Fremont, CA they have cheap tools there, along with metric and standard brake line wrenches I used the old brake fittings that I removed from original and new combo (MC and BB) whichever ones looked to be in better shape. I had a little problems with some when trying to remove them as they were frozen from all the years they had been on there...I also used PB Blaster and let it soak for a while to assist with the removal process. I had to bend this rear line slightly farther and the rod behind it (accelerator) was rubbing on the brake line on Right had turns (freeway onramps) and would get accelerator briefly stuck. Scary when trying to slow down on an onramp and your accelerator gets stuck. After a little and bending..it was all good to go. No other problems. I used ATE Super Blue brake fluid and bled the whole system. I also initially used a one man brake bleeder system also purchased from Harbor Freight Tools... it is a vacuum type bleeder system. I started from RR wheel, bled a few times..then, Left Rear, then Right Front and Left Front last. After it was all said and done...I was so pleased with the results. The braking is now phnomenal!!!! It is by far, one of the best upgrades I have ever done! I would definitely recommend this upgrade to an MJ!!!! Btw, I was initially going to try Precision Rebuilders to do the rod swap first, they turned me to Power Brakes in Sacramento so that it was closer. They then referred me to Power Brake Exchange in San Jose since it was local. I could have sent it to Precision Rebuilders still...but other was local and I got quick turnaround time. I dropped off the BB at 5pm and picked it up 10am the next day. Thanks, Martin!
eunique Posted April 28, 2010 Author Posted April 28, 2010 Also, if anyone noted...the windshield washer bottle was not there in the vecinity was because I had already upgraded to the newer style bottle in the fender. I had gotten a washer bottle from a newer Cherokee Sport and cut out the hole in the fender wall, plugged up the other washer motor (there were 2 washer pumps on that one) and wired it up..only 2 wires...and ran vacuum lines to the line going to the squirter nozzles. I used plastic barbed fittings to attach the rubber hoses together. It freed up a lot of room on the driver's side area where the big reservoir used to be. :cheers:
eunique Posted April 28, 2010 Author Posted April 28, 2010 just found a pic showing the washer bottle/reservoir on the driver's side of the fender wall.
eunique Posted April 29, 2010 Author Posted April 29, 2010 are those H I D lights if so sweetttttttt yup, they sure are HIDs! I got a better lamp housing my brother gave that we have used on another car..and older car. but, these housings have the better lamp patterns, plus, with the addition of HIDs give me a bright, nice pattern to see on the road.

Recommended Posts
Create an account or sign in to comment
You need to be a member in order to leave a comment
Create an account
Sign up for a new account in our community. It's easy!
Register a new accountSign in
Already have an account? Sign in here.
Sign In Now