

wheelsaz08
-
Posts
144 -
Joined
-
Last visited
Content Type
Profiles
Forums
Gallery
Everything posted by wheelsaz08
-

wheels 89 manche
wheelsaz08 replied to wheelsaz08's topic in MJ Hardcore Tech: Epic Journeys to Greatness
Had 8 or 10 beers and decided to pull the axle back out to weld it for good along with the links. it's done minus the spring plates On the drivers side, I weld the inner part of the bracket to preheat the cast side, then welded the cast and wrapped it with a kevlar apron, and my carhartt jumpsuit then let it sit all night. I think it turned out good -
It's going to be strictly a crawler so I'm planning on capping it with something but think I'll go with some 3/16 or 10 gauge. The previous owner welded a piece of 1/4" where the side brace used to be
-
wheels 89 manche
wheelsaz08 replied to wheelsaz08's topic in MJ Hardcore Tech: Epic Journeys to Greatness
Empty Post -
i should have said the cap on the floor pan, not the top of the channel
-
still not done lol work and axle/suspesion stuff got me distracted. hopefully this weekend as i picked up a sheet of 16ga last weekend
-
:drool: :drool: :drool:
-
My '89 Comanche - Getting an LS2
wheelsaz08 replied to Korsch_RS's topic in MJ Hardcore Tech: Epic Journeys to Greatness
man this thing as friggin awesome! love all the fab work and attention to detail! can't wait to see more :thumbsup: -
Starting the rebuild after the flood
wheelsaz08 replied to RescueDuck33's topic in Member Projects: Your Comanches
great work on the jeep! beautiful home you got! is that a house in the right of the flood pic? doesnt look like it fared as well as yours -
wheels 89 manche
wheelsaz08 replied to wheelsaz08's topic in MJ Hardcore Tech: Epic Journeys to Greatness
yeah ive read about that. once the ram gets here ill play around with it and see where it fits best. i was just thinking since I'm planning on buying the cover, if the ram won't fit nicely anywhere else, at least it would be a stout mounting point ive got a couple ideas. option one place some rubber sheet or really heavy foam padding under the tank, while it resides on the bed floor, and invert the xj straps so they hold it down against the bed. id have to cut some notches and drill a couple holes for the straps but it would be simple. or option two would be build a raised "box" in the bed for the outter edge of the tank to rest on, kinda how th xj guys do it when they relocate the tank. like a fuel cell only without forking out the money for one lol bed space isnt going to be much of a concern being i have a long bed and I'm hoping to keep it a full bodied rig as long as possible, till it gets bashed up enough to constitute a tube bed or something of the like. I'm not a big fan of tube beds or exo cages but would like to design a sort of hybrid eventually -
wheels 89 manche
wheelsaz08 replied to wheelsaz08's topic in MJ Hardcore Tech: Epic Journeys to Greatness
slowly chipping away, got all the links tacked up including the drag link, just not pictured. gonna install this tomorrow after i drill and tap the steering box, and drill out the pitman arm for a 3/4 bolt. then i should be able to get it rolled into the garage and start prepping for stiffeners and finish the floor... portaband made quick work of the 2x2x025 square tube links, and my dog. lowers are 37" at thier shortest, upper is 40" at its shortest links on xmemeber -
lookin good! :thumbsup:
-
wheels 89 manche
wheelsaz08 replied to wheelsaz08's topic in MJ Hardcore Tech: Epic Journeys to Greatness
just ordered parts for hydro assist from surplus center: ram: 1.5X8X1 DA HYD CYL SWIVEL EYES hoses (x3, one spare): 3/8" X 48" JIC 6F X JIC 6F 4800 PSI HYD HOSE fittings for box (x2): JIC 6M x 1/4 NPTM 45 ELBOW fittings for ram (x2): JIC 6M x SAE 6M SWIVEL 90 ELBOW going to make my own mounting tabs, might get a ruffstuff cover and mount the ram to it... also ordering a full set of t&m frame stiffeners, and steering box stiffeners on their black friday sale http://www.t-mfab.com/store-3/?model_number=3896750 http://www.t-mfab.com/store-3/?model_number=4761900 -
wheels 89 manche
wheelsaz08 replied to wheelsaz08's topic in MJ Hardcore Tech: Epic Journeys to Greatness
thankfully all that caulking wasnt hiding any rust on the pass floorboard, but I'm still going to cut out a pocket for the 3rd link to fit in, then box around it "to-do" list is getting shorter! HOPING to get this done before new years! the gf is dropping hints, but i got her with the spellcheck! not jeep related, but built a new exhaust for my brothers rx7 drift car. tail pipes stick a good foot and a half out form the rear of the car -
wheels 89 manche
wheelsaz08 replied to wheelsaz08's topic in MJ Hardcore Tech: Epic Journeys to Greatness
Got the axle put under the jeep last night and did some mocking up. got lower links cut but not welder. did some things to the clayton crossmember but still not done. I'm going to reinforce it more and add front and rear skids -
wheels 89 manche
wheelsaz08 replied to wheelsaz08's topic in MJ Hardcore Tech: Epic Journeys to Greatness
not much to report, but progress is progress right? header panel off for the eleventymillionth time along with the front bumper. flares removed for good. i traced the outer edge before removing them. this will be the preliminary cut, then ill trim accordingly passenger floorboard. there was a piece of diamond plate riveted here, and after removing it i found these gobs of caulking.... hope they arent hiding rust! rest of the floor looks good though minus the holes from the old seat that was welded to the floor -
My 88 Comanche Restoration and Modification
wheelsaz08 replied to RustInMyEye's topic in Member Projects: Your Comanches
lookin good! -
lookin good! definitely wana see how you tie em into the stiffeners as this is my next project after i replace my floorpan
-
awesome thank you much. what gauge material did you use to box in the top of the channel? I'm not planning on using the entire replacement pan as the rear section is still in good shape and as for seat mounts, I'm going to be building a cage and will be tying them into that
-
so I'm getting ready to replace the floor pan and have a few questions, but first here's what I'm up against. the PO obviously cut the original floor out, but replaced it with a piece of aluminium diamond plate that was riveted to two pieces of angle iron that were welded to either side of the opening. you can see the inner one in the pic. then he siliconed all the gaps in an attempt to seal it up. the aluminium wasnt bent to fit the original contour of the floor and sat about 2 inches higher the the "frame channel" here's a few pics diamond plate removed. replacement pan as you can see, he also cut off the top of the "frame channel" and here's where my questions are. should i try to source a replacement for this or build my own? and since the pan lays over it, do i need to spot weld it to the channel on top? or will it be ok if i just weld the bottom side of the pan to it?
-
wheels 89 manche
wheelsaz08 replied to wheelsaz08's topic in MJ Hardcore Tech: Epic Journeys to Greatness
Picked up some square tube. Got more than I need cause I'm going to redesign my welding table as well Also I think I'm goin to use these spacers on the spring pads as they will alow the spring to sit "flat" without have to grind the spring or modify anything else. Gonna weld tabs or a ring on the Mount to keep them centered. These along with rubicom express 5.5" coils and the larger axle tube ill be around 6.5-7" of lift. Ignore the short drag link, i was just playing around Got to work on the floor pan a bit too That diamond plate was riveted to the angle iron that's just tacked in there... then silicon was used to try and seal it all up. Messy job -
wheels 89 manche
wheelsaz08 replied to wheelsaz08's topic in MJ Hardcore Tech: Epic Journeys to Greatness
not much of an update, again (sorry to disappoint) but now that ive got more free time and my daily is back on the road, the ol mache should be getting more attention. got back to work on my kingpin dana 60. i had a swamp cooler running in my garage all summer and didnt oil everything or cover it very well, hence the surface rust. but everything is tacked on now to get it under the jeep and measure for links. I'm thinkin the upper link mount is definitely going to be moved more passenger playing around with the camera on my phone -
oh gotcha. would you say its worth the hassle getting em fit? i was mainly looking at the center ones as ive already got iron rock front stiffeners.
-
lookin good! are those t&m stiffeners? I'm considering them for my build but heard fitment was terrible...
-
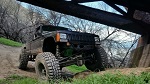
wheels 89 manche
wheelsaz08 replied to wheelsaz08's topic in MJ Hardcore Tech: Epic Journeys to Greatness
wanted to get an idea of how itll eventually look before i roll it into the garage classy instagram pic LOTS of trimming to do lol unfortunately, the motor in my daily (96 xj) clapped out on me last week when scouting for deer last week... so I'm temporarily robbing the motor from the mj till i get my other one rebuilt -
1987 Chief - Clean 'n Simple
wheelsaz08 replied to grinch's topic in Member Projects: Your Comanches
good lookin mj, sounds like a solid plan! i was born in 89 and feel the same way bout mine. i alwasy say its the second best thing made in 1989! haha