

commando14
-
Posts
11 -
Joined
-
Last visited
commando14's Achievements
Jeeper (1/11)
-
Mickey Thompson Baja MTZ ?
commando14 replied to SuperWade2's topic in MJ Tech: Modification and Repairs
I bought a set of 35x12.50's about 4 months ago for $800 shipped to my door on ebay. Which was the cheapest I could find anywhere. I've been on several snow runs this year and they do pretty good. We have lots of snow still up here :D . Been running them at 4 psi in the snow, they seemed a little stiff on the first few runs but now they are starting break in a little and flexing a bit more. In the dry deep powder snow they seem to dig a little too good, but in the spring snow they work great! I plan on siping them and will probably groove them as well. I weighed the MTZ and a BFG MT and the MTZ weighed 10 lbs. more per tire. Had them in the sand this weekend and they did good, I'm not much into the sand wheelin though. Anxious to try them on the trails, as soon as all the snow melts! I have seen bias Claws run in the snow and they are absolutely horrible. Way to stiff... the radial Claws might be better. I think the MTZ is a much better overall tire than the Claw. -
Stock transmission crossmember questions...
commando14 replied to MF Steve!'s topic in MJ Tech: Modification and Repairs
The mounting location on the unibody rails are in different positions depending on the tranny. Measure the mounting location on a Cherokee with a 4.0L/AW4 and you notice the difference. The AW4 is longer than the AX-5 and thus the mounting location is further back. I ran into the same problem when I did my conversion, I ended up modifying the cross member: -
calling all 2.8 to 4.0 swappers
commando14 replied to JeepcoMJ's topic in MJ Tech: Modification and Repairs
Sounds like you have most everything planned out... one other thing you might want to check is the tranny crossmember. I did a 2.5 to 4.0 swap into my Comanche and the crossmember mount location on the unibody was different, not a biggie to fab up the mount to fit, but it was unexpected when I first crawled under there to bolt it up. And yea, a BFH will take care of the firewall. If you compare a '86 firewall with a '87 or newer you will notice they added an larger indentation to clear the valve cover. Do yourself a favor and give it a few whacks before you try to drop the engine in, you should only need to make clearance for the valve cover. -
Hi everyone.. haven't been on the site in awhile, been busy working on our club's site. I noticed my old pic links in my Comanche build page were broke so I updated them: http://comancheclub.com/forums/viewtopic.php?t=749 Think I need to get a comanche club sticker :D . Still any of those left?? Have made a few changes and additions to the back, but it still looks about the same. This was a few weeks ago:
-
My Comanche buildup, 4.0L swap
commando14 replied to commando14's topic in Member Projects: Your Comanches
Haven't been on the site lately... updated the links so the pics work now. -
Yet another manual to auto trans Q
commando14 replied to Cabz's topic in MJ Tech: Modification and Repairs
Here's what you will need to get: 1) ECU (one for an auto) 2) TCU and harness 3) TPS (one for an auto) 4) engine compartment wiring harness (you can splice in the parts you need, but it's much easier and faster just to do the whole harness) 5) the kickdown cable and shifter cable for the AW4 6) the bracket that mounts the kickdown cable onto the throttle control And here are a few things you will need to modify to complete the swap: 1) Crossmember needs to be moved back about 5" 2) Rear driveline needs to be shortened 3) Front driveline needs to be lengethed (or just find some donors out of another xj or mj) Forget about the Power/Comfort switch, it doesn't do much. And you won't need to change the wiring harness under the dash. The manual awshifting setups you can buy are just not worth the money to me. All you have to do is splice into a few wires and you can rig up your own manual shifting and torque convertor control. -
My Comanche buildup, 4.0L swap
commando14 replied to commando14's topic in Member Projects: Your Comanches
Thanks, here's some pics of the rear spring setup. Basically I took the stock mounting plate and flipped it upside down on top of the springs and fabbed up some new spring perches on the axle housings. The shocks sit at about a 45 degree angle, and I used the stock shocks to run up and mount to the frame, these are to reduce axle wrap and axle hop. I'm not sure if they really help anything, but the setup works pretty well (and looks cool too!) -
MSN Autos is a good site to check for basic information like weight, horsepower, wheelbase, etc.. They don't always have all the information but it's still worth it to check out sometimes: http://autos.msn.com/research/vip/spec_ ... &trimid=-1
-
Overload spring removal
commando14 replied to Bounty Hunter's topic in MJ Tech: Modification and Repairs
Here's what happened to my springs after I removed the overloads with SOA. I was thinking it would give more flex and ride softer but it just bent the springs, only took a few weekends of wheelin. I replaced the springs and left the overloads in place this time, I can't tell much a difference in flex and it rides the same. -
My Comanche buildup, 4.0L swap
commando14 replied to commando14's topic in Member Projects: Your Comanches
I found the paint at Walmart. It was Krylon Camouflage, here's a pic of the can. I bought a couple cases of this stuff about 4 years ago now, I only have a few cans left. I'm not sure if they still sell it but I haven't seen it lately. They had a Woodlands Scheme that consisted of 4 different colors, a Desert Scheme with 3 colors, and a Winter scheme with 4 colors. I just used the Olive color from the Woodland scheme. -
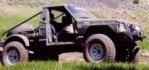
Glad to see so many Comanche fans out there, this is a great site. I had to share mine so here she is. The truck was bone stock and rolled when I bought it for $400 several years ago. I wish I had some before pics, but the first pic here is the earliest one I have. The top was crushed in, luckily the local junk yard had a Comanche at the time so I got the top of the cab for $75. I have a nice '69 Jeepster, but I hate taking it on the trails because I don't want to scratch my nice paint job! My goal for the Comanche was to build a trail rig. Something that I didn't have to worry about scratching or denting. That's what I built it for and it works great. I have about $3k in the entire Jeep (minus the tires), and it will outwheel rigs that cost thousands more. Everyone makes fun of the D35, but it hasn't broke yet after 6 years of hard wheeling. Details: '86 MJ, longbed Shortened wheelbase 1 foot by moving the rear leafs forward (so it's about the same as a shortbed now) Spring over in rear with some home fabbed buggy springs Full cage, plan to make top removal 4.88's, D30 front with ARB locker, D35 non-clip rear with Detroit locker 35" tires Ditched the bench seat and put in some buckets out of a Ford Probe. 4.0L/Auto swap It did have a 2.5L with AX5, NP 207 that I ran for about 3 years, but I recently completed a 4.0L swap with AW4 and NP242. At the same time I swapped the tan colored dash with a newer gray dash and instrument cluster. The firewall needs a little adjustment for rear of the 4.0L valve cover to clear, just a few hits with a hammer took care of that. Motor mounts are different, but bolt right in. The trans crossmember mounts in further back with the 4.0/auto. So you can either re-fab the cross member mounts on the frame, or I chose to re-fab the cross member to fit. The front core support is way different, had to cut away lots of metal on the front to get the radiator and air box to fit. The hood and hood latches are different, I opted to keep my hood and forget about the latches and went with some hood pins. Fuel pump is bigger than the 2.5L's fuel pump, so I replaced that. The engine, trans, and transfercase were from a '89 Cherokee. I used a complete 4.0L/auto wiring harness, dash, and ECU/TCU from a '90 Cherokee.