

Zenobian_84
-
Posts
20 -
Joined
-
Last visited
Content Type
Profiles
Forums
Gallery
Everything posted by Zenobian_84
-
There was another thread on there done by Fire4755 about him making a cupholder for fit in the notch between the shifter and his bench seat. This thread is for those of us who, (for whatever reason :nuts: :shake: ) want to keep the original bench seat in instead of doing the swap over to the XJ buckets like so many others have. Hold onto your butts, 'cuz this one isn't gonna be pretty! :hateputers: ------------ First of all, to get the ball rolling so to speak. Head over to your local hardware store, and pickup some cheap, 1/2 plywood (In my case, Home Depot, and the wood was the second cheapest at just over $3.00 for a good 1 1/2 x 1 1/2 slab) Then what I proceeded to do was cut that piece directly in half, giving myself 2 equal sizes. (At this point, it doesn't matter how big the sizes are, it's just to shear down the overall size of the wood so you can work with something smaller.) After doing so, I trimmed it down even more, just to get the first starting piece on the far left side. Next, you're going to want to go measure the spacing horizontally between the U pieces of the bench, as pictured below (another crappy cell-phone picture... :fs1: ) Which, for those of you who aren't able to see the tape (myself included) it measures out to about 12 and 1/2 in. Give or take a half inch due to falling seat padding pushing out, I decided to go with 13 inches, just to be safe; along with finding the direct center of the wood (no real reason, but it makes measuring easier, mainly because I used to do things like this in my high school drafting class all the time.) Now that you have a nice long piece of wood, you want to measure just how wide it needs to be, once again, since my padding pushes out, the measurement is up to you. The 13x7 in piece of wood. Preferably cut 2 pieces of this equal length, for the top of the holder, and the bottom. As you can see, it just barely fits with it's rectangular shape. I didn't get an image of the next step, but basically the next step is to sand down or cut pieces of the wood off into hexagonal shapes to be able to fit inside the crevices of that U shape. This step only took me about 10 minutes to get the shape right. I probably sound like a broken record, but whatever shape you want the corners or shape to be is up to you. I just did the bare minimum to meet my own requirements of fitting. Nothing fancy, and the picture is with the wood sanded down. Notice the convenient cell-phone / mp3 slot I cut out, generally because I'm on the road a lot and my phone likes to die when I least expect it. For the next step, you need to get either blocks of wood (like I used) or whatever you can find to attach the two pieces together. I happened to have some thick wood laying around I used in another project a year or so ago, so I used this. The measurements of my blocks are 2 1/2 x 2 1/2. Basically a square. After you have the blocks or whatever it is you plan on attaching the top to the bottom with, you can go ahead and attach them, if you don't feel like painting them. I on the other hand, wanted to try and match the interior of my truck. So here's the shot of everything being primed with some $3.00 wood primer spray paint. Nothing too over the top. Now that you have everything primed, you can get some wood paint to match the color of your interior, or whatever you would like. I went with some Krylon Indoor/Outdoor Glossy paint to use as the primary color (Global Blue) from Walmart. Total cost for a can was about $2.50 and $2.50 for Krylon primer. As you can see, not bad for $5.00 :thumbsup: Once everything is painted with at least 2 coats of both primer and paint,(or not) assemble your pieces someplace where you can attach everything. For me, that would be inside my dining room because it's been 100 degrees here in Central FL for the last week, and I don't like working in extreme heat. :fs1: The next step would be drilling holes for the screws to give everything an easier time fitting. I went with 1/4 inch wood screws from Lowe's for about $3.00? for a small box with like 100 or so (not that you'll be using that many :rotfl2: ) and a 1/4 inch drill bit for drilling the holes. My spacing is 2 inches apart for each grouping of holes (refer 3 pictures up from here) and should be done on both the top and bottom pieces of wood; mainly for durability. Mockup picture on how my pieces would fit together. Now, once you have everything screwed together however you decided to fashion things, you should have a cup-holder that vaguely resembles the below picture The most important thing I can stress during this part is to have everything centered perfectly, unless you want a giant crack running through one of your wood pieces :doh: :fs2: (the straight black line on the left piece was just bad shadowing caused from an odd cut) ------------ If you somehow managed to get this far, the below image is what you should now be seeing! A completely finished and usable cupholder. Custom tailored to your individual needs. The end price I ended up paying for the materials to make this was roughly $15 :thumbsup: Hope this helps those of you in need out there. :cheers:
-

Flooded on warm start - STILL NEED HELP
Zenobian_84 replied to tj21's topic in MJ Tech: Modification and Repairs
Yep. I took it out and snapped the photo while it was still draining. Ah... I see. :thumbsup: -
Ah.. You're such a lifesaver hornbrod. :thumbsup:
-
I've seen a few threads on the forum with people that have their factory clocks in the trucks running, and was just wondering on a few things. Since I'm attempting to make the truck as factory as possible, I just wanted to know if I can get a clock to install, where would the connector plug into? (I am assuming that it would plug into the tangled mess of wires where the radio slides into, as that would seem the most logical, but I could be wrong... :hmm: ) Just for reference, I have a few pics of factory clocks that btm24 is trying to sell http://www.comancheclub.com/forums/viewtopic.php?f=24&t=30731 and was wondering if any of these would fit my '87. And if any of them don't fit, what should I look out for if I try and nab one one of these days.
-
Steering Problems and Questions
Zenobian_84 replied to Zenobian_84's topic in MJ Tech: Modification and Repairs
Starting to think that the PS pump wouldn't be that bad of an idea. Thanks for the input and help guys, I appreciate it. :thumbsup: -
Steering Problems and Questions
Zenobian_84 replied to Zenobian_84's topic in MJ Tech: Modification and Repairs
Thanks phil. Good advice, but how long give or take would you imagine that I would have to spend installing the PS setup? So if I ever wanted to do it, I would already know. My guess is at least 3-4 hrs? -
Hey all, I've had my truck for almost 2 months now, and ever since I bought it, I always wondered if it had power steering. As you can tell from the picture below, it's just your average 2.5 I4, and if it does in fact have power steering, where would the power steering pump / filler reservoir be? The PO told me that the steering problem that was there (truck is a PITA to turn when you first start taking off, or when you're trying to park) and told me that all I had to do was adjust the steering box that's located behind the radiator to fix this problem. 1. Would this fix the problem, and how should I go about adjusting the box (other than using the simple star head to adjust the screw)? 2. What should I look out for when adjusting this box, and what could happen if I overtightened or under tightened it? 3. Do these symptoms I'm having even sound like they would be caused by the steering box, or could it be another culprit entirely? Appreciate the feedback; and I still have a lot to learn. :hmm:
-
Flooded on warm start - STILL NEED HELP
Zenobian_84 replied to tj21's topic in MJ Tech: Modification and Repairs
Can someone please help me locate the coolant temperature sensor on my '86 2.5L? I have looked for over an hour. EDIT: Found it just after posting this. Now how do I test it? Here's photos for the next guy locating the sensor: Now is the sensor located where the antifreeze is coming out of the hole in the 2nd picture? :hmm: -
What To Do After a Cluster Swap...?
Zenobian_84 replied to Zenobian_84's topic in MJ Tech: Modification and Repairs
I would love you forever blue88 if you were to sell me that cluster; as long as it was in decent shape. :eek: -
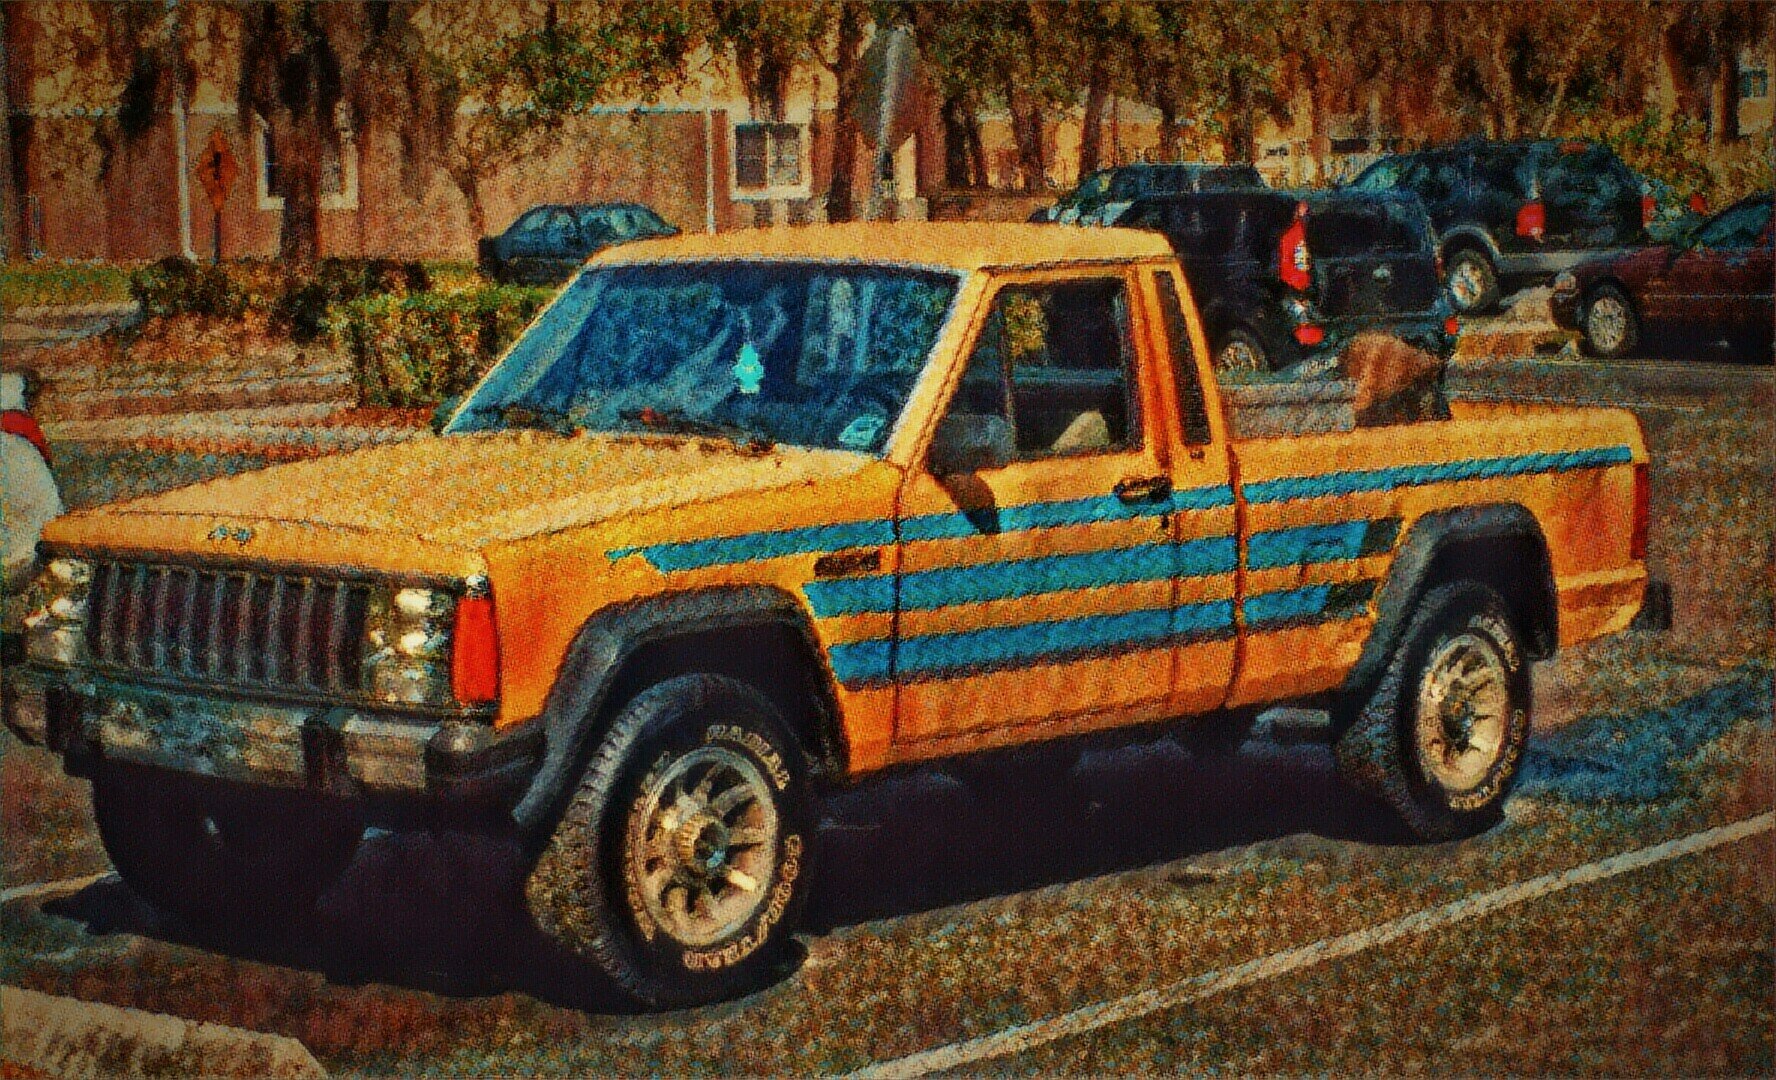
1987 Comanche SporTruck Renix 2.5 / AX-4 / 2WD / D30 / D35 / SWB Build date: April 16, 1987 - Toledo Ohio Plant Current Location: Tavares, FL * * * EDIT: 9/13/2012 - Changed over to some updated pictures / descriptions. Status: Still on the road, and an always on-going project. Awaiting Completing a complete homage restoration mostly finished restoration to a pseudo J10. :chillin: Notes: Originally Midnight Blue exterior, with a turquoise interior an AMC Blue interior. Just your standard SporTruck with your standard factory options (barely any) Currently is getting worked over with more factory options being added (OEM Clock, upgraded OEM steering wheel, OEM upgraded Radio etc etc.) * * * Currently Is: Faded Yellow (Afternoon Tea) base color with Cosmic Blue and Black stripings. * * * Currently Has: OEM Clock, Upgraded 3 Spoke Jeep wheel, Upgraded dash bezel, upgraded valve cover, OEM Hood Insulator pad. Current owner: Johnny de la Riva, the Red Rocker. :MJ 1: :thumbsup:
-
What To Do After a Cluster Swap...?
Zenobian_84 replied to Zenobian_84's topic in MJ Tech: Modification and Repairs
Good point, and well made. This is probably what I'll end up doing if I get another gauge cluster... :hmm: -
forgot to mention that my truck is a 2.5 I4. So I would appreciate it if the donor cluster was from a I4
-
What To Do After a Cluster Swap...?
Zenobian_84 replied to Zenobian_84's topic in MJ Tech: Modification and Repairs
FL is really finicky, and I can't seem to find any "Legal" information other than 1 online website (not gov't owned or operated) saying that it's Illegal to tamper with the odometer. Hopefully I can find out some info in the near future from the DMV, or possibly the dealership where my dad works. In the meantime, thanks for the info guys, especially automan. I've heard stories from a lot of people that had that happen to them, lol. Still, it's always useful to know different things ;) -
I know this is a bit of a stretch, but I was interested in purchasing one of these So if there's anyone out there with one of the old AMC Comanche Clusters w/ Gauges, please step forward! Current mileage in my own truck is nearing the 165k mark, and it would be appreciated if the cluster would be near that. But if it isn't then I'm still willing to consider what you may have. Thanks a bunch :bowdown:
-
I want to do a cluster swap, due to the fact that the below image, isn't doing it for me anymore. What I want to do, is instead get myself one of these And what I want to know is, if I can somehow wrangle an AMC Cluster w/ Gauges, and say for example the Odometer is 30k miles off from my current 164,xxx miles; what would I have to do to legally have the odometer changed to match my old one? ----- IE: If I can get a new cluster swapped in that's different in mileage than my own by several thousand, where and what do I do to have this legally changed? And is it even possible for it to be legally changed to what the previous ACTUAL mileage was, or would I have to tinker with the odometer myself, and how would I go about doing this exactly? Keep in mind I have no intention to sell this car at all (for those thinking that this is for the intent of deceiving another person into buying my truck.) Thanks all. :bowdown:
-
Door Panel Backing Replacement?
Zenobian_84 replied to Zenobian_84's topic in MJ Tech: Modification and Repairs
Thanks phil, I thought about possibly getting something like that to use, but wasn't sure if it would hold and or stand up to the test. Appreciate it! Ah! I should have remembered anotherjeff's thread; considering I spent a while scouring through it :doh: :D Really liking how his truck looks btw. -
Hey all, hope everyone's having a good day. :cheers: Well, the problem is that the 1/4 inch (possibly thinner) cardboard type backing behind the the door panels in my MJ are pretty worn down, and in serious need of repair and or replacement. Not sure how far through the panel they extend to, (haven't messed with removing the door panel due to the long wait to get some window seal replacements) but the questions are: 1. Where would I go to get replacement pieces (other than a Pick and pull for an entirely new panel) or new pieces? And... 2. Is there some DIY fix that some of you have down to replace these worn out pieces?
-
Project "Honcho" - The '87 MJ
Zenobian_84 replied to Zenobian_84's topic in Member Projects: Your Comanches
Greetings all. Just wanted to post a few quick pictures I didn't get a chance to post when I made the thread (due to running around for work purposes.) Please excuse the differing qualities. That's what you get for only having a :mad: phone to take pictures with. First of all, starting with an obvious picture, the rear axel. A Dana 35 in pretty decent shape (from what it looks like to me) for being 24 years old. The floor rust that goes through the driver's side to the bottom. Going to be pulling the carpet up and seeing how bad everything really is once I get more money. The good thing is the new brake line (backwards L shape) that I replaced. Apparently the floor rotted out and rotted onto the line, causing sever corrosion (leading to the brake mishap mentioned in the beginning of the thread.) :( Rust inside the wheel well of the driver's side. Not sure how bad this really is, but it's worth taking a look at, once again, when I get more money and some spare time. (Have to drive some family members to the airport all weekend, then probably work all through next week). Gotta love that minimum wage job :roll: Shots of underneath the bed. Surprisingly it's very rust free, and as we all know, that is always a very good thing :thumbsup: ------ Well, that's it I suppose. Until I get more time to fiddle with the truck, or more money (hopefully the latter) to put towards getting new goodies, keep on jeepin' everyone. -
Project "Honcho" - The '87 MJ
Zenobian_84 replied to Zenobian_84's topic in Member Projects: Your Comanches
Thanks Buck. Would like to meet some of you central floridian MJ'ers one of these days. Feels good knowing I'm not the only Comanche owner around central FL. :cheers: -
This thread = VERY TRUE.
-
Project "Honcho" - The '87 MJ
Zenobian_84 replied to Zenobian_84's topic in Member Projects: Your Comanches
Just wanted to update on how everything is coming along with my repairs. So glad to have graduated high school. More time to dedicate to working on the truck, and working to make money! :wrench: :D Repaired the scraggly rust as best I could that was around (and probably underneath to a degree) of the antennae post. Pretty easy rust removal, primer and finish painting. Those lines of primer I missed are going to annoy me, but it's better than the rust that used to be there. Rust along these window trim pieces. Rust ran through the entire piece to the inside. Only fixed and primed/painted the outside though. I'll probably do the rest whenever I replace the weather stripping on the sides :wall: Oh joy. Replaced the original 100w Pioneer speakers this morning with 180w Pioneers with built in tweeters. Lot better looking than the faded, torn old ones. Gotta clean up the spots of dust they have on the mesh pieces. Thanks to BLHTAZ's writeup on how to replace the stock interior lights, I was able to knock that out of the way a few weeks back. Stellar look, and great price (around $8.00 for both lights). Next on the to do list is replacing this POS radio. Thinking of swapping back to the stock radio since I have these... 1987 factory Cassette holders. I was pretty impressed when I first got them with the truck. The PO wanted to keep them, because he liked the look of them hanging on the fold downs. Just have to clean them up a bit. Other than the above mentioned, no new real developments, other than learning the ins and outs of driving a 4 speed. More to come soon. -
AM/FM Preferably from 86-89 (Not entirely sure if they had the radio/cassette duo in '86, but if you have one from 88 forward, has to have the Jeep emblem on the cassette bar) in working condition, willing to negotiate in price if you have what I might be looking for. Also, please send a pic or two if you have something like this. Trying to restore a truck to factory conditions sure is tough :fs1:
-
Air Supply Hose? - 2.5 I4
Zenobian_84 replied to Zenobian_84's topic in MJ Tech: Modification and Repairs
The air supply hose from the front of the head runs underneath the breather hose to the back of the filter box house. I don't know whether this was the original placement for it, but all I know is that it works for now (until I get a replacement hose). But I appreciate the feedback from you both nonetheless. :bowdown: -
I've been scouring the internet and every piece of literature on the I4 2.5 engine's and I can't seem to find an answer to my question. The circled hose runs from the front of the head straight to the back of the air filter box, and from what my research shows, it's referred to as an "Air Supply Hose" :hmm: What my problem is, is that I've tried to find information on how to take it out, and install another one (if there is such a thing) or if the hose is simply just a pvc hose connected from the head to the box, and is an easy replacement. I can't find what many manuals refer to it as an Air Supply Hose for sale anywhere, and when I try to look up different namings, I come back with no results. As you can see from the picture, the hose in question is being held together by ratty old tape, and is in serious need of replacing. Does anyone know what this hose is called, where I might find a replacement (either another dubious "air supply hose", or another simple replacement) and how I might go about replacing it? If you do, I'd be forever indebted to you. :bowdown:
-
"Viewer beware, you're in for a scare!" :brows: Okay, so not really, but at the very least, a somewhat cool project that's been ongoing for years now, now with added back story! A pseudo restoration / customization on a cool classic known in the Jeep world as the "Comanche". The modifications and designs on this Jeep stem wayyy back to when I was a wee-lad of 6 years old, and had watched the weather-disaster movie "Twister". For those of you who haven't viewed the movie, it's a lame attempt at a story driven movie, with the real heroes being the CGI (computer graphic imagery) Tornadoes, a 1995 Dodge Ram pickup, and (IIRC) a 1979 or early 80s Jeep "J10" truck. When I was a kid, I remember the distinctive yellow and blue J10 moreso than the Ram truck, and I knew I had to have one, or at the very least, something akin to it. 13 years later, I realized that dream and found an 1987 Jeep pickup for sale. Bought it, and have had good and bad times with it. I have come to understand two truths since I've owned this truck. The first being that if you are not mechanically sound before you own a Jeep, you will be after a few short months of working on it constantly and thoroughly. The second is that there are others out there, just like you (yes you) who are doing the same thing; perhaps not at the same time, but they're busting tail to keep these trucks going for as long as humanly possible. One day, when the world is full of electric cars and weekend warrior baby Jeeps, there will hopefully still be an MJ out there, somewhere showing everyone what it's like to be the toughest four letter word on wheels. :cheers: Hi all! Been a lurker on the site for around a month now and just got around to making an account, partially due to the fact that I now am the proud owner of..... My '87 MJ SporTruck! Anyway, I suppose I should give a little insight on how I came to own this truck. I happened upon it on craigslist in my local area (Right smack in the middle of Bithlo, FL; Lake County FL is where I'm situated) and went to go pick it up with a friend of mine for $800. Now, the day I brought it home, it was a disaster. Mounds of dirt and grime plagued the interior, not to mention that the bed of the truck was in serious need of power washing. But, I saw through all this and saw something great about this truck. So needless to say, after 3 hours of driving back through heavy traffic through downtown Orlando on I4, (during Saturday afternoon traffic no less), we somehow made it back to my house. Upon getting home, I checked the fluids in the truck and discovered several major problems. The first being that the back break lines had no brake fluid inside the Master Cylinder, not to mention that the Master Cylinder needed replacing ASAP. The second being that the PO had NO air filter in the box :fs1: which blew me away to no end. Another problem was that there was a leak in the brake lines themselves, so I have to give all the credit to my friend for being able to drive the truck home in the shape that it was; but I digress. My intent and what I plan on doing with this truck is restoring it to as near factory conditions as I can. So for now, I leave you with some pictures! Enjoy all, and until next post, Keep rocking on. Dad's 1986 Pontiac Parisienne in the background Interior, in very good shape! (Especially after my lengthy cleanup) One of the 2 spots of major rust. Underneath the carpet... :fs1: 2.5 I4, running like a champ (mostly) after a few tweaks and some replacements. (Has a brand new clutch and master cylinder, not to mention a few other new parts for the truck itself.)